Using Azure Hybrid Connections to connect to SQL On-Prem Database from Azure WebJob.


Updated = 23rd September 2018.

  • Hybrid Connections allows Azure Web Sites and Services to securely connect to the on-premises resources hosted within the corporate network, without requiring any change to firewall or network.

Hybrid

Prerequisites: –

  • Azure Subscription
  • TCP/IP protocol needs to be enabled.
  • SQL Authentication (1433 Default Port for Default Instance)
  • Windows Server 2008 or later and outbound internet connection and can talk with LOB application – SQL Database.


  • Multiple Hybrid Connection Manager can be installed in separate server that can do the load balancing.
  • Hybrid connection implements Transport Layer Security between the cloud and the on-premise endpoint for data encryption.
  • Hybrid Connection Uses Shared Access Signature for securing the End Points.


Here we’d take a simple example of creating an Azure WebJob that will connect to the SQL On-Prem Database.

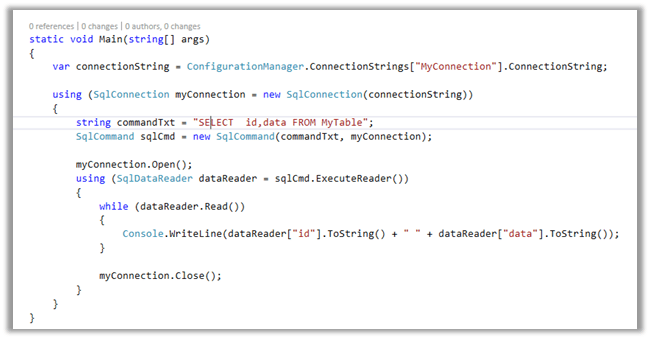
To start with, create a console application that connects to SQL On-Prem Database and pulls information from a table inside it.
Publish it as Azure WebJob.

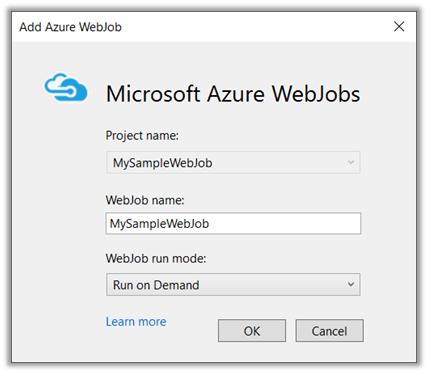
Click on Publish to publish the WebJob.

Back in Azure Portal, we’d see our WebJob. Click on Run to start the WebJob. And click on Logs.
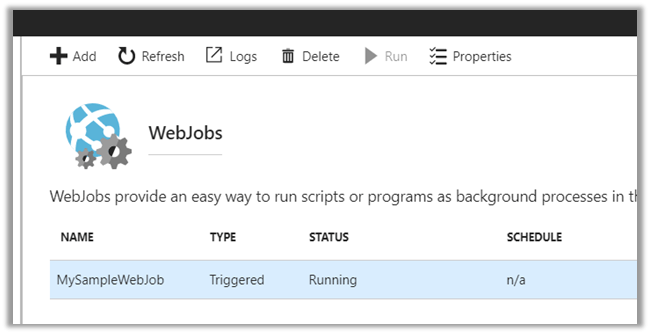
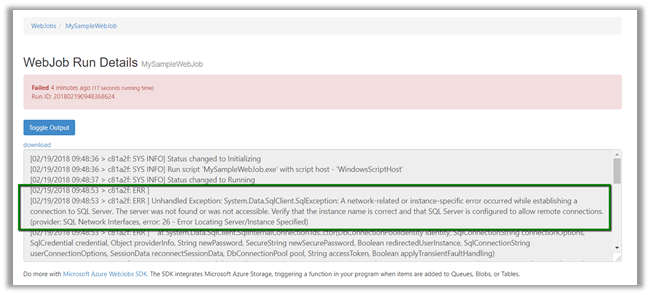
As expected we’d get the SQL Exception as Web Job will not be able to connect to the On-Prem Database.
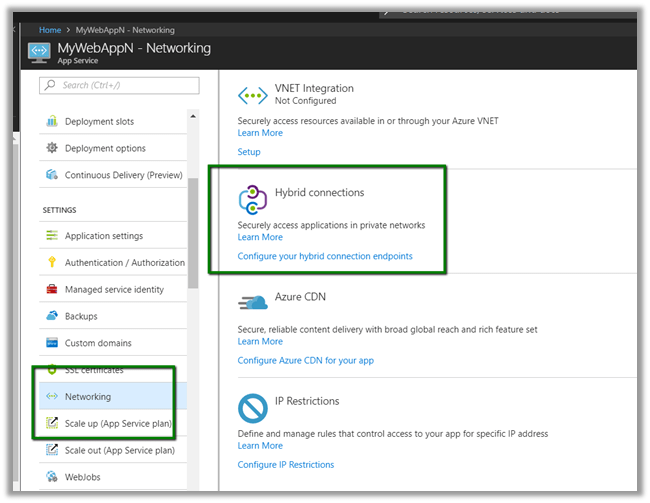
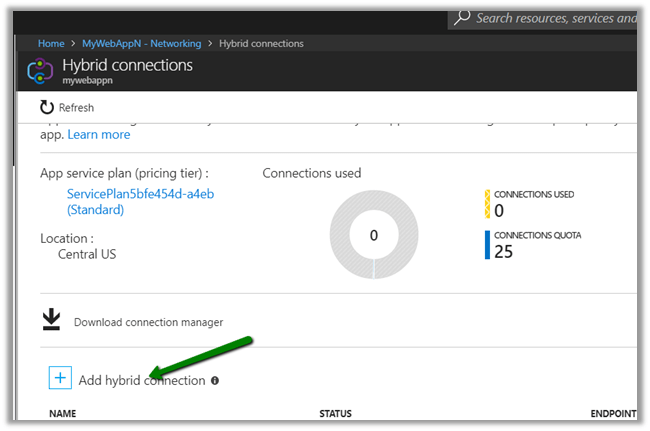
Now let us configure Hybrid Connection to get the WebJob up and running properly. Inside the App Service select Networking and click on Configure your hybrid connection endpoints.
Click on Add hybrid Connection.
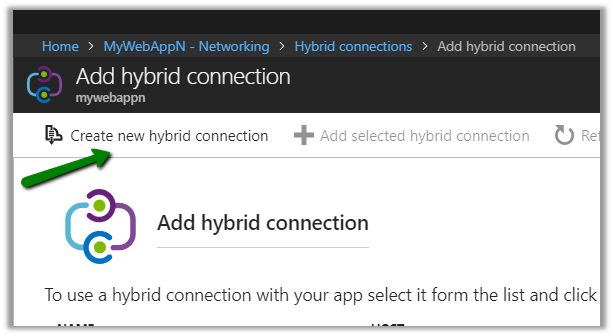
Here Endpoint Host will be the name of our OnPrem Machine\Server, Endpoint Port will be the Port for the SQL Server (1433 for the default instance).

Next step is to install and configure Hybrid Connection Manager.
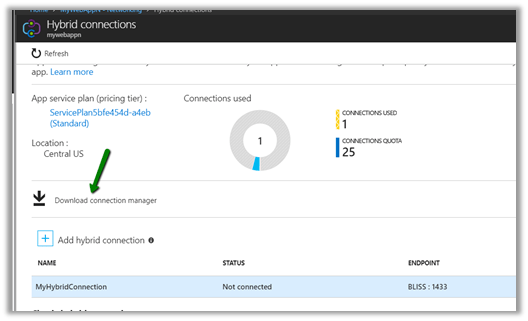
Once installed, open the Hybrid connection manager and click on Add a new Hybrid Connection
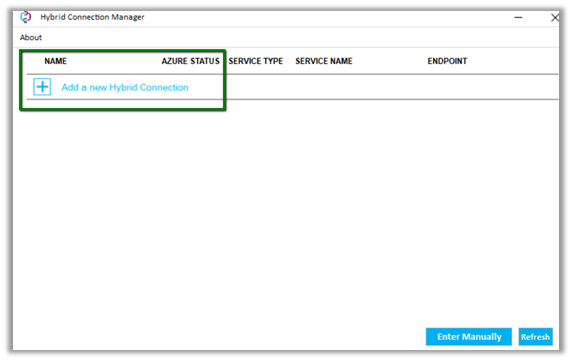
Log in with the Azure Subscription Credentials and select the Hybrid Connection created there.

If everything is correct, it should show the status as connected.
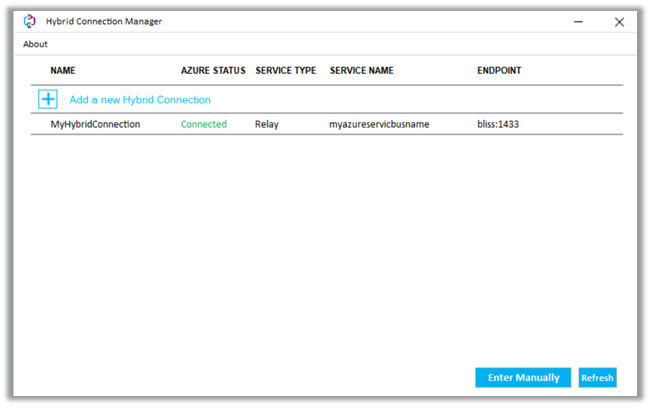
*I had to restart the Azure Hybrid Connection Manager Service after adding the connection for the Azure status to show as connected

Now back in our WebJob, let us click on Run.

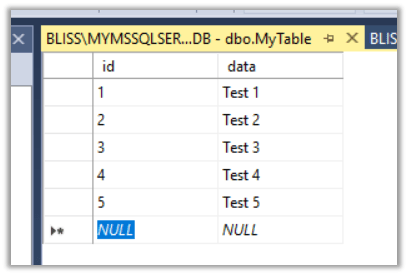
In logs,

we’d see the data successful fetched from our SQL On-Prem DB.

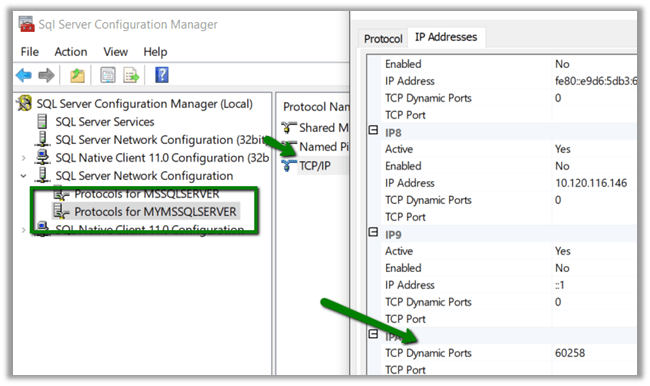
In case of named instance of SQL, we need to create a new hybrid connection with the specific TCP Port used by that named instance.

To find the port used by the named instance, open SQL Server Configuration Manager, select the named instance of SQL and copy the value of TCP Dynamic Ports.
This is how our Hybrid Connection string will look like
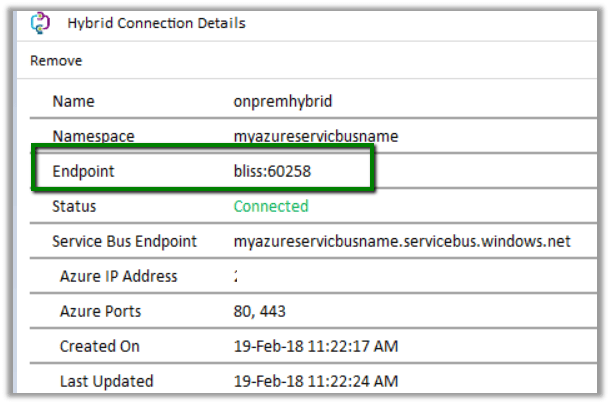
The other important point to remember is that the connection string used should also specify the port.

Hope it helps..

Using Azure SQL Data Sync to Sync On-Premise and SQL Azure Database


Suppose we have an Azure SQL DB named MyDB which we would like to sync with an On-Prem DB.

Here we’d be using Azure SQL Data Sync. The sync can be bi-directional, one way from Azure to On-Prem and On-Prem to Azure or Azure to Azure DB(s) as well.

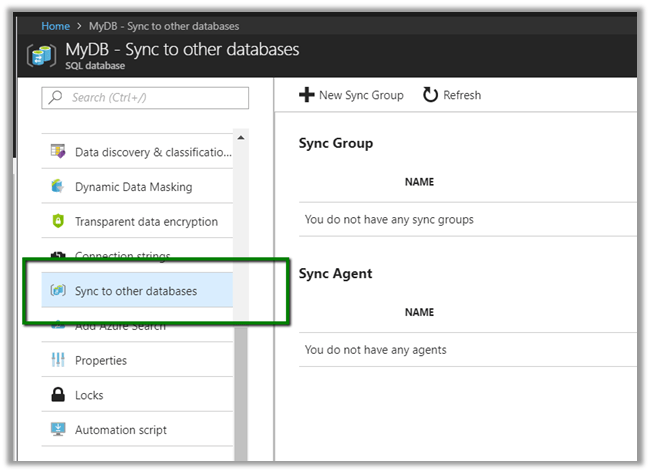
In Azure Portal, select the Azure SQL DB and select Sync to other databases and click on Click on New Sync Group.

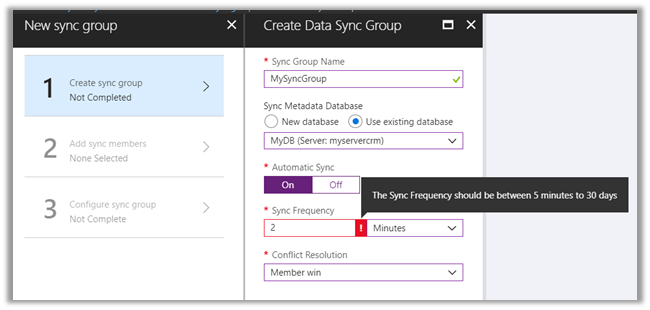
Specify values for the Data Sync Group.

We have selected existing database MyDB, selected Automatic Sync – On. The Sync frequency can be defined in seconds, minutes, hours and days – It needs to be between 5 minutes to 30 days.

Conflict Resolution can be Member Win or Hub Win. Hub here specifies the Azure SQL DB that we have selected here.

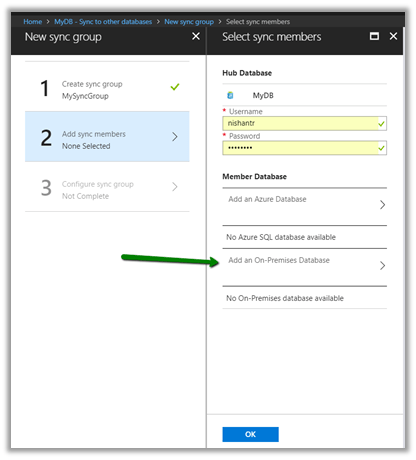
Next click on Add On-Premise database to specify the database to which we want to sync.

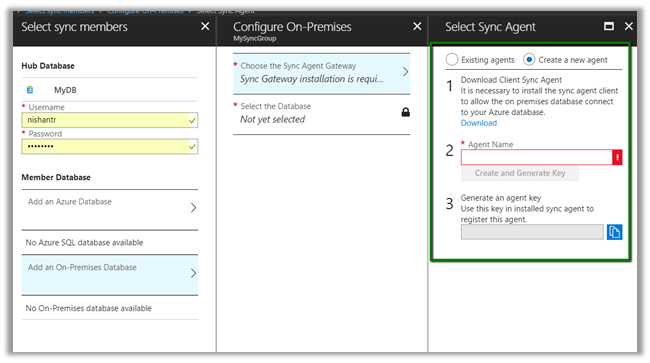
Here we need to specify the Data Client Sync Agent, which requires downloading and configuring the Sync Agent first.

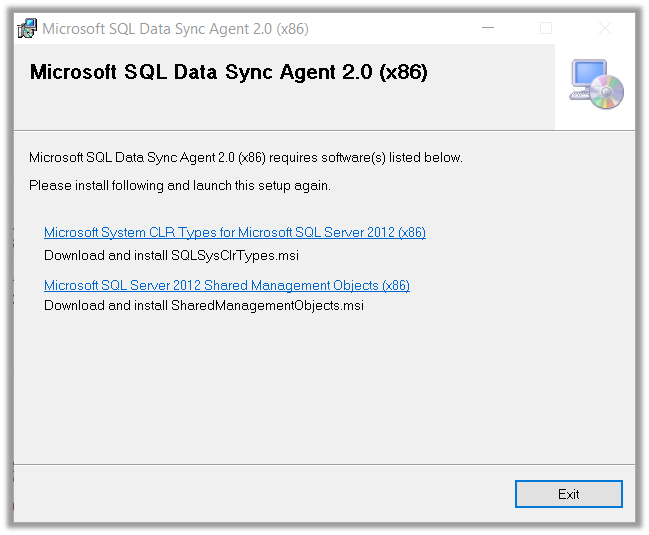
Before installing the Data Sync Agent we need to install the following prerequisites

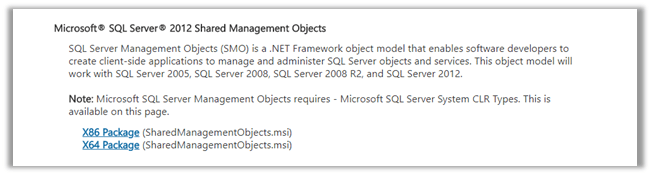
Make sure to download the X86 one.

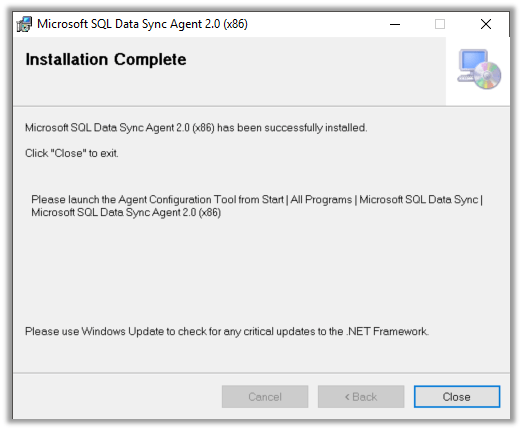
Run the Data Sync Agent installer, specify the Account that can connect to the On Prem DB and finish the installation.

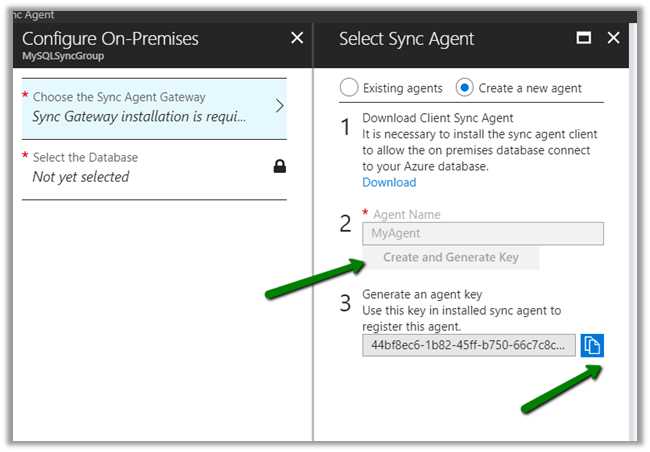
Back in Azure inside Sync group, click on Create and generate a key and copy the key.

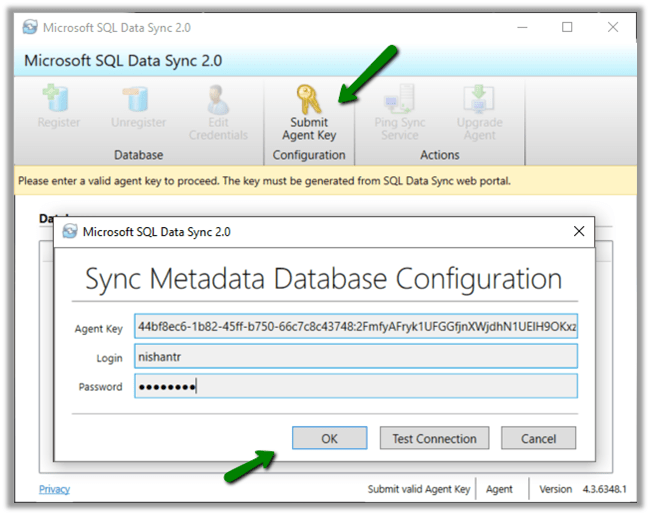
Run the Data Sync Agent and click on Submit Agent Key and specify Agent key along with the credentials to access the Azure SQL DB.

Next click on Register button to register the On-Prem DB as shown below.

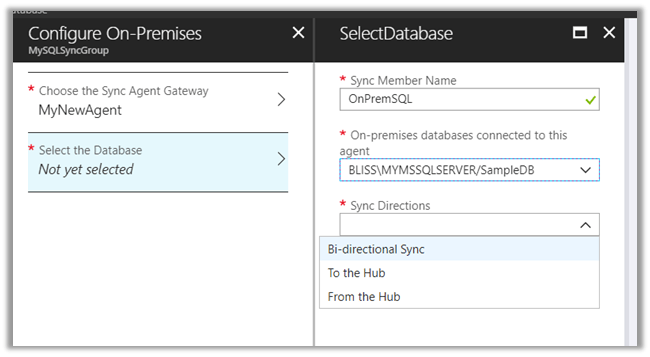
Once registered we can select the On-Prem SQL DB registered along with the Sync Directions.

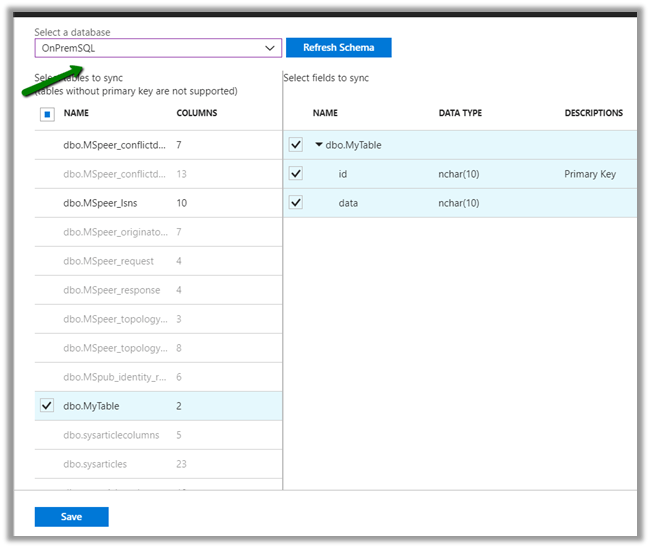
As the last step, select Configure Sync Group and select the Hub Database and the table and column that we want to sync along any of the table of On-Prem DB.

The corresponding tables will be created in the database. For e.g. if we have selected Person table in our Hub Azure SQL Database, it will be created in the our On-Premise Database.

This completes the configuration.

We’d see the Sync running every 5 minutes as we had configured. Update\Insert any data on Azure SQL DB or On-Prem SQL DB, we’d see the same reflecting back in other DB in case of Bi-Directional Sync.

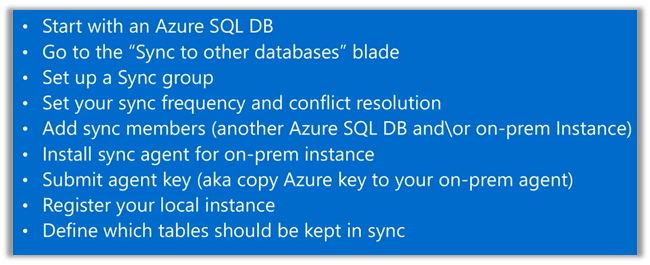
Summary:-

More details here

https://www.youtube.com/watch?v=Kw94bP2WKWY&t=612s

Hope it helps..

Using SQL Server Transactional Replication to move data from SQL Server (On-Prem) to Azure SQL


Hi,

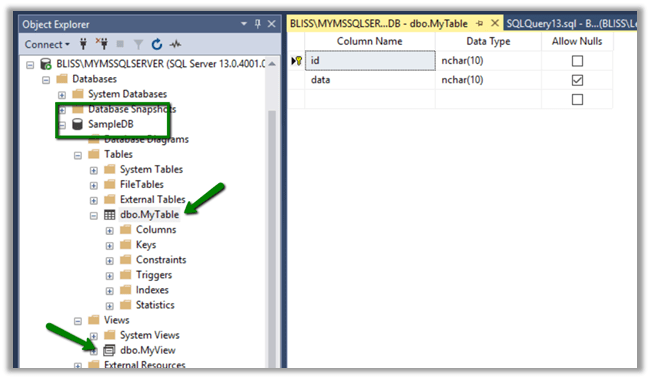
Let us say we want to move data from Table named MyTable and view MyView from my SQL Server DB On-Prem to one of the Azure SQL Database.

The components involved here would be Publisher that publishes this data, Distributor that holds the information about the data to be published and Subscriber who subscribes to the data.

For Transaction Replication to work, the Azure SQL DB or any subscriber needs to have the matching schema as the published table. This can be achieved through Snapshot Agent which applies the snapshot. Distribution Agent distributes this snapshot to the Subscribers.

Transaction Replication Log Reader Agent looks for any changes in the published data. This agent runs at the distributor for “Push” subscriptions. It can run continuously and or can be scheduled. It looks for Insert, Update, Delete operations or any schema changes and pushes this to the Subscriptions.

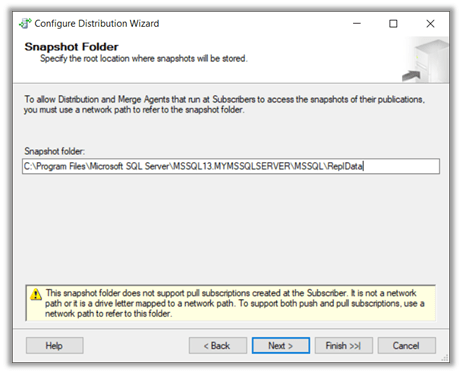
Let us start by configuring the Distributor first. The distributor can be at the local or remote server.

We’d be creating a local Distributor here.

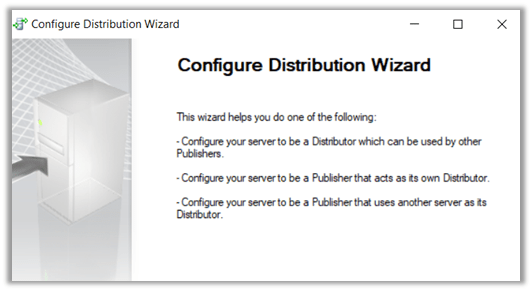
Right-click the Replication and select Configure Distribution

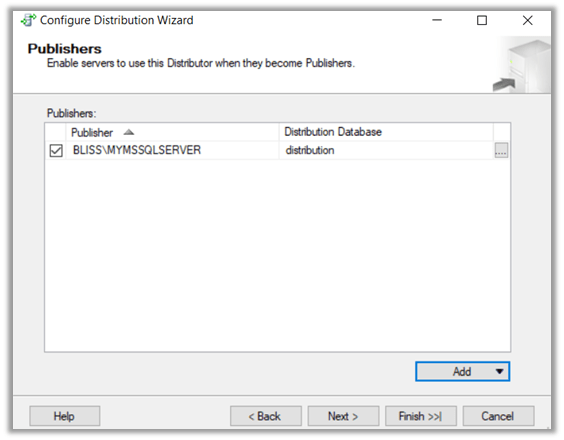
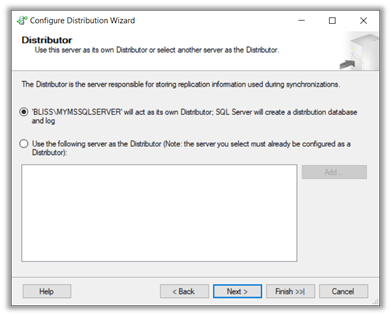
We are using the local server as Distributor.

Click Next.

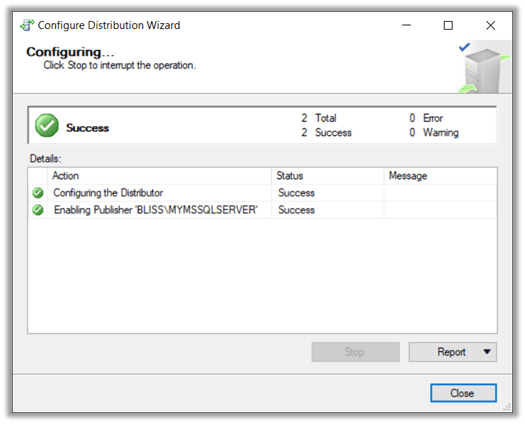
Click Finish to complete the wizard.

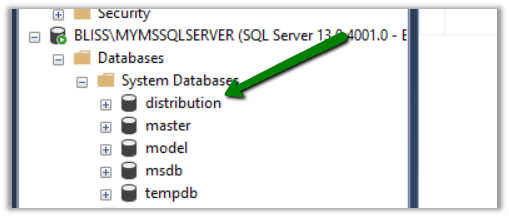
This creates the distribution database in our Local Server.

Now let us configure the Publication.

Right-click the publication and select new publication. SampleDB is the DB from whose table and view we want to publish.

Select SampleDb

Select Transactional Publication

Select the table and the view

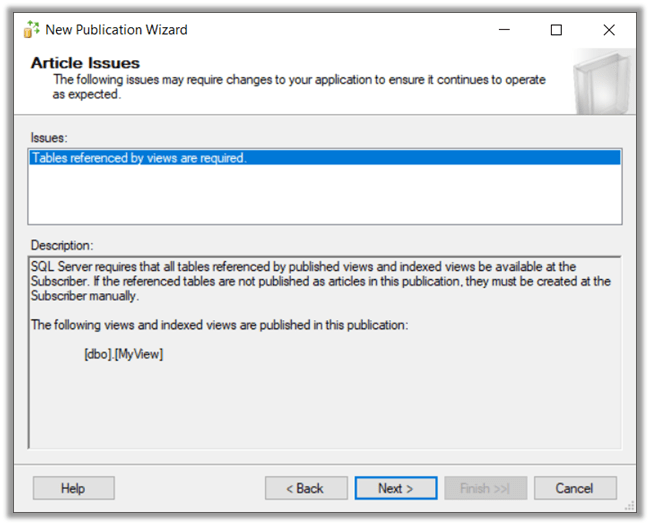
As we are publishing a view, we get the below message

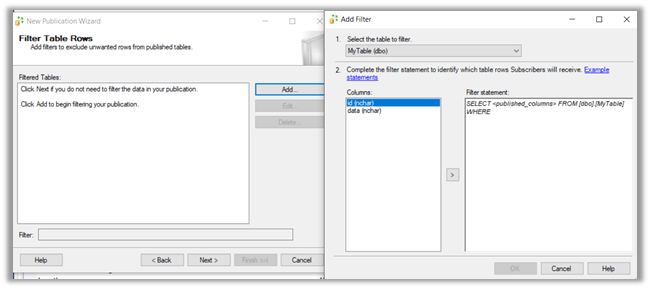
We can click on Add to specify any filtering on the data to be published.

We can specify if we want to snapshot to be created immediately so that it is available while defining subscriptions. We can also schedule the Snapshot Agent or we can run it continuously.

Here we are specifying SQL Server Agent account.

Specify Publication Name and click on Finish to create the publication.

Now let us create the Subscription.

Right-click the publication created earlier, and select new Subscription

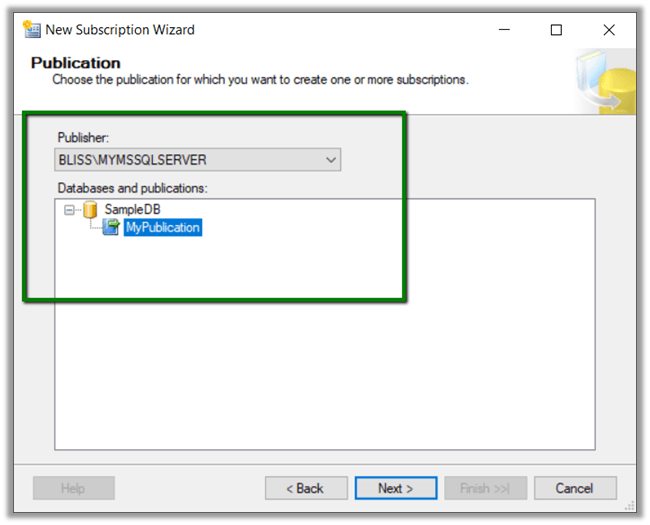
Select the publication

We can specify the type of subscriptions either Push or Pull. In our case, we are selecting Push.

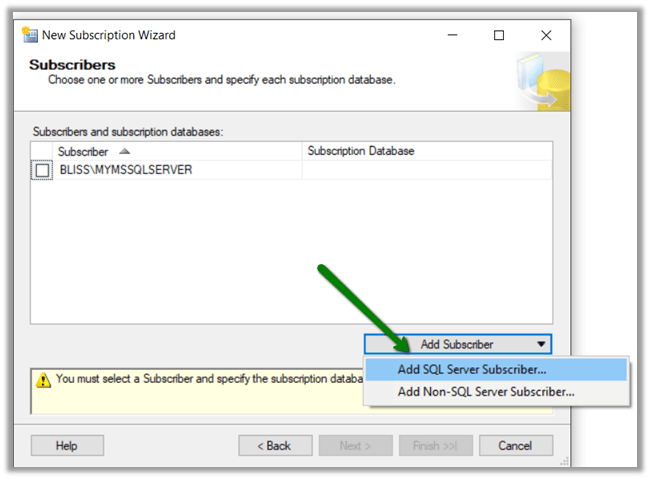
Select Add SQL Server Subscriber to add our Azure SQL DB as the subscriber here.

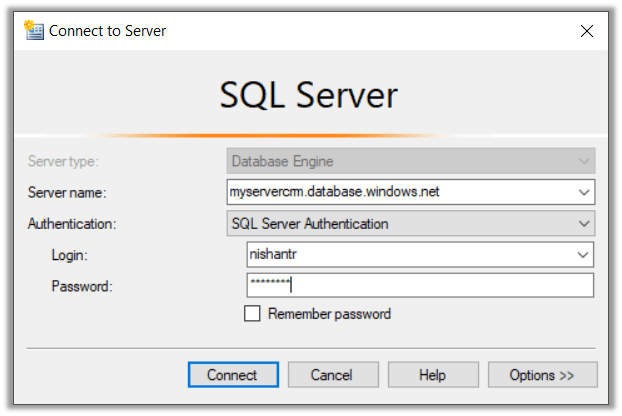
Connect to the Azure SQL DB.

Here MyDB is the Azure DB to which we want to push the data.

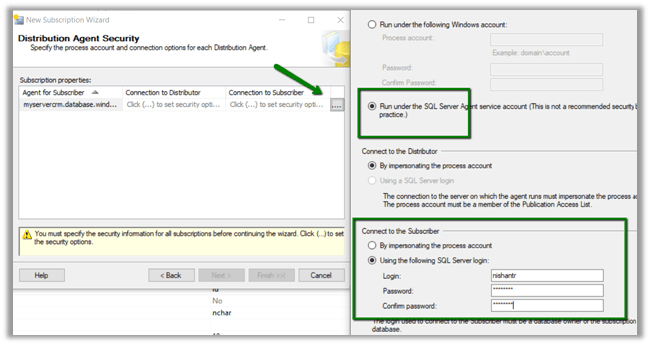
Now specify the account for the Distribution Agent and to connect the Azure SQL DB.

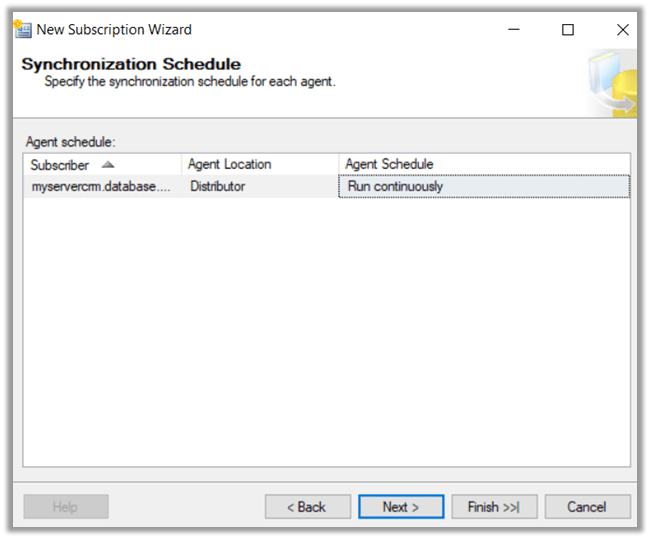
Select Agent schedule as Run Continuously.

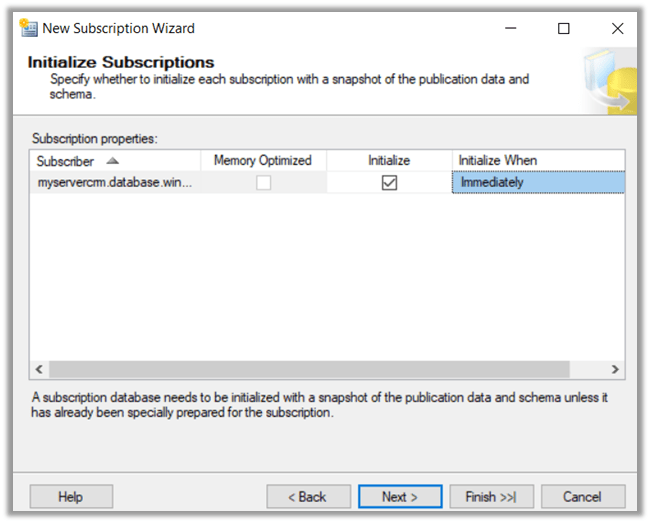
Click Finish to create the subscription.

Back in our Azure SQL DB, we can see the table and the view created with the data.

In Job Activity Monitor, we can see the details.

REPL-LogReader, REPL-Distribution and REBP-Snapshot.

Now just to test it, let us add 2 new rows in our Sample DB’s MyTable.

Back in our Azure DB, we can see the data being added to it.

More details below

https://www.pluralsight.com/courses/sqlserver-transactional-replication-fundamentals

https://docs.microsoft.com/en-us/sql/relational-databases/replication/publish/publish-data-and-database-objects

https://www.mssqltips.com/sqlservertip/5024/using-transactional-replication-with-an-azure-sql-database/

Hope it helps..

Sample code – Upload file to Azure Blob Storage from CRM Online Plugin


Sharing a sample code which we can use to upload files to Azure Blog Storage from within a CRM Online Plugin. Here we’d be making use of the REST API to simplify things (instead of using Windows Azure Storage library) in our Plugin.

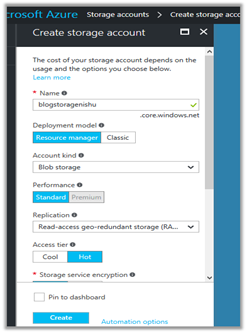
First, we will be creating a storage account of type blob storage and a container inside it.

Log in to Azure Portal

https://portal.azure.com

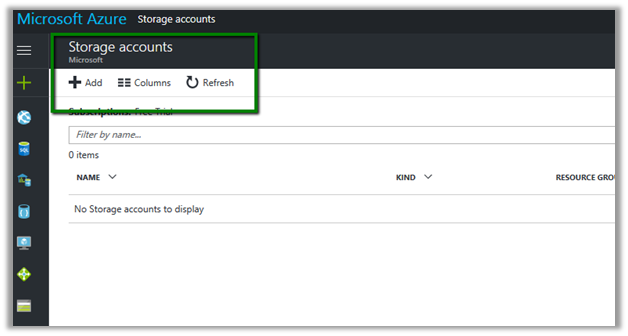
Click on Add to add a new storage account.


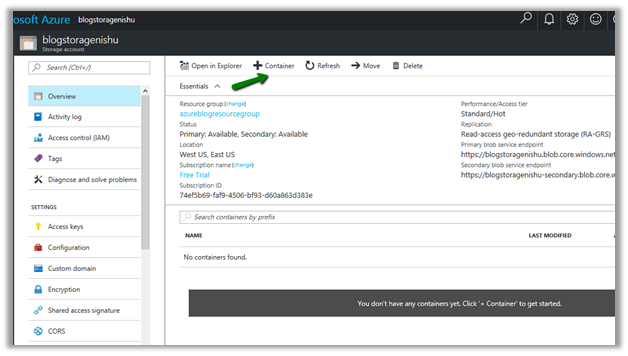
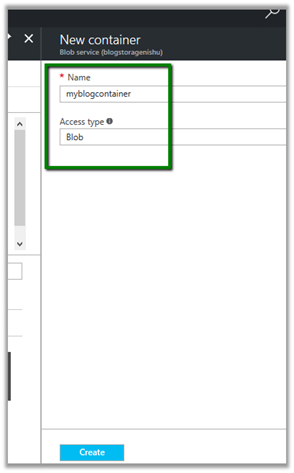
Create a new container in it to store the blob files


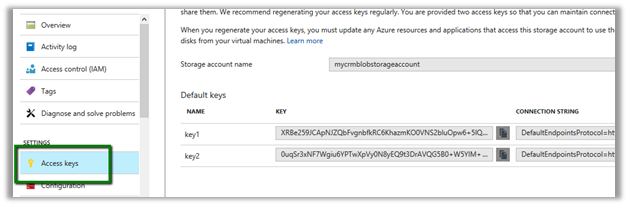
In Azure Portal – Storage Account, go to Access Keys and copy the key


And also note down the storage account name and container name which will be used to construct the URL.


We can also go to container, select its properties and copy the url.


Here we have written the plugin on Create of Annotation, which then retrieves the attachment and uploads its content to the container.

Let us first see it in action.

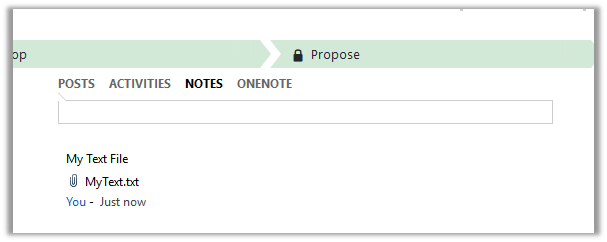
We have created a new note and attached a text file to it.


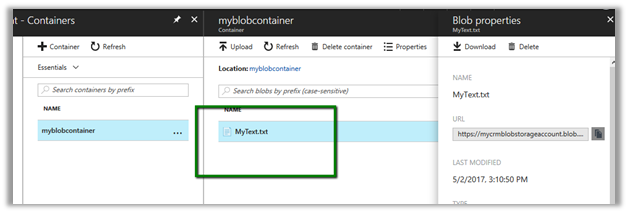
Going back to our portal, we can see the file in our container.


The sample code for the plugin.

<br />
using Microsoft.Xrm.Sdk;<br />
using System;<br />
using System.IO;<br />
using System.Net;<br />
using System.Security.Cryptography;<br />
using System.Text;<br />
namespace MyTestPlugin<br />
{</p>
<p>public class UploadFile : IPlugin<br />
{<br />
public void Execute(IServiceProvider serviceProvider)<br />
{<br />
try<br />
{<br />
// Obtain the execution context from the service provider.<br />
IPluginExecutionContext context = (IPluginExecutionContext)serviceProvider.GetService(typeof(IPluginExecutionContext));</p>
<p>// The InputParameters collection contains all the data passed in the message request.<br />
if (context.InputParameters.Contains("Target") &amp;&amp; context.InputParameters["Target"] is Entity)<br />
{<br />
// Obtain the target entity from the input parameters.<br />
Entity noteEntity = (Entity)context.InputParameters["Target"];<br />
byte[] doumentBody = Convert.FromBase64String(noteEntity.Attributes["documentbody"].ToString());<br />
string content = Encoding.UTF8.GetString(doumentBody);<br />
string fileName = noteEntity.Attributes["filename"].ToString();</p>
<p>// Upload the attached text file to Azure Blog Container<br />
UploadFileToAzureBlobStorage(content, fileName);</p>
<p>}<br />
}<br />
catch (Exception ex)<br />
{<br />
throw new InvalidPluginExecutionException(ex.Message);<br />
}<br />
}</p>
<p>void UploadFileToAzureBlobStorage(string content, string fileName)<br />
{</p>
<p>string storageKey = "storagekey";<br />
string storageAccount = "storageaccountname";<br />
string containerName = "strogaecontaninername";<br />
string blobName = fileName;</p>
<p>string method = "PUT";<br />
string sampleContent = content;<br />
int contentLength = Encoding.UTF8.GetByteCount(sampleContent);</p>
<p>string requestUri = $"https://{storageAccount}.blob.core.windows.net/{containerName}/{blobName}";</p>
<p>HttpWebRequest request = (HttpWebRequest)WebRequest.Create(requestUri);</p>
<p>string now = DateTime.UtcNow.ToString("R");</p>
<p>request.Method = method;<br />
request.ContentType = "text/plain; charset=UTF-8";<br />
request.ContentLength = contentLength;</p>
<p>request.Headers.Add("x-ms-version", "2015-12-11");<br />
request.Headers.Add("x-ms-date", now);<br />
request.Headers.Add("x-ms-blob-type", "BlockBlob");<br />
request.Headers.Add("Authorization", AuthorizationHeader(method, now, request, storageAccount, storageKey, containerName, blobName));</p>
<p>using (Stream requestStream = request.GetRequestStream())<br />
{<br />
requestStream.Write(Encoding.UTF8.GetBytes(sampleContent), 0, contentLength);<br />
}</p>
<p>using (HttpWebResponse resp = (HttpWebResponse)request.GetResponse())<br />
{<br />
if(resp.StatusCode == HttpStatusCode.OK)<br />
{<br />
// successfully uploaded<br />
}<br />
}</p>
<p>}</p>
<p>public string AuthorizationHeader(string method, string now, HttpWebRequest request, string storageAccount, string storageKey, string containerName, string blobName)<br />
{<br />
string headerResource = $"x-ms-blob-type:BlockBlob\nx-ms-date:{now}\nx-ms-version:2015-12-11";<br />
string urlResource = $"/{storageAccount}/{containerName}/{blobName}";<br />
string stringToSign = $"{method}\n\n\n{request.ContentLength}\n\n{request.ContentType}\n\n\n\n\n\n\n{headerResource}\n{urlResource}";</p>
<p>HMACSHA256 hmac = new HMACSHA256(Convert.FromBase64String(storageKey));<br />
string signature = Convert.ToBase64String(hmac.ComputeHash(Encoding.UTF8.GetBytes(stringToSign)));</p>
<p>String AuthorizationHeader = String.Format("{0} {1}:{2}", "SharedKey", storageAccount, signature);<br />
return AuthorizationHeader;<br />
}<br />
}</p>
<p>}</p>
<p>

Hope it helps.

Advertisements

Using Azure Functions for writing Scheduled Jobs for Dynamics CRM


Update -26 – Sep- 2018

https://nishantrana.me/2018/09/26/changing-the-target-runtime-version-of-azure-functions/

https://nishantrana.me/2018/09/25/the-type-or-namespace-name-xrm-could-not-be-found-are-you-missing-a-using-directive-or-an-assembly-reference-error-while-using-azure-functions-2-x/


In our previous post we saw how we can invoke CRM from within the Azure Function.

https://nishantrana.me/2017/04/28/call-dynamics-crm-from-azure-functions/

Using that knowledge, let us now write an Azure Function that will run periodically.

Here we will take a simple example of creating a lead record every 2 minutes. Obviously real world scenario would involve much complex scenario like checking the status of all the open records and update them daily something of that sort.

Another way of writing a scheduled job is using Web Job I have written about it over here.

https://nishantrana.me/2017/03/21/dynamics-crm-web-job-and-azure-scheduler/

Login to Azure Portal and create a new Function App

Create a new function with Timer and CSharp template.

function.json bindings defines the schedule for the timer, it take a CRON expression for value schedule.

CRON Expression format: –

If we want it to run every 2 minute

‘

Back to our code let us click on Run and test it.

Now let us quickly plumb the code to create Lead in CRM.

Go to App Service Editor for the Function App and add new a file named project.json which refers to the CRM Nuget Package.

Sample code that creates the lead record in CRM.


using System.Net;
using Microsoft.Xrm.Sdk;
using Microsoft.Xrm.Sdk.Client;

public static void Run(TimerInfo myTimer, TraceWriter log)
{
IServiceManagement orgServiceManagement = ServiceConfigurationFactory.CreateManagement(new Uri("https://nishutrial.crm.dynamics.com/XRMServices/2011/Organization.svc"));

AuthenticationCredentials authCredentials = new AuthenticationCredentials();
authCredentials.ClientCredentials.UserName.UserName = "test@test.onmicrosoft.com";
authCredentials.ClientCredentials.UserName.Password = "*******";
AuthenticationCredentials tokenCredentials = orgServiceManagement.Authenticate(authCredentials);

OrganizationServiceProxy organizationProxy = new OrganizationServiceProxy(orgServiceManagement, tokenCredentials.SecurityTokenResponse);
Entity lead = new Entity("lead");
lead.Attributes["subject"] = "Lead Created at" + DateTime.Now ;
organizationProxy.Create(lead);

log.Info($"C# Timer trigger function executed at: {DateTime.Now}");
}

Inside CRM

To monitor our Azure Function please select Monitor

Click on live event stream to monitor it real-time.

To stop or disable the function, select Manage and click on function state Disabled.

Hope it helps..
How to – Call Dynamics CRM from Azure Functions


Update -26 – Sep- 2018

https://nishantrana.me/2018/09/26/changing-the-target-runtime-version-of-azure-functions/

https://nishantrana.me/2018/09/25/the-type-or-namespace-name-xrm-could-not-be-found-are-you-missing-a-using-directive-or-an-assembly-reference-error-while-using-azure-functions-2-x/


Let us take a look at a simple Azure Function that refers our CRM assemblies and creates contact record in CRM.

Log in to Azure Portal, search for Function App and create a Function App.

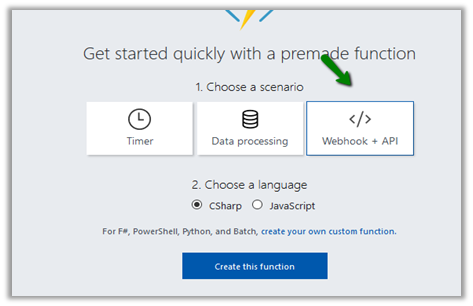
Here we have specified WebHook + API and CSharp Template. Click on Create this function.

Select the function app, go to Platform features tab and click on App Service Editor.

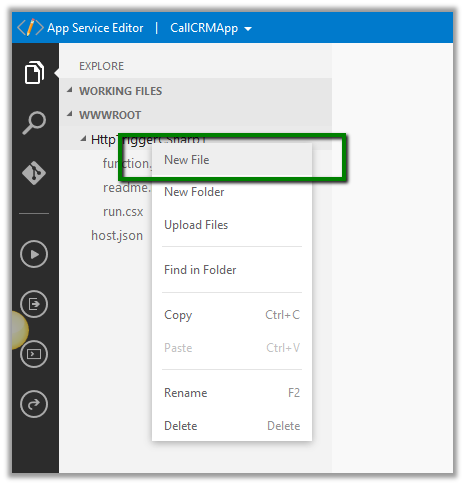
Right click the function and add a new file named project.json. It is within this file we will refer our Nuget Packages that we need in our function.

https://docs.microsoft.com/en-us/azure/azure-functions/functions-reference-csharp

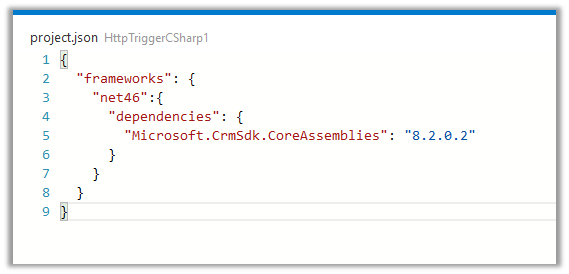
Here we will reference the following Nuget Package for CRM

https://www.nuget.org/packages/Microsoft.CrmSdk.CoreAssemblies/

</p>
<p>{<br />
"frameworks": {<br />
"net46":{<br />
"dependencies": {<br />
"Microsoft.CrmSdk.CoreAssemblies": "8.2.0.2"<br />
}<br />
}<br />
}<br />
}</p>
<p>

Back in our Function when we click on Save or Run, we can see the required assemblies being installed in our Log.

The sample code for the Azure Function (just for simplicity the values are all hardcoded)

</p>
<p>using System.Net;<br />
using Microsoft.Xrm.Sdk;<br />
using Microsoft.Xrm.Sdk.Client;</p>
<p>public static async Task Run(HttpRequestMessage req, TraceWriter log)<br />
{<br />
log.Info("C# HTTP trigger function processed a request.");</p>
<p>// parse query parameter<br />
string firstname = req.GetQueryNameValuePairs()<br />
.FirstOrDefault(q =&gt; string.Compare(q.Key, "firstname", true) == 0)<br />
.Value;</p>
<p>string lastname = req.GetQueryNameValuePairs()<br />
.FirstOrDefault(q =&gt; string.Compare(q.Key, "lastname", true) == 0)<br />
.Value;</p>
<p>IServiceManagement orgServiceManagement = ServiceConfigurationFactory.CreateManagement(new Uri("https://nishutrial.crm.dynamics.com/XRMServices/2011/Organization.svc"));</p>
<p>AuthenticationCredentials authCredentials = new AuthenticationCredentials();<br />
authCredentials.ClientCredentials.UserName.UserName = "abc@abc.onmicrosoft.com";<br />
authCredentials.ClientCredentials.UserName.Password = "*****";<br />
AuthenticationCredentials tokenCredentials = orgServiceManagement.Authenticate(authCredentials);</p>
<p>OrganizationServiceProxy organizationProxy = new OrganizationServiceProxy(orgServiceManagement, tokenCredentials.SecurityTokenResponse);<br />
Entity contact = new Entity("contact");<br />
contact.Attributes["firstname"] = firstname;<br />
contact.Attributes["lastname"] = lastname;<br />
var contactId = organizationProxy.Create(contact);<br />
// Get request body<br />
dynamic data = await req.Content.ReadAsAsync();</p>
<p>string fullname = "";<br />
return fullname == null<br />
? req.CreateResponse(HttpStatusCode.BadRequest, "Please pass a name on the query string or in the request body")<br />
: req.CreateResponse(HttpStatusCode.OK, "Contact created in CRM " + contactId.ToString());<br />
}</p>
<p>

Let us now test our function.

The function expects 2 query string parameter firstname and lastname and creates the contact record in CRM.

In our CRM, we can see the contact record created.

Hope it helps..
 

Advertisements