Always Encrypted feature in SQL Server


Always Encrypted is used for encryption at the column level rather than the entire database. It provides both data at rest as well in memory (in flight).

It is different from column (cell-level) and Transparent Data Encryption (TDE) which uses keys and certificates, which are stored in the database. In the case of Always Encrypted, keys are managed outside the database. SQL Server cannot decrypt on its own, as it is the client who encrypts / decrypts on the fly, separating those who own the data from the one who manages it.

To enable Always Encrypted we can use either T-SQL or the Always Encryption Wizard in SSMS. It supports both Randomized and Deterministic Encryption types.

  • Columns are encrypted using CEK – Column Encryption Key.
  • The encrypted versions of each CEK are stored in the database.
  • CMK – Column Master Key is used to encrypt all the CEKs.
  • Only the client possesses the CMK which is stored in either Azure Key Vault, Certificate Store, HSM.

SSMS Wizard generates both CEK and CMK. CMK is stored in the Client certificate or Azure Key Vault.

CMK is used to encrypt CEK. The encrypted CEK along with Path to CMK is what is stored in the database. So, the database has no way of decrypting the data.

Next SSMS Wizard begins the encryption process, where it creates a new temporary table, transfers the data from the table and encrypts it on the fly, and then drops and replaces the main table.

All of this occurs on the fly at the client side which is SSMS in this case.

The client will pass the ‘Column Encryption Setting=Enabled’ in the connection string, which fetches the Encrypted CEK and Path to CMK from the database.

The client uses the Path to CMK to get the CMK and uses it to decrypt the encrypted CEK received and then uses the CEK to decrypt the encrypted data.

To apply Always Encrypted, within SSMS, right-click the database and select Tasks > Encrypt Columns…

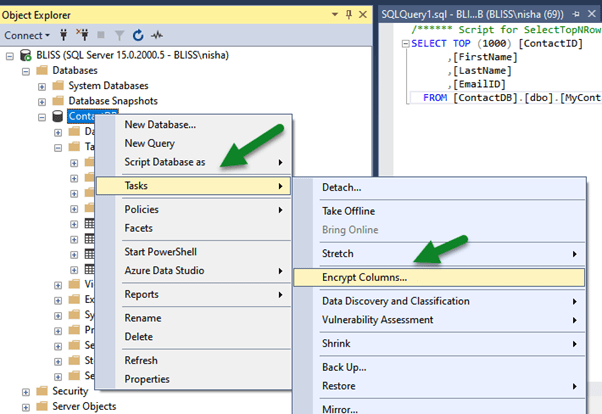
Below we have selected the Email Id column of MyContact table.

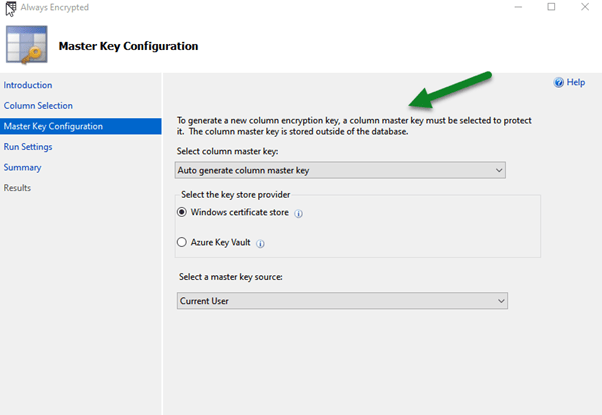
The below wizard step is used for generating CMK which can be either stored in Windows Certificate Store or Azure Key Vault with the client.

We can either run the encryption at that time or choose to generate a PowerShell Script which we can run later.

Below is the summary of steps that will be performed

  • Before encryption

  • After encryption

To decrypt here, at the client which is our SSMS in this case, right-click in the query window and select Connection > Choose Connection…


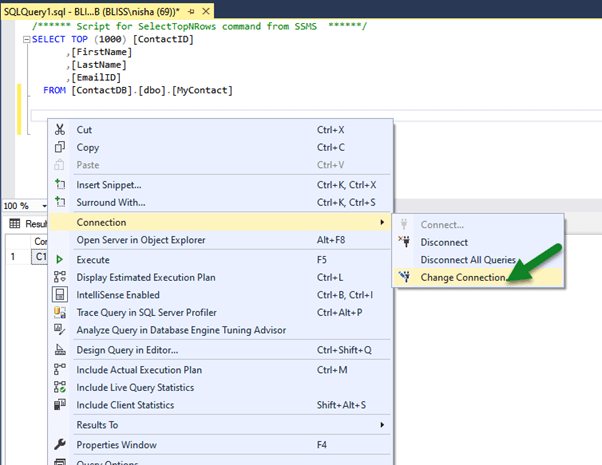
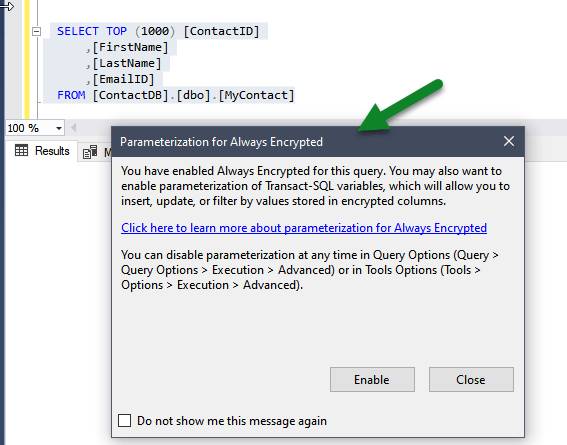
Specify column encryption setting=enabled in the Additional Connection Parameters tab.

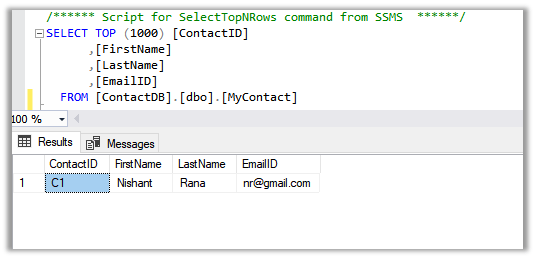
We can see the actual data as the client SSMS in this case, peforms the decryption at the run time using the path to CMK and encrypted CEK details received from the database.

  • Usage within a console application –

Few points to consider while planning to use Always Encrypted –

https://www.sentryone.com/blog/aaronbertrand/t-sql-tuesday-69-always-encrypted-limitations

Reference – Pluralsight – SQL Server Course 

Hope it helps..

Advertisement

Dynamic Data Masking (DDM) in SQL Server


Through the Dynamic Data Masking feature in SQL Server, we can hide the sensitive data by masking the data from the user who does not have permissions. (Here the data in the database is not changed).

There are 4 different functions to do that –

  • default – Entire column is masked.
  • partial – only works with string, for masking staring and / or ending characters of the column data.
  • email – shows only the first character of the column data and masks the rest.
  • random – only works with numeric, the column data is replaced by random values.

  • e.g. Create Table

  • e.g. Alter Table

  • To find the masking details applied on columns –

  • Mask permissions – 

  • Unmask and mask permission –

Granting UNMASK permission to the user allows to see the unmasked data.

  • For Azure SQL Database, we can enable and specify masking through the interface itself, select the Dynamic Data Masking option for the table, click on the Add mask button

Apply the masking format as needed.

Reference – Pluralsight – SQL Server Course 

Hope it helps..

Fixed – The following job steps cannot be reached with the current job step flow logic in SSIS


Recently while scheduling our SSIS Packages in SQL Server Agent Jobs we got the below error

WARNING: The following job steps cannot be reached with the current job step flow logic:

[1] Fashion Spend package

We just need to make sure that we have set correct package in the Start Step properties in Job Properties Dialog Box

To: –

Hope it helps..

Advertisements

Using SQL Server Transactional Replication to move data from SQL Server (On-Prem) to Azure SQL


Hi,

Let us say we want to move data from Table named MyTable and view MyView from my SQL Server DB On-Prem to one of the Azure SQL Database.

The components involved here would be Publisher that publishes this data, Distributor that holds the information about the data to be published and Subscriber who subscribes to the data.

For Transaction Replication to work, the Azure SQL DB or any subscriber needs to have the matching schema as the published table. This can be achieved through Snapshot Agent which applies the snapshot. Distribution Agent distributes this snapshot to the Subscribers.

Transaction Replication Log Reader Agent looks for any changes in the published data. This agent runs at the distributor for “Push” subscriptions. It can run continuously and or can be scheduled. It looks for Insert, Update, Delete operations or any schema changes and pushes this to the Subscriptions.

Let us start by configuring the Distributor first. The distributor can be at the local or remote server.

We’d be creating a local Distributor here.

Right-click the Replication and select Configure Distribution

We are using the local server as Distributor.

Click Next.

Click Finish to complete the wizard.

This creates the distribution database in our Local Server.

Now let us configure the Publication.

Right-click the publication and select new publication. SampleDB is the DB from whose table and view we want to publish.

Select SampleDb

Select Transactional Publication

Select the table and the view

As we are publishing a view, we get the below message

We can click on Add to specify any filtering on the data to be published.

We can specify if we want to snapshot to be created immediately so that it is available while defining subscriptions. We can also schedule the Snapshot Agent or we can run it continuously.

Here we are specifying SQL Server Agent account.

Specify Publication Name and click on Finish to create the publication.

Now let us create the Subscription.

Right-click the publication created earlier, and select new Subscription

Select the publication

We can specify the type of subscriptions either Push or Pull. In our case, we are selecting Push.

Select Add SQL Server Subscriber to add our Azure SQL DB as the subscriber here.

Connect to the Azure SQL DB.

Here MyDB is the Azure DB to which we want to push the data.

Now specify the account for the Distribution Agent and to connect the Azure SQL DB.

Select Agent schedule as Run Continuously.

Click Finish to create the subscription.

Back in our Azure SQL DB, we can see the table and the view created with the data.

In Job Activity Monitor, we can see the details.

REPL-LogReader, REPL-Distribution and REBP-Snapshot.

Now just to test it, let us add 2 new rows in our Sample DB’s MyTable.

Back in our Azure DB, we can see the data being added to it.

More details below

https://www.pluralsight.com/courses/sqlserver-transactional-replication-fundamentals

https://docs.microsoft.com/en-us/sql/relational-databases/replication/publish/publish-data-and-database-objects

https://www.mssqltips.com/sqlservertip/5024/using-transactional-replication-with-an-azure-sql-database/

Hope it helps..

Displaying Image from File Attachment control in InfoPath form inside SSRS report.


I was assigned the task of displaying images attached to InfoPath form using file attachment control in one of the SQL Server Reporting Services Report.

For this we need to add an image control and set it’s property in the following manner

Image Source :- Database

Then select appropriate DataSet, Image Field and MimeType

Here to display the Image properly we need to write a Report Assembly with the following code.

public static class FileDecoder
    {
        /// <summary>
        /// Takes string value for image from the infopath form
        /// and converts it to proper bytes for displaying it as an image
        /// </summary>
        /// <param name="imageData">string representation of the image</param>
        /// <returns>corrected byte array</returns>
        public static byte[] GetCorrectedByte(string imageData)
        {
            byte[] attachmentNodeBytes = Convert.FromBase64String(imageData);
            // Position 20 contains a DWORD indicating the length of the
            // filename buffer. The filename is stored as Unicode so the
            // length is multiplied by 2.
            int fnLength = attachmentNodeBytes[20] * 2;
            // The file is located after the header, which is 24 bytes long
            // plus the length of the filename. 
            byte[] fileContents = new byte[attachmentNodeBytes.Length – (24 + fnLength)];

            for (int i = 0; i < fileContents.Length; ++i)
            {
                fileContents[i] = attachmentNodeBytes[24 + fnLength + i];
            }

            return fileContents;
        }

    }


And set the value for image control as

=(Namespace).FileDecoder.GetCorrectedByte(Fields!fieldName.Value)

ImageFromDB


Bye..

How to – Use Left and CharIndex in Oracle


Well i was given the task to get the email id’s of the user which was stored in one of our oracle db table.

But the problem was that we wanted that part of emailid which  appears before ‘@’ .

Well coming from SQL Server background i thought it could be acheived using CharIndex and Left Function.

Let’s see what they do

Select Left(‘abcdef’,3)

-> abc

and

select charindex(‘c’,’abcde’)

-> 3

But than as expected there were no functions like charindex and left in Oracle.

After searching i finally managed to found the solution

Inplace of CharIndex we have instr function

select instr(‘ab’,’b’) from dual;

->2

and for left and also right we have

SUBSTR (`ABCDEF’,-5); //Right(..)

SUBSTR (`ABCDEF’,1,5); // Left(…

So finally the query was

substr(emailid,1,Instr(Emailid,’@’)-1)

-1 is used otherwise @ will also come along

And one more thing, to extract username portion from login name i.e  nishantr1 from

abccompany\nishantr1 we could write something as following

SUBSTRING(loginname ,charindex(‘\’,loginname)+1, len(loginname)) for sql server.


Bye

Advertisements
%d bloggers like this: