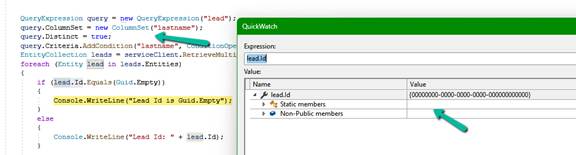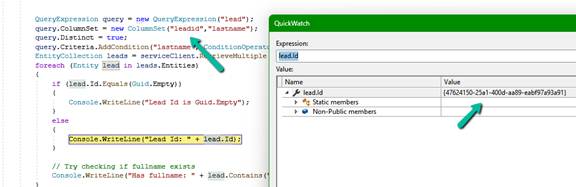
When Entity.Id Is Guid.Empty with QueryExpression.Distinct = True (Dataverse)
While optimising the performance of a Dataverse plugin, we noticed a QueryExpression using ColumnSet(true). The business logic only required a few attributes,…
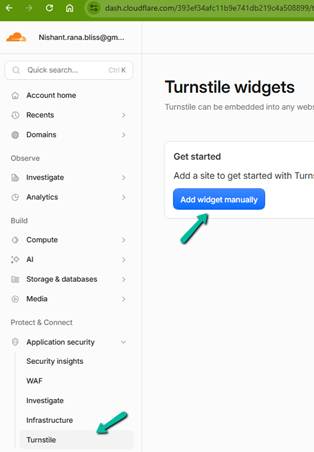
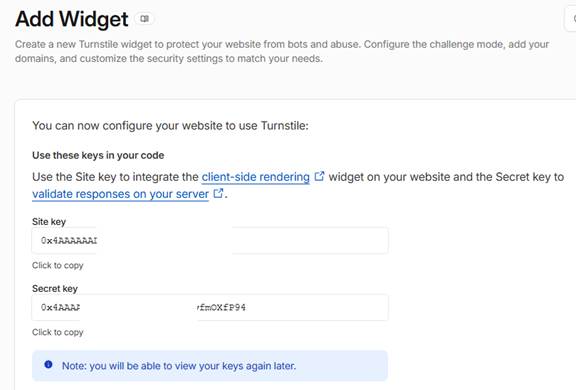
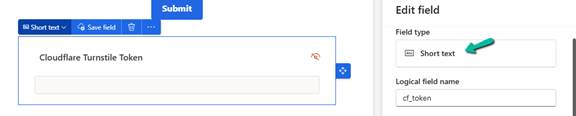
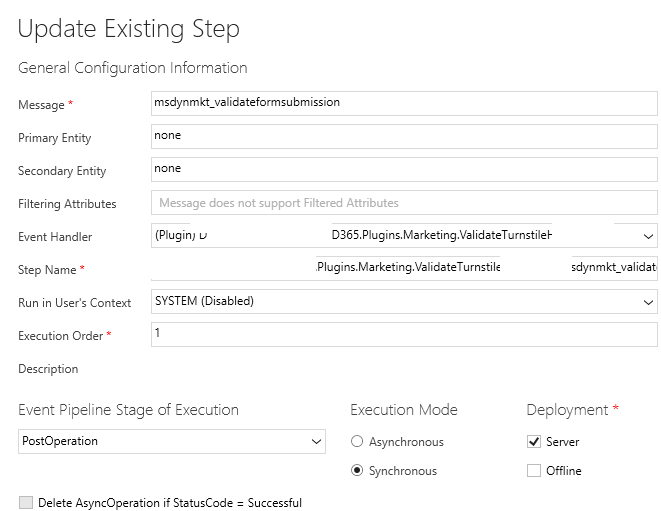
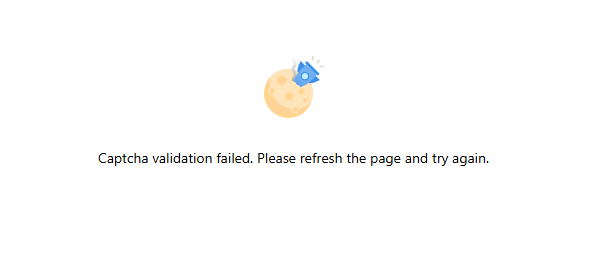
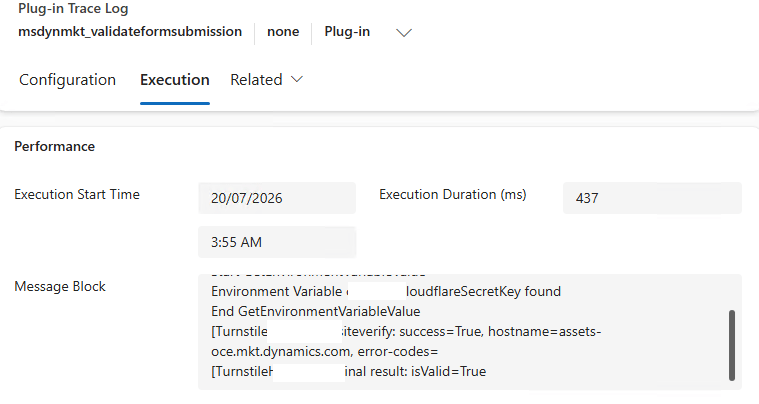
Implementing Cloudflare Turnstile for Dynamics 365 Customer Insights – Journeys Real-Time Marketing Forms
Check the previous posts for more details – In one of our recent projects, we implemented Cloudflare Turnstile (Invisible) for a Dynamics…

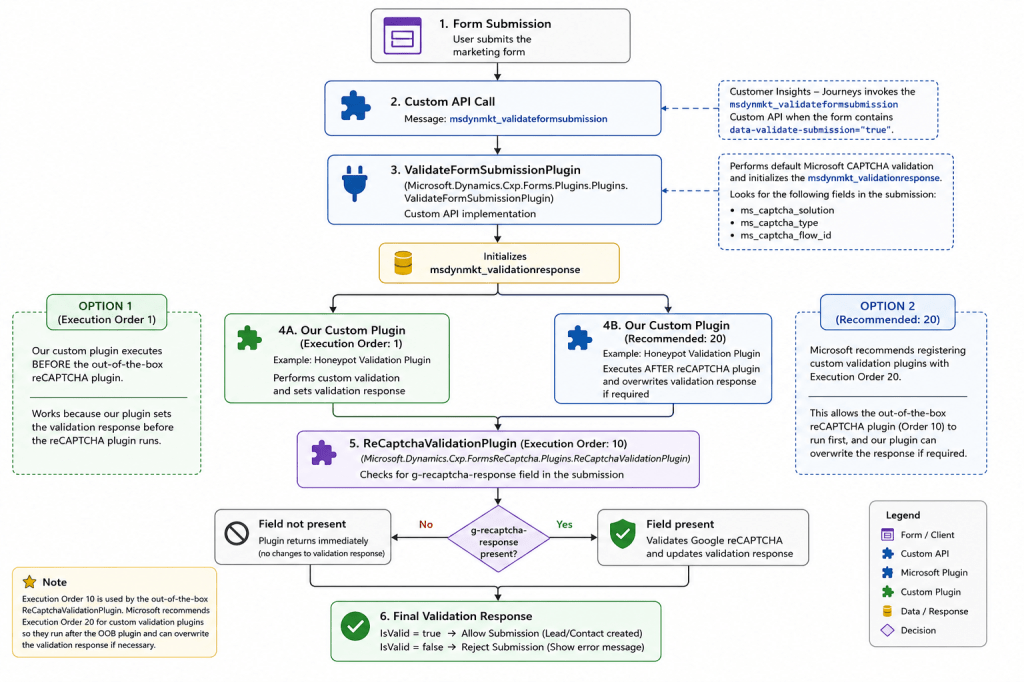
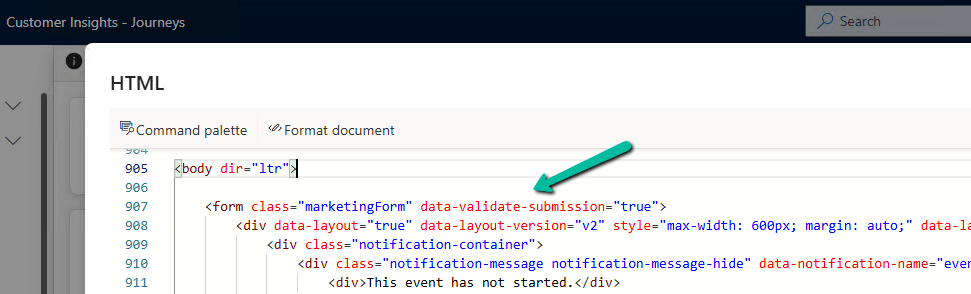
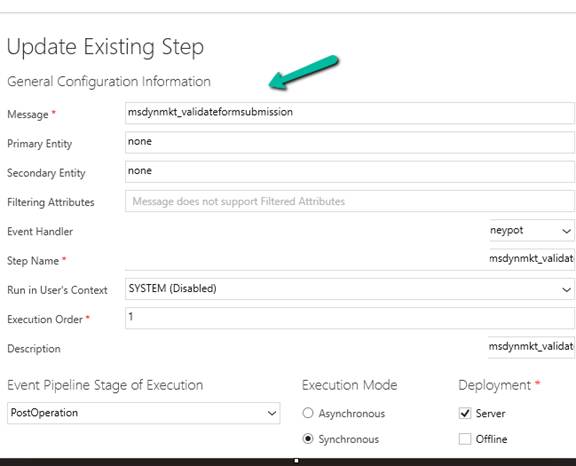
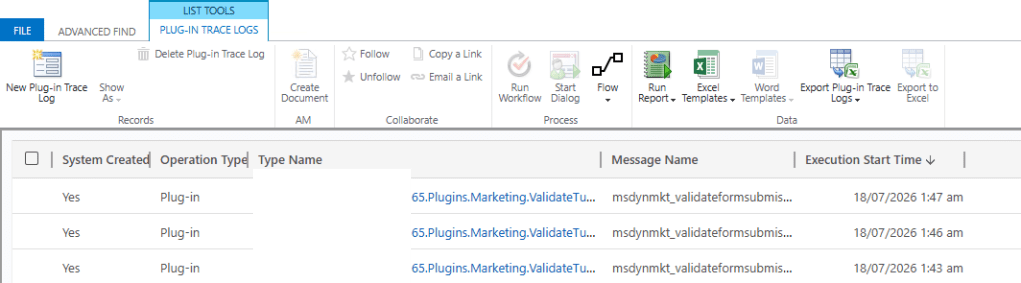
Custom Form Submission Validation in Dynamics 365 Customer Insights – Journeys: Inside the Validation Pipeline and the “ms_captcha_solution” Error
While implementing custom form submission validation (server side validation) for Dynamics 365 Customer Insights – Journeys Real-Time Marketing forms, we came across…

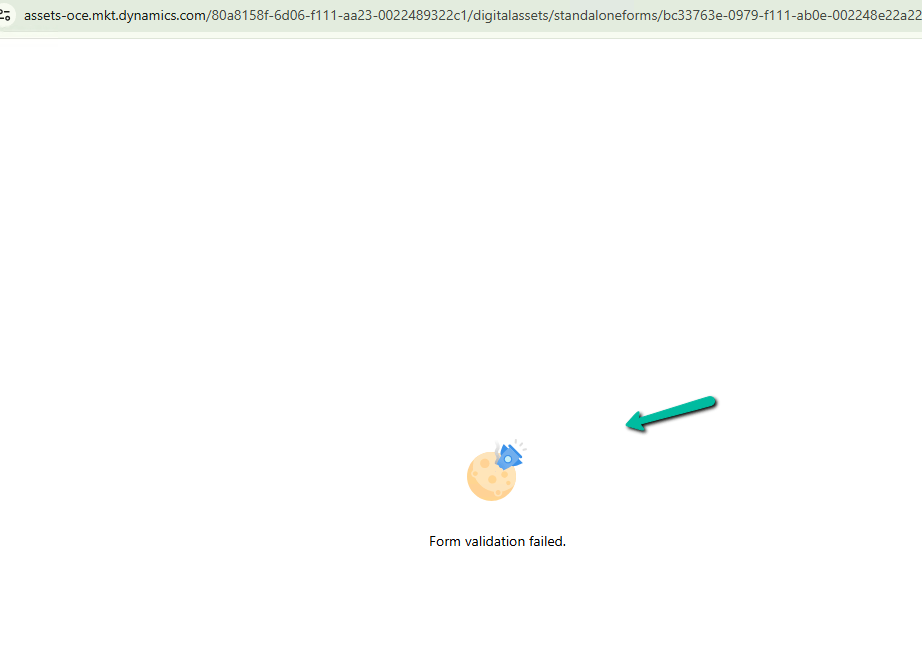
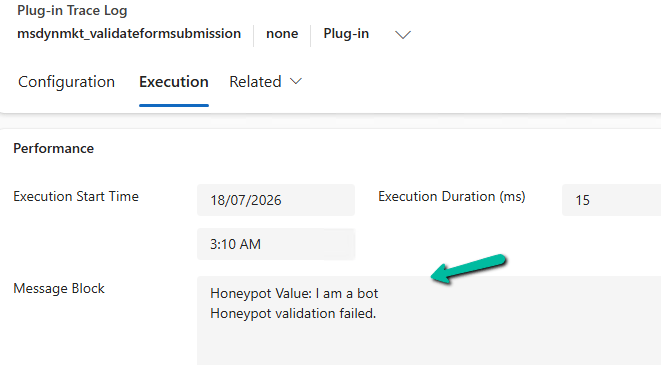
Implementing Server-Side Honeypot Validation for Dynamics 365 Customer Insights – Journeys Forms
In our previous post, we implemented a simple Honeypot for Dynamics 365 Customer Insights – Journeys Real-Time Marketing forms using JavaScript. Although…

Implementing a Simple Honeypot in Dynamics 365 Customer Insights – Journeys Real-time Marketing Forms
While working with Dynamics 365 Customer Insights – Journeys Real-time Marketing Forms, we wanted to explore a simple way of reducing bot…

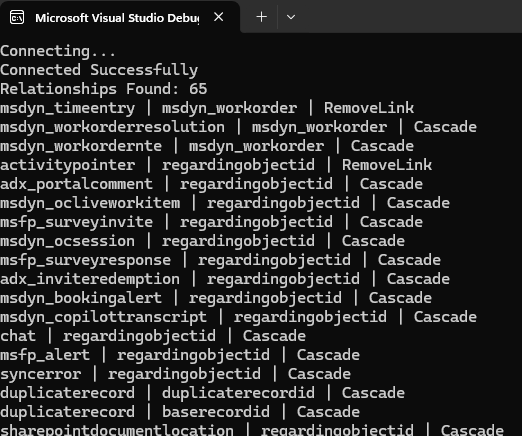
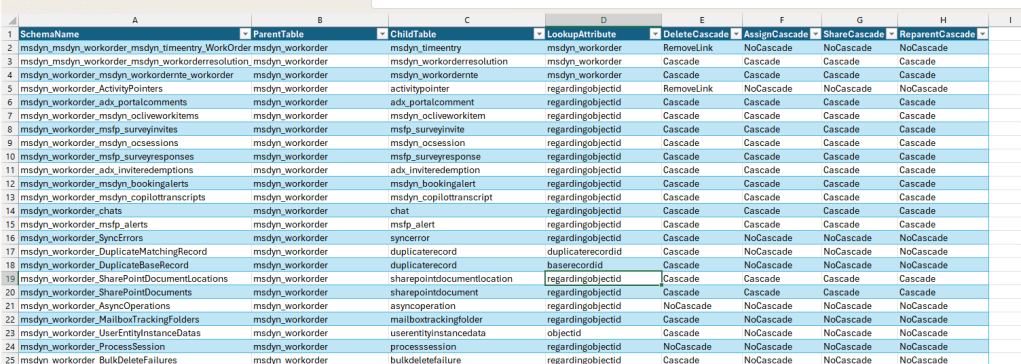
Retrieve All One-to-Many Relationships and Cascade Delete Behavior for a Dataverse Table Using C#
While working on a Dynamics 365 Field Service cleanup, we needed to delete a large number of Work Order records. Before doing…

Why SQL4CDS Record Counts May Not Match Advanced Find for Date Filters (Dataverse / Dynamics 365)
While validating some Dynamics 365 Field Service data recently, we came across an interesting scenario where SQL4CDS and Advanced Find returned different…

How We Successfully Removed the Resco Woodford Managed Solution from Dynamics 365 Field Service
Recently, we needed to remove the legacy Resco MobileCRM (Woodford) managed solution from a Dynamics 365 Field Service environment. Although the uninstall…

Unable to Delete Work Order Due to “The Time To Promised Must Be Later Than The Time From Promised” exception – Dynamics 365 Field Service
While attempting to delete a historical Dynamics 365 Field Service Work Order, we encountered the following error: Exception Message: The time to…
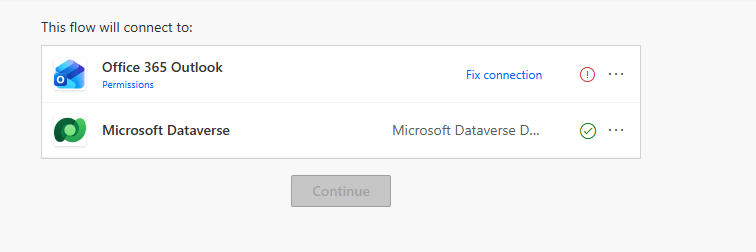
Open a Power Automate Flow for Edit Without Fixing Broken Connections First
While reviewing Power Automate flows recently, we ran into an issue where we could not open a flow in edit mode When…
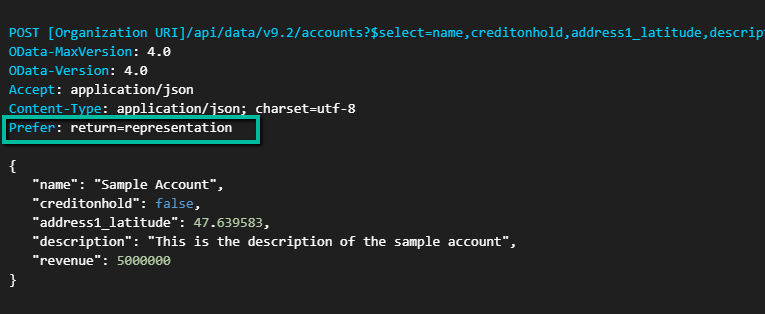
Dataverse Web API: Returning Record Data During Create Using Prefer: return=representation
When creating records using the Dataverse Web API, the default behavior is to return a successful response without including the record data…

Testing the New RunJobForSandbox Option in Bulk Delete Jobs (Preview) – Dataverse / Dynamics 365
“Edit – 25 – June – 2026 – This only applies to sandbox environments not production. Can see Microsoft updating the details.…

Using RetrieveDependenciesForDeleteRequest to find and delete hidden dependencies (Dataverse/ Dynamics 365)
Please refer to the post below, which provides a clear explanation of how RetrieveDependenciesForDeleteRequest works and how it can be used to…

Troubleshooting Hidden Dependency Errors in Dynamics 365 and Dataverse
Recently, while cleaning up some old customizations in Dynamics 365, we came across an interesting dependency issue that was not immediately obvious…

Capture UTM Parameters in Dynamics 365 Marketing Forms Using JavaScript (Dynamics 365 Customer Insights)
When running marketing campaigns, UTM parameters help us understand where our leads are coming from. They help us track whether a lead…
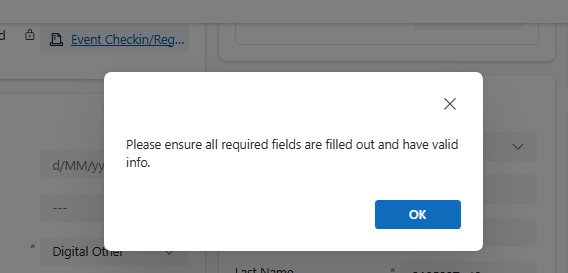
Hidden Required Fields Causing “Please ensure all required fields are filled out” Error While Disqualifying a Lead in Dynamics 365 / Dataverse
While working on a Lead Disqualification scenario in Dynamics 365, we ran into a strange issue. When trying to Disqualify a Lead,…
Preserving ‘modifiedon’ During Data Migration in Dynamics 365 / Dataverse
We were working on a data migration requirement where we needed to preserve system fields like created on and modified on. For…

Reset / Restore the standard (OOTB) button in Dynamics 365 / Dataverse
We recently worked on a requirement where we customized an out-of-the-box ribbon button in Dynamics 365 — specifically, the Reactivate Lead button.…

The Attribute with id does not exist — and Staged Metadata is still being processed (Dataverse / Dynamics 365 Issue)
Last week, we came across a strange issue while working with Dataverse metadata. We had created a new attribute as part of…
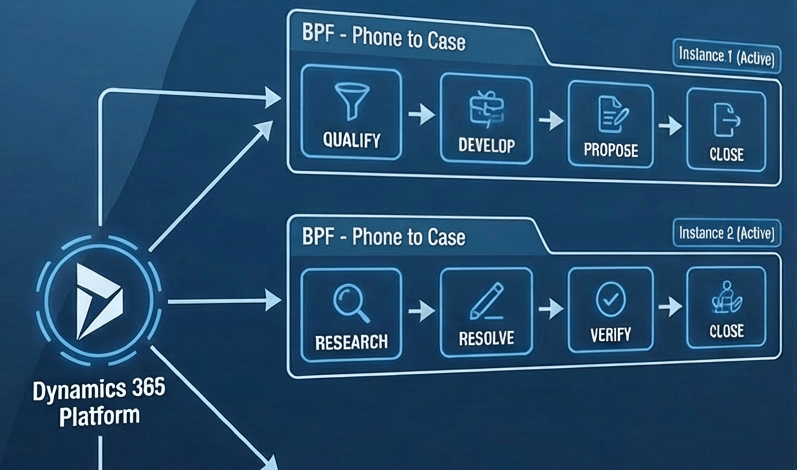
Multiple Active Business Process Flow Instances for a record in Dynamics 365 / Dataverse
We recently worked on a requirement where we had to sync Business Process Flow (BPF) data between two different Dataverse environments for…
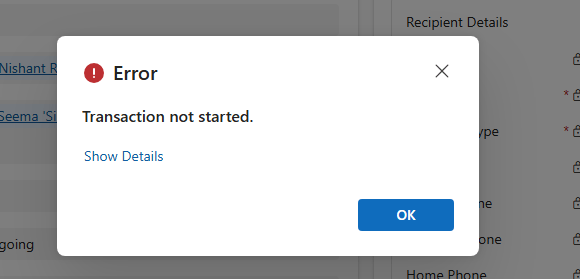
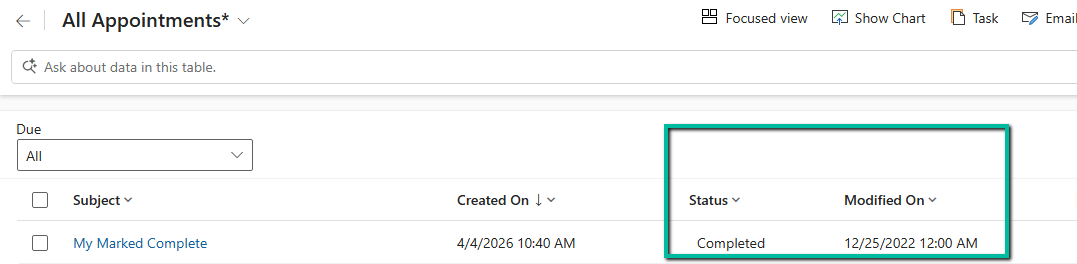
“Transaction not started. There is no active transaction” error (Dynamics 365 / Dataverse)
We recently ran into an interesting and slightly frustrating issue while trying to mark an activity (Appointment/Phone Call/ Task) as Completed in…

Plugin Registration Tool Login with Multi-Factor Authentication (MFA) – Uncheck “Show Advanced”
If we’re logging into the Plugin Registration Tool using an account protected with Multi-Factor Authentication (MFA), there’s one small setting that can…

No Dependencies Shown… But still can’t delete the component? Check Your Cloud Flows (Dataverse / Dynamics 365)
Recently, while performing cleanup in one of our environments, we were removing unused components to reduce clutter and technical debt. As part…

Solution Failed to Import – Missing Lookup View Dependency in Dataverse / Dynamics 365
Recently, while trying to import a solution, we got the below dependencies error. Solution ” Configuration” failed to import: The dependent component…

Renaming Sitemap Display Name in Dataverse / Dynamics 365
While working with a model-driven app in Dataverse, we needed to change the display name of the sitemap. What made this interesting…

Fixed: Audit History Page Not Loading (Dataverse / Dynamics 365)
Recently, we ran into an issue where the Audit History page stopped loading on the form. Interestingly, the problem was limited only…

Why We Switched Our Plugin from PreOperation to PreValidation – Dataverse / Dynamics 365
We had a business requirement to block the closing of a Quote as Lost under certain conditions. Instead of leaving the quote…

Using the Restore Message to Recover Deleted Records in Dataverse
Accidental data deletion in Dataverse happens more often than we expect. A bulk delete job, an incorrect Power Automate flow, or incorrect…

Advancing and Finishing a BPF Using RetrieveProcessInstancesRequest and RetrieveActivePathRequest (Dataverse / Dynamics 365)
In earlier posts, we looked at how to move a Business Process Flow (BPF) stage and finish the process by directly updating…
Finishing (Deactivating) and Reopening a Business Process Flow Using C# Console App (Dataverse / Dynamics 365)
In the previous post, we explored how to move a Business Process Flow (BPF) to the next stage using a console application,…

Advancing a Business Process Flow Stage Using a C# Console App (Dataverse / Dynamics 365)
In Dynamics 365, Business Process Flows are usually progressed by users through the UI. However, in scenarios like data migration, bulk remediation,…

Using a Plugin to Generate Auto-Number Values for Legacy and Reopened Records in Dynamics 365 / Dataverse
In one of our recent Dynamics 365 / Dataverse projects, we ran into one issue with auto-number fields. We had configured an…

Solving CS0006: Metadata File Not Found Error in Visual Studio
Recently, we encountered a build error in one of our Dynamics 365 projects where Visual Studio was unable to find metadata files…
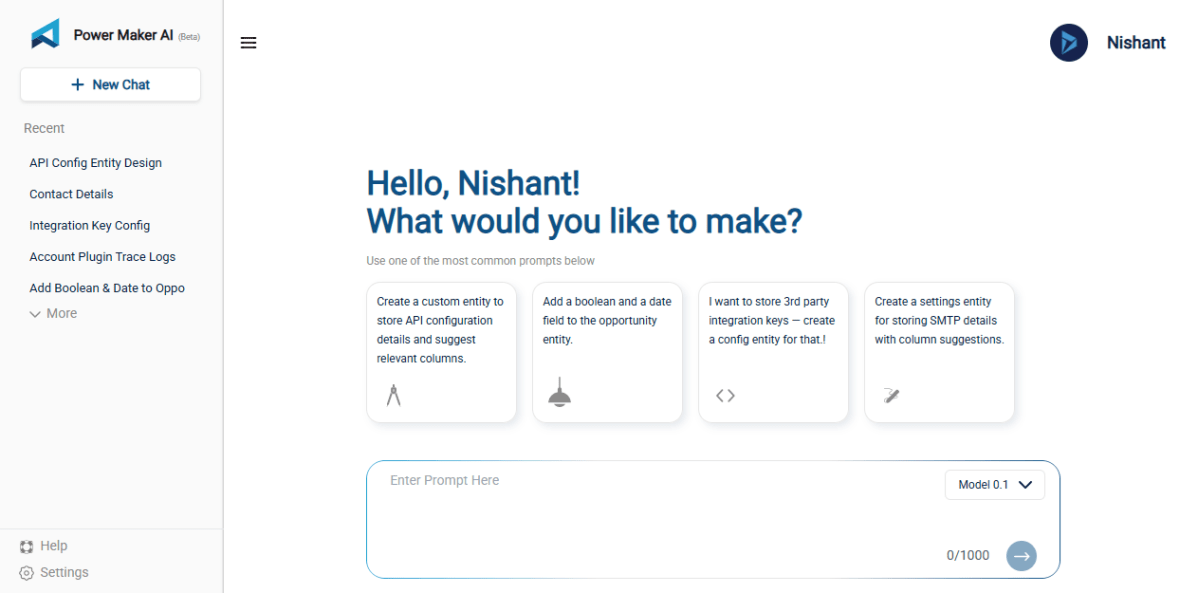
![[Tool Showcase – PowerMakerAI] Talk to Your CRM Like a Teammate — Meet PowerMakerAI’s Context-Aware Chatbot](https://nishantrana.me/wp-content/uploads/2025/12/dashboard.png?w=1200)
[Tool Showcase – PowerMakerAI] Talk to Your CRM Like a Teammate — Meet PowerMakerAI’s Context-Aware Chatbot
You’ve probably used ChatGPT or Gemini to generate code, write emails, or even debug errors. But what if you could do the…

Action ‘Update_a_record’ failed: An error has occurred. No resources were found when selecting for update – Fixing Cross-Company Update Issues in Finance & Operations Using Dataverse Virtual Entities (Power Automate)
Recently, while trying to update the Projects table in Finance & Operations using the Fin & Ops Apps actions in Power Automate,…

Fixing the “Only 1 of 2 keys provided for lookup, provide keys for dataAreaId, ProjectID / Not found” Error in Power Automate (Fin & Ops Apps)
Recently, while working with the Projects table from a Finance & Operations (F&O) environment, we ran into an error while using the…

Fixed – Error occurred while loading document template / Error occurred while loading preview error in Dynamics 365
Recently, one of the users reported the following error while trying to generate a PDF for a Quote record in Dynamics 365:…

How to Identify and Update Power Automate HTTP Request Trigger Flows Before November 2025
Few weeks back, while working on one of our Power Automate flows, we noticed a banner warning on the HTTP Request trigger…

Using Parent Context in Dynamics 365 Plugins — Detecting System-Triggered Operations (Dataverse / Dynamics 365)
In this post, we’ll look at how we used the ParentContext property in Dynamics 365 plugins to determine if a plugin execution…

Fixed – “Action cannot be performed. This quote is not owned by Dynamics 365 Sales” in Dataverse / Dynamics 365
Recently, while working with Quotes in Dynamics 365 Sales integrated with Supply Chain Management (SCM) through Dual-write, we encountered an interesting error…

Understanding “Block Deletion of Out-of-the-box Attribute Maps” in Dataverse / Dynamics 365
In Dynamics 365, attribute maps define how data flows from one record to another when creating related records. For example, when creating…

Flows getting triggered multiple times / missing callbackregistration record – Power Automate / Dataverse
Recently, we observed that one of our flows was getting triggered multiple times in our UAT environment; however, the flow was working…
JavaScript Gotcha: Why [x == (a || b)] Fails
Recently we observed that our JavaScript code was not working as expected. Now when we write conditions in JavaScript, it’s natural to…

What are Partial Merges in Business Process Flow (BPF), and what can we do about it – Dataverse / Dynamics 365
Let’s take an example. Suppose we have the following Business Process Flow (BPF) for Leads: If the Lead Type = Grade A,…

Boolean Fields in Business Process Flows: Required Field Behavior Explained (Dataverse / Dynamics 365)
When designing Business Process Flows (BPF) in Dataverse, we often want to make certain fields mandatory before users can move to the…

Troubleshoot “Something happened, and we couldn’t copy to this environment” error – Dataverse /Dynamics 365
Recently, while trying to copy an environment, we got the following issue – Something happened, and we couldn’t copy to this environment.…
![Fixed –Lookup value plugintypeexportkey [Guid] is not resolvable – Solution Import error (Dynamics 365 / Dataverse)](https://nishantrana.me/wp-content/uploads/2025/09/pexels-photo-4482033.jpeg?w=1200)
Fixed –Lookup value plugintypeexportkey [Guid] is not resolvable – Solution Import error (Dynamics 365 / Dataverse)
Recently, we faced an interesting import failure while moving a solution containing a Custom API. Solution “Temp Plugin Step Custom API Transfer”…

Using addNotification to Simulate Dynamic Tooltips (Dataverse / Dynamics 365)
When working with forms in Dynamics 365 / Power Apps model-driven apps, we often customize field labels based on context, using the…

Resolved – Environment Operation Error, while trying to copy environment (Dataverse / Power Platform)
Recently we created a new environment, and when we tried copying our production environment to it, it gave the below error. “Environment…

Clearing Dirty Fields in Forms to Avoid Unnecessary Save Prompts (Dynamics 365 / Dataverse)
In Dynamics 365 forms, we often run into situations where a record looks unsaved even though the user hasn’t made any manual…

Easily Identify Control Names When a Field Appears Multiple Times in Forms (Dynamics 365/ Dataverse)
Sometimes when we are writing JavaScript in Dynamics 365, we need the exact schema name of a field’s control so that we…

Finding Dirty / Unsaved Fields on the Form Using JavaScript / Browser Console (Dynamics 365 / Dataverse)
Sometimes while debugging forms in Dynamics 365, we need to know which fields have been modified but not yet saved. These are…
Fixed – Flow not getting triggered / incorrect callback registration record (Power Automate / Dataverse)
Recently, we faced an interesting issue, where we updated an existing flow in our Dev, basically we removed the Filter Rows condition…

Few handy SQL Queries (SQL4CDS) – Dataverse / Dynamics 365
Sharing some the queries we had used in our projects recently- 1) Get the list of table with audit enabled – 2)…

Fixed – Workflow must be in Published state (Dynamics 365 Field Service)
Recently, we got the following error while booking a resource in our schedule board. We earlier got the same error while trying…
Using AI to Build Tables and Fields in Dynamics 365 with PowerMakerAI’s AI Entity Builder & Visualizer (Tool Showcase)
Recently, I came across a very interesting tool called PowerMakerAI, developed by a fellow community member. I felt it’s worth sharing here…

Understanding Date and Time Field Behavior in Dataverse
When working with Date and Time fields in Dataverse, one of the most confusing parts is how values are stored in the…

When Do We Use the ActivityParty.AddressUsed Property for Emails in Power Automate (Dataverse)
When we automate emails in Dataverse using Power Automate, we deal with something called Activity Party. It manages the participants of an…

How to – Find Every Cloud Flow That References a Specific Column / Field (Dataverse/ Dynamics 365)
Sometimes we need to find all the flows where a specific Dataverse field is used — maybe before renaming it, removing it,…

Fixing Date Shift Issue After Changing DateOnly Field from Time Zone Independent to User Local – Dataverse / Dynamics 365
In our Dataverse environment, we had a field named custom_sampledate configured as a DateOnly type with User Local behavior. At some point,…

Workflow must be in Published state while deleting the Bookings / Work Orders (Dynamics 365 Field Service)Workflow must be in Published state
Recently we were cleaning some of the work orders and related records in one of our environments. However when trying to delete…

Fix – The FnO Integration solution install failed. HCMScheduling and HCMSchedulingAnchor solutions must be installed. See Field Service documentation for details (Dynamics 365 Field Service)
While trying to install Finance and Operations from Field Service Settings, we might encounter the following error. “The FnO Integration solution install…

Fixed – The following solution cannot be imported: Dynamics365SupplyChainExtended. Some dependencies are missing – HCM Common (Dynamics 365)
While trying to install the Dual Write Supply Chain Extended Solution, we got the following error. We had below apps already installed…

Resolve – This environment can’t be copied because your org (tenant) is over capacity. Request an extension (Dataverse / Dynamics 365)
When trying to overwrite another environment with a copy of Prod, the system prevented the operation due to exceeding tenant capacity limits.…

Using Form fill Assist Toolbar to streamline data entry in Power Apps
We tried the AI Form Filling Assistance feature in model-driven Power Apps and found it very helpful. One part that we liked…
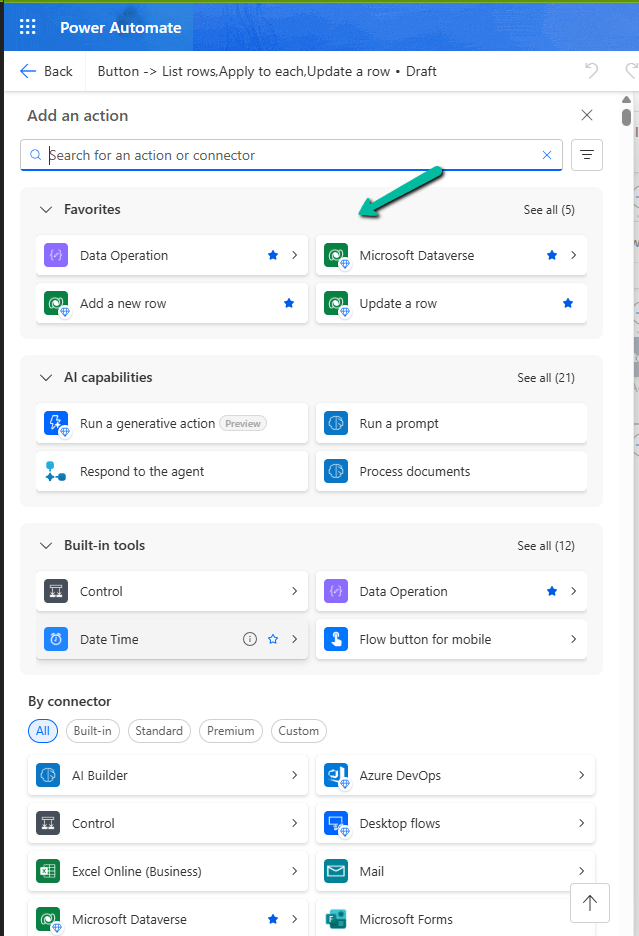
Favorite your Actions and Connectors for quick retrieval in Cloud Flows (Power Automate)
With this new update in Power Automate, it’s now easier for us to find and use the actions and connectors we need.…

How We Reclaimed Storage from the WebResourceBase Table in Dataverse
While reviewing our Dataverse environment’s storage usage, we noticed something surprising—over 13 GB of our file capacity was being consumed by the…

Step-by-Step: Deleting Work Orders (Dynamics 365 Field Service)
When working with historical or test data in Dynamics 365 Field Service, we often come across the need to clean up old…

Handling Unexpected Lookup Auto-Population in Quick Create Forms (Dynamics 365)
Recently, we had a requirement to track the Current and Previous contracts for a Contact in our Dataverse environment. To achieve this,…

Compare Plugin Steps and Images Across Environments in Dynamics 365
Recently, while testing in UAT, we ran into a plugin-related issue that wasn’t reproducible in Dev. After investigating, we discovered the root…

Update Business Process Flow Stage using Excel Import with Power Automate – Dataverse / Dynamics 365
In some business scenarios, we might need to update the Business Process Flow (BPF) stage of a record during an Excel import…

Fixed – The Default Unit is not a member of the specified Unit Group error in Dynamics 365 / Dataverse
Recently while trying to import the product records in our Dynamics 365 Sales, we got the below error – “The Default Unit…

Failed to delete View (View Name). Object dependencies exist, please review before deleting error in Dataverse
While trying to delete a custom public view (Test View) in Dataverse, we encountered the following error: “The SavedQuery(<GUID>) component cannot be…

Fixed – Field Service Time Entry functionality is not available. The installed version of Project Service Automation is not compatible with the installed version of Field Service. Please upgrade Project Service Automation to use Field Service Time Entry functionality.
Recently while trying to set Bookable Resource Booking record’s status as completed or trying to change Settings >> General >> Field Service…

Deleting Elastic Table Records in Dataverse Using Alternate Key in SSIS (KingswaySoft)
Had written a post on deleting the elastic table record earlier – How to Delete Elastic Table Records in Dataverse (SDK). We…

Step-by-Step: Configure Double Opt-In in Dynamics 365 Customer Insights – Journey (Real Time Marketing)
Double Opt-In is a two-step process for email subscription: This process ensures that the person who signed up wants to hear from…

Use Security Roles to manage access to views (preview)– Dataverse / Dynamics 365
Sometimes, we might create a new view for a table, and not everyone in our organization needs to see it — or…

Using gridContext.refreshRibbon() to Dynamically Show/Hide a Subgrid Ribbon Button – Dynamics 365 / Dataverse
In Dynamics 365 / Dataverse, sometimes we want to show or hide a ribbon button based on a form field value. But…

Using External Value property of Choice / Option Set Field for Integration – Dynamics 365 / Dataverse
When working with Choice fields (Option Sets) in Dataverse, we mostly use the label and internal numeric value. But there’s also a…

Fixed – Could not find an implementation of the query pattern for source type. ‘Where’ not found (LINQ, Dataverse)
While working on a LINQ query using early-bound classes in a Dynamics 365 plugin, we encountered a familiar error. “Could not find…

Updating Records Without Triggering Plugins – Bypassing Plugin Execution in Dynamics 365 / Dataverse using C#
Recently, we had to write a small utility—a console application—that would go and update a bunch of existing records in our Dynamics…
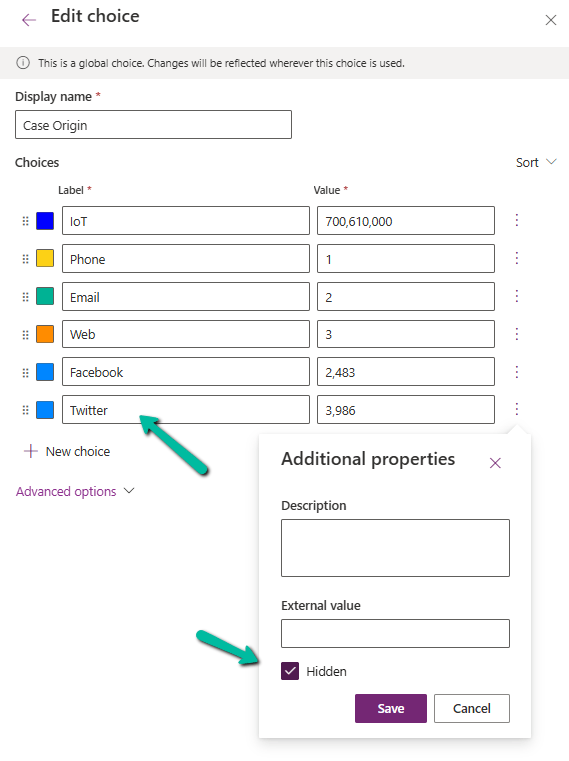
Understanding the Hidden Property for Choice Datatype in Dataverse / Dynamics 365
Dataverse provides a flexible way to manage data through choice (option set) fields. One of the newer enhancements is the Hidden property,…

Fixed – “Input String Was Not in a Correct Format / The specified domain does not exist or cannot be contacted” in Dataverse Plugin (Dynamics 365)
In one of our plugins, we encountered “The specified domain does not exist or cannot be contacted – System.FormatException: Input string was…

Visualize Data in a View with Copilot (Preview) – Dataverse / Dynamics 365
The copilot-powered data visualization in views feature, currently in preview, allows us to generate quick and insightful charts from Dataverse table views…


Unable to save. This form can’t be saved due to a custom setting error in Dynamics 365 / Dataverse.
Recently we got the below error while trying to assign the record. Unable to save. This form can’t be saved due to…

Querying / Filtering MultiSelect Choice / OptionSet Fields in Dataverse / Dynamics 365
MultiSelect OptionSet (Choices) fields in Dataverse provide a flexible way to store multiple values within a single field. However, querying and filtering…

How to Trigger a Plugin on a Calculated Column Change in Dataverse / Dynamics 365
In Microsoft Dataverse, calculated columns are a powerful way to derive values dynamically without the need for manual updates. However, one challenge…

The async operation was skipped because the org is in “Disable Background Processing” mode – Dataverse / Dynamics 365
While testing one scenario we observed one of the plugins (asynchronous) was not updating the record as expected. Checking the System Jobs,…
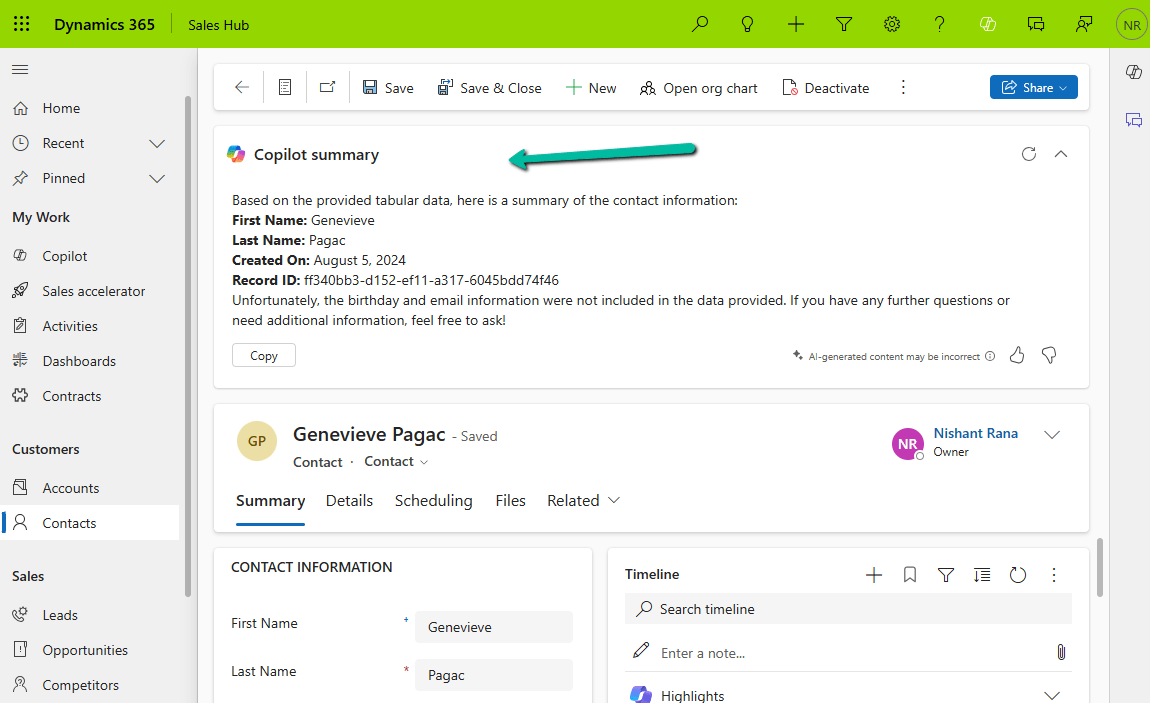
How to – Configure Copilot Row Summary for tables main form – Dataverse / Dynamics 365
We all know how frustrating it can be to dig through records just to find key details. With AI-generated record summaries, users…

Change Choice / OptionSet value’s text/label using JavaScript – Dataverse / Dynamics 365
In Dynamics 365, there are instances when we need to dynamically change the labels of option set fields based on specific conditions.…

“Solution manifest import: FAILURE: Solution patch with version already exists. Updating patch is not supported.” – Power Platform / Dynamics 365
While importing a patch (unmanaged) solution we got the below error – “Solution ‘abc_Configuration’ failed to import: Solution manifest import: FAILURE: Solution…

Cloud Flows are disabled or turned off after copying a Dataverse Environment ? (Power Automate / Power Platform)
Recently we copied our UAT environment to one of the testing environments. After copying, we saw that all the cloud flows were…

Reduce log storage: Delete audit logs – Power Platform Admin Center
Recently we had to copy our production environment to one of our sandbox environments for some analysis and testing. But before we…

Customizing Business Process Flows: Stage Validation Using JavaScript (Dynamics 365 / Dataverse)
Business Process Flows (BPF) in Dynamics 365 offer a structured way to guide users through a defined process. However, there are scenarios…

Check Out the Natural Language Grid and View search
The new Smart Grid Preview feature allows us to find, filter, and sort data with natural language. To enable it navigate to…

Fixed – MisMatchingOAuthClaims – One or more claims either missing or does not match with the open authentication access control policy error – OAuth Authentication for HTTP Request trigger (Power Automate)ismatch
Recently while trying to invoke the HTTP Request trigger, on passing the token we got the below error from the Postman Turned…

Configure OAuth authentication for HTTP Request Triggers (Specific users in my tenant) – Power Automate
Below is our final Power Automate Cloud Flow which uses the HTTP request trigger followed by Response action. The Allows Users =…

Fixed – Delete Plugin on Appointment not firing for operation on Recurring Appointment (Dataverse / Dynamics 365)
Recently we observed that our plugin registered on the Delete message of appointment on the PreValidation stage was not getting triggered when…
Configure Case Handling Time widget for the Case form – Dynamics 365 Customer Service
The Case Handling Time widget (preview) can be added to the Case Form, giving a focused way to track case resolution efficiency.…
Something went wrong. Please refresh the page and/or try again.