While working on a Dynamics 365 Field Service cleanup, we needed to delete a large number of Work Order records.
Before doing so, we wanted to understand exactly what would happen to the related records.
Not every relationship is configured for Cascade Delete. Many use RemoveLink, which doesn’t delete the child records. Instead, Dataverse updates the lookup field to null by removing the relationship.
This behavior is easy to overlook, but it can have unintended consequences. In our case, several integrations were listening for updates on child tables. Deleting a Work Order could therefore generate a large number of update events on related records, potentially triggering unnecessary integration processing.
To identify every table referencing msdyn_workorder along with its delete behavior, I wrote a small console application that retrieves the relationship metadata and exports it to a CSV file.
The application uses the RetrieveEntityRequest message to retrieve all one-to-many relationships for a Dataverse table along with their cascade settings.
static void Main(string[] args)
{
Console.WriteLine("Connecting...");
string connectionString =
ConfigurationManager.AppSettings["ConnectionString"];
var service = new ServiceClient(connectionString);
if (!service.IsReady)
{
Console.WriteLine("Connection Failed");
Console.WriteLine(service.LastError);
Console.ReadLine();
return;
}
Console.WriteLine("Connected Successfully");
var request = new RetrieveEntityRequest
{
LogicalName = "msdyn_workorder",
EntityFilters = EntityFilters.Relationships
};
var response =
(RetrieveEntityResponse)service.Execute(request);
var relationships = new List<RelationshipInfo>();
foreach (var relationship in response.EntityMetadata.OneToManyRelationships)
{
relationships.Add(new RelationshipInfo
{
SchemaName = relationship.SchemaName,
ParentTable = relationship.ReferencedEntity,
ChildTable = relationship.ReferencingEntity,
LookupAttribute = relationship.ReferencingAttribute,
DeleteCascade = relationship.CascadeConfiguration.Delete.ToString(),
AssignCascade = relationship.CascadeConfiguration.Assign.ToString(),
ShareCascade = relationship.CascadeConfiguration.Share.ToString(),
ReparentCascade = relationship.CascadeConfiguration.Reparent.ToString()
});
}
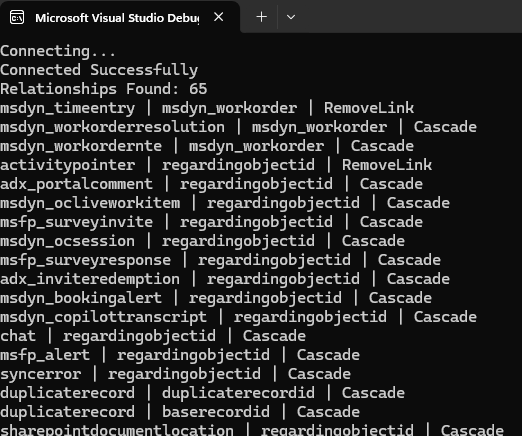
Console.WriteLine($"Relationships Found: {relationships.Count}");
foreach (var relationship in relationships)
{
Console.WriteLine(
$"{relationship.ChildTable} | " +
$"{relationship.LookupAttribute} | " +
$"{relationship.DeleteCascade}");
}
using (var writer = new StreamWriter("WorkOrderRelationships.csv"))
using (var csv = new CsvWriter(writer, CultureInfo.InvariantCulture))
{
csv.WriteRecords(relationships);
}
Console.WriteLine("CSV exported successfully.");
}
RelationshipInfo Class
public class RelationshipInfo
{
    public string SchemaName { get; set; }
    public string ParentTable { get; set; }
    public string ChildTable { get; set; }
    public string LookupAttribute { get; set; }
    public string DeleteCascade { get; set; }
    public string AssignCascade { get; set; }
    public string ShareCascade { get; set; }
    public string ReparentCascade { get; set; }
}
The output :
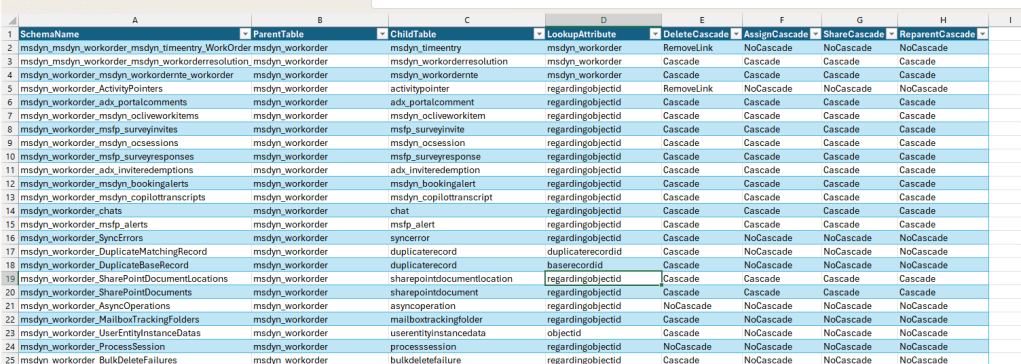
Why is this useful?
This utility can be useful when we need to:
- Review cascade behavior before performing bulk deletes.
- Understand which child tables will be deleted, updated, or left unchanged.
- Identify RemoveLink relationships that generate automatic update events on child records.
- Validate plugin and integration behavior before data cleanup activities.
- Export relationship metadata for documentation or analysis.
The code works for any Dataverse table. Simply replace:
LogicalName = “msdyn_workorder”
with the logical name of the table you want to analyze.
In our case, this quick analysis helped us identify child tables that would receive automatic updates due to RemoveLink relationships, allowing us to ensure those updates did not unnecessarily trigger downstream integrations during the cleanup process.
Hope it helps..