Why SQL4CDS Record Counts May Not Match Advanced Find for Date Filters (Dataverse / Dynamics 365)


While validating some Dynamics 365 Field Service data recently, we came across an interesting scenario where SQL4CDS and Advanced Find returned different record counts even though the date filters appeared to be identical.

At first glance it was surprising to see different record counts being returned despite using what appeared to be the same date range. After investigating further, we found that the difference was related to time zone handling and the behavior of User Local date fields.

In this post, we’ll walk through the issue, explain why it happens, and show how to get matching results between Advanced Find and SQL4CDS.

The Scenario

We had a user in Auckland, New Zealand running the following Advanced Find query against Work Orders.
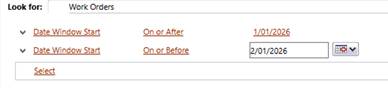
Date Window Start

  • On or After 01/01/2026
  • On or Before 02/01/2026

Advanced Find returned:

5,755 records

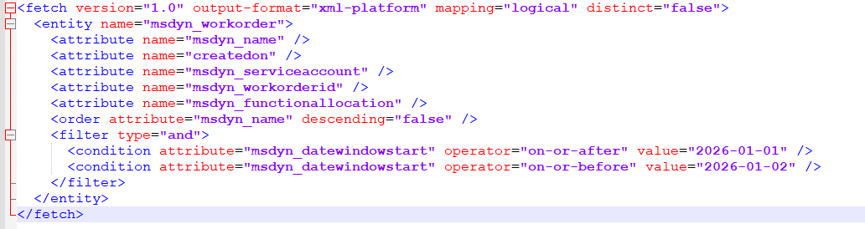
The generated FetchXML looked like this:


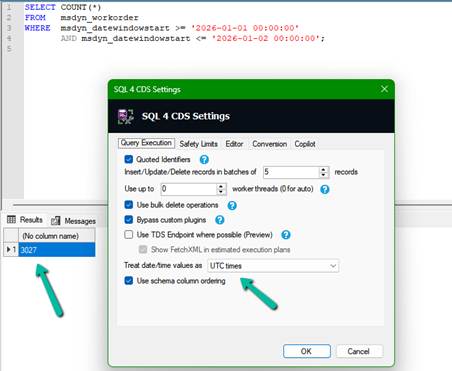
To validate the result, we ran the following query in SQL4CDS:

SELECT COUNT(*)
FROM msdyn_workorder
WHERE msdyn_datewindowstart >= ‘2026-01-01 00:00:00’
  AND msdyn_datewindowstart <= ‘2026-01-02 00:00:00’;

The results were unexpected.

Query MethodTime Zone UsedResult
Advanced Find (Auckland User)Auckland (NZDT)5,755
SQL4CDSUTC Mode3,027
SQL4CDSLocal Mode (India)3,026

At this point, it was clear that Advanced Find and SQL4CDS were evaluating different date boundaries, even though the filters appeared very similar. The next step was to understand why.

Understanding the Date Window Start Field

The key detail was the configuration of the Date Window Start field.

The Date Window Start field is configured as a Date Only field with User Local behavior.

Although users only see a date value, Dataverse stores an underlying UTC datetime value and performs time zone conversion based on the user’s personal settings.

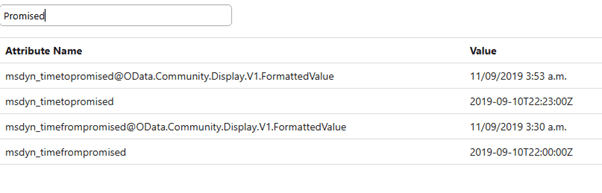
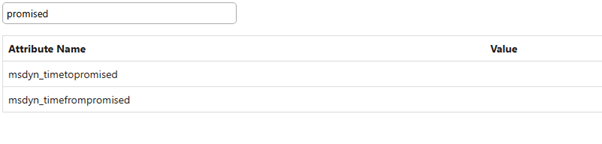
To better understand what was happening, we queried some of the underlying values directly.

SELECT msdyn_workorderid,
       msdyn_datewindowstart
FROM msdyn_workorder
WHERE msdyn_datewindowstart >= ‘2026-01-01 00:00:00’
  AND msdyn_datewindowstart <= ‘2026-01-02 00:00:00’;

When running SQL4CDS in UTC mode, many records had values such as:

2026-01-01 11:00:00

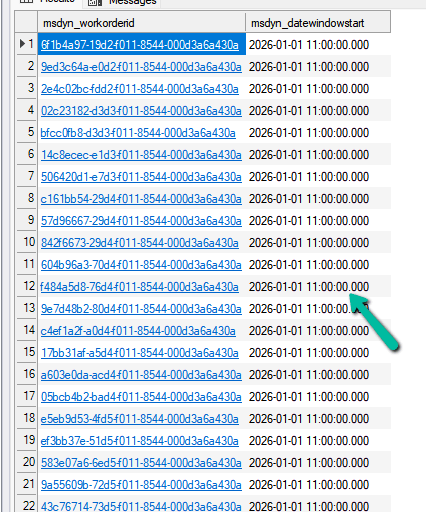
This initially looked unusual because users only see a date value in the application.

However, the explanation becomes clear when we consider the Auckland user’s time zone.

In January, Auckland operates on New Zealand Daylight Time (NZDT), which is UTC+13.

For a User Local Date Only field, Dataverse converts the user’s local date into UTC before storing it.

Date Seen by Auckland UserStored UTC Value
01-Jan-202631-Dec-2025 11:00 UTC
02-Jan-202601-Jan-2026 11:00 UTC
03-Jan-202602-Jan-2026 11:00 UTC

This explains why so many records appear with a value of 11:00 UTC when viewed in SQL4CDS running in UTC mode.

Why Advanced Find Returned More Records

When the Auckland user enters:

01/01/2026
to
02/01/2026

Advanced Find interprets those dates using the user’s personal time zone.

The actual UTC boundaries become:

>= 2025-12-31 11:00:00 UTC
<  2026-01-02 11:00:00 UTC

This represents two complete calendar days for the Auckland user.

Our original SQL4CDS query was searching a different range entirely:

>= 2026-01-01 00:00:00 UTC
<= 2026-01-02 00:00:00 UTC

Although the dates appear similar, the actual UTC boundaries are very different.

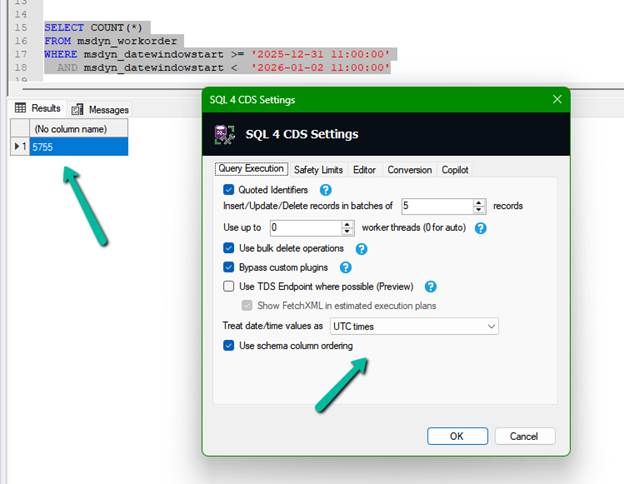
Finding the Correct SQL4CDS Query in UTC Mode

To reproduce the Advanced Find results, we converted the Auckland user’s date range into UTC and updated the SQL4CDS query accordingly.

SELECT COUNT(*)
FROM msdyn_workorder
WHERE msdyn_datewindowstart >= ‘2025-12-31 11:00:00’
  AND msdyn_datewindowstart <  ‘2026-01-02 11:00:00’;

This returned:

5,755 records

which matched Advanced Find exactly.

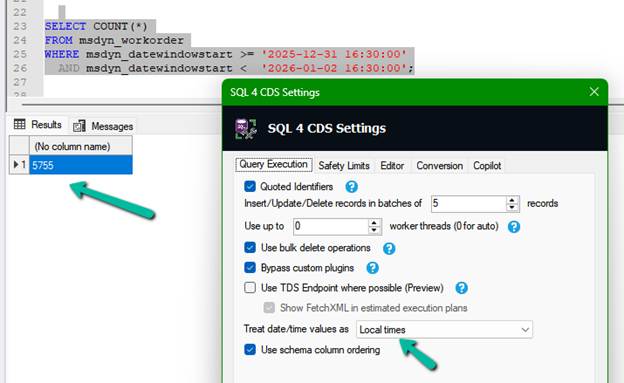
What If SQL4CDS Is Running in Local Mode?

The example above used SQL4CDS running in UTC mode. However, SQL4CDS can also be configured to use Local Time mode.

In our scenario, SQL4CDS was running on a machine configured for India Standard Time (IST), which is UTC+5:30.

To match the Advanced Find results in Local Mode, we need to convert the Auckland UTC boundaries into the local time zone used by SQL4CDS.

Earlier we determined that the Auckland user’s date range:

01-Jan-2026 to 02-Jan-2026

corresponds to the following UTC boundaries:

31-Dec-2025 11:00 UTC
to
02-Jan-2026 11:00 UTC

When SQL4CDS is running in Local Mode on an India machine, those UTC values need to be converted to IST.

UTC BoundaryIST Boundary
31-Dec-2025 11:00 UTC31-Dec-2025 16:30 IST
02-Jan-2026 11:00 UTC02-Jan-2026 16:30 IST

The equivalent SQL4CDS query becomes:

SELECT COUNT(*)
FROM msdyn_workorder
WHERE msdyn_datewindowstart >= ‘2025-12-31 16:30:00’
  AND msdyn_datewindowstart <  ‘2026-01-02 16:30:00’;

This query also returned:

5,755 records

matching Advanced Find exactly.

The results can now be summarized as follows:

Validation MethodQuery BoundaryResult
Advanced Find (Auckland User)User Time Zone5,755
SQL4CDS UTC Mode31-Dec-2025 11:00 UTC → 02-Jan-2026 11:00 UTC5,755
SQL4CDS Local Mode (India)31-Dec-2025 16:30 IST → 02-Jan-2026 16:30 IST5,755

References

For a deeper understanding of how SQL4CDS handles date and time values, I highly recommend Mark Carrington’s article:

https://markcarrington.dev/2021/05/21/date-time-handling-in-sql-4-cds

This article explains how SQL4CDS interprets date and time values in both UTC and Local Time modes and was a useful reference while investigating this scenario.

Key Takeaways

The investigation highlighted that there may be three different time zones involved when validating results:

  • The Dataverse user’s personal time zone used by Advanced Find.
  • The SQL4CDS Local Time setting.
  • UTC when SQL4CDS is configured to use UTC mode.

Even when the same date values are entered, the actual UTC range being queried may be different.

For the most reliable comparison:

  1. Identify the time zone of the user who ran Advanced Find.
  2. Convert the date boundaries to UTC.
  3. Run SQL4CDS in UTC mode.
  4. Use explicit UTC values in your query.

We also recommend using an exclusive upper boundary:

WHERE Field >= StartBoundaryUTC
  AND Field < EndBoundaryUTC

instead of:

WHERE Field <= EndOfDay

This avoids potential issues with milliseconds and provides more predictable results.

SQL4CDS can match Advanced Find in either UTC Mode or Local Mode. The important requirement is that the date boundaries represent the same moment in time. We generally prefer UTC Mode because the query behaves consistently regardless of the machine or user executing it.

Hope it helps..

Advertisements

Unable to Delete Work Order Due to “The Time To Promised Must Be Later Than The Time From Promised” exception – Dynamics 365 Field Service


While attempting to delete a historical Dynamics 365 Field Service Work Order, we encountered the following error:

Exception Message: The time to promised must be later than the time from promised.

ErrorCode: -2147220891

HexErrorCode: 0x80040265

Error Details: {“errorCode”:2147746405,”message”:”The time to promised must be later than the time from promised.”,”code”:2147746405,”raw”:”{\”_errorCode\”:2147746405,\”_errorFault\”:{\”_responseXml\”:null,\”_errorCode\”:2147746405,\”_innerFault\”:{\”_responseXml\”:null,\”_errorCode\”:0,\”_innerFault\”:null,\”_callStack\”:null,\”_responseText\”:null,\”_annotations\”:null,\”_hasCustomerInfo\”:false,\”_messages\”:[\”The time to promised must be later than the time from promised.\”]},\”_callStack\”:null,\”_responseText\”:\”{\\\”error\\\”:{\\\”code\\\”:\\\”0x80040265\\\”,\\\”message\\\”:\\\”The time to promised must be later than the time from promised.\\\”,\\\”@Microsoft.PowerApps.CDS.ErrorDetails.ApiExceptionSourceKey\\\”:\\\”Plugin/Microsoft.Dynamics.FieldService.FieldServicePlugin\\\”,\\\”@Microsoft.PowerApps.CDS.ErrorDetails.ApiStepKey\\\”:\\\”919f17c2-2931-4b27-b6b2-daaf91aaaaf8\\\”,\\\”@Microsoft.PowerApps.CDS.ErrorDetails.ApiDepthKey\\\”:\\\”1\\\”,\\\”@Microsoft.PowerApps.CDS.ErrorDetails.ApiActivityIdKey\\\”:\\\”1642f2af-356e-45c3-b971-42b11e9e91d9\\\”,\\\”@Microsoft.PowerApps.CDS.ErrorDetails.ApiPluginSolutionNameKey\\\”:\\\”

At first, the error suggested that the Work Order contained invalid promise dates. We reviewed the values stored on the record and found that Time To Promised was already later than Time From Promised.

Since the values appeared valid, we attempted to clear both fields using SQL 4 CDS:

The update completed successfully and both fields were set to NULL.

However, deleting the Work Order still resulted in the same error.

Changing the Work Order Status to Cancelled also didn’t help.

After further testing, we changed the Record Status from Active to Inactive. Once the record was inactive, the Work Order could be deleted successfully.

Based on the plugin trace, deleting the Work Order triggered an internal update before the delete operation was executed. It appears that when the Work Order was Active, additional Field Service validations were performed, resulting in the promised date error even after the fields were cleared.

After changing the record to Inactive, the delete operation likely followed a different validation path, allowing the Work Order to be deleted successfully.

Hope it helps..

Advertisements

Using RetrieveDependenciesForDeleteRequest to find and delete hidden dependencies (Dataverse/ Dynamics 365)


Please refer to the post below, which provides a clear explanation of how RetrieveDependenciesForDeleteRequest works and how it can be used to identify dependencies.

Troubleshooting Hidden Dependency Errors in Dynamics 365 and Dataverse


Recently, while cleaning up some old customizations in Dynamics 365, we came across an interesting dependency issue that was not immediately obvious from the user interface. What initially looked like a simple Business Process Flow deletion turned into a deeper investigation into how Dataverse manages published dependencies internally.

While trying to delete a BPF, Dataverse returned the following error: – Failed to delete (). Object dependencies exist, please review before deleting.

Normally, the first step in this situation is to use the built-in dependency viewer. However, in this case, the dependency screen itself was not particularly helpful. Even though the platform clearly stated that dependencies existed, the dependency dialog was not showing any actual records / components blocking the deletion.

To investigate further, we opened the browser developer tools and inspected the network response generated during the delete operation. The response payload contained much more detail than what was shown in the UI, including the GUID of the component and information indicating that dependencies still existed behind the scenes.

The Entity(99980477-1249-447b-8514-6d11fe6f1b1e) component cannot be deleted because it is referenced by 7 other components.

{“error”:{“code”:”0x8004f01f”,”message”:”The Entity(99980477-1249-447b-8514-6d11fe6f1b1e) component cannot be deleted because it is referenced by 7 other components. For a list of referenced components, use the RetrieveDependenciesForDeleteRequest.”}}

–changesetresponse_aa58f311-830f-4c7f-af82-f21732502a1e–

–batchresponse_26fe11bd-bb7c-4cef-ad4b-91121ac828cf—

With the component GUID available, we switched to SQL 4 CDS to query the dependency table directly. The following query was used:

SELECT *

FROM dependency

WHERE requiredcomponentobjectid = ‘99980477-1249-447b-8514-6d11fe6f1b1e’

The results immediately started revealing useful information. One of the most important columns in the results was:

dependencytype = 2, dependencytypename = Published

This turned out to be the key detail. A dependency type of Published means the reference is actively present in the environment and is currently preventing deletion of the component.

The dependency records also showed the following values:

dependentcomponenttype = 29, dependentcomponenttypename = Workflow

That told us the blocking component was actually a workflow. To identify the workflow names, we queried the workflow table directly using the workflow IDs returned by the dependency query, which took us to the below Workflow. When we opened this workflow, we found that it still contained a step creating or referencing the process we were attempting to remove.

We removed the workflow referencing the process, published the changes, and then retried the deletion. Once the workflow dependency was removed, the process was deleted successfully without any further errors.

This was a useful reminder that the dependency viewer in Dynamics 365 and Dataverse does not always surface every dependency clearly, especially with older workflows and process-related customizations. In these situations, SQL 4 CDS and direct dependency table queries can be extremely valuable for identifying hidden references.

Hope this helps..

Advertisements

Hidden Required Fields Causing “Please ensure all required fields are filled out” Error While Disqualifying a Lead in Dynamics 365 / Dataverse


While working on a Lead Disqualification scenario in Dynamics 365, we ran into a strange issue.

When trying to Disqualify a Lead, Dynamics 365 was showing the generic error message:

“Please ensure all required fields are filled out and have valid info.”

Even more confusing, the form itself was not showing any missing required fields.

This is one of those classic “ghost validation” problems in Dynamics 365 where fields are being marked as required dynamically through JavaScript or Business Rules, even though they are not visible on the form. The message was generic and did not indicate which field was causing the validation failure.

Since the form was not highlighting any required fields, we suspected that some fields were being set as required dynamically in the background. To identify them, we executed the following JavaScript in the browser console.

(function () {
    var missingFields = [];
    var attributes = Xrm.Page.data.entity.attributes.get();
    attributes.forEach(function (attribute) {
        var requiredLevel = attribute.getRequiredLevel();
        var value = attribute.getValue();
        var isEmpty =
            value === null ||
            value === "" ||
            (Array.isArray(value) && value.length === 0);
        if (requiredLevel === "required" && isEmpty) {
            missingFields.push(attribute.getName());
        }
    });
    if (missingFields.length) {
        alert("Missing required fields: " + missingFields.join(", "));
    } else {
        alert("No missing required fields found.");
    }

})();

The script immediately showed the fields that were marked as required internally:

Even though these fields were not visible on the form, they were still configured as required dynamically somewhere in the background.

To fix it – we found and updated the JavaScript method that was setting those fields as required. This is the cleaner and recommended approach.

The other quick fix though not recommended is to reset the fields to non-required on OnLoad/ OnSave/ OnChange.

formContext.getAttribute("custom_enquirytype")
    .setRequiredLevel("none");
formContext.getAttribute("custom_decisionmaker")
    .setRequiredLevel("none");

Sometimes these generic validation popups in Dynamics 365 can be a bit tricky because the actual field causing the issue is not even visible on the form.

Running a quick console script like the one above helped us immediately identify which hidden fields were still marked as required and blocking the Disqualify action

Hope it helps..

Advertisements

Preserving ‘modifiedon’ During Data Migration in Dynamics 365 / Dataverse


We were working on a data migration requirement where we needed to preserve system fields like created on and modified on.

For Created On, things are straightforward. We can use the overriddencreatedon field, something we had already explored earlier here:

https://nishantrana.me/2018/10/16/using-overriddencreatedon-or-record-created-on-field-to-update-created-on-field-in-dynamics-365/

In this post, we focus on preserving the modifiedon value.

We started with a simple approach. We registered plugins on Pre-Create and Pre-Update and set the modifiedon field directly on the Target entity. This worked well for normal create and update scenarios.

Everything was working fine… until we started migrating appointment records in the completed state. On checking the plugin execution, we observed the following sequence:

Create -> Update

The pre-update plugin although firing was not updating the value of the modified on field. This was because we have Set State message firing after Update which overriding the modifiedon set in the pre create / update plugin.

So we thought of implementing a plugin on the SetState / SetStateDynamicEntity message which will trigger when they are marked as completed instead of Update. However, in the SetStateDynamicEntity message, we do not receive a Target entity. Instead, we get an EntityMoniker (EntityReference) along with State and Status values. Because of this, we cannot directly set modifiedon in a Pre-Operation plugin for SetStateDynamicEntity.

To handle this scenario, we implemented a small workaround. We created an additional dummy field (for example, new_triggerupdate). Then we registered a plugin on Post Operation of SetStateDynamicEntity and performed a simple update on this dummy field. This update triggered the Update message again, which in turn executed our pre-update plugin where we were setting the modifiedon value.

So the final execution flow became:

Create -> Update -> SetStateDynamicEntity -> Update

And in this final Update, the modifiedon value was set correctly.

After the migration was completed, we disabled or removed these plugins to avoid impacting normal system behavior.

This approach helped us handle all scenarios including create, update, and activities being marked as completed during migration.

The plugin code –

 public void Execute(IServiceProvider serviceProvider)
        {
            IPluginExecutionContext context = (IPluginExecutionContext)serviceProvider.GetService(typeof(IPluginExecutionContext));
            ITracingService tracingService = (ITracingService)serviceProvider.GetService(typeof(ITracingService));
            IOrganizationServiceFactory factory = (IOrganizationServiceFactory)serviceProvider.GetService(typeof(IOrganizationServiceFactory));
            IOrganizationService service = factory.CreateOrganizationService(context.UserId);

            string message = context.MessageName;
            tracingService.Trace($"Message: {message}");         
            DateTime forcedDate = new DateTime(2022, 12, 25);

            // =========================
            // CREATE & UPDATE (Pre-Op)
            // =========================
            if (message == "Create" || message == "Update")
            {
                if (context.InputParameters.Contains("Target") && context.InputParameters["Target"] is Entity target)
                {
                    tracingService.Trace("Handling Create/Update");

                    // Direct override works ONLY in Pre-Operation
                    target["modifiedon"] = forcedDate;

                    tracingService.Trace("Modifiedon overridden in PreOperation.");
                }
            } 

            // =========================
            // SETSTATE (Post-Op)
            // =========================
            if (message == "SetState" || message == "SetStateDynamicEntity")
            {
                tracingService.Trace("Handling SetState");

                if (context.InputParameters.Contains("EntityMoniker"))
                {
                    EntityReference entityRef = (EntityReference)context.InputParameters["EntityMoniker"];

                    Entity updateEntity = new Entity(entityRef.LogicalName, entityRef.Id);

                    updateEntity["new_touchfield"] = forcedDate.ToLongDateString();

                    service.Update(updateEntity);

                    tracingService.Trace("Modifiedon updated via service.Update in SetState.");
                }
            }
        }

Hope it helps..

Advertisements