We were working on a data migration requirement where we needed to preserve system fields like created on and modified on.
For Created On, things are straightforward. We can use the overriddencreatedon field, something we had already explored earlier here:
In this post, we focus on preserving the modifiedon value.
We started with a simple approach. We registered plugins on Pre-Create and Pre-Update and set the modifiedon field directly on the Target entity. This worked well for normal create and update scenarios.
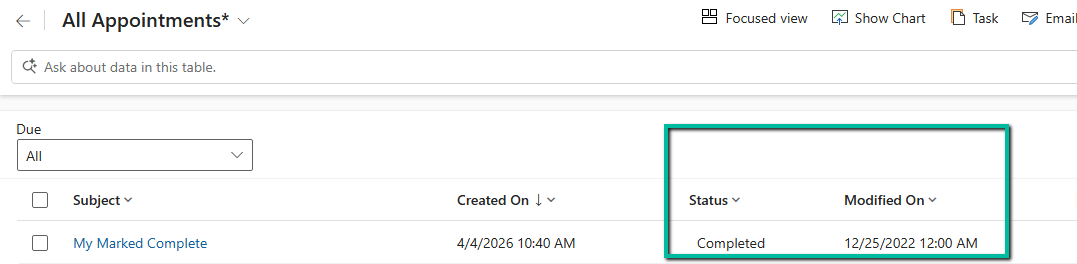
Everything was working fine… until we started migrating appointment records in the completed state. On checking the plugin execution, we observed the following sequence:
Create -> Update
The pre-update plugin although firing was not updating the value of the modified on field. This was because we have Set State message firing after Update which overriding the modifiedon set in the pre create / update plugin.
So we thought of implementing a plugin on the SetState / SetStateDynamicEntity message which will trigger when they are marked as completed instead of Update. However, in the SetStateDynamicEntity message, we do not receive a Target entity. Instead, we get an EntityMoniker (EntityReference) along with State and Status values. Because of this, we cannot directly set modifiedon in a Pre-Operation plugin for SetStateDynamicEntity.
To handle this scenario, we implemented a small workaround. We created an additional dummy field (for example, new_triggerupdate). Then we registered a plugin on Post Operation of SetStateDynamicEntity and performed a simple update on this dummy field. This update triggered the Update message again, which in turn executed our pre-update plugin where we were setting the modifiedon value.
So the final execution flow became:
Create -> Update -> SetStateDynamicEntity -> Update
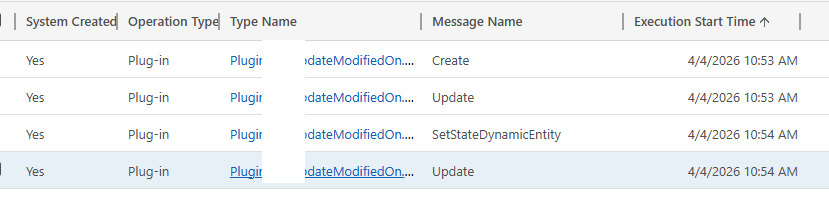
And in this final Update, the modifiedon value was set correctly.
After the migration was completed, we disabled or removed these plugins to avoid impacting normal system behavior.
This approach helped us handle all scenarios including create, update, and activities being marked as completed during migration.

The plugin code –
 public void Execute(IServiceProvider serviceProvider)
        {
            IPluginExecutionContext context = (IPluginExecutionContext)serviceProvider.GetService(typeof(IPluginExecutionContext));
            ITracingService tracingService = (ITracingService)serviceProvider.GetService(typeof(ITracingService));
            IOrganizationServiceFactory factory = (IOrganizationServiceFactory)serviceProvider.GetService(typeof(IOrganizationServiceFactory));
            IOrganizationService service = factory.CreateOrganizationService(context.UserId);

            string message = context.MessageName;
            tracingService.Trace($"Message: {message}");
            DateTime forcedDate = new DateTime(2022, 12, 25);

            // =========================
            // CREATE & UPDATE (Pre-Op)
            // =========================
            if (message == "Create" || message == "Update")
            {
                if (context.InputParameters.Contains("Target") && context.InputParameters["Target"] is Entity target)
                {
                    tracingService.Trace("Handling Create/Update");

                    // Direct override works ONLY in Pre-Operation
                    target["modifiedon"] = forcedDate;

                    tracingService.Trace("Modifiedon overridden in PreOperation.");
                }
            }

            // =========================
            // SETSTATE (Post-Op)
            // =========================
            if (message == "SetState" || message == "SetStateDynamicEntity")
            {
                tracingService.Trace("Handling SetState");

                if (context.InputParameters.Contains("EntityMoniker"))
                {
                    EntityReference entityRef = (EntityReference)context.InputParameters["EntityMoniker"];

                    Entity updateEntity = new Entity(entityRef.LogicalName, entityRef.Id);

                    updateEntity["new_touchfield"] = forcedDate.ToLongDateString();

                    service.Update(updateEntity);

                    tracingService.Trace("Modifiedon updated via service.Update in SetState.");
                }
            }
        }
Hope it helps..