SQL4CDS UTC Mode: Converting Advanced Find Date Filters to UTC Boundaries– A Quick Reference (Dataverse / Dynamics 365)


While validating record counts for a Work Orders view in Dynamics 365 Field Service, we ran into the same underlying issue covered in an earlier post – Why SQL4CDS Record Counts May Not Match Advanced Find for Date Filters.

This time, instead of just explaining the root cause again, we put together a quick reference table for converting an Advanced Find date range into the correct SQL4CDS UTC boundary, for any user time zone.

The Scenario

Advanced Find query on Work Orders, filtered on Created On:

  • On or After 01/01/2026
  • On or Before 05/01/2026

The user running this is in Auckland, New Zealand. (User’s Time Zone is Auckland)

We were running SQL4CDS in UTC mode. A query that simply matches the literal date strings against createdon will not reliably reproduce the Advanced Find count, because Advanced Find evaluates the date range in the user’s local time zone, while createdon is stored in UTC. The two only line up once the date range is converted to explicit UTC boundaries.

The Reliable Formula

StartBoundaryUTC = StartDate 00:00:00 (user’s local time) → converted to UTC

EndBoundaryUTC   = (EndDate + 1 day) 00:00:00 (user’s local time) → converted to UTC

WHERE createdon >= StartBoundaryUTC AND createdon < EndBoundaryUTC

Two points worth calling out:

  • The upper boundary always uses End Date + 1 day, with a strict <, not <=. This avoids any ambiguity around milliseconds and reliably captures the entire end date.
  • For time zones ahead of UTC (New Zealand, India), convert by subtracting the offset. For time zones behind UTC (Hawaii, US), convert by adding the offset.

Quick Reference Table

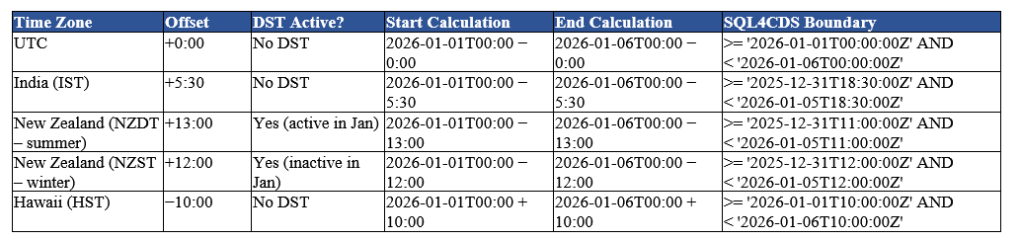
Boundary used below: 1/01/2026 to 5/01/2026 (end boundary = 6/01/2026 local, converted to UTC).

Time ZoneOffsetDST Active?Start CalculationEnd CalculationSQL4CDS Boundary
UTC+0:00No DST2026-01-01T00:00 − 0:002026-01-06T00:00 − 0:00>= ‘2026-01-01T00:00:00Z’ AND < ‘2026-01-06T00:00:00Z’
India (IST)+5:30No DST2026-01-01T00:00 − 5:302026-01-06T00:00 − 5:30>= ‘2025-12-31T18:30:00Z’ AND < ‘2026-01-05T18:30:00Z’
New Zealand (NZDT – summer)+13:00Yes (active in Jan)2026-01-01T00:00 − 13:002026-01-06T00:00 − 13:00>= ‘2025-12-31T11:00:00Z’ AND < ‘2026-01-05T11:00:00Z’
New Zealand (NZST – winter)+12:00Yes (inactive in Jan)2026-01-01T00:00 − 12:002026-01-06T00:00 − 12:00>= ‘2025-12-31T12:00:00Z’ AND < ‘2026-01-05T12:00:00Z’
Hawaii (HST)−10:00No DST2026-01-01T00:00 + 10:002026-01-06T00:00 + 10:00>= ‘2026-01-01T10:00:00Z’ AND < ‘2026-01-06T10:00:00Z’

Since January falls in NZ summer, the Auckland user’s boundary above uses NZDT (+13:00):

SELECT count(1)
FROM msdyn_workorder
WHERE createdon >= '2025-12-31T11:00:00Z'
AND createdon < '2026-01-05T11:00:00Z'

This reproduces the Advanced Find count for the same range.

NZ DST Transition Windows

New Zealand does not stay on a single offset year-round, so the correct value depends on the date range being queried, not the date the query is run.

PeriodOffset
Late Sep – early Apr (NZDT)UTC+13
Early Apr – late Sep (NZST)UTC+12

Confirm the exact transition dates for the specific year, as they shift slightly.

Rules of Thumb

RuleReason
End boundary = End Date + 1 day, use < not <=Captures the full end date without truncating time
Time zones ahead of UTC: subtract the offsetUTC = Local − Offset
Time zones behind UTC: add the offsetUTC = Local + Offset
Check DST for the query dates, not today’s dateThe same time zone can have two different offsets depending on the time of year

Key Takeaway

When running SQL4CDS in UTC mode, the reliable and repeatable approach is to convert the Advanced Find date range into explicit UTC boundaries using the local-time offset (accounting for DST where applicable), and query using >= / < against those boundaries.

Reference

For more background on how SQL4CDS interprets date and time values in UTC vs Local mode, see Mark Carrington’s article: Date/Time handling in SQL 4 CDS

Hope it helps..

Advertisements

Hide Expired Sessions in Event Registration Form using JavaScript (Dynamics 365 Customer Insights – Journeys)


One of our recent requirements was to ensure that users could no longer register for event sessions once the session had already ended. The goal was to improve the user experience by hiding expired sessions from the Event Registration form, rather than displaying sessions that were no longer available. Once a session’s end date and time had passed, it should be hidden from the UI so that new registrations could not be made through the form.

We used the standard ‘Default registration form with Sessions’ provided by Microsoft and added a small JavaScript customization. The script executes after the form loads by subscribing to the d365mkt-afterformload event. It reads the rendered session date and end time, creates a JavaScript Date object, compares it with the current browser time (all users are in the New Zealand time zone), and hides any expired sessions. If every session has expired, the entire Sessions section is also hidden.

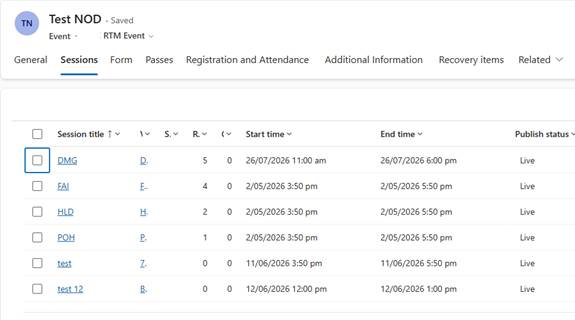
We can see the following sessions configured for the event.

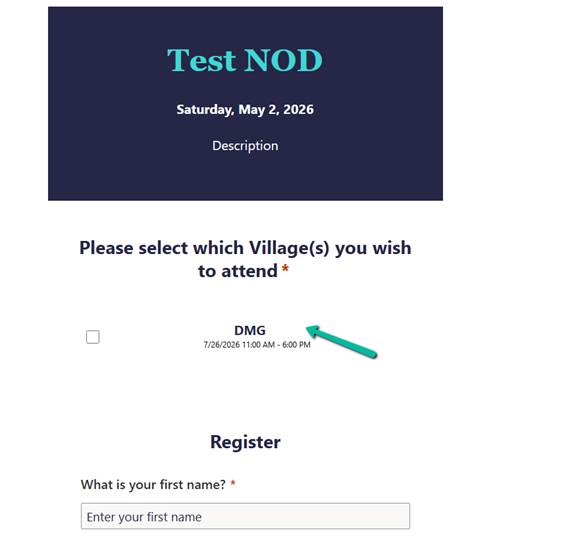
Below we can see the Event Registration form showing all the sessions before it is rendered for the end users.

And after our JavaScript that is registered on d365mkt-afterformload runs, it hides all the expired sessions except the active one.

JavaScript

 document.addEventListener("d365mkt-afterformload", function () {

    document.querySelectorAll(".eventSession").forEach(function (session) {
        debugger;
        const values = Array.from(
            session.querySelectorAll(".msdynmkt_personalization")
        ).map(x => x.textContent.trim());

        // [0] Session Title
        // [1] Session Date (M/D/YYYY)
        // [2] Start Time
        // [3] End Time
        // [4] Location/Room (optional)

        if (values.length < 4) {
            return;
        }

        const dateText = values[1];
        const endTimeText = values[3];

        const dateParts = dateText.split('/');

        if (dateParts.length !== 3) {
            return;
        }

        const month = parseInt(dateParts[0], 10) - 1;
        const day = parseInt(dateParts[1], 10);
        const year = parseInt(dateParts[2], 10);

        const timeMatch = endTimeText.match(/(\d+):(\d+)\s*(AM|PM)/i);

        if (!timeMatch) {
            return;
        }

        let hours = parseInt(timeMatch[1], 10);
        const minutes = parseInt(timeMatch[2], 10);
        const meridian = timeMatch[3].toUpperCase();

        if (meridian === "PM" && hours !== 12) {
            hours += 12;
        }

        if (meridian === "AM" && hours === 12) {
            hours = 0;
        }

        const sessionEndDateTime = new Date(
            year,
            month,
            day,
            hours,
            minutes,
            0
        );

        if (sessionEndDateTime <= new Date()) {
            session.style.display = "none";
        }
    });

    // Hide the entire Sessions block if all sessions are hidden
    const visibleSessions = Array.from(
        document.querySelectorAll(".eventSession")
    ).filter(s => s.style.display !== "none");

    if (visibleSessions.length === 0) {

        const sessionBlock =
            document.querySelector('[data-editorblocktype="Sessions"]') ||
            document.querySelector("fieldset.eventSessions")?.closest("div");

        if (sessionBlock) {
            sessionBlock.style.display = "none";
        }
    }
});

Things to Note

Reference

Set up sessions in Dynamics 365 Customer Insights.

Extend Customer Insights – Journeys marketing forms using code.

Hope it helps..

Advertisements

When Entity.Id Is Guid.Empty with QueryExpression.Distinct = True (Dataverse)


While optimising the performance of a Dataverse plugin, we noticed a QueryExpression using ColumnSet(true). The business logic only required a few attributes, so replacing ColumnSet(true) with a minimal ColumnSet looked like an easy performance improvement. The query also used Distinct = true, which we left unchanged because it had always been there and everything was working correctly.

The Original Query

query.ColumnSet = new ColumnSet(true);
query.Distinct = true;

We changed the query to retrieve only the attributes required by the business logic:

query.ColumnSet = new ColumnSet(
    "msdyn_systemstatus",
    "msdyn_datewindowstart",
    "custom_cancelledreason");
query.Distinct = true;

The optimisation looked perfectly valid. The query returned the expected records, but part of the plugin logic suddenly stopped working.

The Unexpected Bug

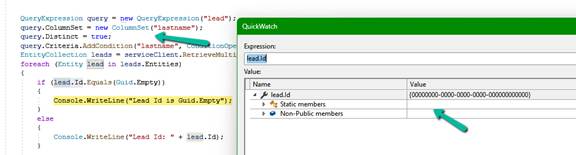
The plugin compared Work Orders using Entity.Id to determine whether a record already existed in a collection. During debugging, we discovered that every retrieved entity had Guid.Empty as its Id, causing the comparison logic to fail and duplicate records to be added.

Finding the Root Cause

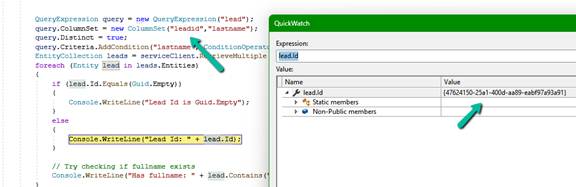
To isolate the problem, we reproduced the behaviour with a simple Lead query.

QueryExpression query = new QueryExpression("lead");
query.ColumnSet = new ColumnSet("lastname");
query.Distinct = true;

Once again, the record was returned successfully, but Entity.Id was Guid.Empty.

While reading the Microsoft documentation for QueryExpression.Distinct, we found the following remark:

“When the Distinct property is true, the results returned don’t include primary key values for each record because they represent an aggregation of all the distinct values.”

The Fix

Including the primary key in the ColumnSet resolved the issue.

query.ColumnSet = new ColumnSet("leadid", "lastname");
query.Distinct = true;

After this change, both Entity.Id and the leadid attribute were populated correctly.

One More Observation

While investigating the issue, we realised something else. The original query used ColumnSet(true) together with Distinct = true. Since ColumnSet(true) retrieves every readable attribute, including the primary key, every record is already unique because the primary key itself is unique. In that particular QueryExpression there were no LinkEntity joins or other scenarios that could naturally produce duplicate rows. That meant Distinct = true was not really providing any value. In fact, once we reviewed the query, removing Distinct = true was a cleaner solution than simply adding the primary key back into the ColumnSet.
This serves as a useful reminder that performance optimisation is not just about reducing the columns retrieved. It is also a good opportunity to question whether every part of the original query is still necessary.

Lessons Learned

• Replacing ColumnSet(true) with a minimal ColumnSet is a good optimisation.
• If a query uses Distinct = true and the code relies on Entity.Id, include the primary key in the ColumnSet.
• Review whether Distinct = true is actually required. In many QueryExpression scenarios, especially those without joins, it may be redundant.
• Small performance improvements can sometimes expose subtle behaviours that are easy to overlook.

Hope it helps..

Advertisements

Custom Form Submission Validation in Dynamics 365 Customer Insights – Journeys: Inside the Validation Pipeline and the “ms_captcha_solution” Error


While implementing custom form submission validation (server side validation) for Dynamics 365 Customer Insights – Journeys Real-Time Marketing forms, we came across the following error,

“Required params cannot be null or empty –
ms_captcha_solution
ms_captcha_type
ms_captcha_flow_id”

after enabling the data-validate-submission attribute on the form as shown below.


Setting this attribute to true caused the platform to invoke the msdynmkt_validateformsubmission Custom API, which ultimately resulted in the error.

After reviewing Microsoft’s documentation, plugin trace logs, and decompiling the Microsoft assemblies, we were able to understand exactly how the validation pipeline works.

When does this error occur?

• data-validate-submission=”true” is enabled.
• Microsoft CAPTCHA isn’t configured.
• No custom validation plugin overwrites the default validation response.

Understanding the Validation Pipeline

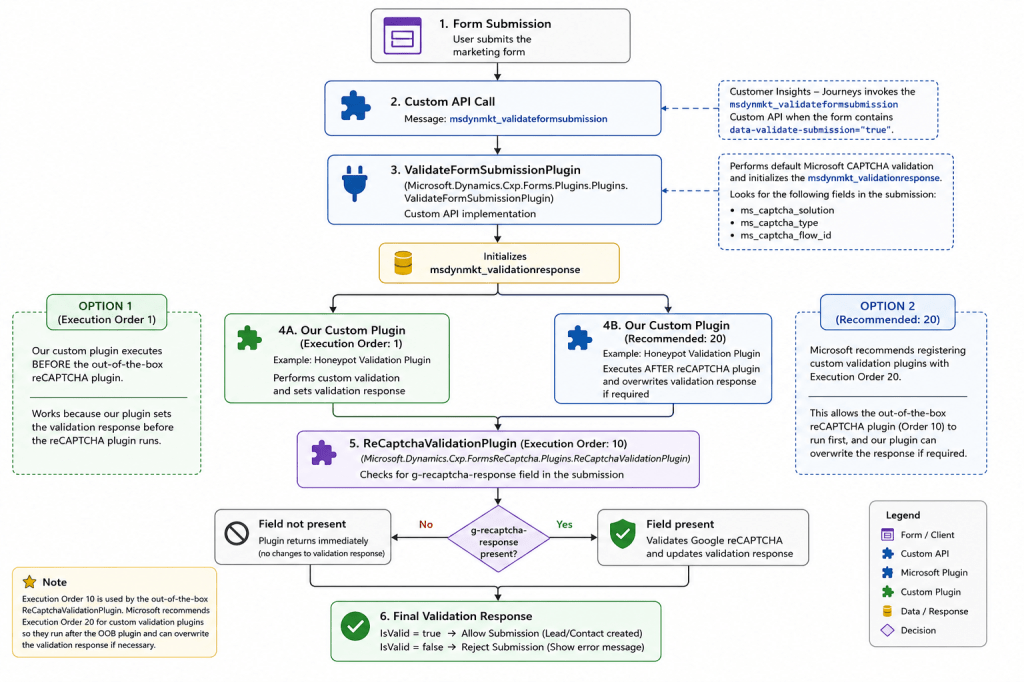
Customer Insights invokes the following Custom API:

msdynmkt_validateformsubmission

The msdynmkt_validateformsubmission Custom API is implemented by Microsoft’s Microsoft.Dynamics.Cxp.Forms.Plugins.Plugins.ValidateFormSubmissionPlugin, which performs the default CAPTCHA validation and initializes the msdynmkt_validationresponse.

We can then register our own plugin steps on the same message.

Microsoft recommends registering custom validation plugins with an Execution Order of 20, allowing them to execute after the out-of-the-box Microsoft.Dynamics.Cxp.FormsReCaptcha.Plugins.ReCaptchaValidationPlugin (Execution Order 10) and overwrite the validation response if required.

Check the flow below to get more details –

Why does the error occur?

The VerifyCaptchaChallenge service expects the following fields:

ms_captcha_solution
ms_captcha_type
ms_captcha_flow_id

If any are missing, it returns IsValid = false.

if (solution == null ||
    string.IsNullOrEmpty(captchaType) ||
    string.IsNullOrEmpty(flowId))
{
    return new VerifyCaptchaResponse
    {
        IsValid = false
    };
}

How our custom validation plugin resolves the issue

Our custom Honeypot custom plugin performs its own validation and overwrites the validation response.

SetValidationResponse(context, true, null);

// or

SetValidationResponse(context, false, “Form validation failed.”);

What about the ReCaptchaValidationPlugin?

The ReCaptchaValidationPlugin checks for g-recaptcha-response. If it isn’t present, it simply returns.

if (field == null)
{
    tracing.Trace("g-recaptcha-response field was not present in form submission");
    return;
}

Plugin Trace Logs

Our trace logs confirmed:

1. ValidateFormSubmissionPlugin executes.
2. Our Honeypot plugin overwrites the validation response.
3. ReCaptchaValidationPlugin executes afterwards and exits because g-recaptcha-response isn’t present without throwing any exception.

Conclusion

Although the error appears to be a configuration issue, it’s actually the expected behaviour of the default validation pipeline. The default implementation expects Microsoft’s CAPTCHA fields. If we’re implementing our own custom plugin for form submission validation, it should overwrite the validation response after performing its own server-side validation.

Get more details –

https://learn.microsoft.com/en-us/dynamics365/customer-insights/journeys/real-time-marketing-form-customize-submission-validation

https://www.ameyholden.com/articles/recaptcha-v3-cloudflare-turnstile-for-customer-insights-journeys-forms

Check the previous posts –

Honey Pot Validation (Server-side)

Hope it helps..

Advertisements

Why SQL4CDS Record Counts May Not Match Advanced Find for Date Filters (Dataverse / Dynamics 365)


While validating some Dynamics 365 Field Service data recently, we came across an interesting scenario where SQL4CDS and Advanced Find returned different record counts even though the date filters appeared to be identical.

At first glance it was surprising to see different record counts being returned despite using what appeared to be the same date range. After investigating further, we found that the difference was related to time zone handling and the behavior of User Local date fields.

In this post, we’ll walk through the issue, explain why it happens, and show how to get matching results between Advanced Find and SQL4CDS.

The Scenario

We had a user in Auckland, New Zealand running the following Advanced Find query against Work Orders.

Date Window Start

  • On or After 01/01/2026
  • On or Before 02/01/2026

Advanced Find returned:

5,755 records

The generated FetchXML looked like this:


To validate the result, we ran the following query in SQL4CDS:

SELECT COUNT(*)
FROM msdyn_workorder
WHERE msdyn_datewindowstart >= ‘2026-01-01 00:00:00’
  AND msdyn_datewindowstart <= ‘2026-01-02 00:00:00’;

The results were unexpected.

Query MethodTime Zone UsedResult
Advanced Find (Auckland User)Auckland (NZDT)5,755
SQL4CDSUTC Mode3,027
SQL4CDSLocal Mode (India)3,026

At this point, it was clear that Advanced Find and SQL4CDS were evaluating different date boundaries, even though the filters appeared very similar. The next step was to understand why.

Understanding the Date Window Start Field

The key detail was the configuration of the Date Window Start field.

The Date Window Start field is configured as a Date Only field with User Local behavior.

Although users only see a date value, Dataverse stores an underlying UTC datetime value and performs time zone conversion based on the user’s personal settings.

To better understand what was happening, we queried some of the underlying values directly.

SELECT msdyn_workorderid,
       msdyn_datewindowstart
FROM msdyn_workorder
WHERE msdyn_datewindowstart >= ‘2026-01-01 00:00:00’
  AND msdyn_datewindowstart <= ‘2026-01-02 00:00:00’;

When running SQL4CDS in UTC mode, many records had values such as:

2026-01-01 11:00:00

This initially looked unusual because users only see a date value in the application.

However, the explanation becomes clear when we consider the Auckland user’s time zone.

In January, Auckland operates on New Zealand Daylight Time (NZDT), which is UTC+13.

For a User Local Date Only field, Dataverse converts the user’s local date into UTC before storing it.

Date Seen by Auckland UserStored UTC Value
01-Jan-202631-Dec-2025 11:00 UTC
02-Jan-202601-Jan-2026 11:00 UTC
03-Jan-202602-Jan-2026 11:00 UTC

This explains why so many records appear with a value of 11:00 UTC when viewed in SQL4CDS running in UTC mode.

Why Advanced Find Returned More Records

When the Auckland user enters:

01/01/2026
to
02/01/2026

Advanced Find interprets those dates using the user’s personal time zone.

The actual UTC boundaries become:

>= 2025-12-31 11:00:00 UTC
<  2026-01-02 11:00:00 UTC

This represents two complete calendar days for the Auckland user.

Our original SQL4CDS query was searching a different range entirely:

>= 2026-01-01 00:00:00 UTC
<= 2026-01-02 00:00:00 UTC

Although the dates appear similar, the actual UTC boundaries are very different.

Finding the Correct SQL4CDS Query in UTC Mode

To reproduce the Advanced Find results, we converted the Auckland user’s date range into UTC and updated the SQL4CDS query accordingly.

SELECT COUNT(*)
FROM msdyn_workorder
WHERE msdyn_datewindowstart >= ‘2025-12-31 11:00:00’
  AND msdyn_datewindowstart <  ‘2026-01-02 11:00:00’;

This returned:

5,755 records

which matched Advanced Find exactly.

What If SQL4CDS Is Running in Local Mode?

The example above used SQL4CDS running in UTC mode. However, SQL4CDS can also be configured to use Local Time mode.

In our scenario, SQL4CDS was running on a machine configured for India Standard Time (IST), which is UTC+5:30.

To match the Advanced Find results in Local Mode, we need to convert the Auckland UTC boundaries into the local time zone used by SQL4CDS.

Earlier we determined that the Auckland user’s date range:

01-Jan-2026 to 02-Jan-2026

corresponds to the following UTC boundaries:

31-Dec-2025 11:00 UTC
to
02-Jan-2026 11:00 UTC

When SQL4CDS is running in Local Mode on an India machine, those UTC values need to be converted to IST.

UTC BoundaryIST Boundary
31-Dec-2025 11:00 UTC31-Dec-2025 16:30 IST
02-Jan-2026 11:00 UTC02-Jan-2026 16:30 IST

The equivalent SQL4CDS query becomes:

SELECT COUNT(*)
FROM msdyn_workorder
WHERE msdyn_datewindowstart >= ‘2025-12-31 16:30:00’
  AND msdyn_datewindowstart <  ‘2026-01-02 16:30:00’;

This query also returned:

5,755 records

matching Advanced Find exactly.

The results can now be summarized as follows:

Validation MethodQuery BoundaryResult
Advanced Find (Auckland User)User Time Zone5,755
SQL4CDS UTC Mode31-Dec-2025 11:00 UTC → 02-Jan-2026 11:00 UTC5,755
SQL4CDS Local Mode (India)31-Dec-2025 16:30 IST → 02-Jan-2026 16:30 IST5,755

References

For a deeper understanding of how SQL4CDS handles date and time values, I highly recommend Mark Carrington’s article:

https://markcarrington.dev/2021/05/21/date-time-handling-in-sql-4-cds

This article explains how SQL4CDS interprets date and time values in both UTC and Local Time modes and was a useful reference while investigating this scenario.

Key Takeaways

The investigation highlighted that there may be three different time zones involved when validating results:

  • The Dataverse user’s personal time zone used by Advanced Find.
  • The SQL4CDS Local Time setting.
  • UTC when SQL4CDS is configured to use UTC mode.

Even when the same date values are entered, the actual UTC range being queried may be different.

For the most reliable comparison:

  1. Identify the time zone of the user who ran Advanced Find.
  2. Convert the date boundaries to UTC.
  3. Run SQL4CDS in UTC mode.
  4. Use explicit UTC values in your query.

We also recommend using an exclusive upper boundary:

WHERE Field >= StartBoundaryUTC
  AND Field < EndBoundaryUTC

instead of:

WHERE Field <= EndOfDay

This avoids potential issues with milliseconds and provides more predictable results.

SQL4CDS can match Advanced Find in either UTC Mode or Local Mode. The important requirement is that the date boundaries represent the same moment in time. We generally prefer UTC Mode because the query behaves consistently regardless of the machine or user executing it.

Hope it helps..

Advertisements

How We Successfully Removed the Resco Woodford Managed Solution from Dynamics 365 Field Service


Recently, we needed to remove the legacy Resco MobileCRM (Woodford) managed solution from a Dynamics 365 Field Service environment.

Although the uninstall initially appeared straightforward, when we attempted to uninstall the Woodford solution, Dynamics 365 displayed a list of dependencies that needed to be addressed before.

The dependencies included references from model-driven apps, site maps, security roles, workflows, plug-in steps and managed solutions.

One of the first dependencies we identified was a set of Resco tables that were still included in a model-driven application. These included Mobile Project, Mobile Audit, Questionnaire, and Mobile Report. Removing these tables from the application eliminated the app-related dependencies.

The next set of dependencies came from site maps. The Mobile CRM navigation area was still present in multiple site maps and needed to be removed. Once the references were removed and the changes published, the related site map dependencies disappeared.

The dependency report also showed a dependency on the Resco MobileCRM Administrator security role. The role was being referenced from a form, and removing that reference resolved the dependency.

Another dependency involved the following plug-in step:

MobileCrm.Server.Plugins.Tracking.DisassociateTracking

Deleting the plug-in step removed the dependency.

We also found a legacy workflow named:

Push Notification - Schedule Change

After stopping and deleting the workflow, the dependency was removed.

At this point, most of the dependencies had been addressed, but the uninstall was still blocked by process and flow dependencies associated with Resco entities.

After further investigation, we found that these dependencies were originating from legacy geofencing functionality. Uninstalling the Geofence Alerts managed solution removed the remaining process and flow dependencies.

At this point, the dependency report showed no remaining blockers.

Despite the dependency report being clean, the uninstall continued to fail with the following error:

The uninstall operation will delete the base layer for the component ‘SdkMessageProcessingStep’. The operation cannot continue because there are other managed layers over the base layer.

The error referenced a plug-in step associated with a Resco entity. Since the dependency report was now clean, we investigated the component using the Solution Layers feature.

The layer information showed that Woodford was providing the base layer, while another managed solution named msdyn_FSMNotifications had installed a managed layer on top of that component.

This explained why Dataverse would not allow the Woodford base layer to be removed.

After uninstalling the dependent managed solution, the layer dependency was removed.

We then re-tried the Woodford uninstall, and this time it completed successfully.

One interesting observation was that the uninstall itself took approximately two hours to complete after it was started.

The key takeaway from this exercise is that a clean dependency report does not always mean a managed solution can be removed. If the uninstall fails with a managed layer error, reviewing the Solution Layers for the component referenced in the error message can quickly identify the actual blocking solution.

Hope it helps..

Advertisements