How to Enable Microsoft 365 Copilot in Model-Driven Apps


Microsoft 365 Copilot brings conversational AI directly into Model-Driven Apps, allowing users to ask natural language questions about Dataverse data, quickly locate records, and improve productivity without leaving the application.

In this post, we walk through the steps we follow to enable Microsoft 365 Copilot in a Model-Driven App, covering the tenant, environment, and application-level configuration required before the feature becomes available.
What We Need Before We Start

  • Microsoft 365 Administrator permissions for tenant-level Copilot settings.
  • Power Platform Administrator access to the target environment.
  • Dataverse Search enabled for the environment (Default or On).
  • Sufficient Dataverse database capacity — Microsoft 365 Copilot for Model-Driven Apps relies on Dataverse Search indexing, and turning it on can increase capacity consumption.
  • Appropriate licensing (covered in Step 4 below).

Step 1: Enable Dataverse Data in Microsoft 365 Copilot (Tenant Level)

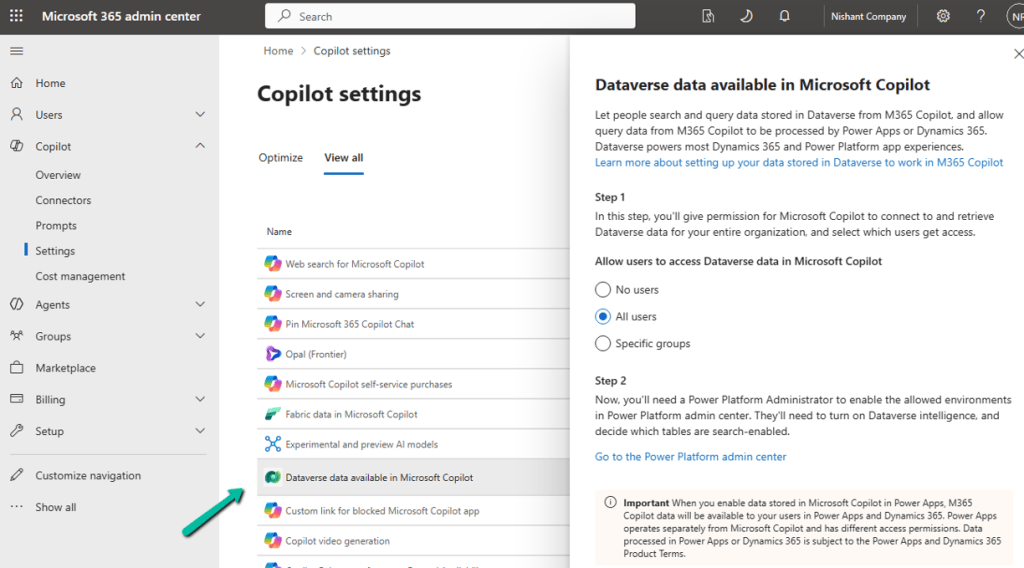
Sign in to the Microsoft 365 Admin Center → Copilot → Settings, and locate Dataverse data available in Microsoft 365 Copilot.

Turn it on and choose either All Users or Specific Groups, then Save.

This is a tenant-level setting; it must be enabled before users can access Dataverse data through Microsoft 365 Copilot.
Step 2: Enable Dataverse Search for the Environment

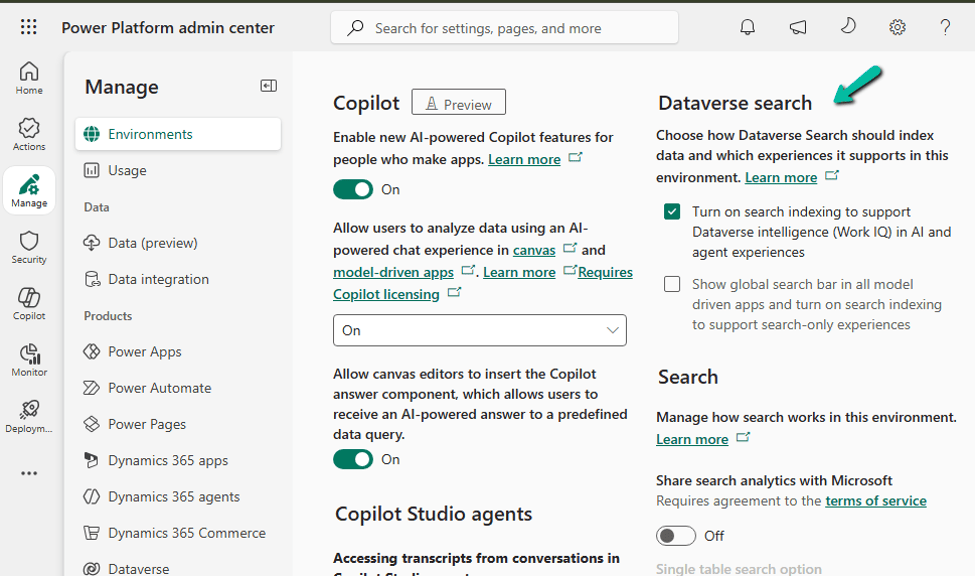
Go to Power Platform Admin Center → Environments → select the environment → Settings → Product → Features, and set Dataverse Search to On, then save.

Dataverse Search is what powers the indexing behind Copilot’s answers, so this has to be on before Copilot can ground its responses in your table data.
Step 3: Verify Dataverse Capacity

Since Microsoft 365 Copilot for Model-Driven Apps relies on Dataverse Search indexing, make sure the environment has enough Dataverse database capacity to support indexing, semantic search, and the Copilot queries themselves. Check this under Power Platform Admin Center → Licensing → Capacity add-on for the environment before rolling this out to a production environment with a large dataset.

Step 4: Verify Licensing

Licensing depends on where the app lives:

  • Power Apps (Custom Model-Driven Apps) — users need a Power Apps Premium license together with a Microsoft 365 Copilot license.
  • Dynamics 365 apps — users need a qualifying Dynamics 365 Enterprise or Premium license. A Microsoft 365 Copilot license is also required to unlock advanced Work IQ capabilities beyond standard Dataverse grounding.

Worth confirming this with your licensing/procurement team before you promise the feature to end users — a missing Microsoft 365 Copilot license is one of the most common reasons Copilot doesn’t show up for a user even after everything else is configured correctly.

Step 5: Enable Microsoft 365 Copilot for the Environment

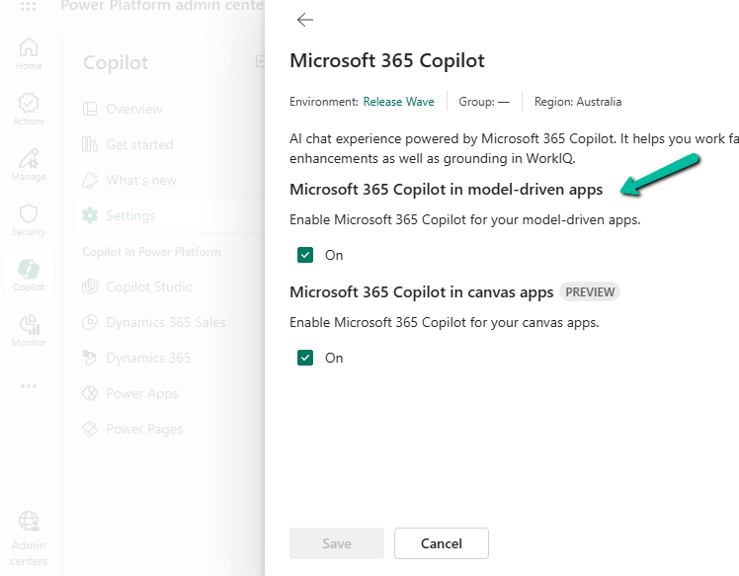
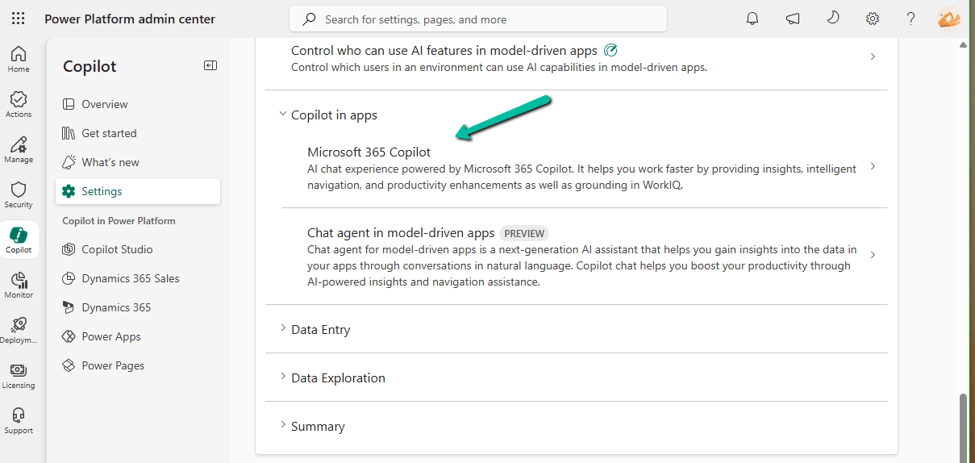
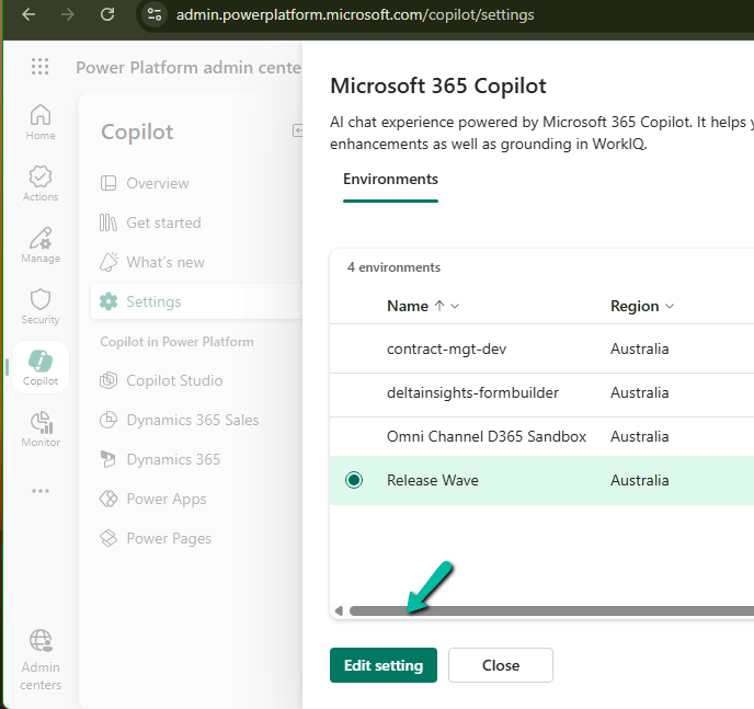
Go to Power Platform Admin Center → Copilot → Settings. Under Power Apps, expand Copilot in Apps, choose Microsoft 365 Copilot, select the environment (or environment group), select Edit Setting, turn it On, and Save.
Step 6: Enable It for the Model-Driven App

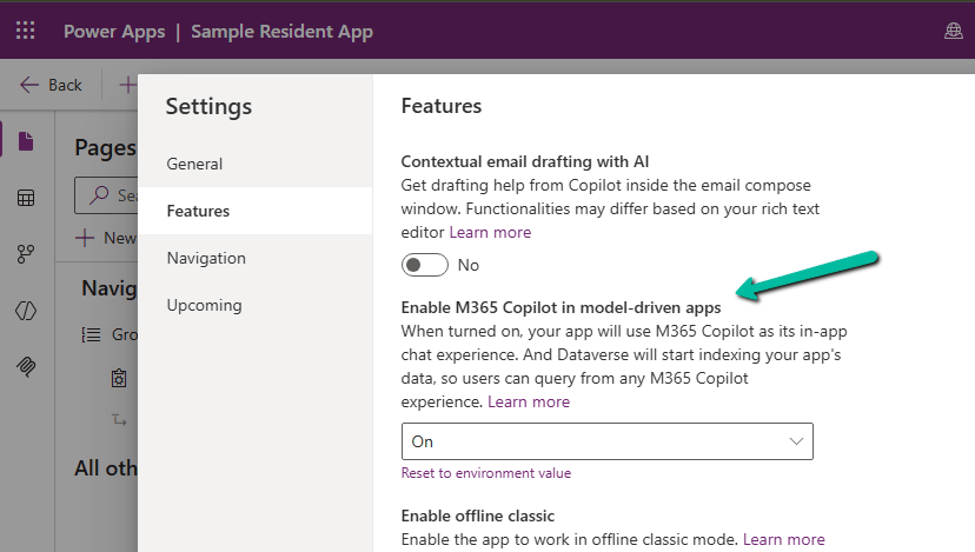
Open the app in the Power Apps Maker Portal → Settings → Features, set M365 Copilot in model-driven apps to On, then Save and Publish the app.
Enable It for All Model-Driven Apps in an Environment

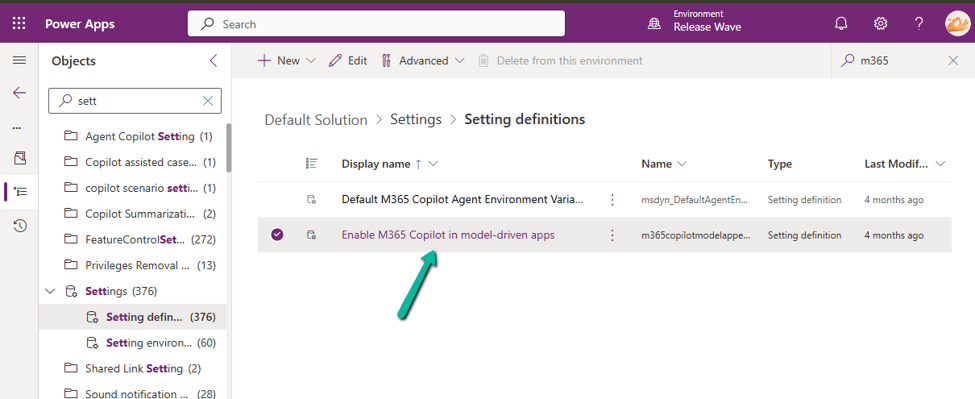
If you’d rather turn this on once instead of app by app, open the Default Solution → Objects → Settings, locate Enable M365 Copilot in model-driven apps, add the value if it doesn’t already exist, set it to 2, Save, and Publish the change.
What Users Will See

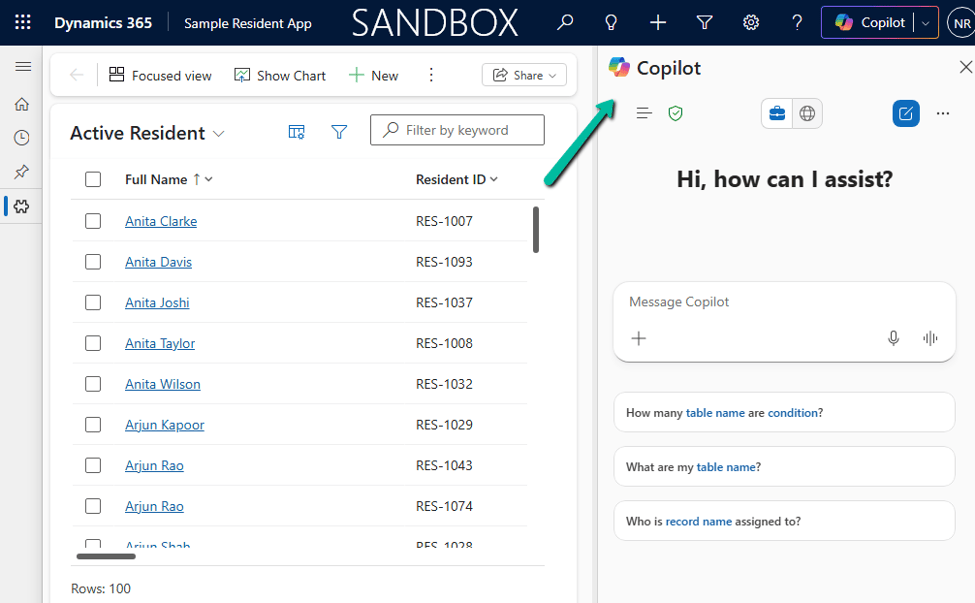
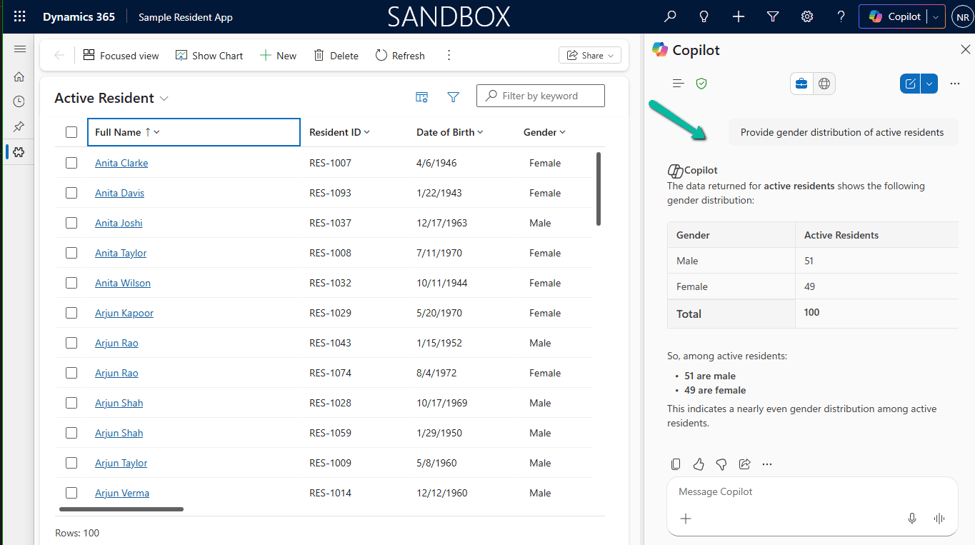
Once everything is configured, users can open Copilot → Chat from the top-right corner of the Model-Driven App and start asking natural language questions about Dataverse records.

The current experience is read-only by default: Copilot can find and summarize data, but it can’t make changes on the user’s behalf unless you’ve customized it with an agent. It’s also worth knowing that Microsoft 365 Copilot for Model-Driven Apps isn’t available in the Power Apps mobile app yet.
Microsoft 365 Copilot vs. Copilot Chat: What’s Changing?

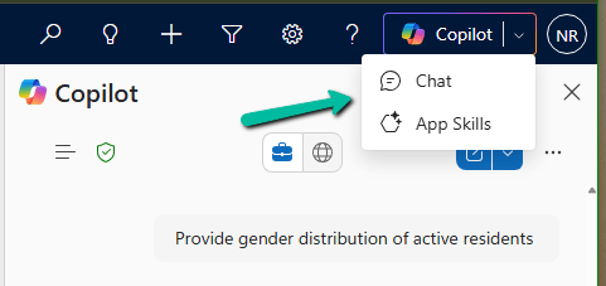
If you’ve previously enabled Copilot Chat in Model-Driven Apps, you’ll now see two options in the Copilot menu: Chat and App Skills. This is part of Microsoft’s transition to Microsoft 365 Copilot, which is becoming the standard AI experience across Power Apps and Dynamics 365.
AreaMicrosoft 365 Copilot (Chat)Copilot Chat (App Skills)
StatusRecommended, actively evolvingBeing deprecated
AvailabilityPower Apps and Dynamics 365Preview in Power Apps
Dataverse queriesYesYes
NavigationYesYes
Future directionMicrosoft’s strategic platformTransitioning out

Deprecation Timeline

Microsoft has announced that Copilot Chat in Model-Driven Apps, for Power Apps environments not enabled for Dynamics 365 apps, began its deprecation starting in January 2026. During the transition period, organizations can enable either one or both experiences while users migrate.

What Users Will See During the Transition

  • Chat opens Microsoft 365 Copilot.
  • App Skills opens the legacy Copilot Chat experience.
  • Both experiences can coexist during the transition.

Recommendation

For new implementations, enable Microsoft 365 Copilot rather than investing further in the legacy Copilot Chat experience. Since Microsoft is standardizing AI experiences across Power Apps and Dynamics 365 around Microsoft 365 Copilot, adopting it now saves you a migration later and gives users access to the latest Dataverse-grounded capabilities, including Work IQ where licensed.

Reference Links

Hope it helps..

Advertisements

Understanding the Hidden Property for Choice Datatype in Dataverse / Dynamics 365


Dataverse provides a flexible way to manage data through choice (option set) fields. One of the newer enhancements is the Hidden property, which allows administrators to hide specific choice values from selection while retaining them in the system.

To see it in action,

Navigate to Dataverse Table Designer in the Power Apps Maker Portal, and select the Choice (Option Set) field.

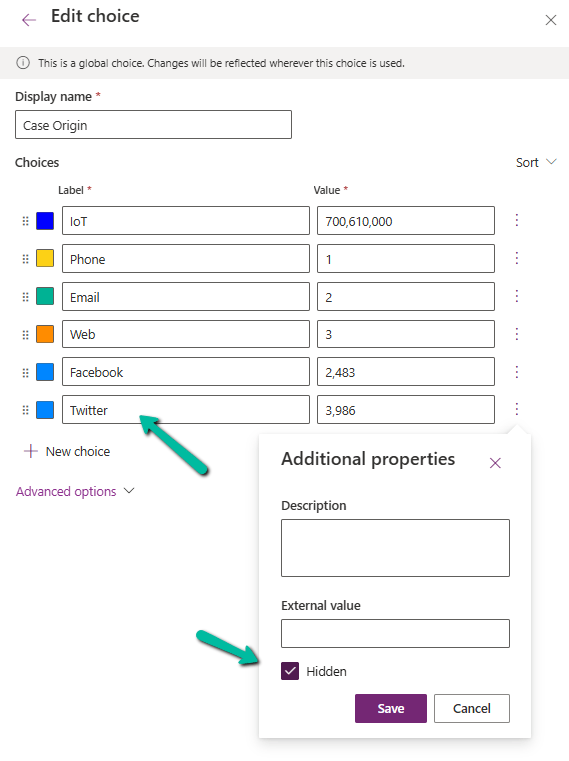
Here we have selected the Origin choice field of the Case table.

We have selected the Twitter choice value.

A screenshot of a computer

AI-generated content may be incorrect.

Click on a particular choice value and open Additional Properties, check the Hidden checkbox, and save and publish the changes.

A screenshot of a computer

AI-generated content may be incorrect.

After applying these settings,

  • Hidden choice values will not appear in dropdown lists when users create or update records.
A screenshot of a computer

AI-generated content may be incorrect.

Existing records with hidden values will still display them in forms and views.

A screenshot of a computer

AI-generated content may be incorrect.

We can see the option greyed out for the record having that existing hidden value.

A screenshot of a computer

AI-generated content may be incorrect.
  • Business rules and workflows can still reference hidden values.
  • The hidden choice remains in the metadata and can be retrieved using FetchXML, OData, or SDK queries.
  • Power Automate flows triggered on record updates will still recognize hidden values.

We can use this new feature for the deprecating values that should no longer be used but still need to exist in historical data. Also, we need to communicate changes to users to prevent confusion when certain values disappear from selection lists. And finally, we should consider data migration and cleanup if a value should never be used again.

Thus, the Hidden property for choice fields in Dataverse provides a powerful way for us to manage choice options dynamically without affecting existing records. By leveraging this feature, we can ensure a smoother transition when phasing out obsolete values while maintaining data integrity.

Hope it helps..
Advertisements

How to use the setIsValid Method in Dataverse / Dynamics 365


We can use the setIsValid method for validating field values in Model-driven apps. This method helps ensure that the data entered by users meets the required criteria before it’s processed or saved.

The setIsValid method is used to set the validity of a column’s value. It can mark a field as valid or invalid based on custom validation logic.

formContext.getAttribute(arg).setIsValid(bool, message);

bool: A Boolean value. Set to false to mark the column value as invalid, and true to mark it as valid.

message: (Optional) A string containing the message to display when the value is invalid.

Below we are using the setIsValid method in the function that ensures that the “End Date” is earlier than or equal to the “Start Date”, else it will mark the “End Date” as invalid.

function validateDates(executionContext) {
    var formContext = executionContext.getFormContext();
    var startDate = formContext.getAttribute("custom_startdate");
    var endDate = formContext.getAttribute("custom_enddate");
  
    if (startDate && endDate && endDate.getValue() <= startDate.getValue()) {
        endDate.setIsValid(false, "End Date must be after Start Date.");
    } else {
        endDate.setIsValid(true);
    }
}

We have it registered in the On Change of the ‘Start Date’ and ‘End Date’ fields.

Here if we try saving the record, if the End Date is smaller than the Start Date, we will get the message specified.

Hope it helps..

Advertisements

Manage solution dependencies easily through the refreshed look – Dataverse


In Dataverse, solution dependencies are a vital aspect of managing and deploying applications. Dependencies ensure that required components are present for a solution to work seamlessly across environments. However, with complex solutions, understanding and managing these dependencies can become overwhelming.

The updated dependencies page is designed to simplify dependency management by offering a more intuitive, action-driven experience.

Select a particular component in the solution, right-click>> Advanced >> Show dependencies.

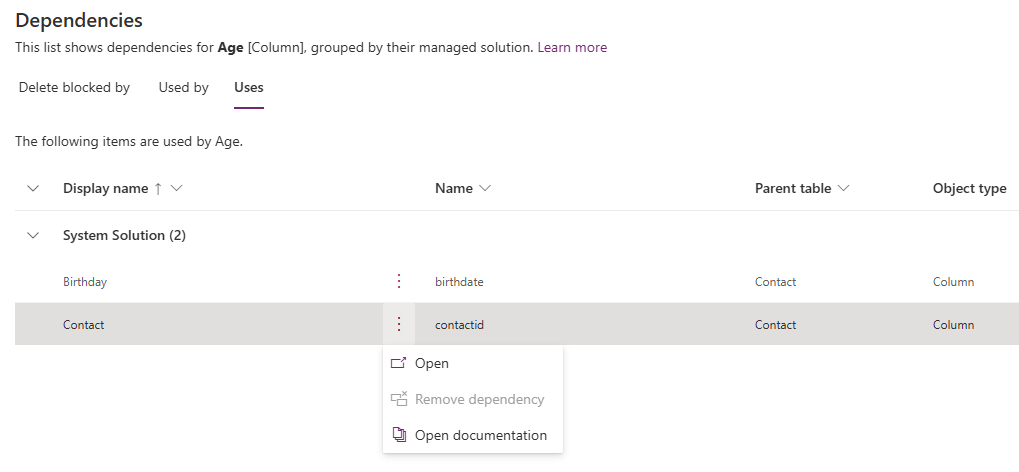
We can see 3 different tabs.

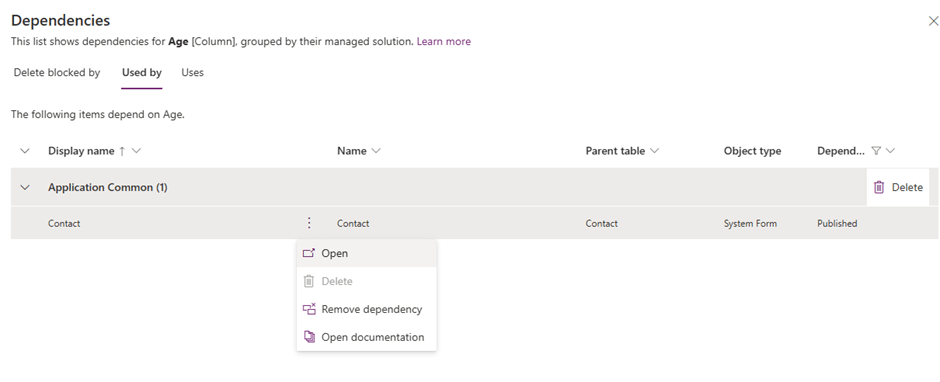
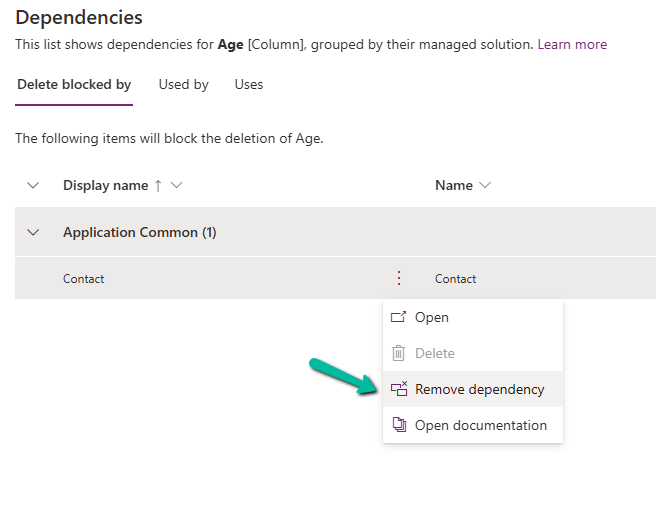
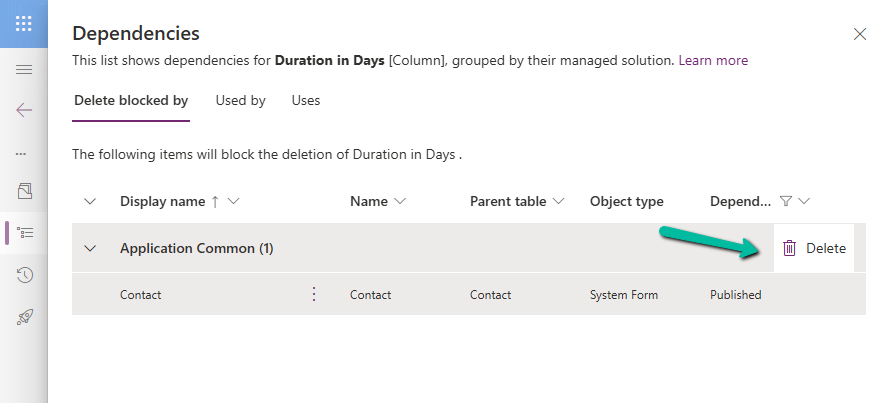
Delete Blocked By (tab): Displays any dependencies preventing deletion of a component. Below we can see that for the Age column, it shows Contact’s System Form as the dependency.

A screenshot of a computer

Description automatically generated

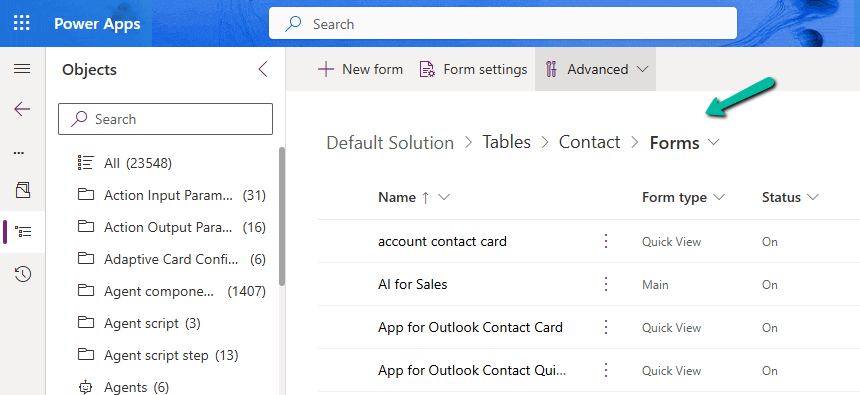
Clicking on the Open option takes us to the component page, where we can see all the forms for the contact table.

A screenshot of a computer

Description automatically generated

Used By (tab): Lists other components dependent on the selected component.

Uses (tab): Shows dependencies that the selected component relies upon.

A screenshot of a computer

Description automatically generated

On clicking Open, it opens the Columns page for that table.

A screenshot of a computer

Description automatically generated

The different actions that we can take are Open and inspect the object, Delete the object, Remove dependency, and open the relevant documentation.

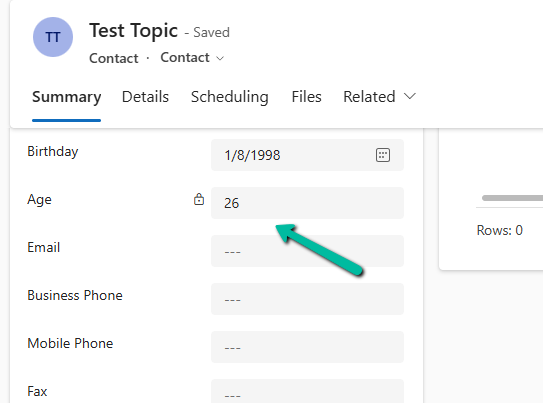
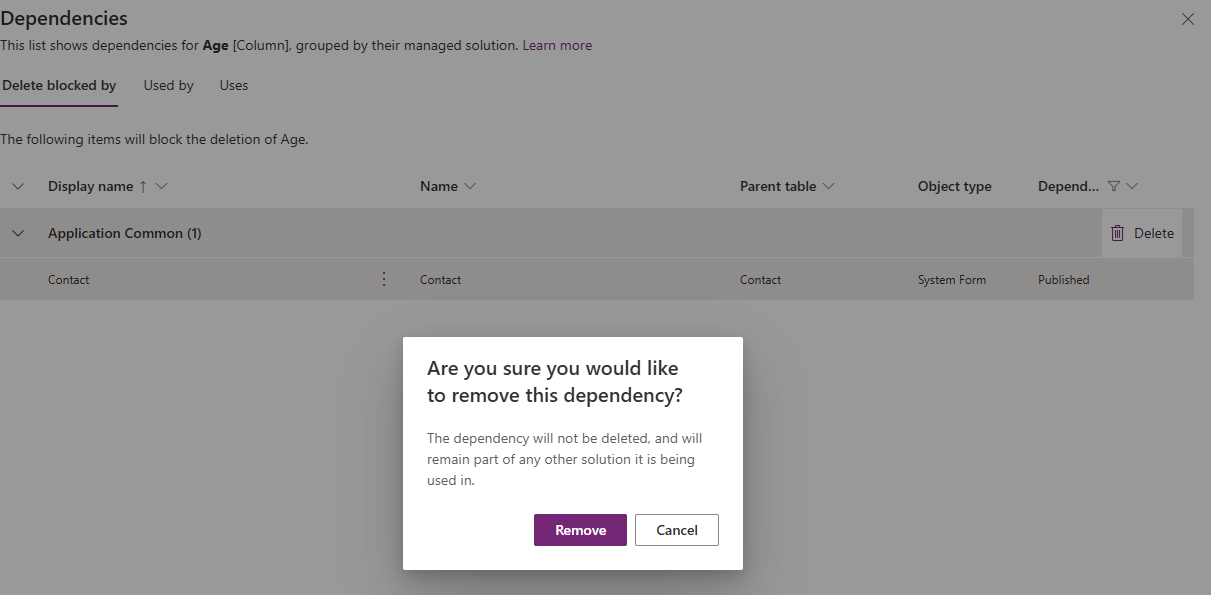
Below we have selected the option Remove dependency. As we saw the dependency here refers to the Contact System form in which we have the age field used.

A screenshot of a computer

Description automatically generated
A screenshot of a computer

Description automatically generated

Select Remove.

A screenshot of a computer

Description automatically generated

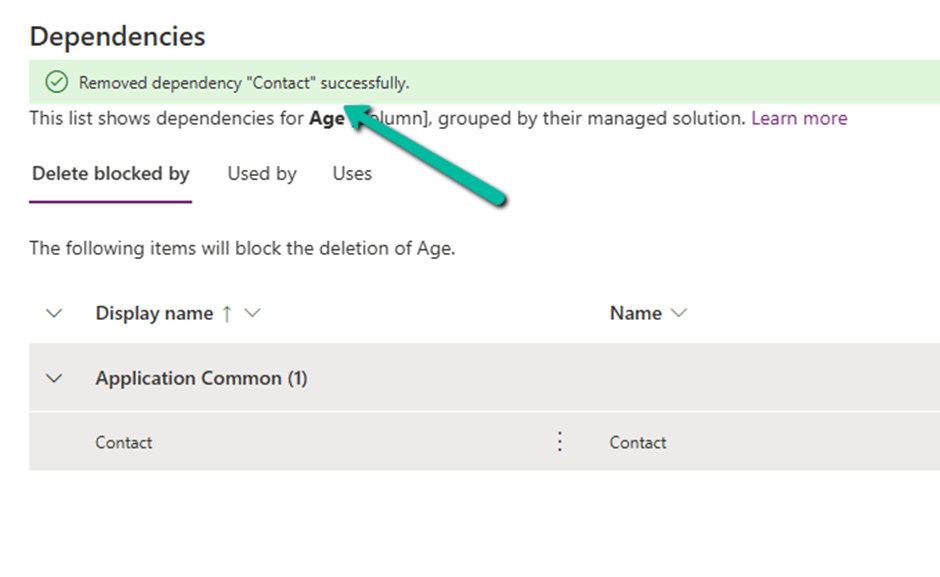
We get the success message after the successful removal of the dependency.

i.e. we can see the field removed from the blocking Contact’s System form.

Now if we want we can easily delete that particular field with no object blocking the delete.

Lastly, the Delete option for the solution allows the delete (uninstall) the solution that has dependencies on the solution component.

Get all the details here.

Hope it helps..

Advertisements

Using Copilot to Create and Explain Formulas – Power Apps


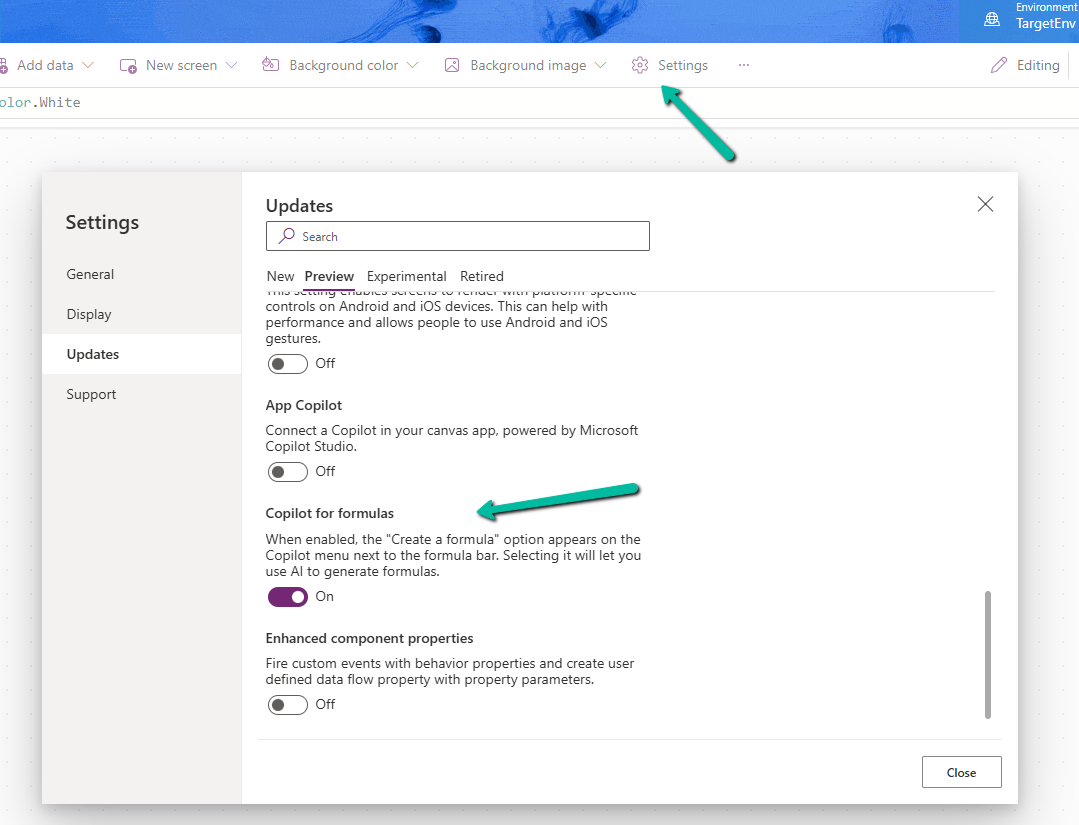
Using the new features – Create a formula (preview) and Explain this formula we can now easily write, edit, and understand formulas in Power Apps.

To enable it, navigate to switch on – Settings >> Updates >> Preview >> Copilot for formulas

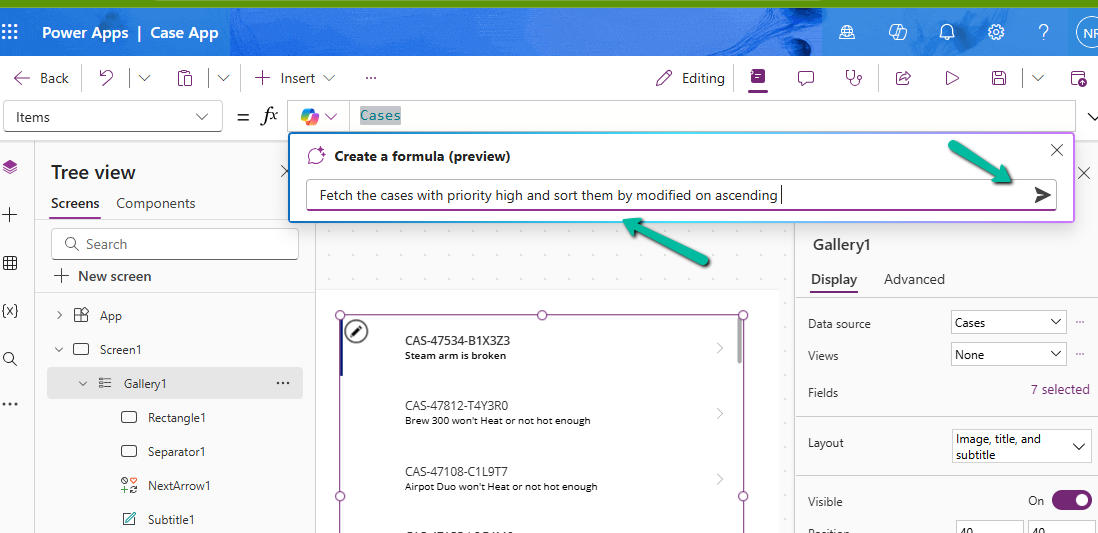
Here in the sample app below, we are trying to set the Items property of the Gallery using Create a formula. Here our gallery control is bound to Cases as the data source.

A screenshot of a computer

Description automatically generated

We can describe what formula we need in plain language.

A screenshot of a computer

Description automatically generated

We can see it generating the formula for us. We have the option to Apply, Discard, and Copy it.

A computer screen with a blue background

Description automatically generated

Here we have applied the generated formula.

A screenshot of a computer

Description automatically generated

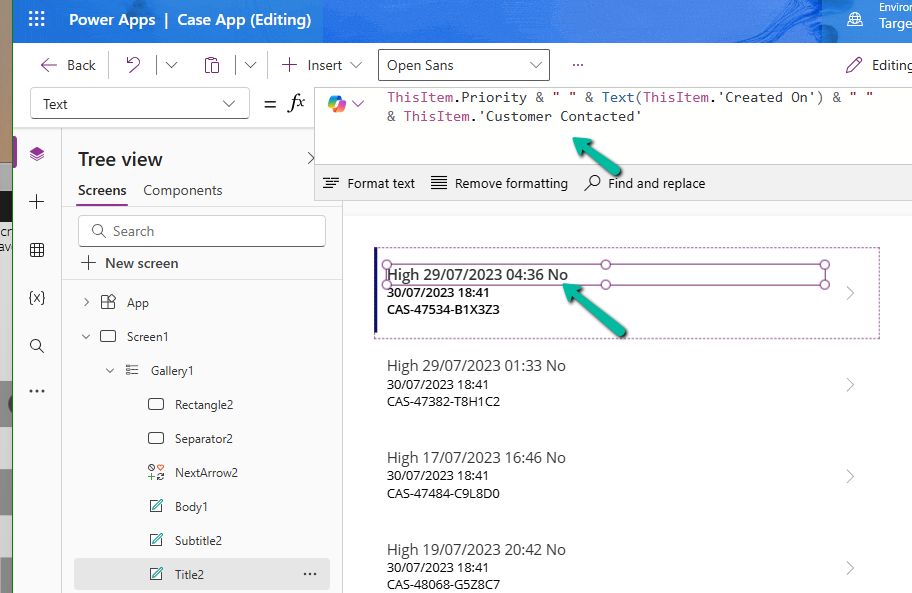
Another example is where we are setting the Text property.

Here instead of the customer name it considered the Customer Contacted field. So basically we need to review the formula generated.

A screenshot of a computer

Description automatically generated

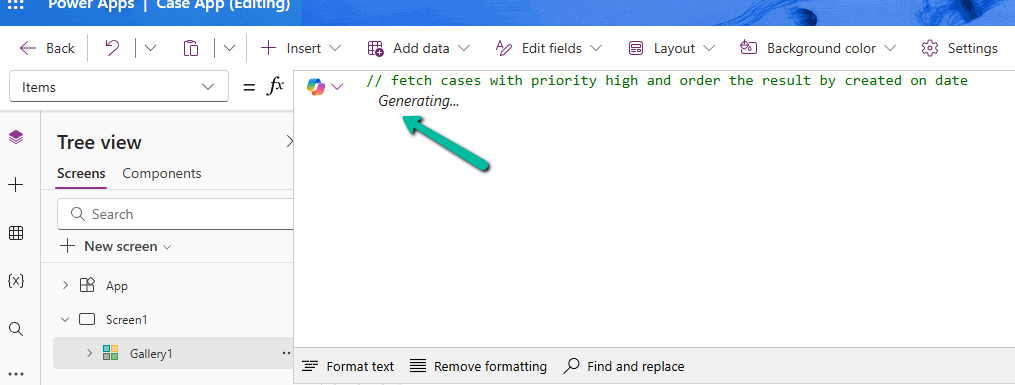
We can also generate formula from code comments as show below. Simply type the comment and wait for formula to be generated or otherwise press Enter.

The result

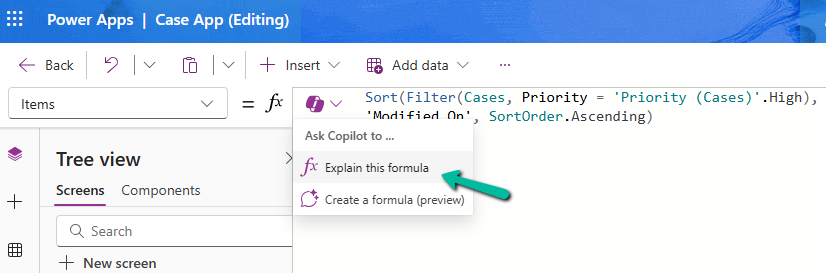
Next using Explain this formula we can use the copilot’s ability to explain the formula in plain language.

The result

A screenshot of a computer

Description automatically generated

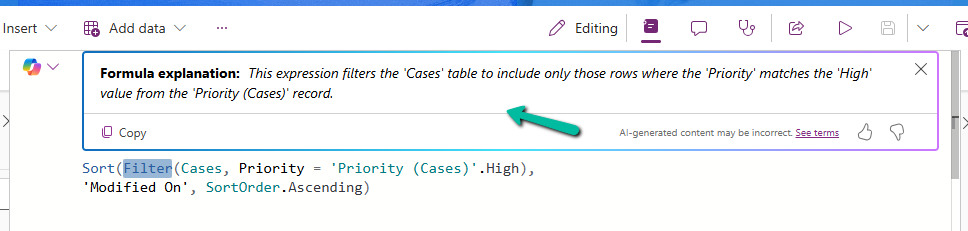
We can also select specific parts of the formula for explanation.

Below we have selected the Filter keyword and Explain this selection option.

A computer screen with text and arrows pointing to the right

Description automatically generated

The result

A screenshot of a computer

Description automatically generated

Similarly, on selecting SortOrder

A computer screen shot of a computer screen

Description automatically generated

The result

A close-up of a text

Description automatically generated

Get all the details here

Hope it helps..
Advertisements

Field suggestions by Copilot –Power Apps (Dataverse)


Field Suggestions by Copilot for Canvas Apps apply to Gallery, Form Table controls both classic and modern for Dataverse, SharePoint, or SQL Server data source. It analyzes the schema of the table selected and recommends up to 10 fields that also include a maximum of 10 required fields of that table.

Let us see it in action.

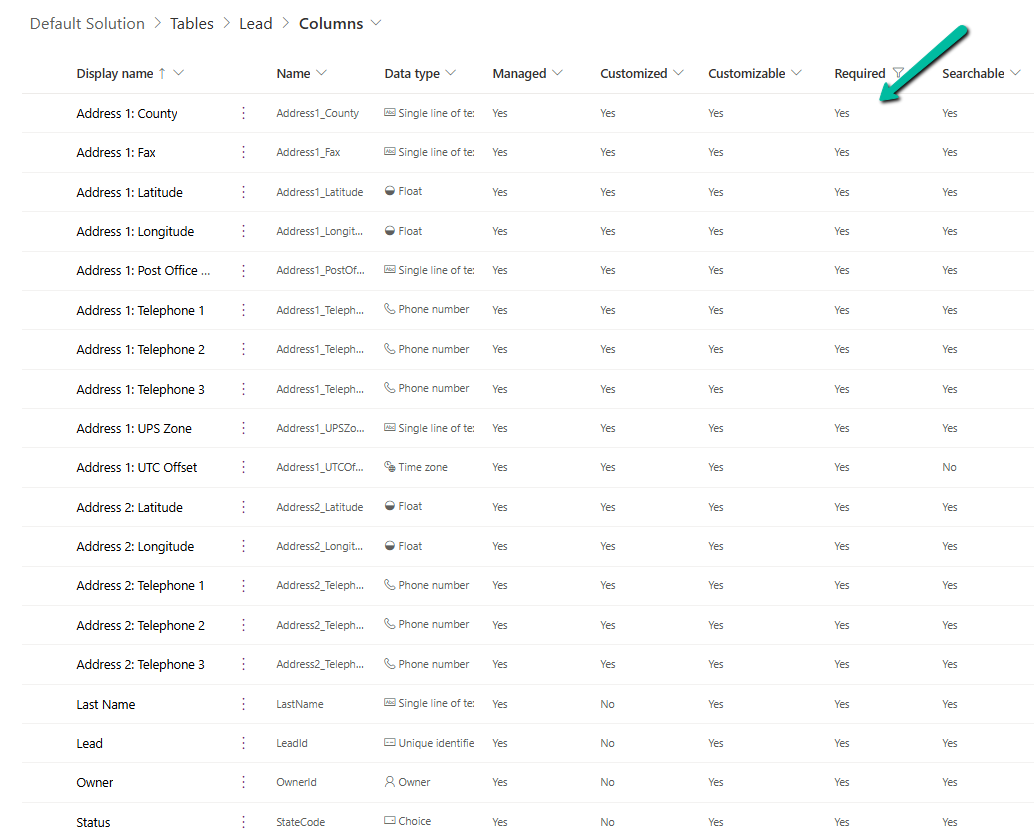
Below we have the following fields defined as required fields in the lead table.

A screenshot of a computer

Description automatically generated

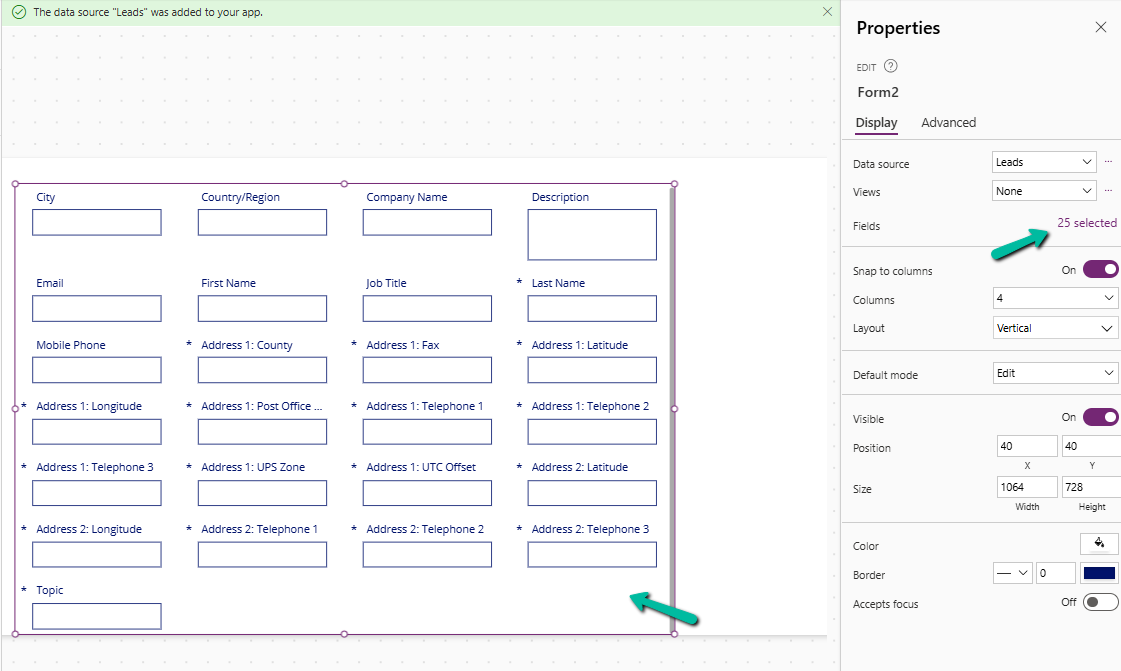
Now inside CanvasApp when we insert and bind the Modern Form / Table or the classic Edit Form / Display Form, Data Table to the lead table it automatically suggests the fields for binding.

Here we have selected Lead as the Data Source for the Edit form or Form (modern) control.

Here we can see it suggesting all the required fields of the lead along with other key fields of lead like City, Country, Email, First Name, etc.

In the case of Table, we can see it suggesting the following 10 fields.

A screenshot of a computer

Description automatically generated

In the case of a custom table with very few fields in it, it suggested the below fields for Form and Table control.

A screenshot of a computer

Description automatically generated

Get all the details here.

Hope it helps..

Advertisements