How to – Delete the elastic table records (Dataverse)


Recently we wrote an SSIS package to delete the Elastic Table records using KingswaySoft’s Integration Toolkit for Dynamics 365.
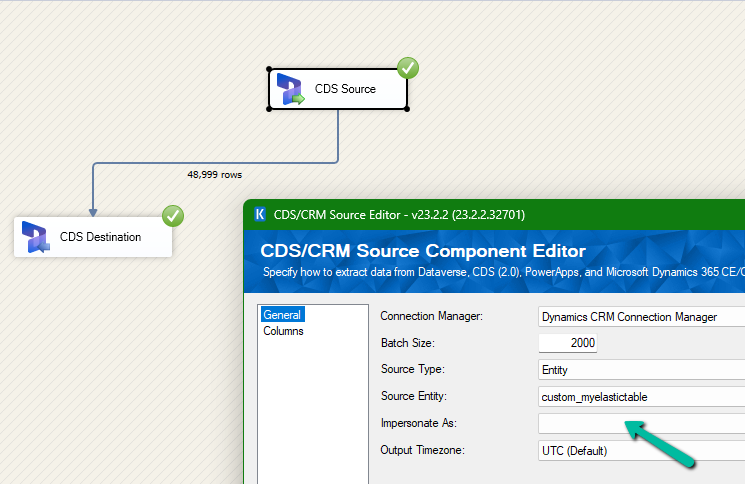
A screenshot of a computer

Description automatically generated

We had mapped the primary field for deletion and the package was also showing success.
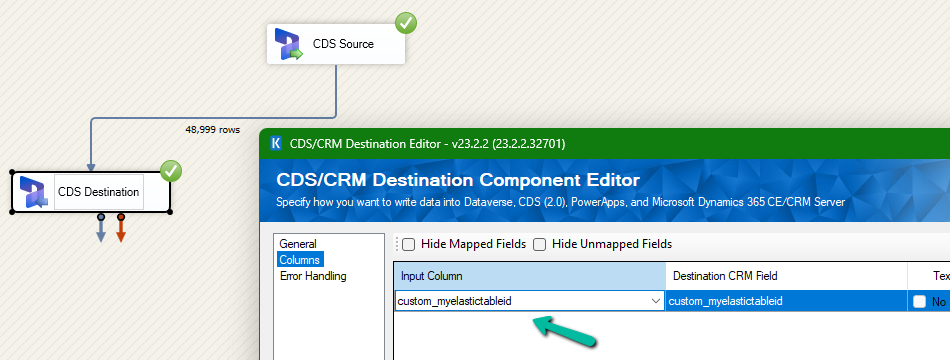
A screenshot of a computer

Description automatically generated

However back in our CRM / Sales Hub app, we saw that none of the records were deleted (total – 48999)

A screenshot of a computer

Description automatically generated

The reason it was showing success is that we had specified the Ignore Error option in our CDS Destination component.
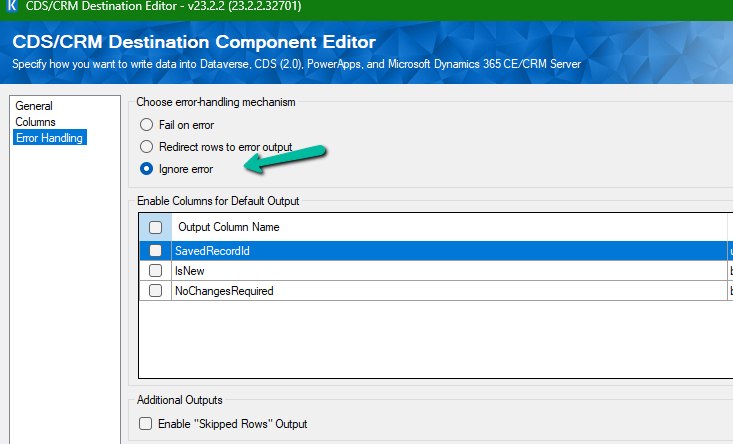
A screenshot of a computer

Description automatically generated

Then we created 2 more records but didn’t specify the partition ID for them.

A screenshot of a computer

Description automatically generated

This time on the successful run of the package we can see those 2 new records getting deleted for which we didn’t specify any partition ID i.e. Test 1 and Test 2 records were deleted successfully.

A screenshot of a computer

Description automatically generated

If we check the Microsoft docs it mentions that we need to include the partition ID using the alternate key to delete those records using the DeleteMultiple request.

Could not find a way to specify an Alternate Key in the CDS Destination component for the Delete message and if we try deleting the records one by one instead of using the DeleteMultiple request we get the below error.

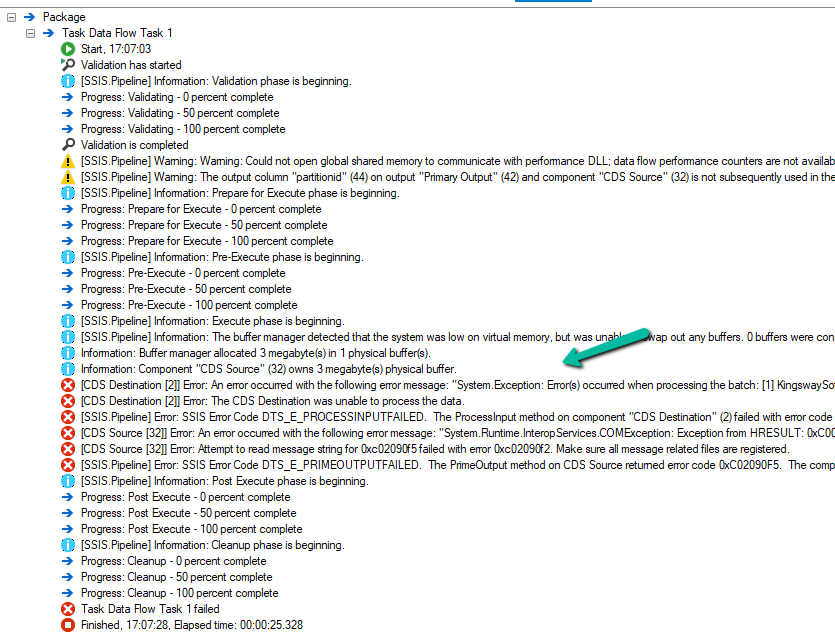
A screenshot of a computer

Description automatically generated
A screenshot of a computer

Description automatically generated

[CDS Destination [2]] Error: An error occurred with the following error message: “System.Exception: Error(s) occurred when processing the batch: [1] KingswaySoft.IntegrationToolkit.DynamicsCrm.WebAPI.WebApiServiceException: The remote server returned an error: (404) Not Found. (Error Type / Reason: NotFound, Detailed Message: {“error”:{“code”:”0x80040217″,”message”:”The HTTP status code of the response was not expected (404).\n\nStatus: 404\nResponse: \n{\”error\”:{\”message\”:\”Could not find item ‘b3a70971-9674-ef11-a671-6045bdfe58ee’.\”,\”details\”:[{\”message\”:\”\\r\\nErrors : [\\r\\n \\\”Resource Not Found. Learn more: https://aka.ms/cosmosdb-tsg-not-found\\\”\\r\\n]\\r\\n\”}]}}”}}) (SSIS Integration Toolkit for Microsoft Dynamics 365, v23.2.2.32701 – DtsDebugHost, v16.0.5270.0)System.Net.WebException

As expected, using CrmServiceClient also if we do not include partitionid we will get the below error for the records that have partition id specified.

The HTTP status code of the response was not expected (404).

Response:

{“error”:{“message”:”Could not find item ‘b3a70971-9674-ef11-a671-6045bdfe58ee’.”,”details”:[{“message”:”\r\nErrors : [\r\n \”Resource Not Found. Learn more: https://aka.ms/cosmosdb-tsg-not-found\”\r\n]\r\n”}]}}

Here we can specify the partitionId parameter to delete those records having the partitionId specified in the DeleteRequest

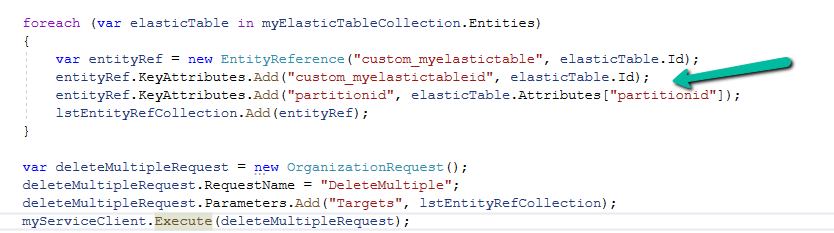
For DeleteMultiple Request we need to provide the alternate key as shown below.
A screen shot of a computer code

Description automatically generated

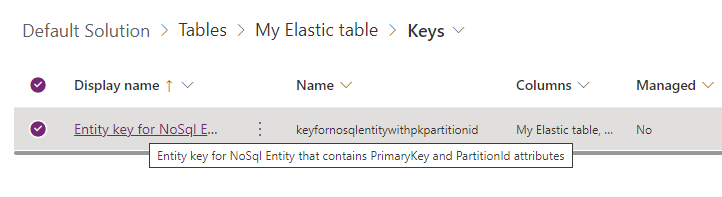
We will have the alternate key auto-created by the system when we create an elastic table.
Sample Code –

 var myServiceClient = new CrmServiceClient(connectionString);
        var query = new QueryExpression("custom_myelastictable");
        query.ColumnSet.AddColumns("custom_name", "partitionid");
        var myElasticTableCollection = myServiceClient.RetrieveMultiple(query);
        var lstEntityRefCollection = new EntityReferenceCollection();

        // Delete Request
        foreach (var elasticTable in myElasticTableCollection.Entities)
        {
            var deleteRequest = new DeleteRequest();
            deleteRequest.Target = new EntityReference("custom_myelastictable", elasticTable.Id);
            deleteRequest.Parameters["partitionId"] = elasticTable.Attributes["partitionid"];
            var response = myServiceClient.Execute(deleteRequest);
        }

        // DeleteMultiple Request 
       
        foreach (var elasticTable in myElasticTableCollection.Entities)
        {
            var entityRef = new EntityReference("custom_myelastictable", elasticTable.Id);
            entityRef.KeyAttributes.Add("custom_myelastictableid", elasticTable.Id);
            entityRef.KeyAttributes.Add("partitionid", elasticTable.Attributes["partitionid"]);
            lstEntityRefCollection.Add(entityRef);
        }

        var deleteMultipleRequest = new OrganizationRequest();
        deleteMultipleRequest.RequestName = "DeleteMultiple";
        deleteMultipleRequest.Parameters.Add("Targets", lstEntityRefCollection);
        myServiceClient.Execute(deleteMultipleRequest);

Hope it helps..

Advertisements

How to remove contact and customer validation on Cases– Dynamics 365


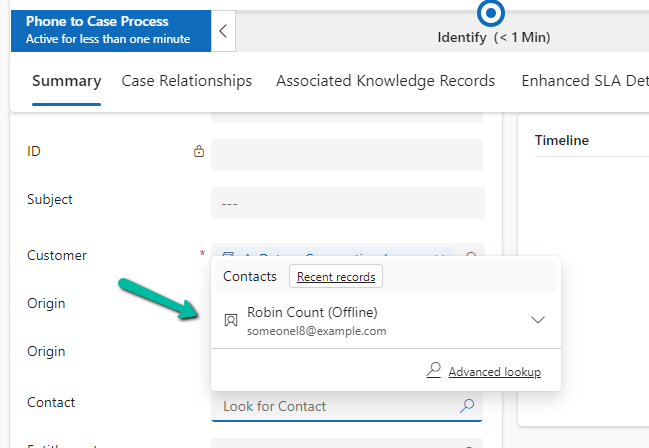
By default, we can only specify the contact associated with the customer for the case record. If we try specifying a contact record that is not associated with the Customer selected, we will get the below error message.

Invalid Contact – The specified contact doesn’t belong to the account selected as the customer. Specify a contact that belongs to the selected account, and then try again.

Also, CRM will filter the lookup to show only the associated contact record

A screenshot of a computer

Description automatically generated

However, if we do not want this validation, we can remove it using the environment variable.

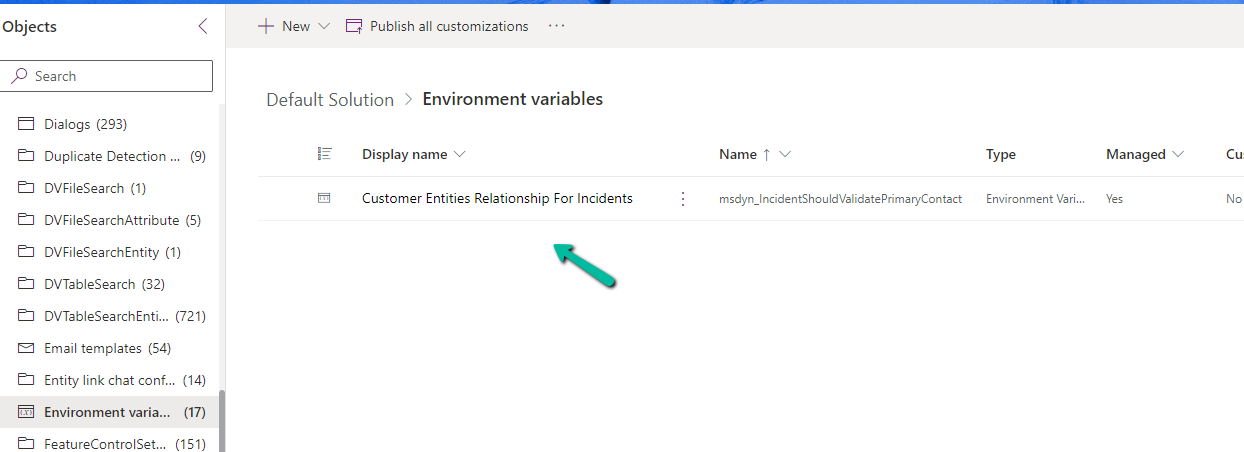
Search for Customer Entities Relationship For Incidents / msdyn_IncidentShouldValidatePrimaryContact

A computer screen shot of a computer screen

Description automatically generated

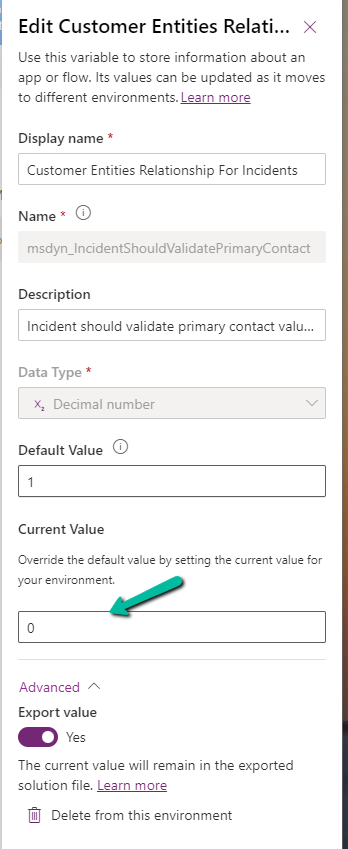
Set the new value as 0.

A screenshot of a computer

Description automatically generated

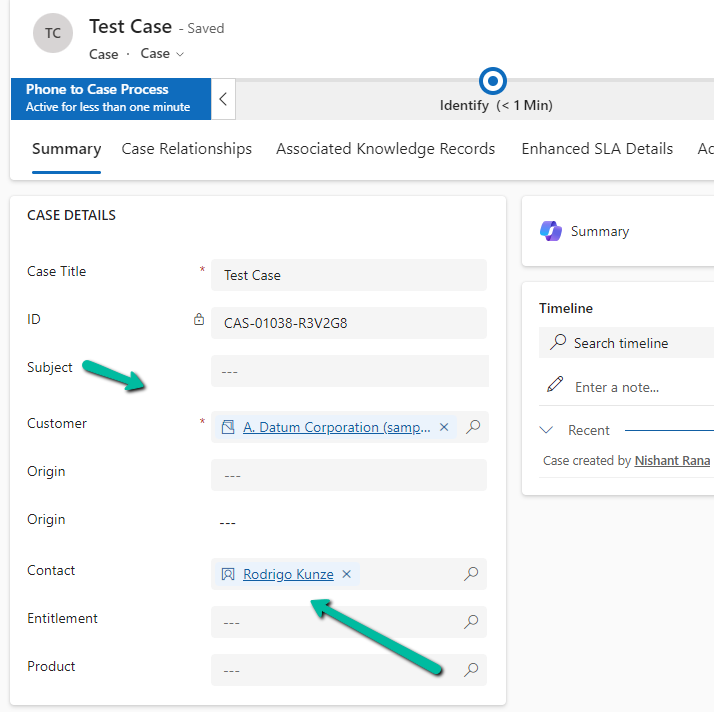
Now we will be able to save the record using an unassociated contact.

A screenshot of a test case

Description automatically generated

Get all the details here

Hope it helps..
Enable Copilot for the Rich Text Control – Dataverse / Dynamics 365


To enable Copilot for a specific instance of a Rich Text editor field, we first need to create a Web Resource where we need to specify the property we want to update/override as specified in the RTEGlobalConfiguration_Readonly.json, the base read-only configuration file for the Rich Text editor control.

We have created a JavaScript Web Resource file named rtecustom.js.

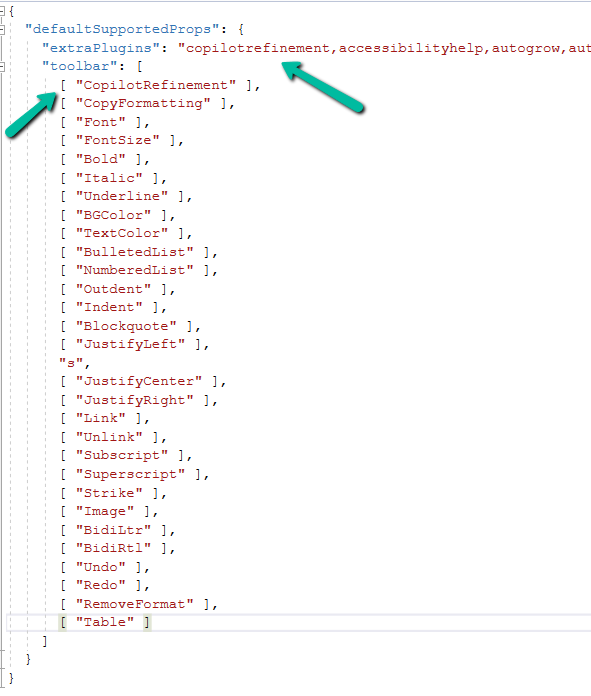
Added the copilitrefinement and CopilotRefinement values to the extraPlugins and toolbar properties existing values as shown to enable copilot.

Refer to the sample configuration file for all the properties and their corresponding values.

A screenshot of a computer program

Description automatically generated
{
  "defaultSupportedProps": {
    "extraPlugins": "copilotrefinement,accessibilityhelp,autogrow,autolink,basicstyles,bidi,blockquote,button,collapser,colorbutton,colordialog,confighelper,contextmenu,copyformatting,dialog,editorplaceholder,filebrowser,filetools,find,floatpanel,font,iframerestrictor,indentblock,justify,notification,panel,panelbutton,pastefromword,quicktable,selectall,stickystyles,superimage,tableresize,tableselection,tabletools,uploadfile,uploadimage,uploadwidget",
    "toolbar": [
      [ "CopilotRefinement" ],
      [ "CopyFormatting" ],
      [ "Font" ],
      [ "FontSize" ],
      [ "Bold" ],
      [ "Italic" ],
      [ "Underline" ],
      [ "BGColor" ],
      [ "TextColor" ],
      [ "BulletedList" ],
      [ "NumberedList" ],
      [ "Outdent" ],
      [ "Indent" ],
      [ "Blockquote" ],
      [ "JustifyLeft" ],
      [ "JustifyCenter" ],
      [ "JustifyRight" ],
      [ "Link" ],
      [ "Unlink" ],
      [ "Subscript" ],
      [ "Superscript" ],
      [ "Strike" ],
      [ "Image" ],
      [ "BidiLtr" ],
      [ "BidiRtl" ],
      [ "Undo" ],
      [ "Redo" ],
      [ "RemoveFormat" ],
      [ "Table" ]
    ]
  }
}

Note down the URL of the Web Resource created.

A screenshot of a computer

Description automatically generated

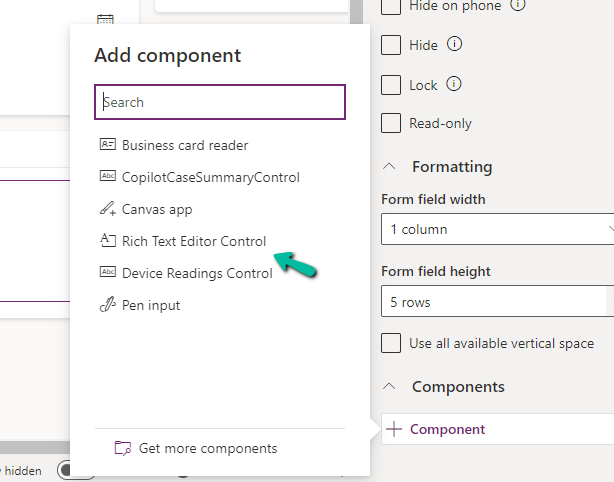
Next, we opened one of the Contact’s forms for Customization, selected the description field, and added the component – “Rich Text Editor Control” to it.

A screenshot of a computer

Description automatically generated
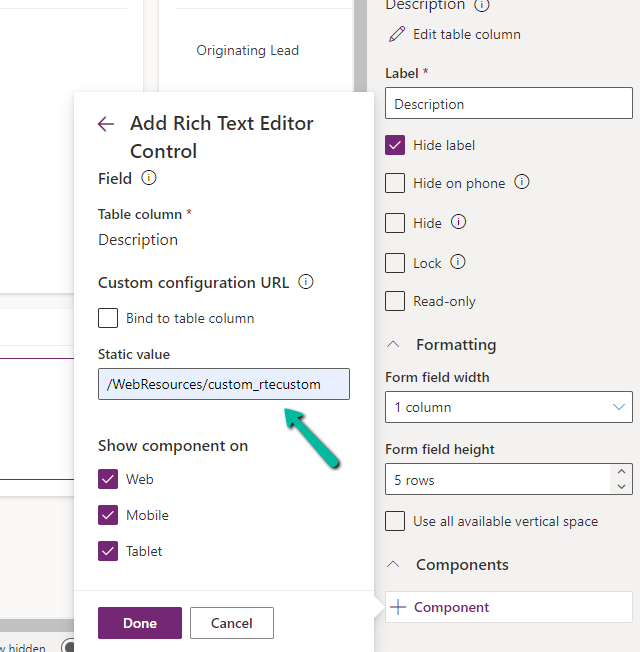
A screenshot of a computer

Description automatically generated

In the Static value property, we specified the relative URL of the Web Resource file. We can also specify the full path but then we would need to update it each time we move it to other environments.

A screenshot of a computer

Description automatically generated

Save and publish the changes.

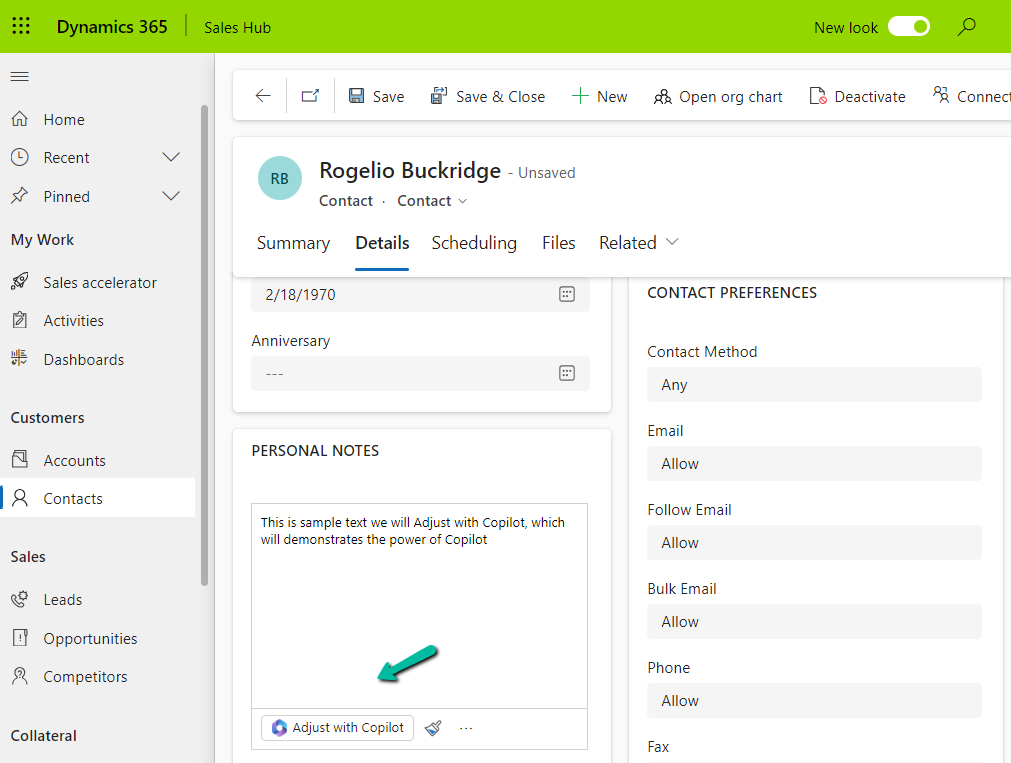
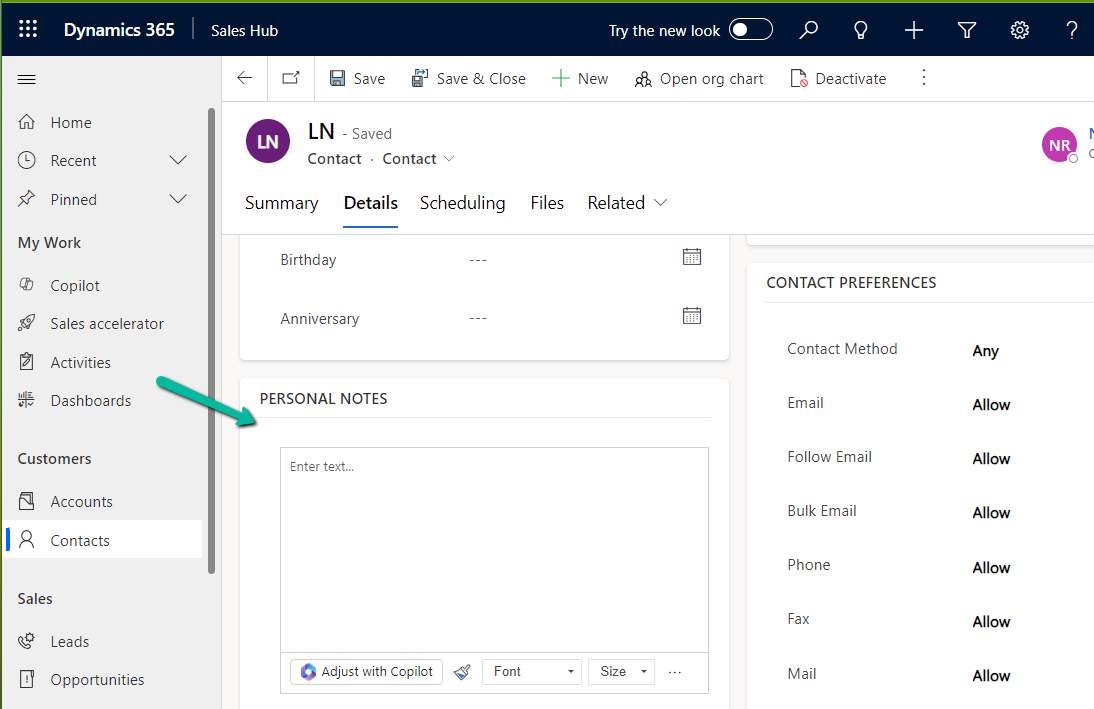
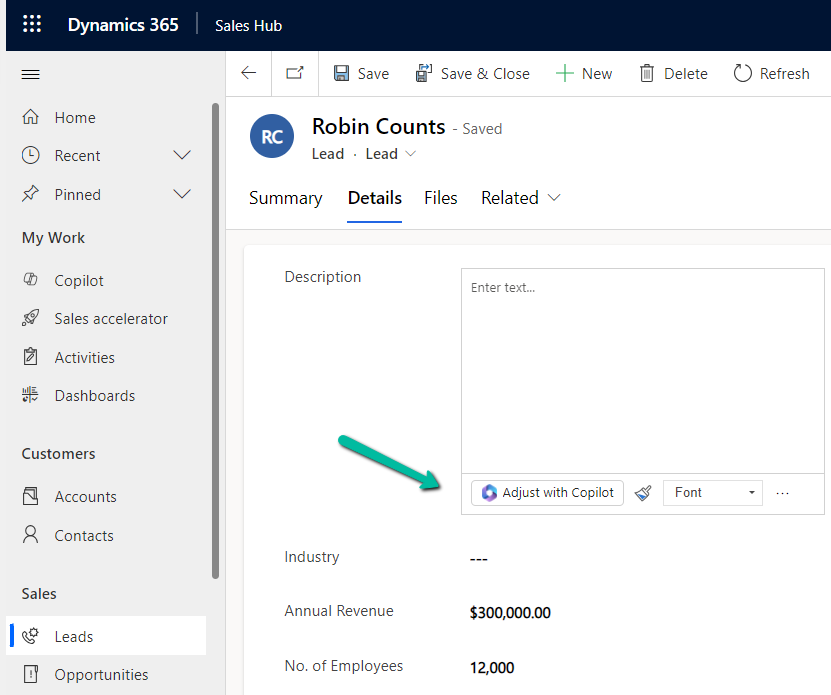
We can see the option Adjust with Copilot added to the toolbar for the control.

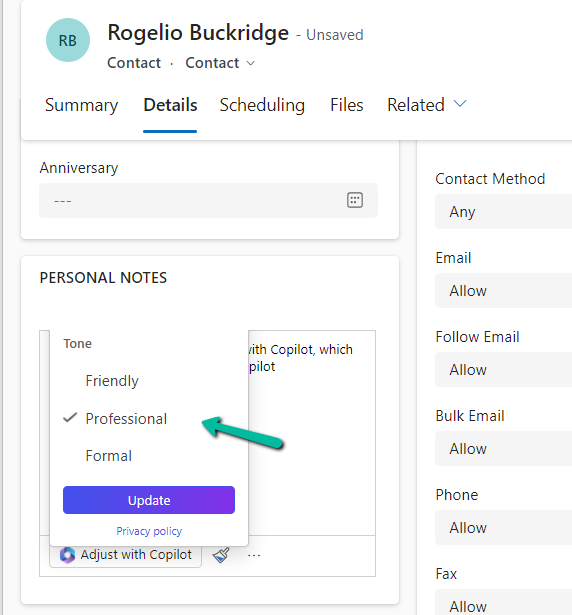
On selecting the text, and clicking on “Adjust with Copilot”, we get the option to update the Tone of the content.

A screenshot of a computer

Description automatically generated

On selecting a Professional tone, the text is updated in the control.

A screenshot of a computer

Description automatically generated

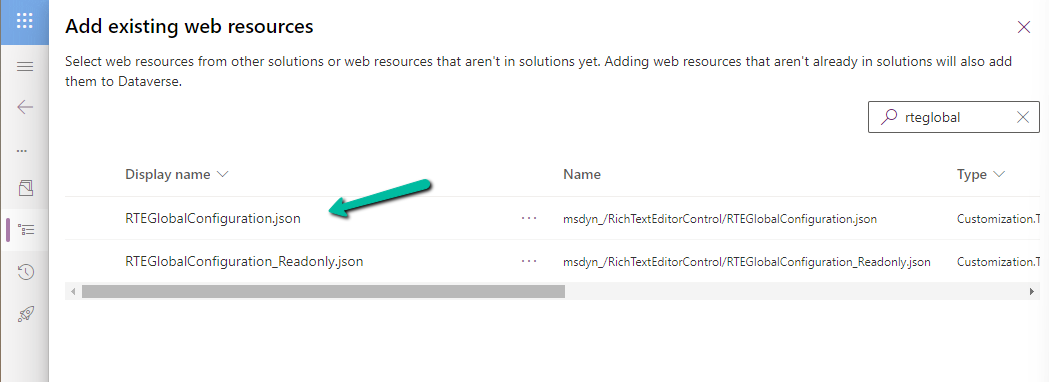
In case we want to apply to all the fields that are using Rich Text Editor Control instead of specifying it for individual fields, we need to update and add the same JSON to the existing RTEGlobalConfiguration.json file.

A screenshot of a computer

Description automatically generated

The file is blank by default, and we can specify properties to it that we want to override.

A green screen with black text

Description automatically generated

We updated the RTEGlobalConfiguration.json file, to use the same definition we used earlier for our custom web resource.

A screen shot of a computer

Description automatically generated

We can see the “Adjust with Copilot” added to the form even without specifying the URL in the static value while customizing the form.

On saving and publishing the changes, we can then see it rendered for all the Rich Text Editor fields.

A screenshot of a computer

Description automatically generated
A screenshot of a computer

Description automatically generated

Also, check – Copilot Control

Hope it helps..

Advertisements

Set an app (Model-driven or Canvas App) as a startup app – Power Apps Mobile


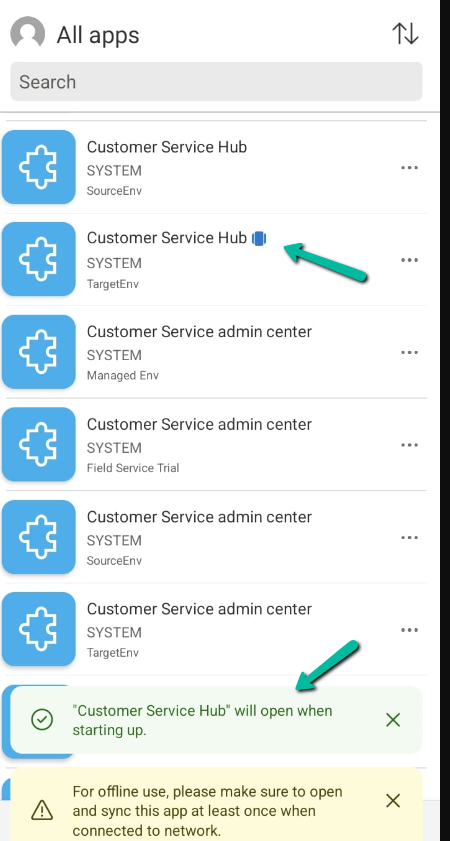
Microsoft has introduced a new feature, through which we can now specify a particular app as a start-up app, that will open up when we launch the Power Apps mobile, instead of waiting for the home page / or selecting it from favorites.

Below we can select the option Open at Startup to specify the Customer Service Hub app as the startup app as an example.

A screenshot of a phone

Description automatically generated

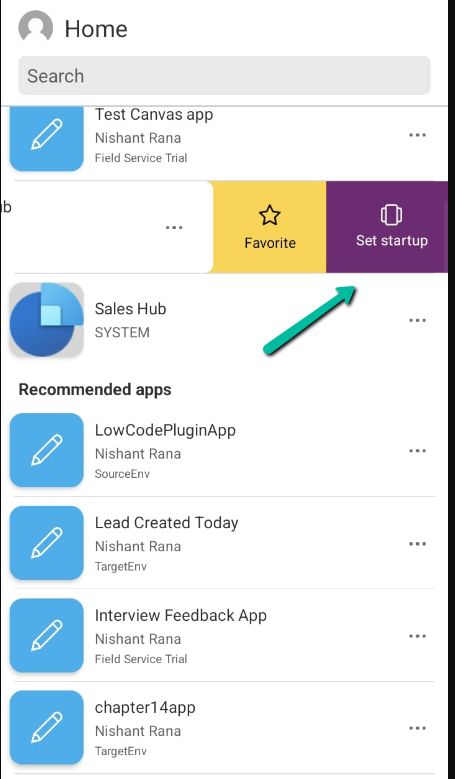
Or we can swipe left to mark an app as “Startup App”

A screenshot of a phone

Description automatically generated

We can see an icon next to the app.

Now launching the Power Apps mobile app will directly open the Customer Service Hub app.

A screenshot of a phone

Description automatically generated

Using the Remove from startup option we can remove it as the startup app

A screenshot of a phone

Description automatically generated

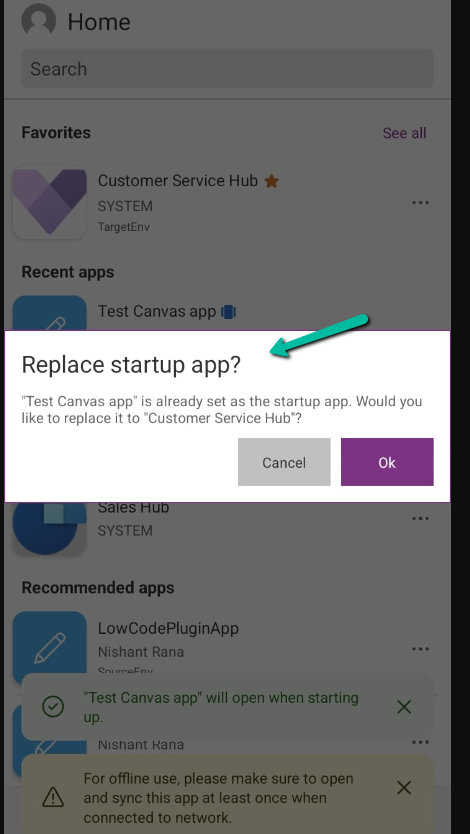
We can only have one app set as a startup app, if we try setting up another app as a startup we get the notification that it will replace the existing app.

A screenshot of a phone

Description automatically generated

Get all the details here

Hope it helps..

Advertisements

Perform Age calculation using Formula Columns in Dataverse / Dynamics 365


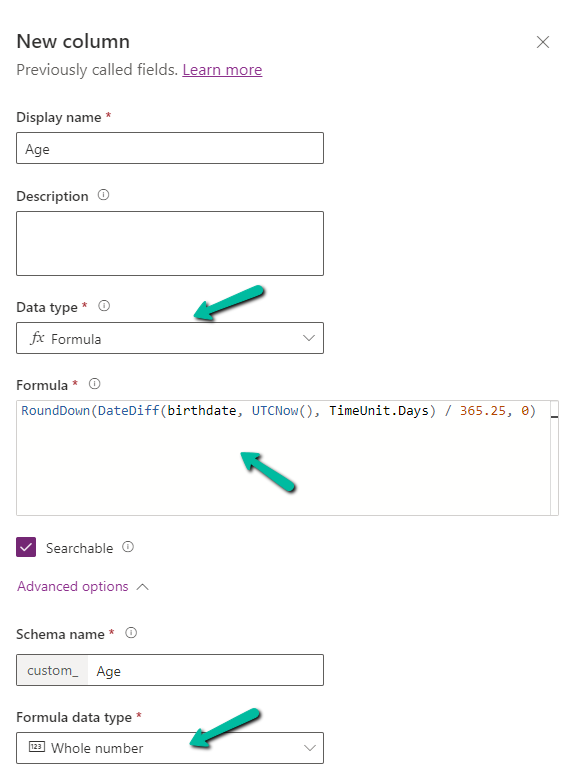
Below we have created a new field of Data Type Formula and Formula Data Type as Whole Number

A screenshot of a computer

Description automatically generated

Specify the following formula.

RoundDown(DateDiff(birthdate, UTCNow(), TimeUnit.Days) / 365.25, 0)

  • DateDiff calculates the difference in days between birthdate and current UTC Date.
  • Dividing by 365.25 takes care of converting the days to years, considering the leap year into account.
  • Roundown takes care of rounding the result to a nearest integer.

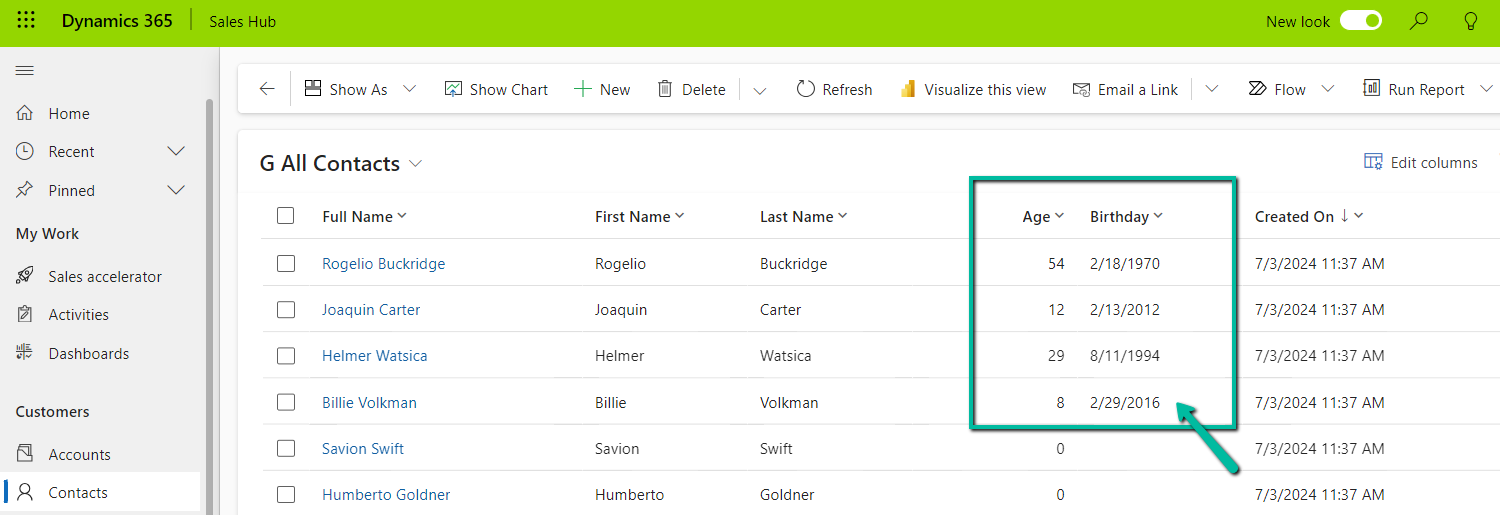
Below we see the field in action.

UTC current date is 10th Wednesday July 2024 for the below example.

A screenshot of a computer

Description automatically generated

Also checkout the helpful video –

and the forum – https://powerusers.microsoft.com/t5/Microsoft-Dataverse/Calculating-age-in-CDS-entity/td-p/495528

Hope it helps..

Advertisements

Force Sync users from Azure AD Security Group / Microsoft 365 Group to Dataverse environment – Power Automate


For Microsoft 365 Group we can use – List Group members action of Office 365 Group connector.

Also check – https://nishantrana.me/2022/06/23/how-to-force-user-sync-power-platform-dynamics-365/

Hope it helps..