Open a Power Automate Flow for Edit Without Fixing Broken Connections First


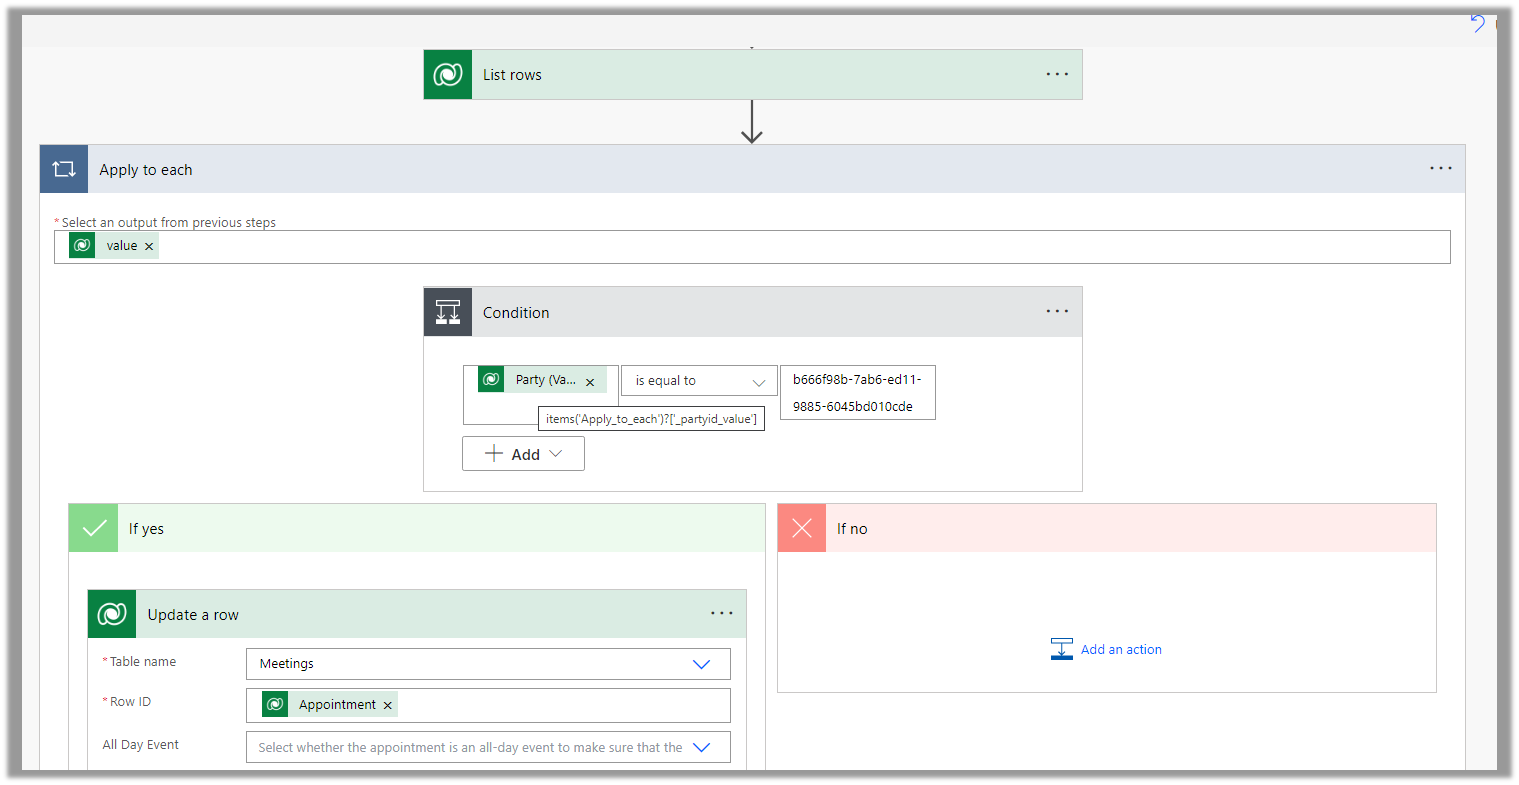
While reviewing Power Automate flows recently, we ran into an issue where we could not open a flow in edit mode

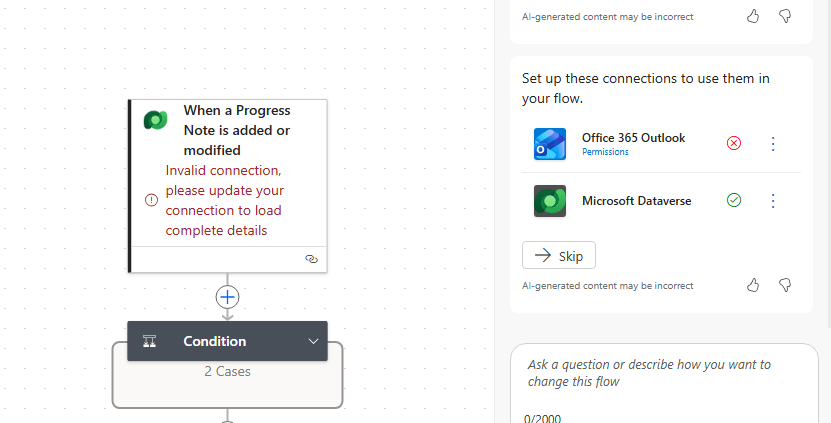
When opening the flow, Power Automate displayed the “This flow will connect to” screen and requested that we fix one or more connections before proceeding.

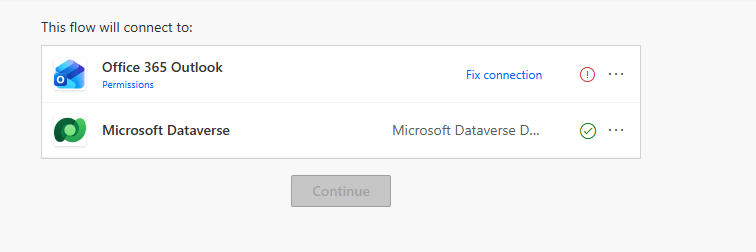
In our case, the flow contained an Office 365 Outlook connection reference that required attention. The problem was that we did not have access to create or repair that connection. Because of this, the Continue button remained disabled and we were unable to open the flow designer to understand what the flow actually did.

At first glance, it appeared that fixing the connection was the only option. However, in our scenario, we were simply analyzing existing flows to understand their purpose and determine whether they were still required.Repairing the Outlook connection would have required additional investigation, coordination with the appropriate users, and potentially creating or reassigning connection references. Since our immediate goal was only to review the flow logic, spending time resolving the connection issue first did not make sense.

Fortunately, we found another approach that allowed us to access the flow designer without fixing the connection immediately.

Instead of trying to fix the connection, open the flow’s Details page. From the details page, locate the Connections section and select Edit.

Next, add your user account as a Co-owner of the flow.

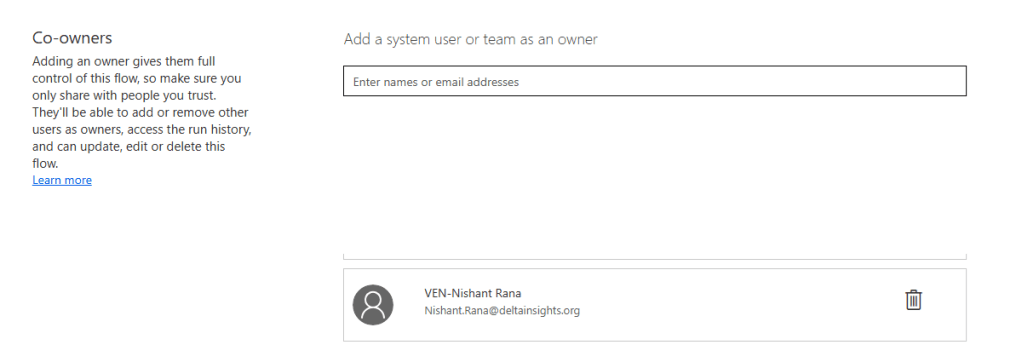
Once we added our user account as a co-owner, we refreshed the page and tried opening the flow again.This time, we were able to open the flow designer and review the flow logic even though the Outlook connection issue was not resolved.

Seems that adding our account as a co-owner provides the permissions required to access and inspect the flow. This simple workaround can save considerable time when reviewing large numbers of flows across an environment.

Hope it helps..

Advertisements

Fix – Cannot write more bytes to the buffer than the configured maximum buffer size: 104857600 (Power Automate / Dataverse)


We might below error in our flow –
BadRequest
. Http request failed as there is an error: ‘Cannot write more bytes to the buffer than the configured maximum buffer size: 104857600.’.

This is because of the 100 MB Message Size limits in Power Automate.

We can enable Allow chunking option if supported by the action.

Or we can fix it by specifying Select columns and Filter Rows to limit the data returned as in the case of the List Rows action of Dataverse.

Hope it helps..

Advertisements

Enable / Disable (turn on / turn off) multiple cloud flows – Dataverse


Within the Maker Portal, we can only turn on / turn off one cloud flow at a time.

If we select multiple flows, we do not see that option.

Here we can make use of XrmToolBox’s Bulk Data Update plugin.

Get the required cloud flows to be disabled from the Workflow table having Category as Modern Flow.

Select the required cloud flows (or all flows returned), navigate to the Set State tab, and set the appropriate Status and click on Update records.

Or, from the Advanced Find also we can look for the Processes with the Category as the Modern Flow

And use Activate and Deactivate options (here for a few flows we faced issues while trying to activate even though we used the proper account for doing so)

Hope it helps..

Advertisements

Auto-create SharePoint Folder (SharePoint Document Location) on record create using Power Automate Flow (Dataverse)


We recently had a requirement to create the SharePoint folder automatically on the Account records creation, instead of having the users click on the Documents tab to create it.

We could write a Power Automate flow to achieve this.

Here we have enabled the Share Point server-based integration. Also, the SharePoint Site and the main or parent folder for the Account are already created/configured.

Below is the corresponding Document location record for the parent Account folder.

  • So basically, we will create a new folder inside the Account folder in the SharePoint site configured in CRM.
  • Then create a new SharePoint Document Location record specifying the Account document location as a parent.
  • And then Associate / Relate the new account record created with this new document location record.

Below is how our Flow will look like –

  1. Triggers on Account record creation.

2. Create a new folder inside Account Folder, here for the name of the folder we are using the format “AccountName_AccountNumber

3. Create a new Document Location record, associating the Account document location with the parent location record. Here we are specifying the same folder name in the relative URL.

We can also fetch the GUID of the Account document location and/or use a variable to store the GUID.

4. Lastly, we are associating these 2 new records.

Below is our newly created account record.

Below we can see our flow ran successfully.

We can see the new folder created and associated.

Here if we click the Documents tab immediately after creating the account record, before our flow runs, we might have the OOB folder also getting created along with our custom folder (flow being asynchronous). If our custom folder is already created and associated before the user clicks on the documents tab, then CRM will not be creating a new folder.

Hope it helps..

Advertisements

Fixed – Power Automate flow not getting triggered


We had one flow on the creation of an account record, our flow was running fine, and then we made a few changes to it and saved it, after which it stopped getting triggered.

We could not figure out why it was not getting triggered so eventually we tried changing the Trigger Type to Added or Modified or Deleted, just to see if that will trigger it.

It ran this time on create of account record.

After which we changed it back to Added, the original definition.

And from that point onwards it was getting triggered as expected.

Also make sure if the Admin mode is turned off.

https://learn.microsoft.com/en-us/power-automate/triggers-troubleshoot#verify-if-admin-mode-is-turned-on

Hope it helps..

Advertisements

Get RequiredAttendee (Required) from the Meeting (appointment) table – Power Automate / Dataverse


Below is the sample flow we can use to retrieve the Required (requiredattendees) field’s value from the Meeting table (on the update of the record).

Here we are triggering the flow, if there is an update in the subject field of the meeting record.

Then using the List rows action we are fetching the Activity Parties record associated using the Appointment’s unique identifier and participation mask as 5.

More on participation type mask

And in the last step, we are checking for all the associated Activity Party GUIDs for a specific GUID and then update the record or cancel the record.

Hope it helps..

Advertisements