One of our recent requirements was to ensure that users could no longer register for event sessions once the session had already ended. The goal was to improve the user experience by hiding expired sessions from the Event Registration form, rather than displaying sessions that were no longer available. Once a session’s end date and time had passed, it should be hidden from the UI so that new registrations could not be made through the form.
We used the standard ‘Default registration form with Sessions’ provided by Microsoft and added a small JavaScript customization. The script executes after the form loads by subscribing to the d365mkt-afterformload event. It reads the rendered session date and end time, creates a JavaScript Date object, compares it with the current browser time (all users are in the New Zealand time zone), and hides any expired sessions. If every session has expired, the entire Sessions section is also hidden.
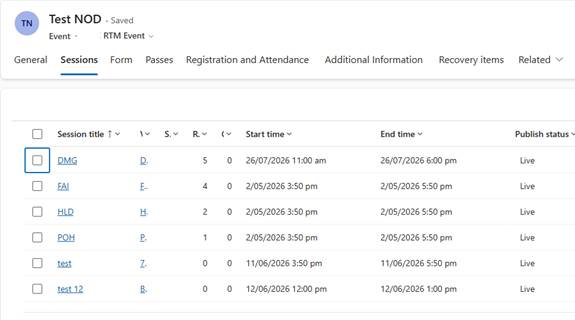
We can see the following sessions configured for the event.
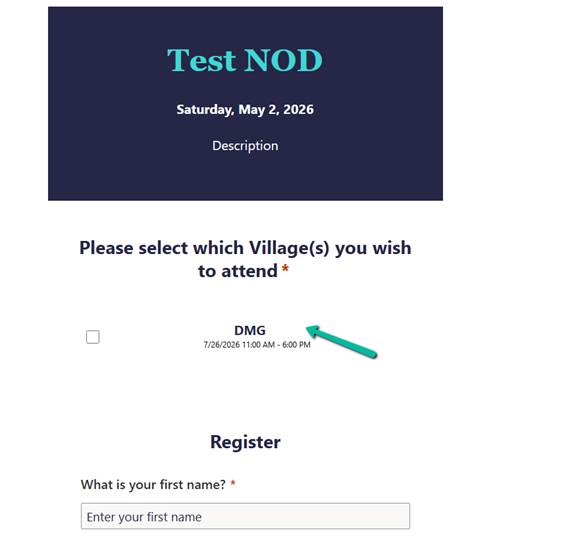
Below we can see the Event Registration form showing all the sessions before it is rendered for the end users.
And after our JavaScript that is registered on d365mkt-afterformload runs, it hides all the expired sessions except the active one.
JavaScript
 document.addEventListener("d365mkt-afterformload", function () {

    document.querySelectorAll(".eventSession").forEach(function (session) {
        debugger;
        const values = Array.from(
            session.querySelectorAll(".msdynmkt_personalization")
        ).map(x => x.textContent.trim());

        // [0] Session Title
        // [1] Session Date (M/D/YYYY)
        // [2] Start Time
        // [3] End Time
        // [4] Location/Room (optional)

        if (values.length < 4) {
            return;
        }

        const dateText = values[1];
        const endTimeText = values[3];

        const dateParts = dateText.split('/');

        if (dateParts.length !== 3) {
            return;
        }

        const month = parseInt(dateParts[0], 10) - 1;
        const day = parseInt(dateParts[1], 10);
        const year = parseInt(dateParts[2], 10);

        const timeMatch = endTimeText.match(/(\d+):(\d+)\s*(AM|PM)/i);

        if (!timeMatch) {
            return;
        }

        let hours = parseInt(timeMatch[1], 10);
        const minutes = parseInt(timeMatch[2], 10);
        const meridian = timeMatch[3].toUpperCase();

        if (meridian === "PM" && hours !== 12) {
            hours += 12;
        }

        if (meridian === "AM" && hours === 12) {
            hours = 0;
        }

        const sessionEndDateTime = new Date(
            year,
            month,
            day,
            hours,
            minutes,
            0
        );

        if (sessionEndDateTime <= new Date()) {
            session.style.display = "none";
        }
    });

    // Hide the entire Sessions block if all sessions are hidden
    const visibleSessions = Array.from(
        document.querySelectorAll(".eventSession")
    ).filter(s => s.style.display !== "none");

    if (visibleSessions.length === 0) {

        const sessionBlock =
            document.querySelector('[data-editorblocktype="Sessions"]') ||
            document.querySelector("fieldset.eventSessions")?.closest("div");

        if (sessionBlock) {
            sessionBlock.style.display = "none";
        }
    }
});
Things to Note
All users were in the New Zealand time zone, so browser time could be safely used for comparison.
The solution targets the standard out-of-the-box Event Registration form with Sessions.
In one of our recent projects, we implemented Cloudflare Turnstile (Invisible) for a Dynamics 365 Customer Insights – Journeys Real-Time Marketing form. In this post, we’ll look at how to configure Cloudflare Turnstile, integrate it with the marketing form using JavaScript, and validate submissions on the server using the msdynmkt_validateformsubmission plugin.
Cloudflare Turnstile provides an invisible verification mechanism that evaluates the request in the background and only requires additional verification when necessary.
For marketing forms, this means: • Better user experience • Reduced spam and bot submissions • Server-side verification
Solution Overview
The implementation consists of two major components.
The first component is a JavaScript that runs inside the Marketing form. It loads the Cloudflare Turnstile library, renders an invisible widget, requests a token when the user submits the form, writes that token into a hidden form field, and then allows the submission to continue.
The second component is a Dataverse plugin registered on the msdynmkt_validateformsubmission message. The plugin retrieves the Turnstile token, reads the Cloudflare secret key from a Dataverse Environment Variable, validates the token against the Cloudflare SiteVerify API, and finally tells Customer Insights whether the submission should be accepted.
Solution Flow
Visitor │ ▼ Customer Insights – Journeys Form │ ▼ JavaScript │ ├── Loads Cloudflare Turnstile ├── Executes Invisible Challenge └── Stores Token in Hidden Field │ ▼ Form Submission │ ▼ msdynmkt_validateformsubmission Plugin │ ├── Reads Token ├── Retrieves Secret Key from Environment Variable ├── Calls Cloudflare SiteVerify API └── Returns Validation Result │ ▼ Lead / Contact Created
Step 1 – Create a Cloudflare Account
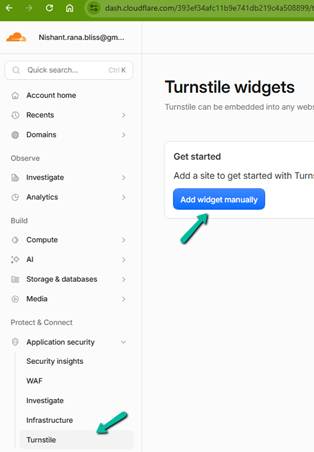
Create a free Cloudflare account and navigate to Application Security > Turnstile. Turnstile widgets are managed from this area.
Step 2 – Create an Invisible Turnstile Widget
Create a new widget, select Invisible mode, and configure all hostnames that will serve the Customer Insights form.
e.g. hostname – assets-oce.mkt.dynamics.com
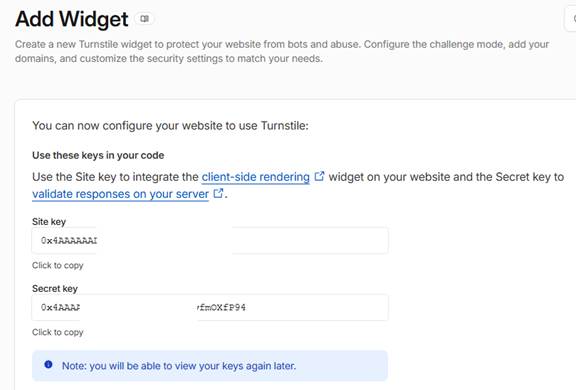
Cloudflare generates a Site Key and Secret Key. The Site Key is used by JavaScript while the Secret Key is kept securely on the server and used by the plugin.
Step 3 – Create a Dataverse Environment Variable
Create an environment variable to hold the Secret Key that will be used by the plugin for server-side validation of the token.
Step 4 – Configure the Marketing Form
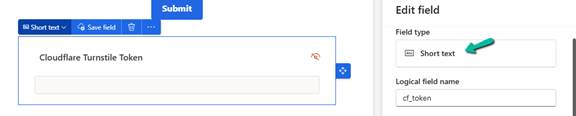
Add an unmappedhidden Short Text field named cf_token to the form. This field temporarily stores the token generated by Cloudflare.
Enable data-validate-submission=”true” and add the JavaScript to the form between the closing form and body tag : </form> <Script>JavaScript </Script></body> (added in the next section)
JavaScript Implementation
The JavaScript is responsible for integrating the Customer Insights form with Cloudflare Turnstile.
At a high level, it performs the following tasks:
• Defines configuration such as the Site Key and token field name. • Dynamically loads the Cloudflare Turnstile JavaScript library. • Renders an invisible Turnstile widget inside the marketing form. • Waits until the user clicks Submit. • Executes Turnstile to obtain a fresh token. • Stores the token in the hidden cf_token field. • Resubmits the form after the token has been written.
The implementation also caches tokens for a short period and automatically refreshes expired tokens, ensuring that only valid tokens are submitted.
(function () {
   'use strict';

   // ---------------------------------------------------------------------
   // Configuration
   // ---------------------------------------------------------------------

   var TURNSTILE_SITE_KEY = 'SITEKEY';
   var TURNSTILE_SCRIPT_URL = 'https://challenges.cloudflare.com/turnstile/v0/api.js?render=explicit';

   var FORM_SELECTOR = 'form.marketingForm';
   var SUBMIT_EVENT = 'd365mkt-formsubmit';
   var AFTER_LOAD_EVENT = 'd365mkt-afterformload';

   // Refresh tokens after four minutes.
   // Cloudflare tokens expire after approximately five minutes.
   var TOKEN_STALE_MS = 4 * 60 * 1000;

   // Hidden unmapped field added through the Customer Insights – Journeys
   // form designer. The generated Turnstile token is copied into this field
   // before the form is submitted.
   var TOKEN_FIELD_NAME = 'cf_token';

   var scriptPromise = null;

   // Stores the Turnstile widget state for each form instance without
   // preventing the form from being garbage collected.
   var widgetState = new WeakMap();

   function loadTurnstileScript() {
      if (scriptPromise) return scriptPromise;

      scriptPromise = new Promise(function (resolve, reject) {

         if (window.turnstile) {
            resolve();
            return;
         }

         var script = document.createElement('script');
         script.src = TURNSTILE_SCRIPT_URL;
         script.async = true;
         script.defer = true;

         script.onload = function () {
            resolve();
         };

         script.onerror = function () {
            scriptPromise = null;
            reject(new Error('[CIJ Turnstile] Failed to load Turnstile script.'));
         };

         document.head.appendChild(script);
      });

      return scriptPromise;
   }

   function renderWidget(formEl) {

      if (widgetState.has(formEl)) {
         return widgetState.get(formEl);
      }

      // The widget container must exist inside the form so that Cloudflare's
      // internally managed hidden field is created within the form element.
      var container = document.createElement('div');
      container.style.display = 'none';
      formEl.appendChild(container);

      var entry = {
         widgetId: null,
         token: null,
         tokenAt: 0,
         resolve: null,
         reject: null
      };

      entry.widgetId = window.turnstile.render(container, {
         sitekey: TURNSTILE_SITE_KEY,

         // Execute Turnstile only when the user submits the form.
         execution: 'execute',

         // Keep the widget completely invisible.
         appearance: 'execute',

         callback: function (token) {
            entry.token = token;
            entry.tokenAt = Date.now();

            if (entry.resolve) {
               entry.resolve(token);
               entry.resolve = null;
               entry.reject = null;
            }
         },

         'error-callback': function (code) {
            console.error('[CIJ Turnstile] Widget error:', code);

            if (entry.reject) {
               entry.reject(new Error('Turnstile error: ' + code));
               entry.resolve = null;
               entry.reject = null;
            }
         },

         'expired-callback': function () {
            entry.token = null;
            entry.tokenAt = 0;
         }
      });

      widgetState.set(formEl, entry);

      return entry;
   }

   function getToken(formEl) {

      return loadTurnstileScript().then(function () {

         var entry = renderWidget(formEl);

         var isFresh =
            entry.token &&
            entry.tokenAt &&
            (Date.now() - entry.tokenAt) < TOKEN_STALE_MS;

         if (isFresh) {
            return Promise.resolve(entry.token);
         }

         return new Promise(function (resolve, reject) {

            entry.resolve = resolve;
            entry.reject = reject;

            window.turnstile.reset(entry.widgetId);
            window.turnstile.execute(entry.widgetId);
         });
      });
   }

   function getFormFromEvent(evt) {

      var target = evt && evt.target;

      if (!target) {
         return null;
      }

      if (target.tagName === 'FORM') {
         return target;
      }

      if (target.querySelector) {
         var nested = target.querySelector('form');

         if (nested) {
            return nested;
         }
      }

      return target.closest ? target.closest('form') : null;
   }

   function setTokenField(formEl, token) {

      var input = formEl.querySelector('[name="' + TOKEN_FIELD_NAME + '"]');

      if (!input) {
         console.error(
            '[CIJ Turnstile] Could not find field "' +
            TOKEN_FIELD_NAME +
            '". Add an unmapped field with this name in the Customer Insights – Journeys form designer.'
         );
         return false;
      }

      input.value = token;

      return true;
   }

   function getSubmitButton(formEl) {
      return formEl.querySelector('button[type="submit"], input[type="submit"]');
   }

   function showWaiting(formEl) {

      var btn = getSubmitButton(formEl);

      if (btn) {
         btn.disabled = true;
         btn.style.opacity = '0.6';
         btn.style.cursor = 'wait';
      }
   }

   function hideWaiting(formEl) {

      var btn = getSubmitButton(formEl);

      if (btn) {
         btn.disabled = false;
         btn.style.opacity = '';
         btn.style.cursor = '';
      }
   }

   function onFormSubmit(evt) {

      var formEl = getFormFromEvent(evt);

      if (!formEl || formEl._cijResubmitting) {
         return;
      }

      // Allow the re-submitted request to continue once a valid token
      // has already been written to the hidden field.
      if (formEl._cijTurnstileReady) {
         formEl._cijTurnstileReady = false;
         return;
      }

      evt.preventDefault();

      if (evt.stopImmediatePropagation) {
         evt.stopImmediatePropagation();
      }

      showWaiting(formEl);

      getToken(formEl)

         .then(function (token) {

            setTokenField(formEl, token);

            formEl._cijTurnstileReady = true;
            formEl._cijResubmitting = true;

            // Re-submit the form after a valid Turnstile token has been obtained.
            if (formEl.requestSubmit) {
               formEl.requestSubmit();
            } else {
               formEl.submit();
            }

            setTimeout(function () {
               formEl._cijResubmitting = false;
            }, 0);
         })

         .catch(function (err) {

            // Do not allow the form to continue without a valid token.
            // The server-side plugin will also reject missing or invalid tokens.
            console.error('[CIJ Turnstile] Could not obtain token. Submission blocked.', err);

            hideWaiting(formEl);
         });
   }

   function wireForm(formEl) {

      if (formEl._cijTurnstileWired) {
         return;
      }

      formEl._cijTurnstileWired = true;

      loadTurnstileScript().then(function () {
         renderWidget(formEl);
      });
   }

   function findAndWireForms(root) {
      (root || document)
      .querySelectorAll(FORM_SELECTOR)
         .forEach(wireForm);
   }

   document.addEventListener(AFTER_LOAD_EVENT, function (evt) {

      var formEl = getFormFromEvent(evt);

      if (formEl) {
         wireForm(formEl);
      } else {
         findAndWireForms(document);
      }
   });

   document.addEventListener(SUBMIT_EVENT, onFormSubmit);

   // Handle forms that were rendered before this script was loaded.
   if (document.readyState !== 'loading') {
      findAndWireForms(document);
   } else {
      document.addEventListener('DOMContentLoaded', function () {
         findAndWireForms(document);
      });
   }

})();
Plugin Implementation
The plugin performs the server-side verification. The Execute method first retrieves the form submission payload supplied by Customer Insights. From that payload, it reads the cf_token field. The plugin then retrieves the Cloudflare Secret Key from the Dataverse Environment Variable. If the Environment Variable has not been configured, the plugin throws an exception because verification cannot continue.
Once both values are available, the plugin calls the Cloudflare SiteVerify endpoint using HttpClient. Cloudflare returns a JSON payload indicating whether the token is valid. Only successful responses allow the submission to continue. Finally, the plugin creates a ValidateFormSubmissionResponse object and returns it to Customer Insights. The cf_token field is included in ValidationOnlyFields, so it is ignored during entity creation.
using Microsoft.Xrm.Sdk;
using System;
using System.Collections.Generic;
using System.IO;
using System.Linq;
using System.Net.Http;
using System.Runtime.Serialization;
using System.Runtime.Serialization.Json;
using System.Text;

namespace SamplePlugin
{
    /// <summary>
    /// Validates Customer Insights - Journeys form submissions by verifying
    /// the Cloudflare Turnstile token before allowing record creation.
    /// Registered on:
    /// Message: msdynmkt_validateformsubmission
    /// Stage: PostOperation
    /// Mode: Synchronous
    /// </summary>
    public class ValidateTurnstilePlugin : IPlugin
    {
        private const string TurnstileVerifyUrl =
            "https://challenges.cloudflare.com/turnstile/v0/siteverify";

        private const string TokenFieldName = "tokenfieldname";

        private const string FailureMessage =
            "Captcha validation failed. Please refresh the page and try again.";

        private const string SecretKeyEnvironmentVariableSchemaName =
            "environmentvariablename";

        public void Execute(IServiceProvider serviceProvider)
        {
            var tracing =
                (ITracingService)serviceProvider.GetService(typeof(ITracingService));

            var context =
                (IPluginExecutionContext)serviceProvider.GetService(typeof(IPluginExecutionContext));

            if (!context.InputParameters.Contains("msdynmkt_formsubmissionrequest"))
            {
                tracing.Trace(
                    "[Turnstile] Input parameter 'msdynmkt_formsubmissionrequest' not found.");
                return;
            }

            var serviceFactory =
                (IOrganizationServiceFactory)serviceProvider.GetService(
                    typeof(IOrganizationServiceFactory));

            var service = serviceFactory.CreateOrganizationService(null);

            string secretKey = GetEnvironmentVariableValue(
                service,
                tracing,
                SecretKeyEnvironmentVariableSchemaName);

            if (string.IsNullOrWhiteSpace(secretKey))
            {
                throw new InvalidPluginExecutionException(
                    $"Environment Variable '{SecretKeyEnvironmentVariableSchemaName}' does not contain a value.");
            }

            var request = Deserialize<FormSubmissionRequest>(
                (string)context.InputParameters["msdynmkt_formsubmissionrequest"]);

            var fields = request?.Fields ?? new List<FormField>();

            string token = fields
                .FirstOrDefault(f => f.Key == TokenFieldName)?
                .Value;

            if (string.IsNullOrWhiteSpace(token))
            {
                tracing.Trace(
                    $"[Turnstile] Token field '{TokenFieldName}' is empty.");

                SetValidationResponse(
                    context,
                    false,
                    FailureMessage);

                return;
            }

            bool isValid = VerifyTurnstile(
                secretKey,
                token,
                tracing);

            tracing.Trace(
                $"[Turnstile] Validation Result = {isValid}");

            SetValidationResponse(
                context,
                isValid,
                isValid ? null : FailureMessage);
        }

        private bool VerifyTurnstile(
            string secretKey,
            string token,
            ITracingService tracing)
        {
            var formContent =
                new FormUrlEncodedContent(
                    new Dictionary<string, string>
                    {
                        { "secret", secretKey },
                        { "response", token }
                    });

            using (var httpClient = new HttpClient())
            {
                string body;

                try
                {
                    var response =
                        httpClient.PostAsync(
                            TurnstileVerifyUrl,
                            formContent).Result;

                    body =
                        response.Content.ReadAsStringAsync().Result;

                    if (!response.IsSuccessStatusCode)
                    {
                        tracing.Trace(
                            $"[Turnstile] siteverify returned HTTP {(int)response.StatusCode}. " +
                            $"Body: {(string.IsNullOrWhiteSpace(body) ? "<empty>" : body)}");

                        return false;
                    }
                }
                catch (Exception ex)
                {
                    tracing.Trace(
                        "[Turnstile] Exception calling siteverify: " +
                        ex);

                    return false;
                }

                var verifyResponse =
                    Deserialize<TurnstileVerifyResponse>(body);

                tracing.Trace(
                    $"[Turnstile] success={verifyResponse.Success}, " +
                    $"hostname={verifyResponse.Hostname}, " +
                    $"errors={(verifyResponse.ErrorCodes == null ? "none" : string.Join(", ", verifyResponse.ErrorCodes))}");

                return verifyResponse.Success;
            }
        }

        private void SetValidationResponse(
    IPluginExecutionContext context,
    bool isValid,
    string error)
        {
            var response = new ValidateFormSubmissionResponse
            {
                IsValid = isValid,
                ValidationOnlyFields = new List<string>
                {
                    TokenFieldName
                },
                Error = error
            };

            context.OutputParameters["msdynmkt_validationresponse"] =
                Serialize(response);
        }

        private string GetEnvironmentVariableValue(
            IOrganizationService service,
            ITracingService tracing,
            string schemaName)
        {
            tracing.Trace(
                "[Turnstile] Retrieving Environment Variable: {0}",
                schemaName);

            var request = new OrganizationRequest(
                "RetrieveEnvironmentVariableValue")
            {
                Parameters =
                {
                    ["DefinitionSchemaName"] = schemaName
                }
            };

            var response = service.Execute(request);

            if (response.Results.Count == 0)
            {
                tracing.Trace(
                    "[Turnstile] Environment Variable '{0}' not found.",
                    schemaName);

                return null;
            }

            var value = response.Results
                .Values
                .FirstOrDefault()
                ?.ToString();

            tracing.Trace(
                "[Turnstile] Environment Variable '{0}' retrieved successfully.",
                schemaName);

            return value;
        }

        private static T Deserialize<T>(string json)
        {
            using (var stream =
                new MemoryStream(Encoding.UTF8.GetBytes(json)))
            {
                return (T)new DataContractJsonSerializer(typeof(T))
                    .ReadObject(stream);
            }
        }

        private static string Serialize<T>(T value)
        {
            using (var stream = new MemoryStream())
            {
                new DataContractJsonSerializer(typeof(T))
                    .WriteObject(stream, value);

                return Encoding.UTF8.GetString(stream.ToArray());
            }
        }

        #region Models

        [DataContract]
        private class FormField
        {
            [DataMember(Name = "Key")]
            public string Key { get; set; }

            [DataMember(Name = "Value")]
            public string Value { get; set; }
        }

        [DataContract]
        private class FormSubmissionRequest
        {
            [DataMember(Name = "Fields")]
            public List<FormField> Fields { get; set; }
        }

        [DataContract]
        private class ValidateFormSubmissionResponse
        {
            [DataMember(Name = "IsValid")]
            public bool IsValid { get; set; }

            [DataMember(Name = "ValidationOnlyFields")]
            public List<string> ValidationOnlyFields { get; set; }

            [DataMember(Name = "Error")]
            public string Error { get; set; }
        }

        [DataContract]
        private class TurnstileVerifyResponse
        {
            [DataMember(Name = "success")]
            public bool Success { get; set; }

            [DataMember(Name = "hostname")]
            public string Hostname { get; set; }

            [DataMember(Name = "error-codes")]
            public string[] ErrorCodes { get; set; }

            [DataMember(Name = "action")]
            public string Action { get; set; }

            [DataMember(Name = "challenge_ts")]
            public string ChallengeTimestamp { get; set; }
        }

        #endregion
    }
}
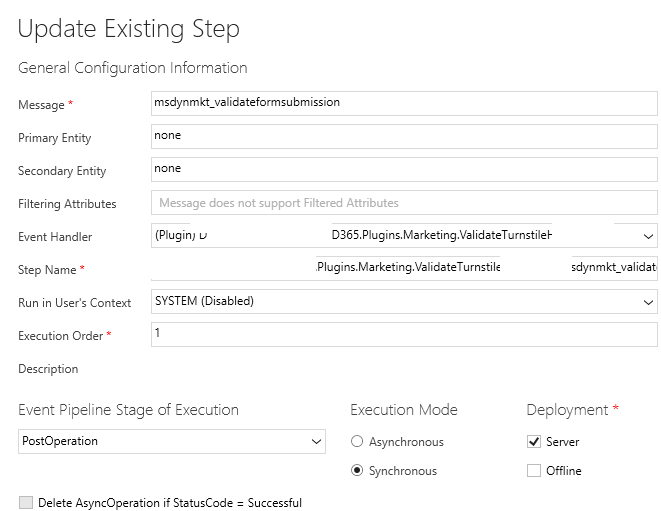
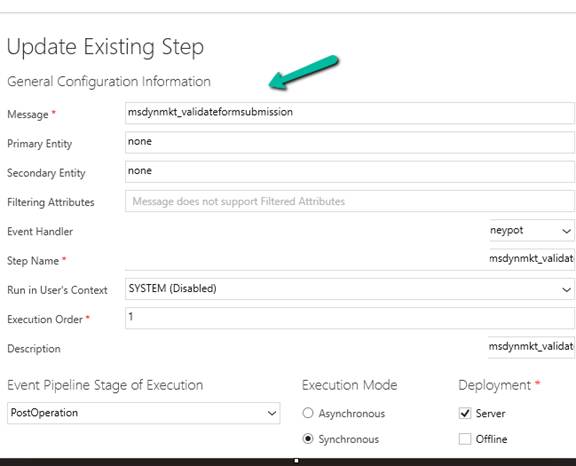
Register a synchronous plugin step on the msdynmkt_validateformsubmission message.
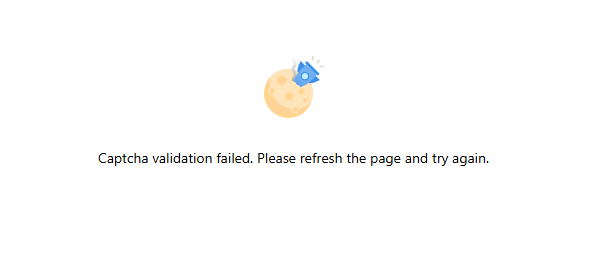
On failure – we get the message specified in the plugin
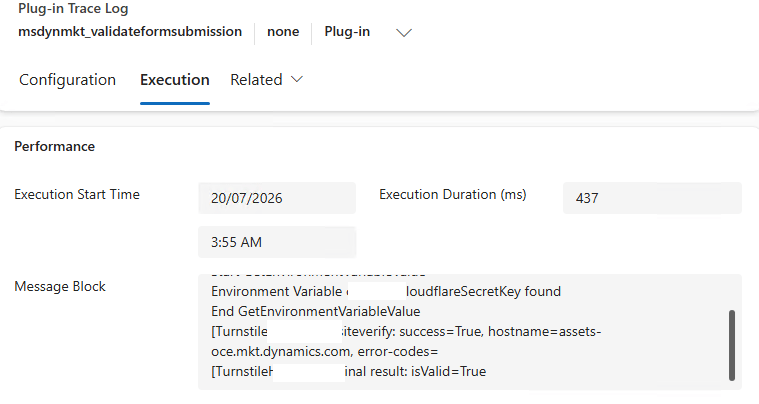
On the successful submission, we can see the marketing form submitted successfully and the details in our plugin trace log.
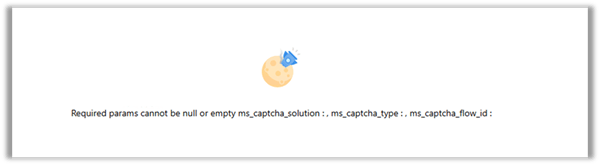
While implementing custom form submission validation (server side validation) for Dynamics 365 Customer Insights – Journeys Real-Time Marketing forms, we came across the following error,
“Required params cannot be null or empty – ms_captcha_solution ms_captcha_type ms_captcha_flow_id”
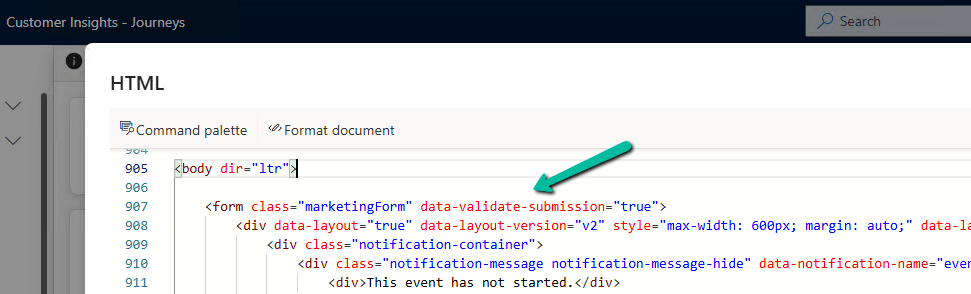
after enabling the data-validate-submission attribute on the form as shown below.
Setting this attribute to true caused the platform to invoke the msdynmkt_validateformsubmission Custom API, which ultimately resulted in the error.
After reviewing Microsoft’s documentation, plugin trace logs, and decompiling the Microsoft assemblies, we were able to understand exactly how the validation pipeline works.
When does this error occur?
• data-validate-submission=”true” is enabled. • Microsoft CAPTCHA isn’t configured. • Nocustom validation plugin overwrites the default validation response.
Understanding the Validation Pipeline
Customer Insights invokes the following Custom API:
msdynmkt_validateformsubmission
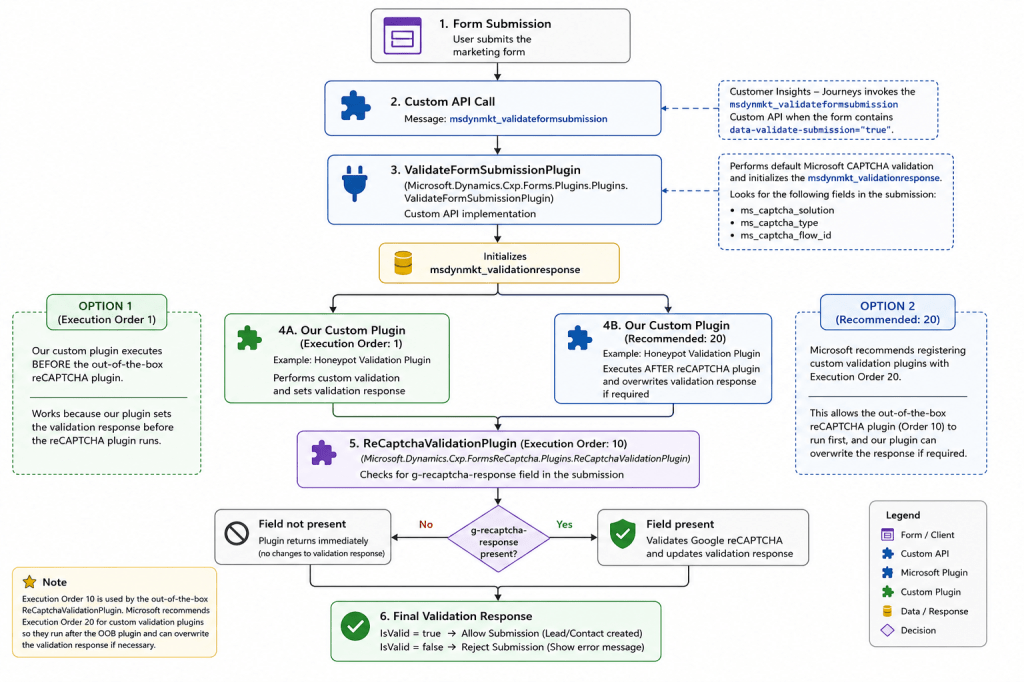
The msdynmkt_validateformsubmission Custom API is implemented by Microsoft’s Microsoft.Dynamics.Cxp.Forms.Plugins.Plugins.ValidateFormSubmissionPlugin, which performs the default CAPTCHA validation and initializes the msdynmkt_validationresponse.
We can then register our own plugin steps on the same message.
Microsoft recommends registering custom validation plugins with an Execution Order of 20, allowing them to execute after the out-of-the-box Microsoft.Dynamics.Cxp.FormsReCaptcha.Plugins.ReCaptchaValidationPlugin (Execution Order 10) and overwrite the validation response if required.
Check the flow below to get more details –
Why does the error occur?
The VerifyCaptchaChallenge service expects the following fields:
The ReCaptchaValidationPlugin checks for g-recaptcha-response. If it isn’t present, it simply returns.
if (field == null)
{
    tracing.Trace("g-recaptcha-response field was not present in form submission");
    return;
}
Plugin Trace Logs
Our trace logs confirmed:
1. ValidateFormSubmissionPlugin executes. 2. Our Honeypot plugin overwrites the validation response. 3. ReCaptchaValidationPlugin executes afterwards and exits because g-recaptcha-response isn’t present without throwing any exception.
Conclusion
Although the error appears to be a configuration issue, it’s actually the expected behaviour of the default validation pipeline. The default implementation expects Microsoft’s CAPTCHA fields. If we’re implementing our own custom plugin for form submission validation, it should overwrite the validation response after performing its own server-side validation.
In our previous post, we implemented a simple Honeypot for Dynamics 365 Customer Insights – Journeys Real-Time Marketing forms using JavaScript.
Although that prevents most automated submissions, the validation only runs in the browser. Anyone can bypass the JavaScript and submit requests directly to the server.
Fortunately, Customer Insights – Journeys provides a server-side validation pipeline through the msdynmkt_validateformsubmission message, allowing us to validate every form submission before a Lead, Contact, or custom record is created.
When a form with the data-validate-submission attribute is submitted, Microsoft first executes its built-in validation plugin, followed by any custom plugins registered on the same message.
Update the HTML of the marketing form and add the attribute –
One important behavior to be aware of is that if our form doesn’t contain Microsoft’s built-in CAPTCHA fields, the default Microsoft validation plugin sets IsValid = false, causing the submission to fail. Our custom plugin must overwrite this response by returning IsValid = true when our validation succeeds, or IsValid = false if it fails. In this post, we’ll use this pipeline to validate the Honeypot field that we created in the previous article.
The submitted form values are available in the msdynmkt_formsubmissionrequest input parameter.
Next, as described in the Microsoft Learn documentation, we can overwrite the response by returning a new ValidateFormSubmissionResponse with IsValid = true.
Read the Honeypot Field
var request = Deserialize<FormSubmissionRequest>(                (string)context.InputParameters["msdynmkt_formsubmissionrequest"]);
 var fields = request?.Fields ?? new List<FormField>();
 string honeypotValue = fields.FirstOrDefault(f => f.Key == HoneypotFieldName)?.Value;
Reject Bot Submissions
if (!string.IsNullOrWhiteSpace(honeypotValue))
{
    SetValidationResponse(context, false, "Form validation failed.");
    return;
}
Return the Validation Response
Customer Insights expects the plugin to return a ValidateFormSubmissionResponse. We also include the Honeypot field in ValidationOnlyFields, so it isn’t mapped to the target record.
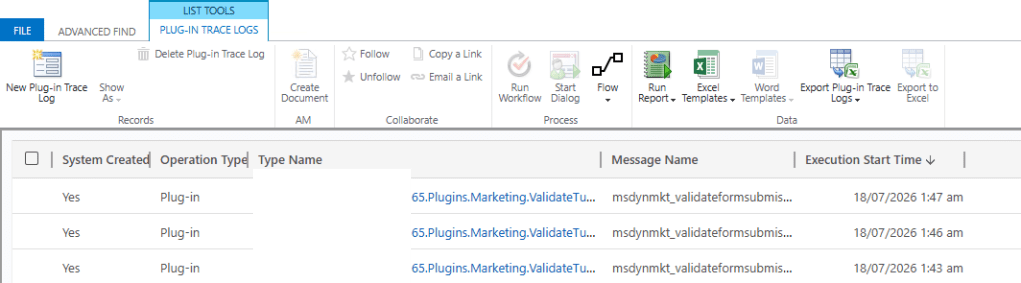
On Successful Form submission, we can see our validation plugin triggering
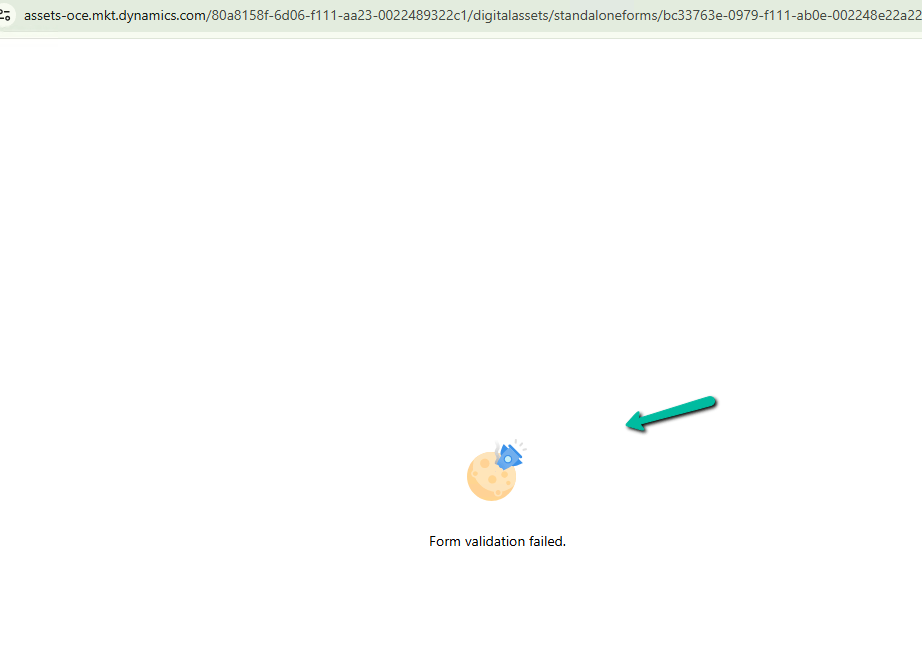
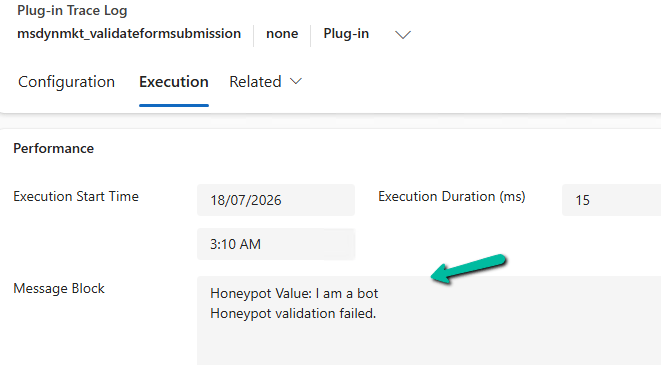
If server side validation fails (i.e. honey pot field has a value in it) we get our custom error message and submission fails.
Complete Plugin
using Microsoft.Xrm.Sdk;
using System;
using System.Collections.Generic;
using System.IO;
using System.Linq;
using System.Runtime.Serialization;
using System.Runtime.Serialization.Json;
using System.Text;

namespace DI.D365.Plugins.Marketing
{
    /// <summary>
    /// Plugin Registration
    ///
    /// Message: msdynmkt_validateformsubmission
    /// Stage: PostOperation
    /// Mode: Synchronous
    /// </summary>
    public class ValidateHoneypot : IPlugin
    {
        private const string HoneypotFieldName = "hp_check";
        private const string ErrorMessage = "Form validation failed.";

        public void Execute(IServiceProvider serviceProvider)
        {
            var context = (IPluginExecutionContext)serviceProvider.GetService(
                typeof(IPluginExecutionContext)
            );

            var tracing = (ITracingService)serviceProvider.GetService(typeof(ITracingService));

            if (!context.InputParameters.Contains("msdynmkt_formsubmissionrequest"))
            {
                tracing.Trace("Form submission request not found.");
                return;
            }

            var request = Deserialize<FormSubmissionRequest>(
                (string)context.InputParameters["msdynmkt_formsubmissionrequest"]
            );

            var fields = request?.Fields ?? new List<FormField>();

            string honeypotValue = fields.FirstOrDefault(f => f.Key == HoneypotFieldName)?.Value;

            tracing.Trace($"Honeypot Value: {honeypotValue}");

            if (!string.IsNullOrWhiteSpace(honeypotValue))
            {
                tracing.Trace("Honeypot validation failed.");

                SetValidationResponse(context, false, ErrorMessage);

                return;
            }

            tracing.Trace("Honeypot validation passed.");

            SetValidationResponse(context, true, null);
        }

        private void SetValidationResponse(
            IPluginExecutionContext context,
            bool isValid,
            string error
        )
        {
            var response = new ValidateFormSubmissionResponse
            {
                IsValid = isValid,
                ValidationOnlyFields = new List<string> { HoneypotFieldName },
                Error = error
            };

            context.OutputParameters["msdynmkt_validationresponse"] = Serialize(response);
        }

        private static T Deserialize<T>(string json)
        {
            using (var stream = new MemoryStream(Encoding.UTF8.GetBytes(json)))
            {
                return (T)new DataContractJsonSerializer(typeof(T)).ReadObject(stream);
            }
        }

        private static string Serialize<T>(T value)
        {
            using (var stream = new MemoryStream())
            {
                new DataContractJsonSerializer(typeof(T)).WriteObject(stream, value);

                return Encoding.UTF8.GetString(stream.ToArray());
            }
        }
    }

    #region Helper Classes

    [DataContract]
    public class FormSubmissionRequest
    {
        [DataMember(Name = "Fields")]
        public List<FormField> Fields { get; set; }
    }

    [DataContract]
    public class FormField
    {
        [DataMember(Name = "Key")]
        public string Key { get; set; }

        [DataMember(Name = "Value")]
        public string Value { get; set; }
    }

    [DataContract]
    public class ValidateFormSubmissionResponse
    {
        [DataMember(Name = "IsValid")]
        public bool IsValid { get; set; }

        [DataMember(Name = "ValidationOnlyFields")]
        public List<string> ValidationOnlyFields { get; set; }

        [DataMember(Name = "Error")]
        public string Error { get; set; }
    }
    #endregion
}
Conclusion
Adding a client-side Honeypot is a great first step, but validating it on the server makes the solution much more robust. Since every submission passes through the msdynmkt_validateformsubmission pipeline, bots can’t bypass the validation simply by skipping our JavaScript.
“The msdynmkt_validateformsubmission Custom API is implemented by Microsoft’s Microsoft.Dynamics.Cxp.Forms.Plugins.Plugins.ValidateFormSubmissionPlugin, which performs the default Microsoft CAPTCHA validation and initializes the msdynmkt_validationresponse. We can then register our own plugin steps on the same message. Microsoft recommends registering custom validation plugins with an Execution Order of 20, allowing them to execute after the out-of-the-box Microsoft.Dynamics.Cxp.FormsReCaptcha.Plugins.ReCaptchaValidationPlugin (Execution Order 10) and overwrite the validation response if required.”
While working with Dynamics 365 Customer Insights – Journeys Real-time Marketing Forms, we wanted to explore a simple way of reducing bot submissions.
A common technique used on websites is a honeypot. The idea is straightforward:
Add a field that genuine users never see.
Hide it using JavaScript.
If the field contains a value when the form is submitted, assume it was completed by a bot and cancel the submission.
In this post, we’ll implement this using the supported Client-side Extensibility events provided by Dynamics 365.
Step 1: Add an Unbound Field
Add a new Short Text field to the form.
The field can be Unbound, as it is only used for validation and does not need to be stored in Dataverse.
We used hp_check for the field name as this avoids browser autofill heuristics that may populate well-known fields such as Middle Name, Email, or Phone.
Step 2: Hide the Field
The field should remain in the HTML so that automated bots can still discover it, but it should not be visible to genuine users.
In our implementation, the field is hidden using CSS, which avoids any brief flicker that could occur if it were hidden only after the form loads.
Using the supported d365mkt-afterformload and d365mkt-formsubmit events, configure the field and validate it before submission.
<script>
let honeypotField = null;

document.addEventListener("d365mkt-afterformload", function () {

    honeypotField = document.querySelector('[name="hp_check"]');

    if (!honeypotField) {
        return;
    }

    honeypotField.setAttribute("autocomplete", "off");
    honeypotField.setAttribute("tabindex", "-1");
    honeypotField.setAttribute("aria-hidden", "true");
});

document.addEventListener("d365mkt-formsubmit", function (event) {

    if (honeypotField && honeypotField.value.trim() !== "") {
        event.preventDefault();
    }

});
</script>
The d365mkt-formsubmit event is cancelable, so calling event.preventDefault() prevents the form from being submitted.
Testing
To test the implementation, we opened the browser Developer Tools and executed the following in the Console:
document.querySelector('[name="hp_check"]').value = "I am a bot";
When we clicked Submit, the d365mkt-formsubmit event was triggered and event.preventDefault() successfully cancelled the submission.
Things to consider
While implementing this, there were a few considerations that helped improve the solution:
Use a neutral field name such as hp_check instead of generic field name to reduce the chance of browser autofill populating the field.
Hide the field using CSS instead of JavaScript to avoid a brief flash of the field while the page is loading.
Keep the field unbound, as it is only used for validation.
A client-side honeypot helps reduce spam submissions, but it should be considered one layer of protection. For higher security requirements, additional server-side validation can also be implemented. For e.g. if it is bound field on lead than a plugin on pre create operation or if it is unbound we can have plugin against Form Submission table.
Conclusion
A honeypot is a simple but effective technique for reducing automated submissions to Dynamics 365 Customer Insights – Journeys Real-time Marketing Forms.
By using the supported Client-side Extensibility events, the implementation remains lightweight, requires no Dataverse customizations, and can be easily reused across multiple for
When running marketing campaigns, UTM parameters help us understand where our leads are coming from. They help us track whether a lead came from Google Ads, Facebook campaigns, email campaigns, or some other source.
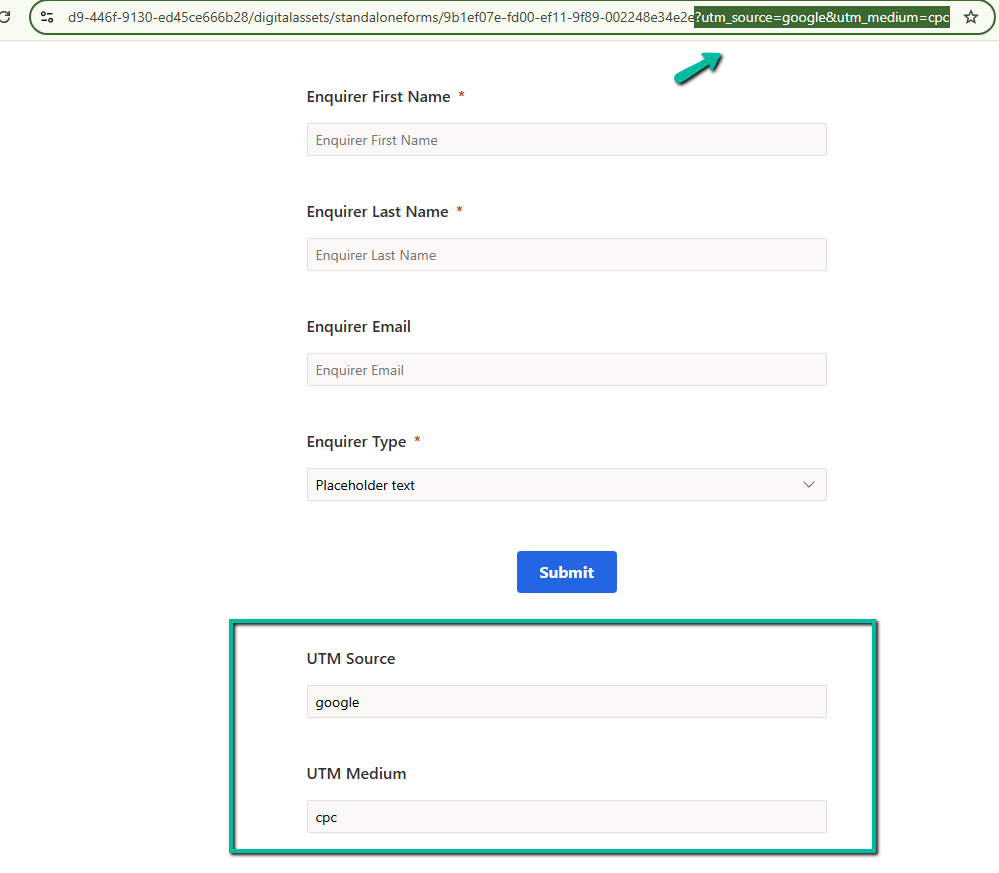
Recently while working with a Dynamics 365 Marketing form, we used a small JavaScript snippet to automatically capture UTM parameters from the URL and store them directly into marketing form fields.
In the example below, the values from the URL are automatically populated into the form fields.
The script first waits for the Dynamics 365 Marketing form to fully load using the d365mkt-afterformload event. This is important because the fields may not yet exist when the page initially loads.
After that, the script reads the query string from the URL using URLSearchParams. So if the URL contains values like utm_source=google or utm_medium=cpc, those values become available to the script.
The mappings array is used to map URL parameters to marketing form fields. For example, utm_source maps to custom_utm_source and utm_medium maps to custom_utm_medium.
The script then loops through each mapping, finds the matching field inside the marketing form, and sets the value automatically.
Using this approach helps us capture campaign attribution data directly inside Dataverse during form submission