How to – configure website tracking in Dynamics 365 Marketing


We can create a website record in Dynamics 365 Marketing to trace visitors to the website.

To setup Dynamics 365 Marketing (trial) – https://nishantrana.me/2021/11/13/step-by-step-configure-dynamics-365-marketing-in-a-dataverse-environment

Navigate to Outbound marketing >> Internet Marketing >> Marketing websites and create a new marketing website record.

Marketing will record closely grouped visits from a single browser as a single session. A new session will start after the timeout specified period of inactivity – 20 min is the default.

On saving the record, JavaScript Code and Form capture code is generated. The URL field and Description are for entering details for the website record for our use, it doesn’t affect the codes generated.

JavaScript code can be added to any page that we want to track. We can reuse the same code across multiple pages or can have different website records (code) for each page as per our requirements. JavaScript uses cookies for tracking, the users will remain anonymous till they register themselves through the landing page.

Form capture code is used when we want to integrate with a form created externally. We will look at it in later posts when we discuss marketing forms.

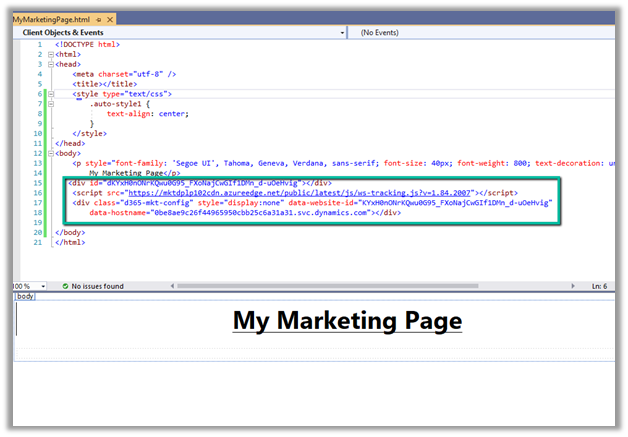
Below we have added the JavaScript code to one of the HTML pages inside Visual Studio.

Let us open the page in the browser.

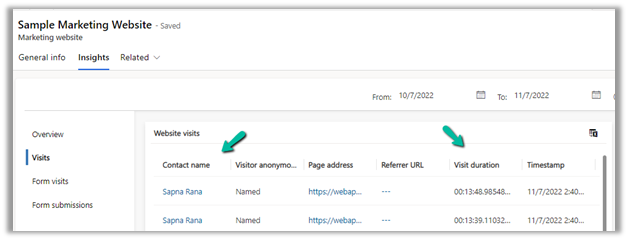
Go to Insights >> Visits in the marketing website record, we can see the visits being tracked.

Now we have published the page in the Azure App Service, just to see what details are captured this time.

This time we can see it tracking the Page Address, unlike last time when we were running it locally.

If the user has registered through the landing page (through marketing form submission, which we’d cover in the next post), we will get more details about the visitor as shown below.

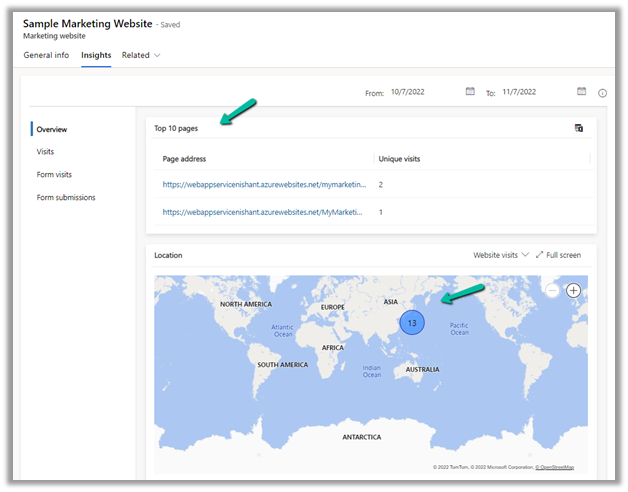
Within the overview section, we can get a few more details as shown below.

Hope it helps..

Advertisements

How to – configure Outbound Calling – Dynamics 365 Omnichannel for Customer Service


For setting up Outbound calling we need to first set up a phone number that will be used for outbound calling.

This would help – https://nishantrana.me/2022/10/17/how-to-set-up-omnichannel-voice-using-azure-communication-service-acs/

In a nutshell below are the steps we are going to perform –

  1. Configure Phone Number for outbound calling.
  2. Define a queue of type voice for outbound calling or use an existing queue.
  3. Configure outbound capacity profile and add users.
  4. Create an outbound profile using the phone number, queue, and outbound capacity profile.

Next click on Edit for the phone number added.

Select Make calls for the phone number and save the changes (if not already done) for enabling outbound calling.

Next select Setup for the phone number.

Select Create a profile to create an outbound profile. For agents to make an outbound call they must be assigned or added to an outbound capacity profile.

https://learn.microsoft.com/en-gb/dynamics365/customer-service/configure-outbound-inbound-profiles

For each phone number, we need to define an outbound profile.

Clicking on Create profile will take us to the page for creating the new outbound profile. We can also navigate there directly through – Advanced Settings >> Agent Experience >> Outbound and Inbound Profile >> Manage


Before we can create a
new outbound profile, we need to have Queue and Capacity Profile in place.

Here we have a Queue named Default Voice Queue of type Voice created and a user added to it.


For creating a Capacity profile, navigate to User Attributes >> Capacity Profile >> Manage


Here we have a capacity profile named – Default voice outbound with the users added to it.


With the Phone Number, Voice Type – Queue, and Capacity Profile defined, let us now create the new outbound profile.

Navigate to – Advanced Settings >> Agent Experience >> Outbound and Inbound Profile >> Manage

Select + New profile

Specify the Profile name and Profile type as Outbound.

Add the phone number and specify the Outbound
info required.

Specify Outbound behaviours

Click on Next and check the details in the summary and Save and close to create the outbound profile record.

Now with the configuration done, agents can make calls by clicking the Launch
Dialer.

Or from the Mobile Phone field, they can click on the Phone icon.

It launches the Dialer, with the phone number populated.

Lastly, we can also assign a Phone Number to a user, which allows him to make calls using that number. (toll-free numbers cannot be assigned)

https://learn.microsoft.com/en-us/dynamics365/customer-service/voice-channel-outbound-calling?tabs=omnichanneladmincenter#assign-personal-phone-numbers-to-agents

https://learn.microsoft.com/en-us/dynamics365/customer-service/voice-channel-outbound-calling?tabs=omnichanneladmincenter

With all the proper configurations in place, we were able to make an outbound call using the phone number configured as shown below.

Please check – https://neilparkhurst.com/2022/04/05/omnichannel-for-customer-service-outbound-voice-calling/

https://learn.microsoft.com/en-us/dynamics365/customer-service/voice-channel-outbound-calling?tabs=customerserviceadmincenter

Hope it helps..

Advertisements

How to – Access Dataverse environment storage using SAS Token


We can access our environment’s storage using a SAS token. 

Download – Azure Storage Explorerhttps://azure.microsoft.com/features/storage-explorer/#overview

Select Connect to Azure resources option

Select ADLS Gen2 container or directory for the Azure storage type.

Select the Shared access signature URL for the connection

To get the SAS URLhttps://[ContainerURL]/CDS?[SASToken],

we need ContainerURL and SASToken.

To get Container URL use the below link –

ContainerURL = <a href="https:///api/data/v9.1/datalakefolders”>https://&lt;EnvironmentURL>/api/data/v9.1/datalakefolders

In our case – https://mycrm2022.crm.dynamics.com/api/data/v9.1/datalakefolders

The containerendpoint = https://aeth2b4c5907361d483c9641.dfs.core.windows.net/aeth-b986098f-1315-45cc-b8e6-61c5a1a1631a

Copy the value of containerendpoint (ContainerURL)


Navigate to the below URL by replacing the value of the Environment URL and Container URL

<a href="https:///api/data/v9.1/RetrieveAnalyticsStoreAccess(Url=@a,ResourceType=’Folder&#8217;,Permissions=’Read,List’)?@a=’/CDS”>https://&lt;EnvironmentURL>/api/data/v9.1/RetrieveAnalyticsStoreAccess(Url=@a,ResourceType=’Folder’,Permissions=’Read,List’)?@a='<ContainerURL>/CDS’

i.e.

https://mycrm2022.crm.dynamics.com/api/data/v9.1/RetrieveAnalyticsStoreAccess(Url=@a,ResourceType=’Folder’,Permissions=’Read,List’)?@a=%27https://aeth2b4c5907361d483c9641.dfs.core.windows.net/aeth-b986098f-1315-45cc-b8e6-61c5a1a1631a/CDS%27

to get the SAS token (the SAS Token will expire after 1 hour)


Construct the SAS URL which we will use in the Azure Explorer’s connection info  <a href="https:///CDS?https://<ContainerURL>/CDS?<SASToken&gt;

https://aeth2b4c5907361d483c9641.dfs.core.windows.net/aeth-b986098f-1315-45cc-b8e6-61c5a1a1631a/CDS?skoid=3c1e8701-292f-478f-8f42-df7e9cc692c9&sktid=975f013f-7f24-47e8-a7d3-abc4752bf346&skt=2022-11-04T19%3A02%3A44Z&ske=2022-11-04T20%3A18%3A44Z&sks=b&skv=2020-08-04&sv=2020-08-04&se=2022-11-04T20%3A08%3A44Z&sr=d&sp=rl&sdd=1&sig=kKHHJLbb4gjAtTiQCbiuwQ8QrInY33zGEY1FvpxCLK%03D0

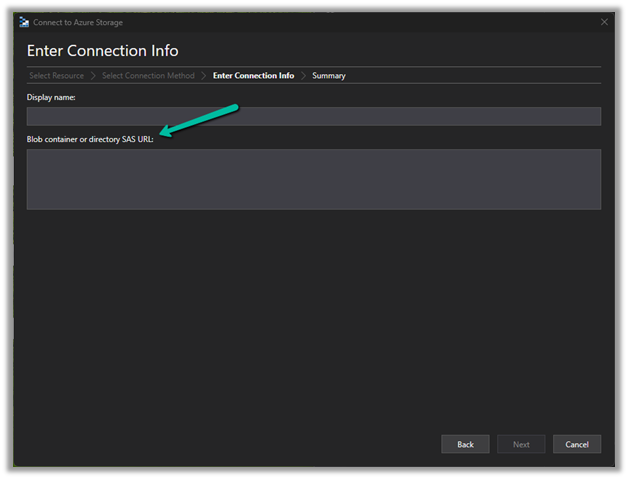
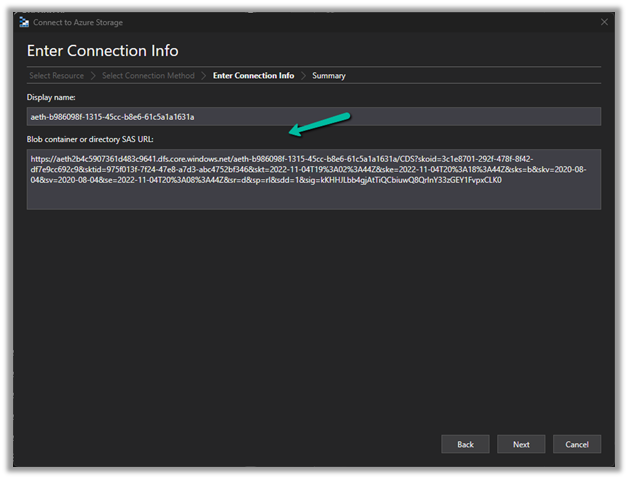
Now we have access to the storage

Here we have opened the contact folder just as an example


We only have read-only access, any other access like delete, rename, upload, etc. will fail


Get all the details here – https://learn.microsoft.com/en-us/power-platform/admin/storage-sas-token

Hope it helps..

Advertisements

How to – quickly find Tenant Id https://www.whatismytenantid.com/


Recently we had to find the tenant id, usually, we will log in to Azure Portal and within Azure Active Directory we will get the tenant id.

However, in this case, we only had the user’s email address.

So we had https://www.whatismytenantid.com/ to help us here.

Just enter the domain name, and click on Find my tenant ID.

The result –

The corresponding PowerShell script – https://craigporteous.com/azure-tenant-id-powershell/

Hope it helps..

Advertisements

Key points – Copying environment in Dynamics 365 Marketing


Few key points for quick reference, if we plan to copy Dynamics 365 Marketing environment.

You could find all the details here –

https://learn.microsoft.com/en-us/dynamics365/marketing/manage-marketing-environments

Copy procedure will –

  • Delete the target environment
  • Uninstall the Dynamics 365 Marketing on the target environment (if the target environment already has the marketing license it will take over the same license).
  • Delete all the interactions records – email clicks, website visits, etc. and images used in Email and Marketing Pages (they need to be backed up in separate storage, the marketing environment backup will not have that data as it is managed separately / differently by Marketing Service including Marketing Insight Service).

After Copy

  • We need to re-run the Marketing Setup as the email sending and insights services will not work.
  • The marketing setup will create a new set of marketing services, therefore new interaction data will be created.
  • We need to again Authenticate Domain and update the DNS records.
  • Images used in Email and Marketing pages in Source Environment will have to be uploaded again in the Target Environment, else they will keep referring to the images hosted in the source environment.
  • All the emails, customer journeys, lead-score records, and more will be in the draft stage after copy, they need to be updated to the go-live status in the target environment.
  • All real-time journeys will be in the stopped stage, to restart them the journey must be duplicated before it can be executed.
  • In case Power App portals are being used, they need to reset first in the target environment to release the license and need to be configured again after copy

Also,

We can use the Configuration Migration Utility to move data between environments – marketing pages, journeys, emails, etc.

Interaction data cannot be to transferred to the target environment.

Solution export and import procedure can be used to move the customizations between different environments.

For extracting marketing interactions – https://community.dynamics.com/365/dynamics-365-fasttrack/b/dynamics-365-fasttrack-blog/posts/extracting-marketing-interactions-in-dynamics-365-marketing

Below is our marketing app showing configured before copy –

and after copying the environment, as expected, shows Not configured.

On trying to re-run the marketing setup we got the below error –

Click on Retry starts the uninstall process

We had to raise the Microsoft Support which eventually fixed the issue at their end with the help of Product Group team.

Hope it helps..

Advertisements

Few key points – Dynamics 365 Marketing Licensing / Apps


Below are a few key points and links for quick reference –

Core Marketing License

Dynamics 365 Marketing – For organizations without any other Dynamics 365 Application.

Dynamics 365 Marketing Attach – For organizations with qualifying Dynamics 365 Applications (minimum 10 users of the following apps – Dynamics 365 Sales, Customer Service, Field Service, Supply Chain Management, Finance or Commerce)

Additional Marketing Licenses – that can be purchased apart from the core license –

Production License – Used for the production environment. Fully functional and includes both solutions and services. It is licensed per tenant and includes a default capacity allotment of 10K Marketing contacts (contact, lead, account, customer insights B2C profile, etc) and 100K marketing interactions (email, SMS, push notifications) per month.

Non-Production License – Used for the test environment to try out new features or customizations. Fully functional and includes both solutions and services but has strict quotas and cannot be used to run production campaigns.

Solution Only License – Used for development or test environment for customizations, importing or exporting solutions, non-functional testing, other development, etc. Only includes solutions and entities and doesn’t include any services. Included with Paid Licenses. To convert a solution-only environment to production or non-production, we will need to purchase either production or non-production license and do the configuration using the marketing setup wizard.


Another Tenant example –

Picture1

A configured Marketing Application app will have the unique id of the organization / env. appended to it, on which it has been configured as shown above.

Dynamics 365 Marketing Application App: This is a fully functional Dynamics 365 Marketing application, including both solutions and services. Mainly for production but can be used for another environment for testing the functionalities.

Dynamics 365 Marketing Solution Only App: This application includes all the marketing solutions/entities but doesn’t include any services. It can be installed on as many test or development environments as needed for no additional charge.

Other points –

We can only have one Dynamics 365 marketing app per environment i.e. each Dynamics 365 Marketing App can be tied to only one environment.

To add more marketing apps to the tenant, we need to purchase an additional license. On purchase of the license, we can see an unconfigured Dynamics 365 Marketing app added in the tenant.

We can have n number of marketing apps available in the tenant, which can be assigned to any of the Dynamics 365 environments not being used for marketing earlier.

We can also set up a marketing trial – https://learn.microsoft.com/en-us/dynamics365/marketing/trial-signup which can be later purchased – https://learn.microsoft.com/en-us/dynamics365/marketing/direct-purchase#purchase-a-license-within-a-trial

Adding Marketing capacities – We can buy additional marketing contacts and interactions as below

Dynamics 365 Marketing Pricinghttps://dynamics.microsoft.com/en-us/marketing/pricing/

Step by step – Configure Dynamics 365 Marketing in a Dataverse Environment

Hope it helps..

Advertisements