How to – Create Marketing form submission record through Flow (Power Automate) – Dynamics 365 Marketing


Recently we were exploring the possibility of creating a marketing form submission record through flow/custom code. Here simply creating the marketing form submission record is not enough, for it to be processed by the platform, we need to call the bound action – msdyncrm_UpdateMarketingFormSubmission with Step = Retry. (And it’s all not an officially supported scenario, so be careful)

Below is how the flow looks like

First, we create a form submission record –

After creating the form submission record, we are creating and associating the marketing field submission records with the values that we want to pass for the form – email, first name, and last name in this case.

And then eventually calling the action –msdyncrm_UpdateMarketingFormSubmission to trigger the submission (resubmit) of the form submission record.

On running the flow, we can see the record created with the status as pending.

Within a few seconds, if the input is correct, we can see the status updated as success

and the corresponding contact/lead created or updated.

Hope it helps..

Advertisements

Using addProperty to dynamically add a custom property to a JSON object – Power Automate


Recently while working on the integration of Facebook Lead Ads with CRM, through Webhooks / Power Automate we had to process the lead data and create lead and contact records.

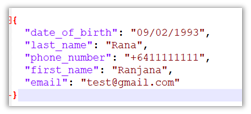
Below is a sample format in which we’d get the lead data for the FB form having a first name, last name, date of birth, and email fields in it.

Now we want to create an object having name as proprety and value from values like below from the above response, which will make it easy for use to refer in add a new row / update a row Dataverse step.

For this we will be using addProperty function.

Below is our sample flow –

First we are initializing varJSON – string variable with the JSON response

Than intializing the another variable varFieldData as type Object

Parse JSON action using the sample response.

Here we are interested in field_data property

So in the next step, we loop through each field_data, than use addProperty function in Compose to add name and value to the varFieldData object, and use the outputs of compose to set the varFieldData variable.

addProperty function – addProperty(variables(‘myObject’), ‘newProperty’, ‘propertyValue’)

In the next step, we can see the varFieldData and the way we can access the property last_name added to it.

On running the flow we can see the result as expected –

Hope it helps..

Advertisements

Using Coalesce Function to handle null value in Power Automate – Dataverse


Recently in one of our flows, we were getting the below error –

InvalidTemplate. Unable to process template language expressions in action ‘List_rows_:_Region’ inputs at line ‘0’ and column ‘0’: ‘The template language function ‘replace’ expects its first parameter ‘string’ to be a string. The provided value is of type ‘Null’. Please see https://aka.ms/logicexpressions#replace for usage details.’.

One or more fields provided is of type ‘Null’, a different type is expected.

This was because the replace function that we were using for the Filter rows property of List Rows (Dataverse) had the variable value as null.

Below was our dynamics expression where we replaced apostrophe with 2 single quotes – https://nishantrana.me/2023/02/27/how-to-handle-single-quote-apostrophe-in-filter-rows-in-power-automate-dataverse/

replace(replace(variables(‘varFieldData’)?[‘myVariable’],‘_’,’ ‘),””,”””)

The solution was to use coalesce function, to replace null with a blank string as shown below.

replace(replace(coalesce(variables(‘varFieldData’)?[‘myVariable’],”),‘_’,’ ‘),””,”””)

Similarly, we can use coalesce function to provide a default value.

The coalesce function will evaluate its arguments in order and will return the first non-blank or non-empty value. If all the arguments are blank or empty strings, the function will return blank.

After using the coalesce function, our flow was successful.

More on COALESCE

A similar example in SQL –

Hope it helps..

Advertisements

How to – Handle single quote/apostrophe in Filter Rows in Power Automate (Dataverse)


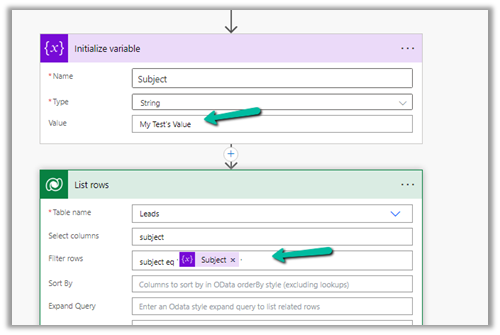
Say for e.g. we have the below flow, which finds the lead having subject as “My Test’s Value”

On running it we get the below error

To make it work we can make use of replace function here.

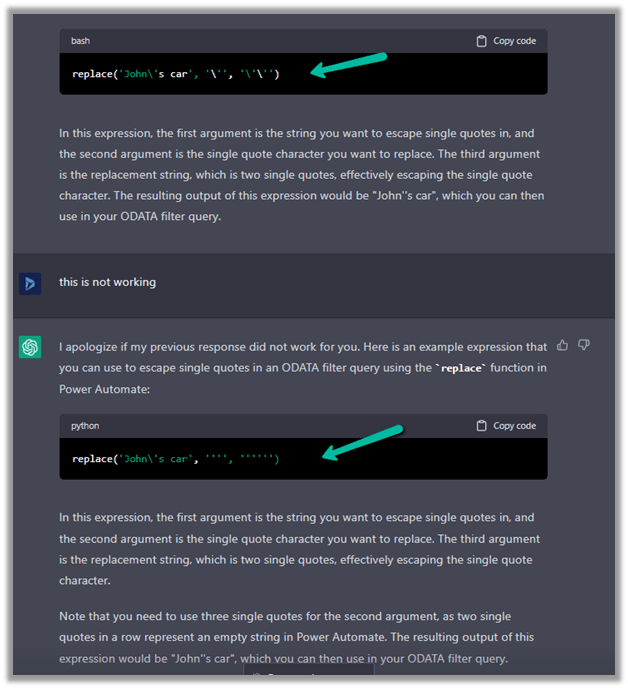
replace(variables('Subject'),'''','''''')

‘ = to espace

‘ = special character

replace(variables(‘Subject’),‘‘‘‘,‘‘‘‘‘‘)

Please refer to the helpful post- https://techcommunity.microsoft.com/t5/power-apps-power-automate/how-to-handle-single-quotes-in-the-filter-property-with-get/m-p/2617747

This time it works successfully.

ChatGPT – quick to correct and give the right answer.

Hope it helps..


Advertisements

Resolved – Request to XRM API failed with server error: ‘Message: Timeout occurred when calling the XRM api’ Code: InnerError: Type: System.Threading.Tasks.TaskCanceledException Message: A task was canceled in Power Automate


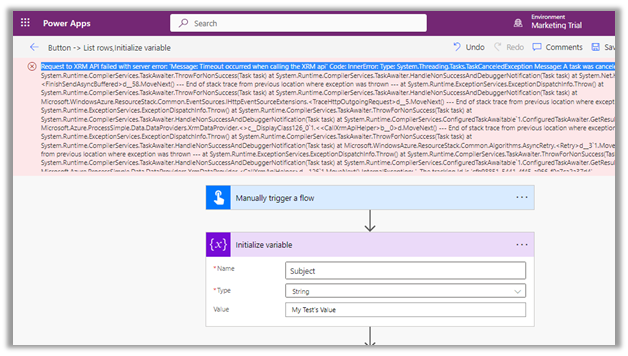
We were getting below Timeout error while trying to save our Power Automate flow.

Request to XRM API failed with server error: ‘Message: Timeout occurred when calling the XRM api’ Code: InnerError: Type: System.Threading.Tasks.TaskCanceledException Message: A task was canceled. 

It could be because of some issues at the product end – some outage or server load. It lasted for around 15-20 minutes for us, after which we were able to save and test our flow successfully.

Hope it helps..

Advertisements

How to – Hide Approve / Reject Button in Approval Email in Power Automate Approval Workflow


Recently we had a requirement to remove or hide the Approve and Reject buttons from the approval email as we wanted the user to manage it all from the Approval Center.

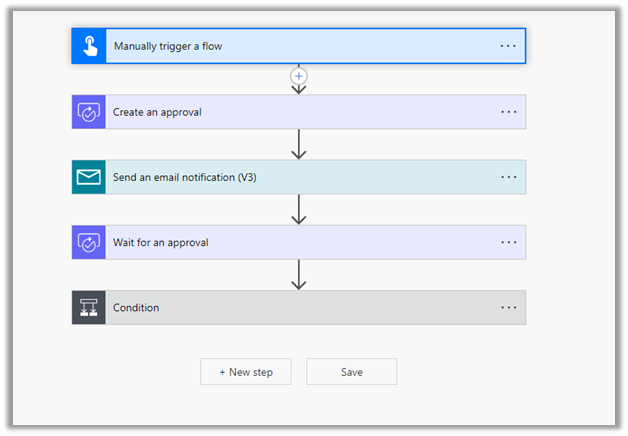
The way we implemented this is by replacing the Start and wait for an approval action with Create an approval, Send email notification and Wait for an approval action.

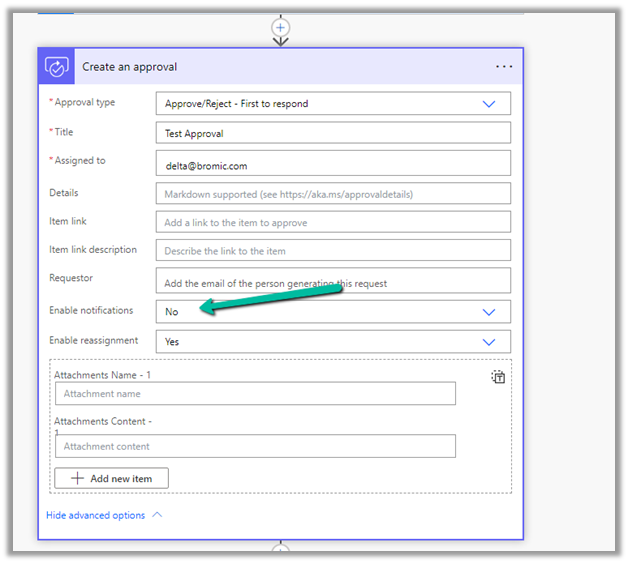
For Create an approval action, set Enable notifications as No this makes sure no email is sent.

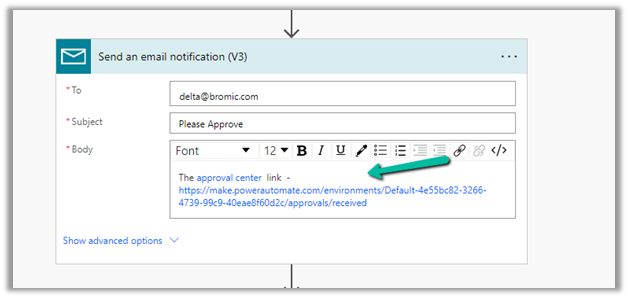
Followed by– in the body, specify Send an email notification the Approval Center link.

Followed by Wait for an approval, specify the Approval ID there.

And the Condition control and the required logic.

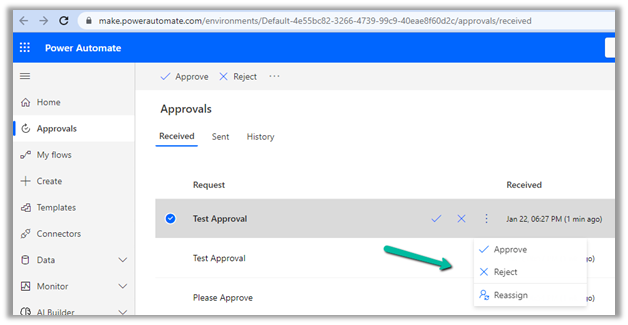
After running the flow, the user will get the email and can click the link to navigate to the Approval center.

The user can then take the required action from within the Approval center.

The flow will wait for the user

Also, check – Implementing approvals with Teams notifications

https://powergi.net/2021/07/11/use-power-automate-approvals-with-teams-notifications-only-no-emails/

Check other articles on Power Automate Approvals 

Approvals – Power Automate & Dynamics 365

Hope it helps..

Advertisements