Use ExecuteWorkflowAction to call Action and Workflow in CDS Destination KingswaySoft – Dynamics 365 / Dataverse


We can use ExecuteWorkflowAction in the CDS/CRM Destination Component of KingswaySoft’s SSIS Integration Toolkit for Dynamics 365 to execute workflow and custom action.

If there is no Destination Entity defined (left blank), Workflow/Action options will list down all the global action available


On selecting a specific entity/table e.g. lead entity, it is listing down the actions tied to the lead entity and the on-demand workflows created for the lead.

Here new_TestLeadAction is a custom action and Test Lead Workflow On-Demand is an On-Demand Workflow.


Suppose we have the following input and output parameters defined in the custom action.


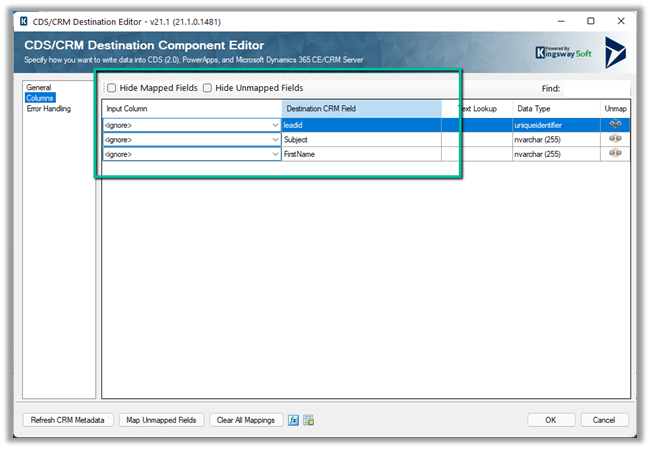
Within the CRM Destination Component, we can see the input fields listed for mapping along with the LeadId field where it expects the GUID of the lead record to be passed, against which action has to be executed.


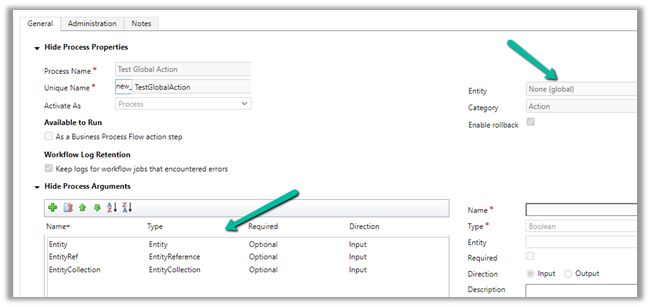
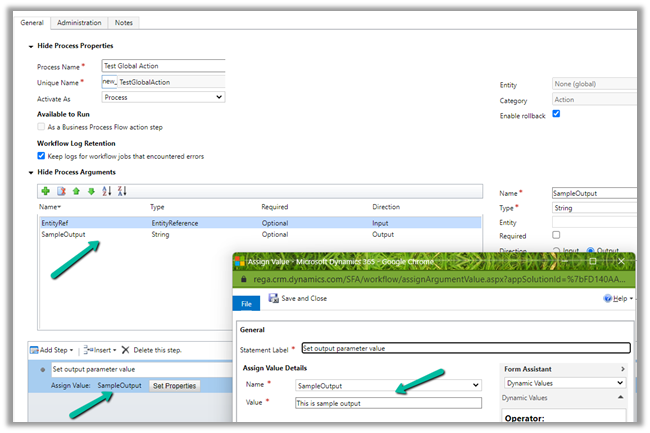
Let us create a custom Global Action – Test Global Action and see if it is listed there or not.


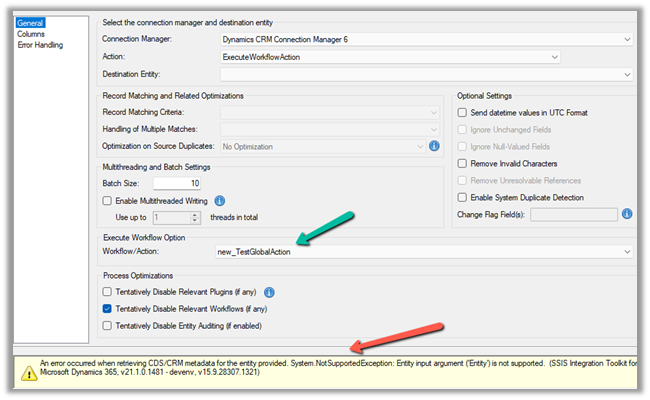
We can see the custom global action listed when there is no destination entity selected as we saw earlier.

However, we also get the error that the Entity as input argument is not supported.


We get the same error for the input parameter of type Entity Collection.


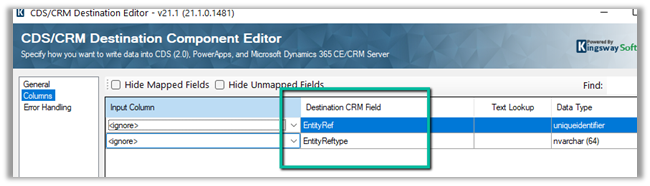
For Entity Reference input it works properly and expects Entity Ref and Entity Ref Type to be passed.

We have removed the input parameter of type Entity and Entity Collection and added an output parameter named SampleOutput.

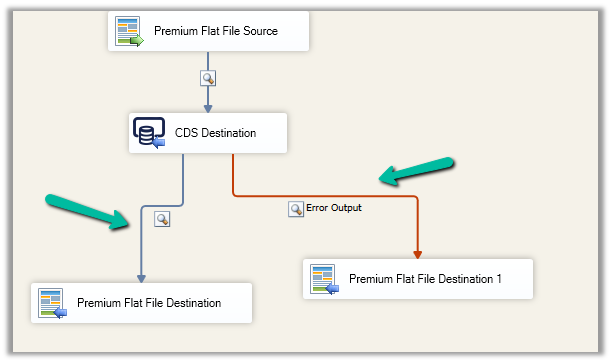
Surprisingly within our SSIS package, we could not figure out to get the output parameter’s value back from the Action.


We asked KingswaySoft Technical Support (support@kingswaysoft.com), and as usual, within a couple of hours the experts there were able to confirm our understanding that output parameters are not supported in the CDS Destination component for now.

Check other posts on KingswaySoft and Dynamics 365 / CRM https://nishantrana.me/2020/10/16/ssis-kingswaysoft-and-dynamics-365/

Hope it helps.

Advertisements

Set Auto Number field value conditionally in Dynamics 365 / Dataverse


Recently we had a requirement to use auto numbers for lead records.

However, based on where the lead records are being created from, we wanted to specify a different prefix to it.

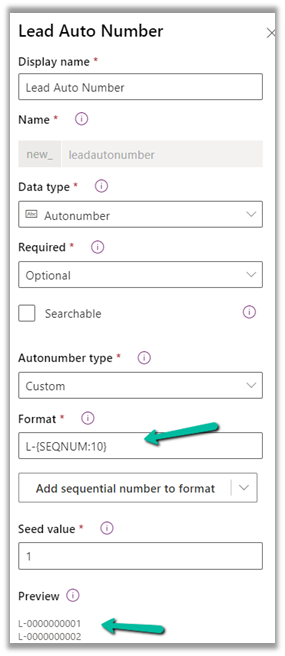
For leads created manually, the format should be prefixed “L” followed by “– “and then 10 digit sequence number.

L-{SEQNUM:10}

And if created through API the prefix should be B.

B-{SEQNUM:10}

To achieve this, we can define an auto-number field with the following format.


Next, we can have a bool field (default – false) in the lead table, to identify if it is being created from the API, which we can set while creating the lead record through API.

And a Pre Create Plugin on Lead to check the value of that field.

If it is set (true), that we can replace the Prefix from L to B in the auto-number field within the context.

In the Pre Create plugin, we get the next sequence in the auto-number field, so simply replacing/setting the value of the auto numbering field did the trick.

Lead created through Web Application –

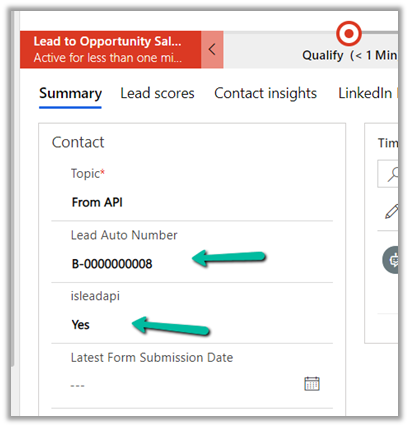
Lead created through API –

Here uniqueness was more important than the next sequence of the lead record so this solution worked.

Also check –

https://jonasr.app/2020/03/anm-unique-seq/

https://nishantrana.me/2021/11/09/few-key-points-auto-number-field-in-dataverse-dynamics-365-ce-crm/

Hope it helps..

Advertisements

Fixed – BadGateway. The request failed. Error code: ‘502’. Error Message: ‘BadGateway’ in PowerAutomate – Start and wait for an approval


Recently we were getting the below error for one of our Flows.

BadGateway. The request failed. Error code: ‘502’. Error Message: ‘BadGateway’.

Everything seemed right.

Finally, found (thanks to the forum) that the fix was to update the Approvals Administrator security role.

Provide – Read Access to System Job inside Customization tab.

Before

After

This time our flow worked smoothly.

Hope it helps..

Advertisements

How to enable Collaboration feature in Dynamics 365 CRM Online?


Quick reference…

Arun Potti's avatarArun Potti's Power Platform blog

View original post 377 more words

Lookup Behavior – Minimum character to trigger search and delay between trigger – Dynamics 365


Within Power Platform Admin Center – (https://admin.powerplatform.microsoft.com/)  through Environments >> [Name] >> Settings >> Behavior >> Lookup Behavior settings we can control the minimum number of characters entered before triggering the search in the and delay before the search is triggered for the lookups.

  • Minimum number of characters to trigger typeahead search – Default (2)
  • Delay between character inputs that will trigger a search – Default (250ms)

Here we have updated the value to 5 and 5000 respectively for our testing.

The result –

Lookup Behaviour

After 5 characters are entered, it waits for 5 seconds before searching (loading..)

Also check –

https://nishantrana.me/2021/06/22/advanced-lookup-in-model-driven-power-apps-dynamics-365/

https://docs.microsoft.com/en-us/power-platform/admin/settings-behavior

Hope it helps ..

Advertisements

Step by step – Configure Dynamics 365 Marketing in a Dataverse Environment


To configure Dynamics 365 Marketing in an existing Dataverse Environment –

  • Login to Power Platform Admin Center

  • Click on Dynamics 365 apps inside Resources

If Dynamics 365 Marketing is not listed there, log in to Microsoft Admin Center and start the trial.

We can see the product listed within Admin Center.

Back in Power Platform Admin Center we can see the Marketing application listed in the resources.

  • We can either install the Dynamics 365 Marketing Application with complete features or the Dynamics 365 Marketing Solution only, which only installs the solution.

Note – you don’t need a Global Admin role, the System Administrator role is enough to finish the setup.

  • It asks for the address to continue. In the case of multiple organizations, it would give the option of selecting the organization against which we want to configure the marketing app.

  • The installation starts, usually it takes somewhere around 2 hours or so.

  • After installation finishes, we can navigate to the app or uninstall the marketing app from the org.

  • Take me to the app, opens the app.

  • We can all see the Marketing app listed in the Apps section.

  • Similarly to Uninstall Dynamics 365 Marketing Application, we use the same option – navigate to Resources >> Dynamics 365 Apps – select Manage for the app.

  • It takes to the Marketing Admin Page, from where we can Uninstall the App

  • Read the details before continuing with the uninstall.

  • Apart from configuring Dynamics 365 Marketing over an existing organization, we can also set up a separate trial of the Marketing app.

https://dynamics.microsoft.com/en-gb/marketing/overview/#

  • Specify the work email id and launch the trial.

  • We can see the trial environment listed separately within Power Platform Admin Center

Hope it helps..

Advertisements