Step by step – LinkedIn Sales Navigator integration with Dynamics 365 Sales


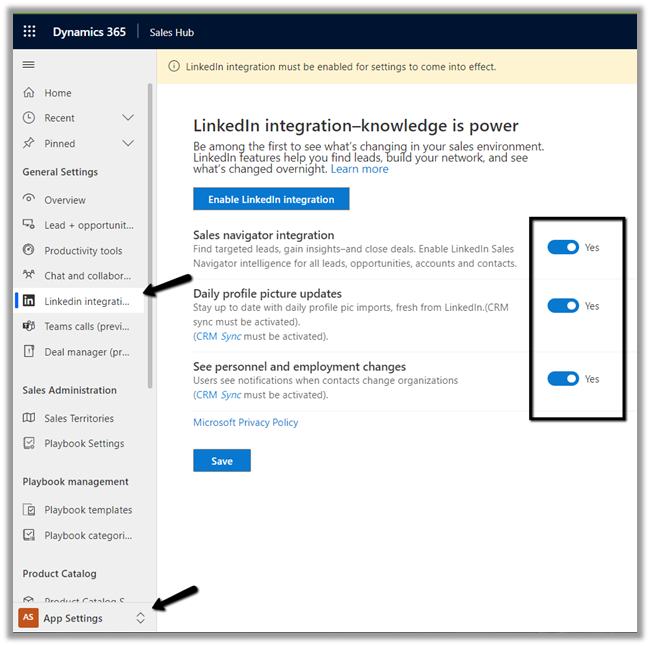
To enable the LinkedIn Sales Navigator Integration with Dynamics 365 Sales, navigate to App Settings >> General Settings >> LinkedIn Integration and click on Enable LinkedIn Integration

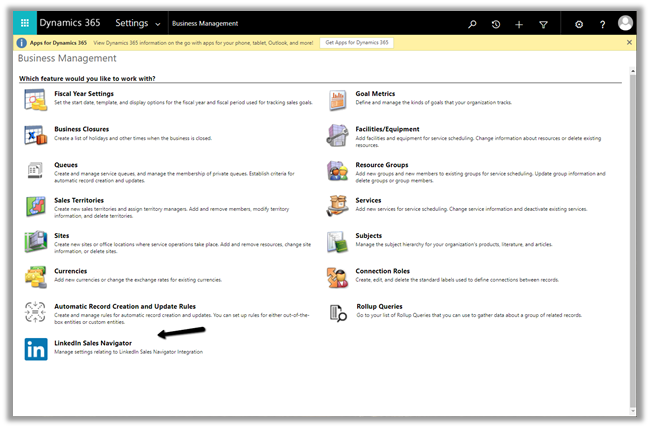
We can do the same from System Settings >> Business Management >> LinkedIn Sales Navigator

Click on continue to install the LinkedIn Sales Navigator

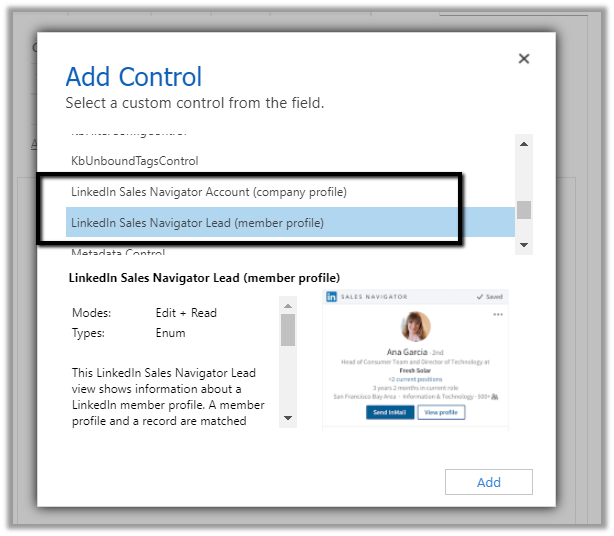
LinkedIn Sales Navigator solution will add the LinkedIn Sales Navigator controls to the default forms of Lead, Opportunity, Contact, and Account.

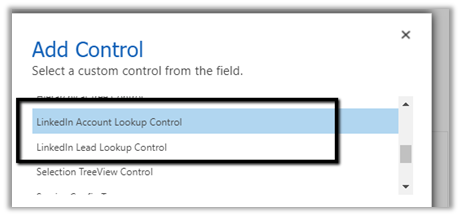
The controls are LinkedIn Sales Navigator Lead control and LinkedIn Sales Navigator Account control along with their corresponding lookup controls.

These controls can be added to any other entity as well.

https://docs.microsoft.com/en-us/dynamics365/linkedin/integrate-sales-navigator#unified-interface-apps-sales-navigator-controls-for-the-unified-interface

The installation process will start.

The installation should complete in 10-15 minutes.

Click on Go to Configuration, select LinkedIn Sales
Navigator and enable it.

Toggle to Yes and Save the settings above or within the Sales Hub >> App Settings

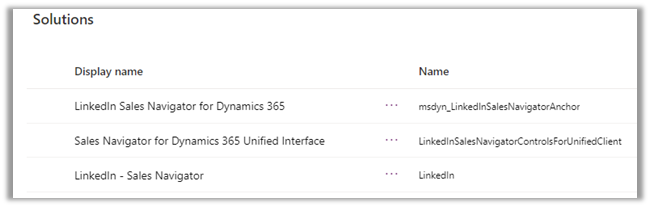
The installation process has installed the below LinkedIn solutions.

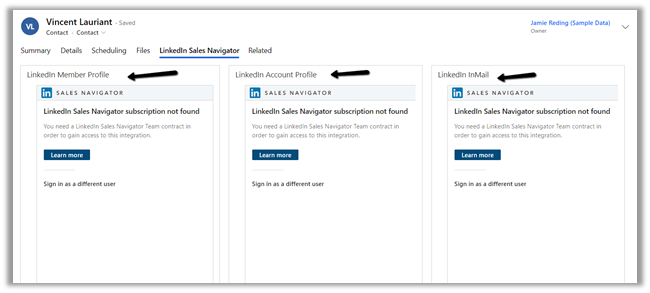
We can see the LinkedIn Sales Navigator tab added to the Lead, Opportunity, Contact, and Account form.

To configure it further click on Sign in as a different
user

Enter your LinkedIn credentials and start the free trial of the Sales Navigator
Team.

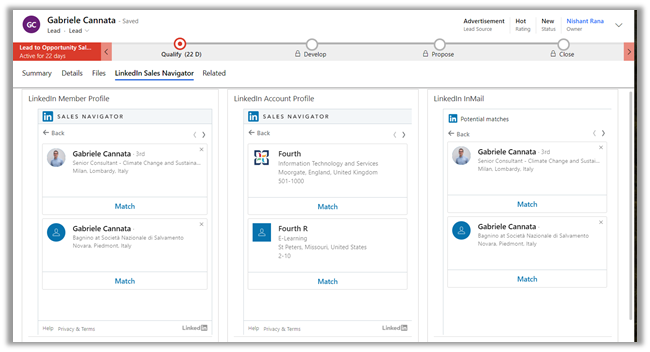
After setting up the trial we can see the details populated in the LinkedIn Sales Navigator tab.

The sample contact record –

The sample lead record –

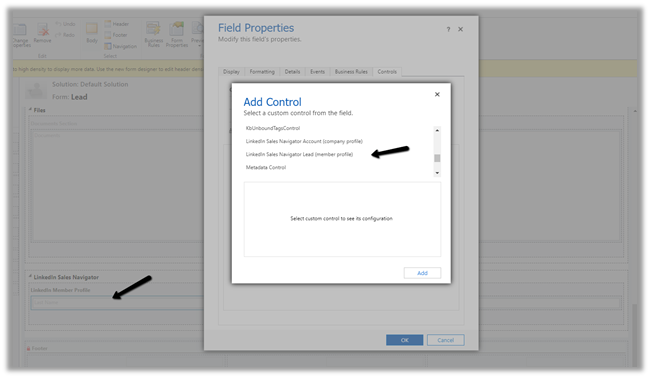
The LinkedIn Controls for member and account profile on the form are bound to Last Name and Company Name fields (single line of text field) inside the Lead form.

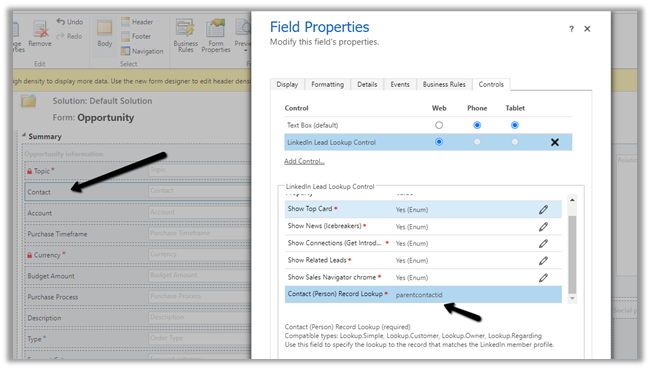
Similarly, we have lookup specific LinkedIn control

Here we have added the LinkedIn Lead Lookup Control in Opportunity form for the contact lookup.

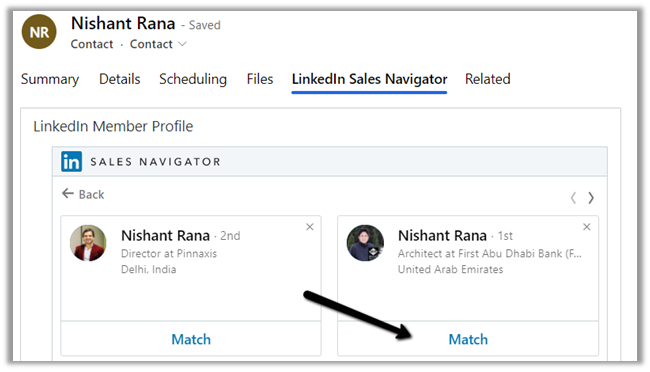
The result –

The Match will associate the profile with the record.

Now back in our LinkedIn Sales Navigator, navigate to the Admin page

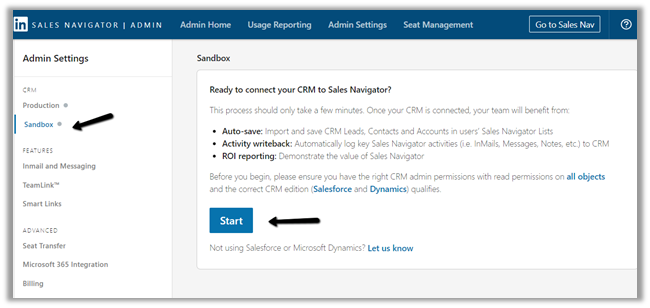
Click on Connect to CRM to configure the integration.


We have selected the Sandbox environment here

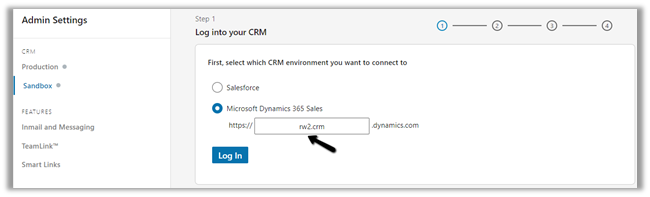
Enter the domain name of the Dynamis 365 Sales organization and Log In

Provide the requested permissions

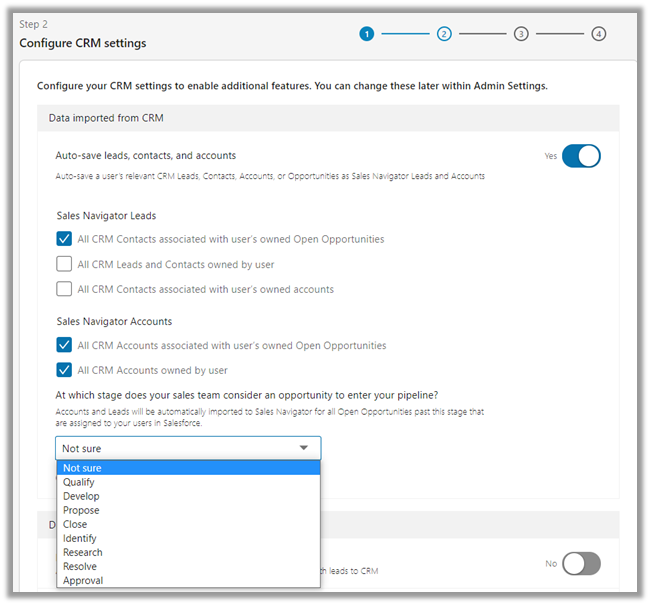
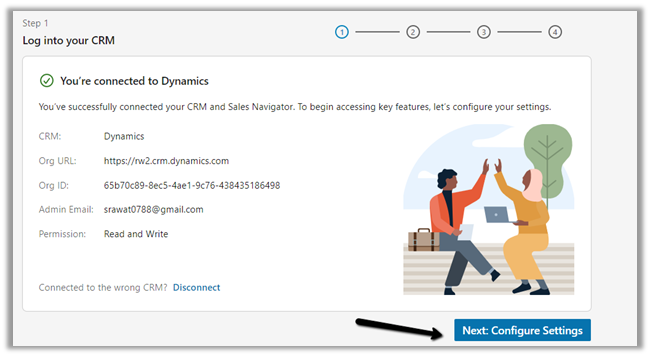
Step 1 of the wizard will provide the details of the connection.

Click on Configure Settings

  • Data Imported from CRM (CRM >> LinkedIn)

We have the option to import/sync Leads, Contacts, and Account records from CRM to LinkedIn Sales Navigator.


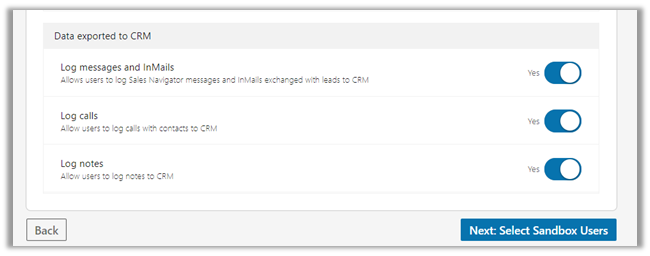
  • Data exported to CRM (LinkedIn >> CRM)

We can export messages, InMails, calls, and notes from LinkedIn to CRM.

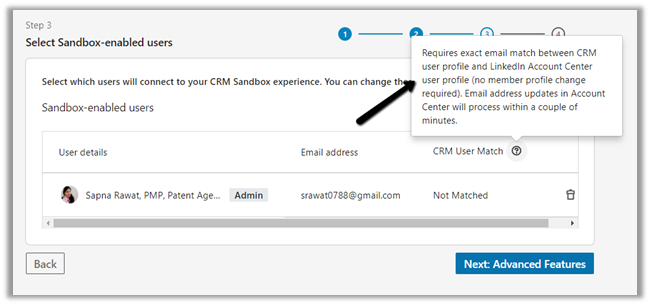
The Sandbox users’ steps require the exact email match between the LinkedIn Account Center user profile and CRM’s user profile.

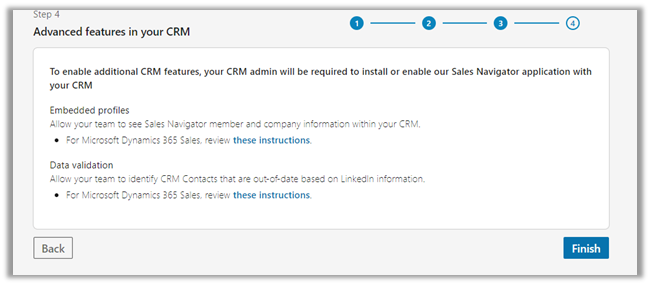
Advanced Features


Data Validationhttps://business.linkedin.com/sales-solutions/sales-navigator-customer-hub/resources/data-validation-dynamics

Log to CRM option gets enabled after we have connected LinkedIn Sales Navigator to CRM

Notes à

Messages à

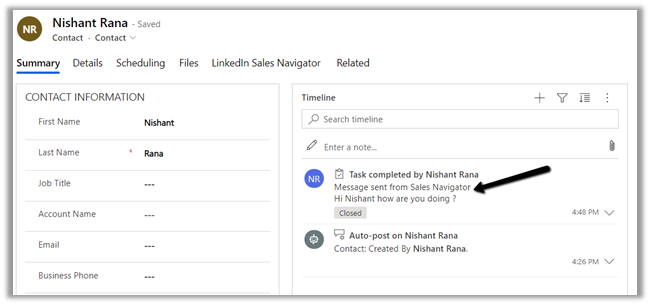
Back in the timeline, inside the contact record, we can see them added to the timelines.

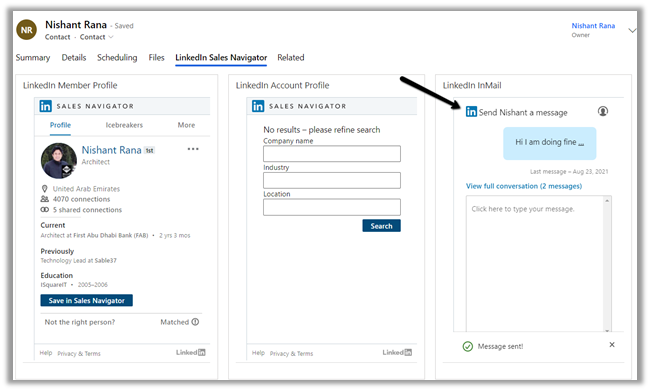
We can also send InMail messages to the contact

Back inside our LinkedIn Member Profile, we can message and connect with the profile populated from within the Contact form.

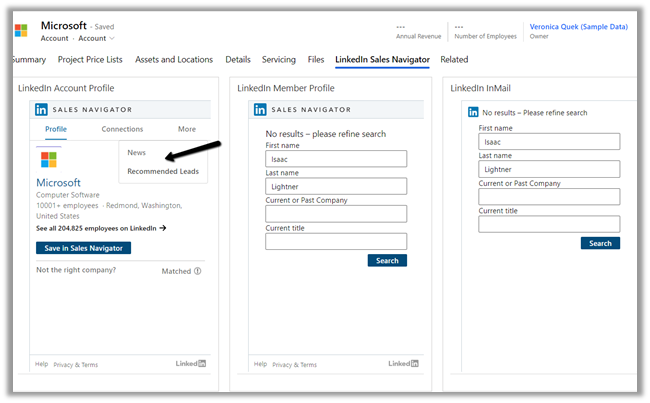
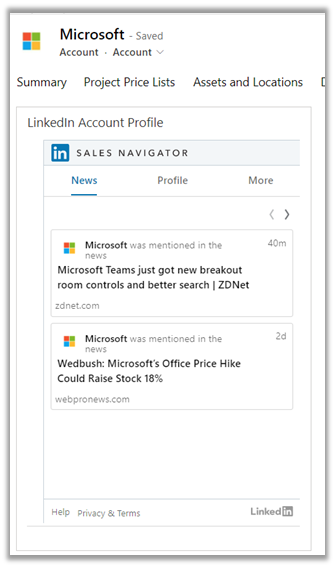
Sample Account Record shows the News and Recommended Leads

News à

Here we saw the basic steps we need to perform to integrate Dynamics 365 Sales with LinkedIn Sales Navigator and the features provided.

To sum up –

  • LinkedIn Controls will be added to Dynamics 365  Sales for Member profile, Account Profile and InMail.
  • We can import Leads, Contacts, and Account records from CRM to LinkedIn 
  • We can export messages, InMails, calls, and notes from LinkedIn to CRM.

Get all the details here –

https://docs.microsoft.com/en-us/dynamics365/linkedin/integrate-sales-navigator

Hope it helps..

Advertisements

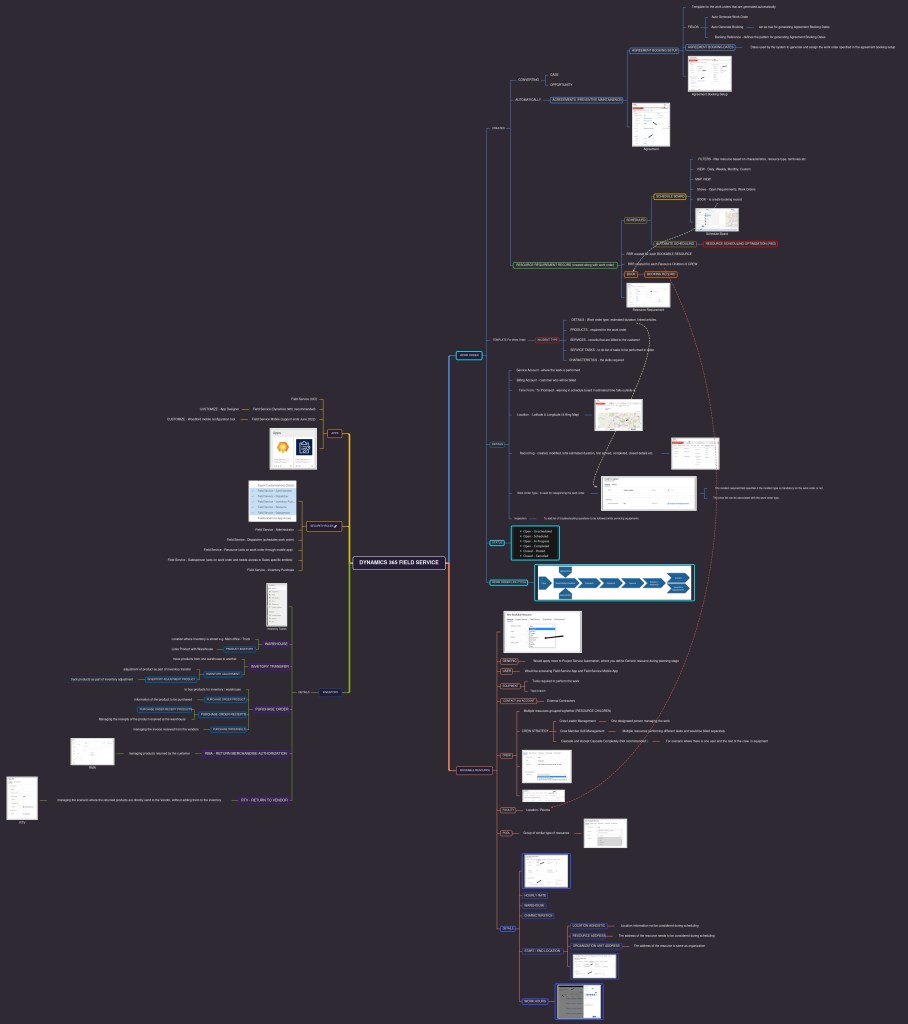
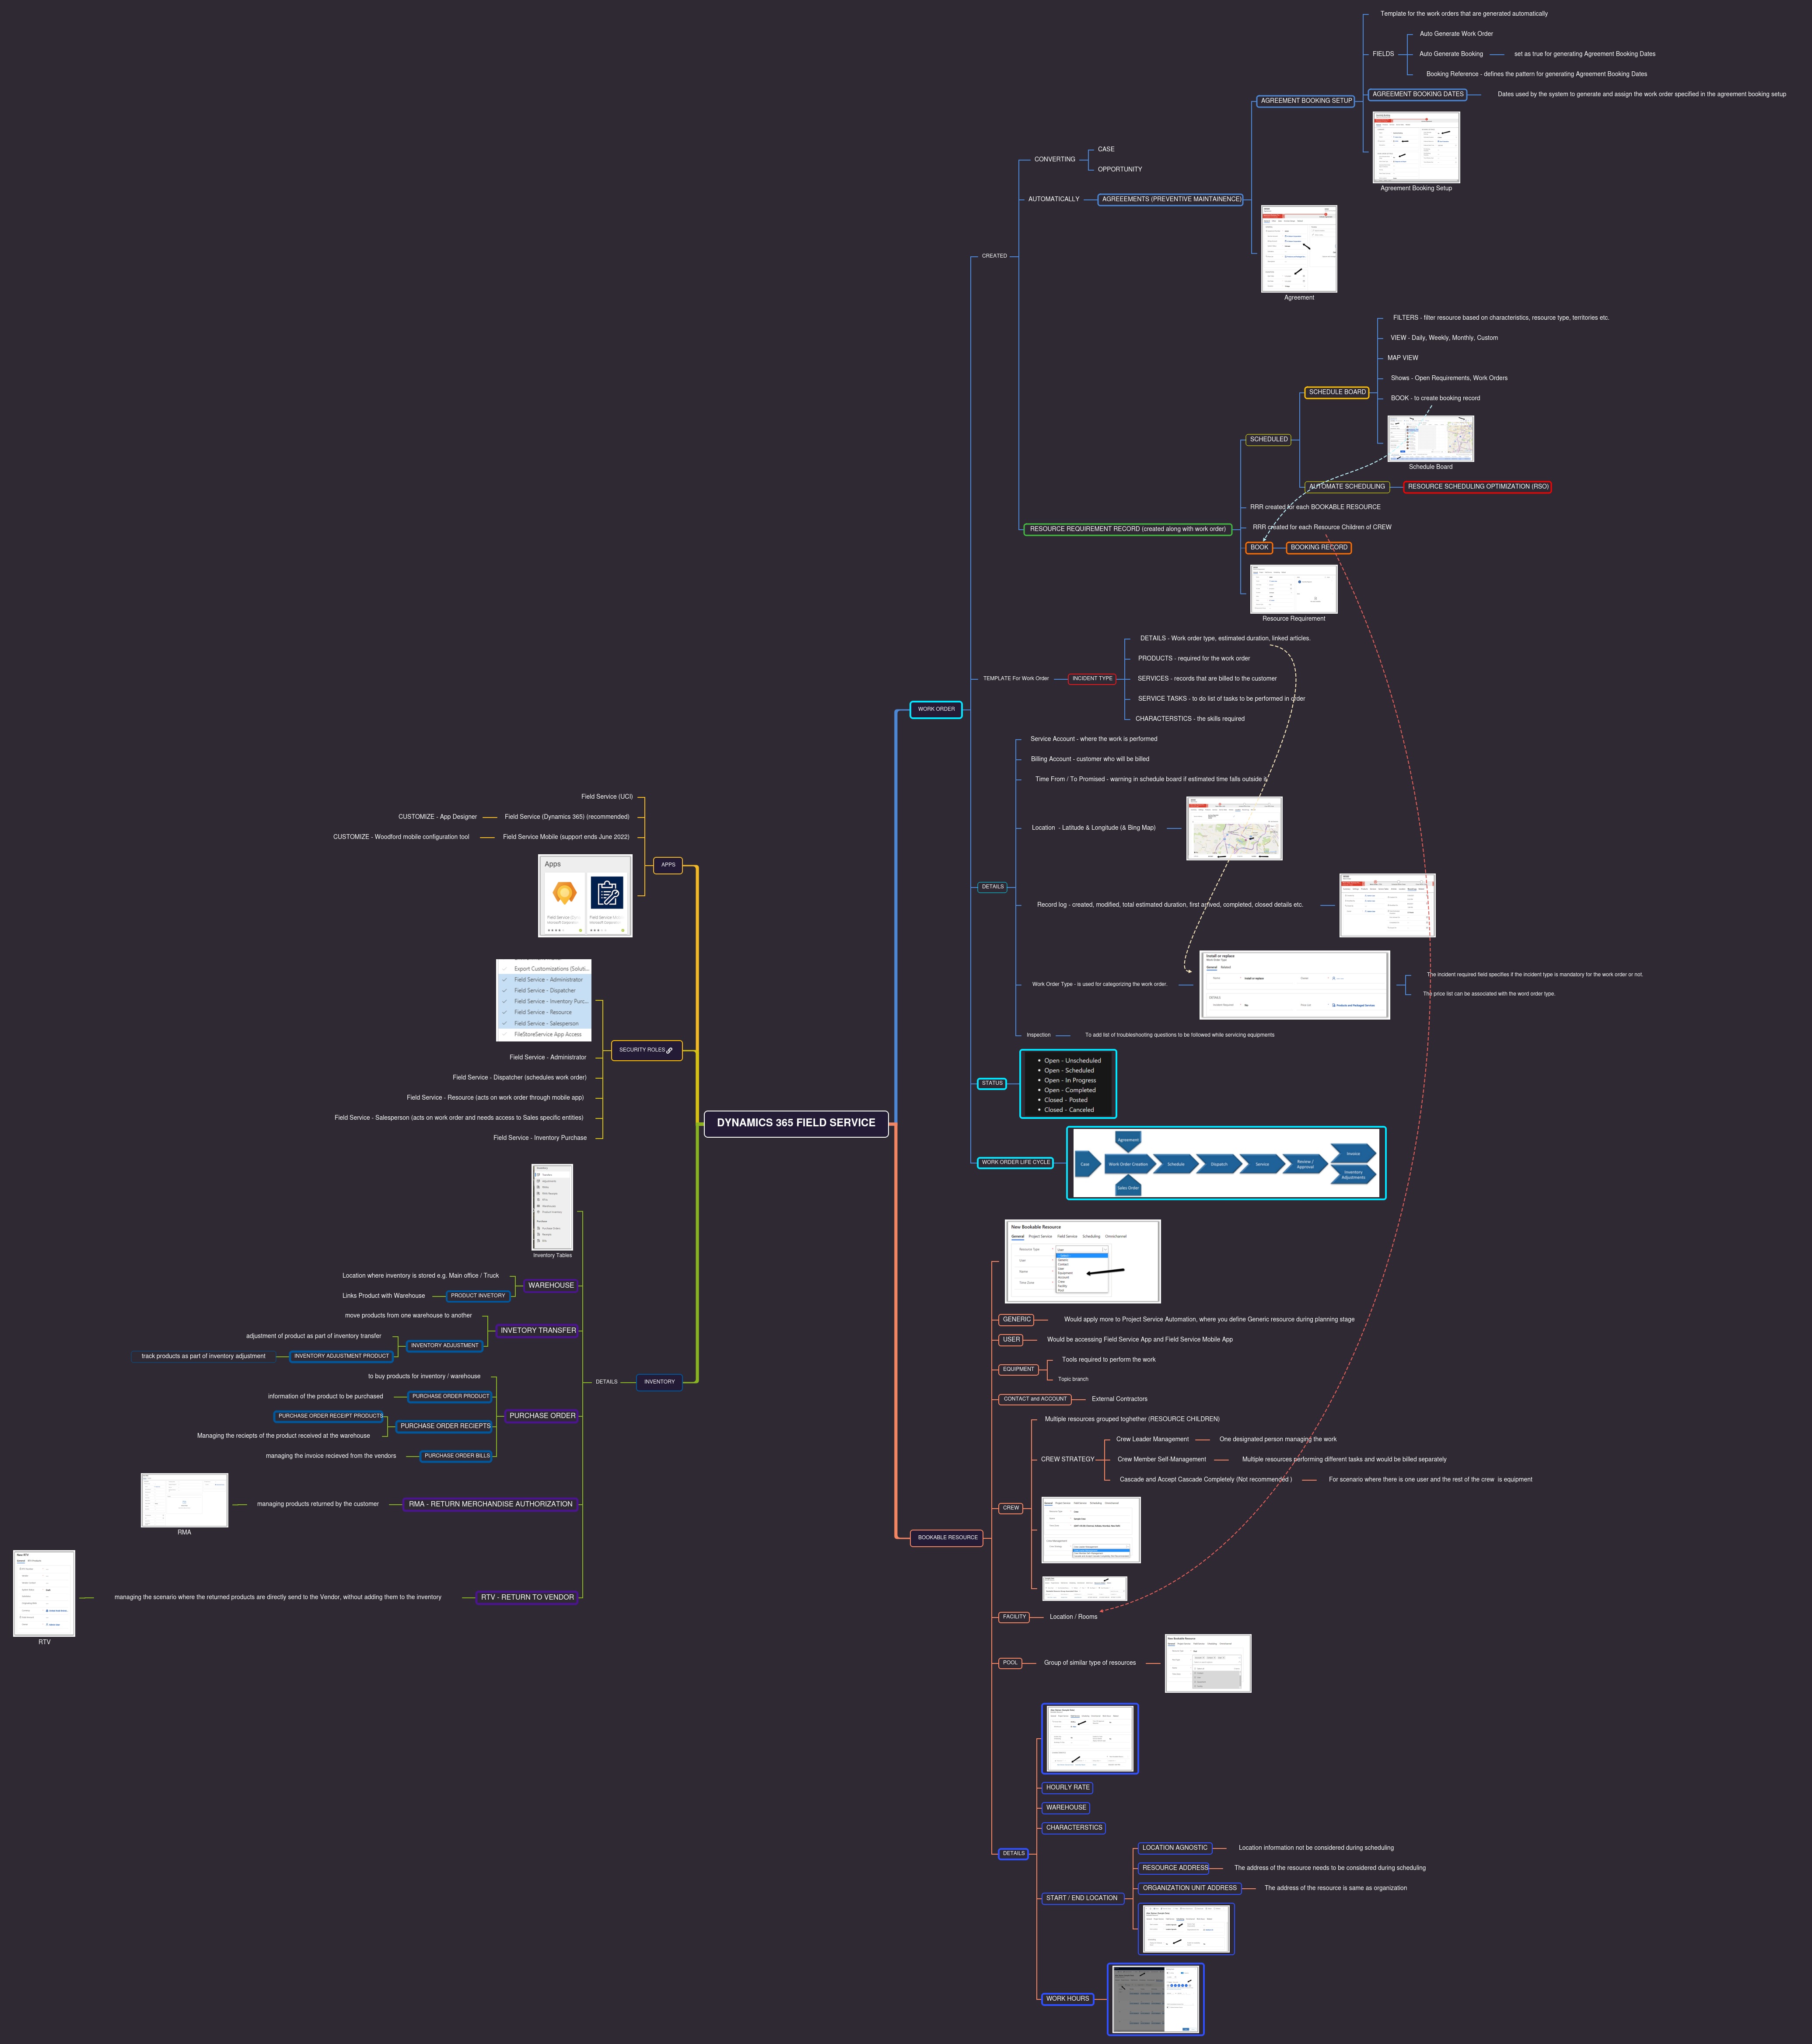
Mind map – Dynamics 365 Field Service


Prepared a mind map on Dynamics 365 Field Service for quick reference.

Access it here (recommended)

Link: https://gitmind.com/app/docs/m627y7wd
Password: 7457

Download the .png format

Dynamics 365 Field Service

Refer the content here – https://nishantrana.me/2021/08/17/quick-reference-dynamics-365-field-service/

Advertisements

How to – Export Dataverse (Dynamics 365) data to Azure SQL using Azure Data Factory pipeline template


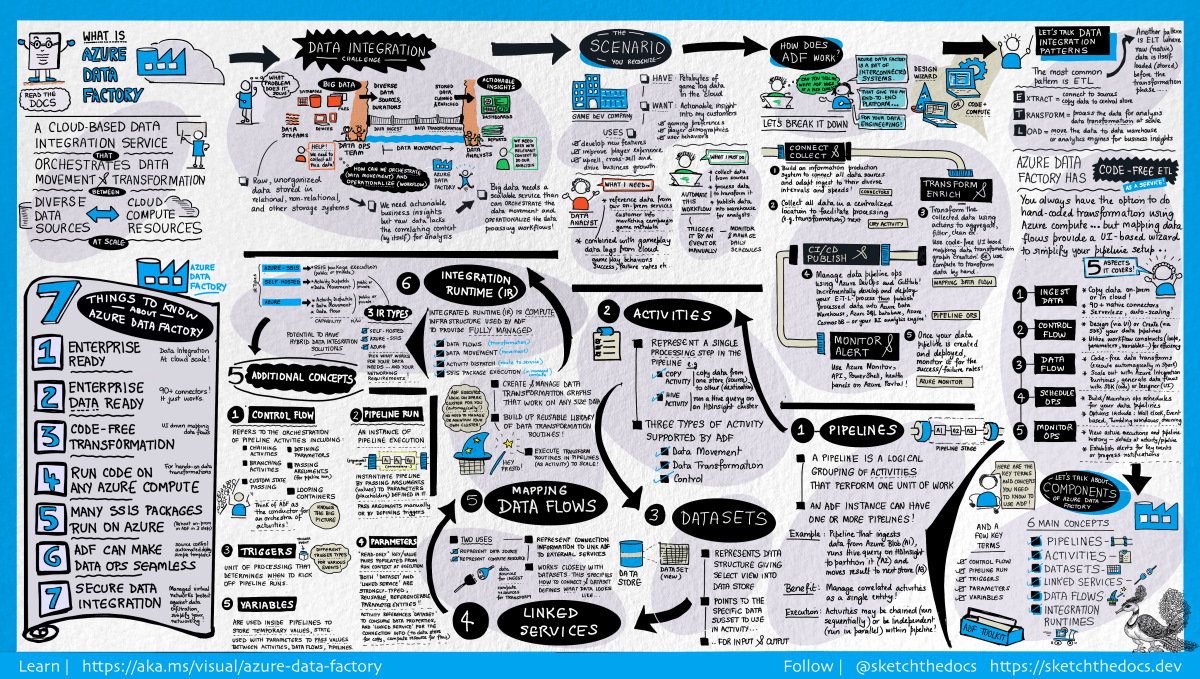
[Visual Guide to Azure Data Factory - https://acloudguru.com/blog/engineering/a-visual-guide-to-azure-data-factory]

Using the new Azure Data Factory pipeline template – Copy Dataverse data from Azure Data Lake to Azure SQL – we can now easily export the Dataverse data to Azure SQL Database.

https://docs.microsoft.com/en-us/power-platform-release-plan/2021wave1/data-platform/export-dataverse-data-azure-sql-database

Check other posts on Azure Data Factory

Select Pipeline from template option inside the Data Factory

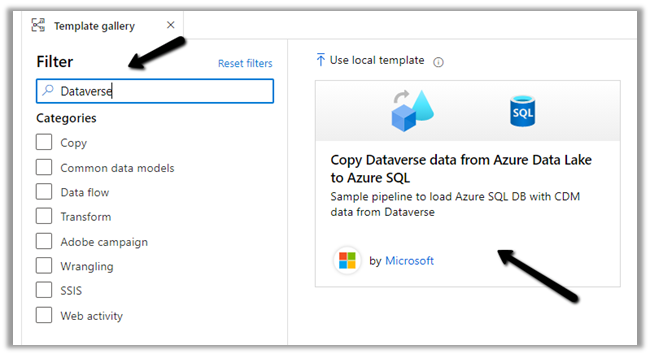
Search for Dataverse and select the Copy Dataverse data from Azure Data Lake to Azure SQL template

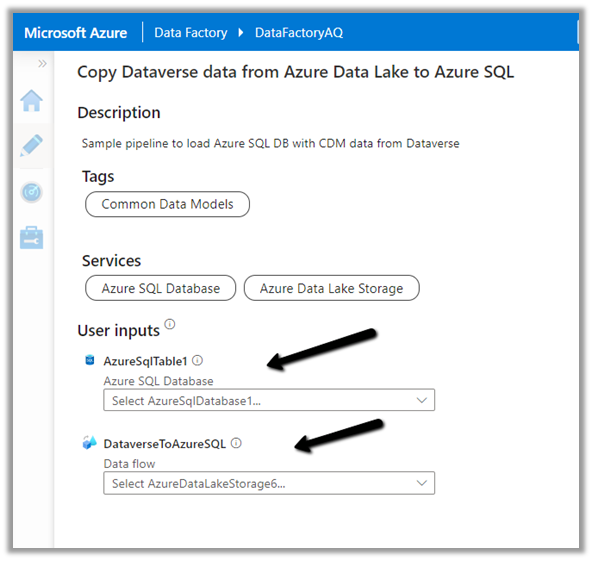
Let us specify the User Inputs required by the template – i.e. Azure SQL Database and the Data Lake Storage.

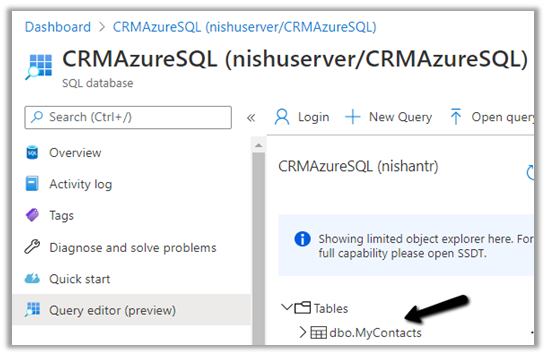
First we have created the linked service for the Azure SQL Database.

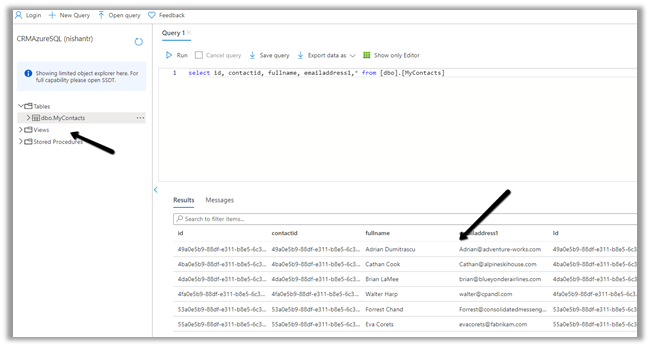
We’d use it to connect to the below table MyContacts.

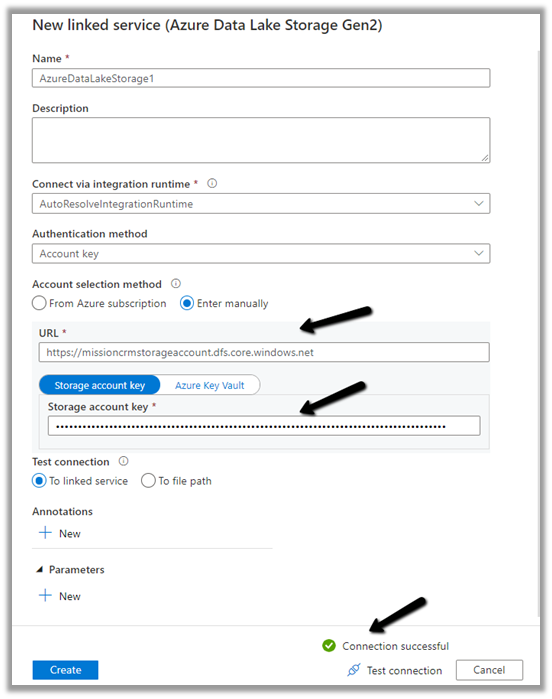
Similarly create a linked service to Azure Data Lake Gen 2, which holds our Dataverse data.

Get the URL from the Container’s property. (replace blob with dfs in the URL)

To get the storage account key, select Access Keys >> Show Keys >> Copy the Key for the Storage Account.

Here we have already configured Azure Synapse Link for Dataverse

https://nishantrana.me/2020/09/07/export-data-from-common-data-service-to-azure-data-lake-storage-gen2/

Now as we have defined the User Inputs, select Use this template.

Navigate to the data flow created – DataverseToAzureSQL

Select our source ADLS and check and configure its properties.

Source Settings

Here we have the Inline dataset type set to Common Data Model and the Linked service is the AzureDataLakeStorage1 we created earlier.

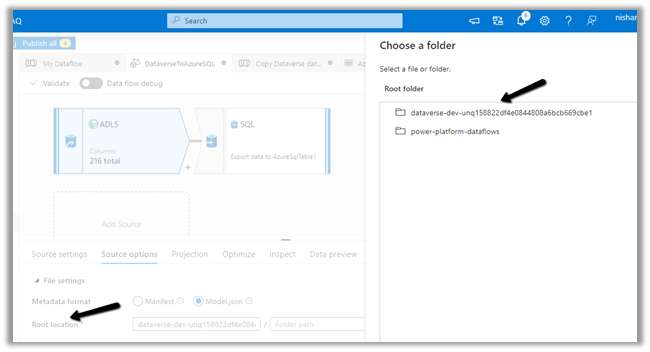
Source Option

Specify the Dataverse folder for the Root Location.

Here we have specified the contact entity from our Data Lake Storage.

Projection

In the projection we have cleared the generated schema using Clear Schema, also selected Schema options >> Allow schema drift


We have enabled Allow schema drift option which will create the required columns in the destination Azure SQL Table.

Optimize

Inspect

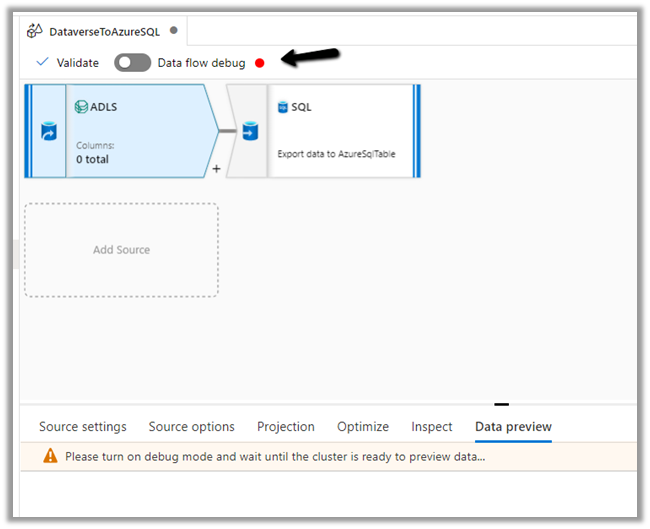
Data preview

As we have not turned on Debug mode, there is nothing to preview

Now let us move to our Destination – SQL.

Sink

Here we have AzureSQLTable dataset connected to contact table in Azure SQL and have checked Allow schema drift option.


Below is our AzureSQLTable Dataset connected to the MyContacts table.

Settings

Here we have selected Allow Insert as the Update Method and Table
action as Recreate table – as we want the destination table to be re-created dynamically based on the source.

Mapping

We have left it to Auto mapping.

Optimize

Inspect

Data preview

Let us Publish All our changes and Debug our pipeline.

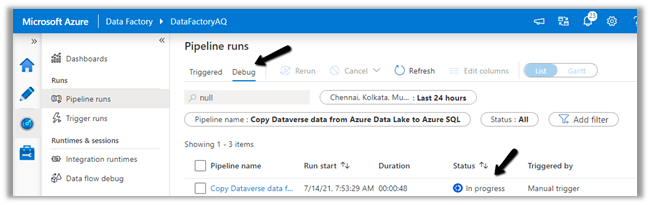
Let us monitor our pipeline run.

We can see that pipeline has run successfully and took around 4 minutes.

We can see the contact’s data copied to our Azure SQL successfully.

So here we covered the insert operation, in the next posts we’d see how we can configure update, upsert and delete operation.

Also, check

Posts on Azure Data Factory

Posts on Azure Data Lake

Hope it helps..
How to – Get the size of tables in Dataverse / Dynamics 365


Using the Capacity page in the Power Platform Admin Center we can extract the details of size occupied by table (in MB) within a particular environment.

Login to the admin portal and navigate to Capacity

https://admin.powerplatform.microsoft.com/resources/capacity

Select the Dataverse tab and click on Details or in case of trial click on the Trial tab

Here we have selected the details (graph) option for one of the environments.

Select Download all tables option for the Top database capacity use, by table chart


We can see the details within the extracted CSV file.

Get all the details here

https://docs.microsoft.com/en-us/power-platform/admin/capacity-storage#environment-storage-capacity-details

Hope it helps..
Advertisements

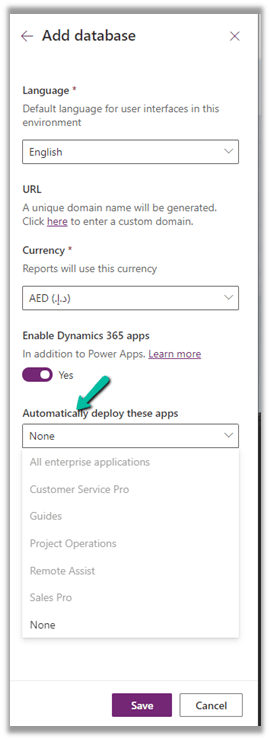
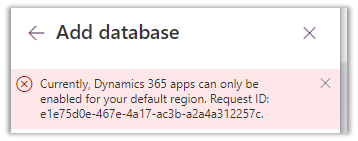
Solved- Currently, Dynamics 365 apps can only be enabled for your default region error


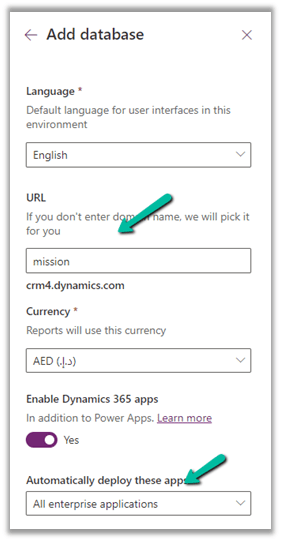
While trying to add a new Trial (subscription-based) on a Dynamics 365 Trial environment, we were getting the below error

Currently, Dynamics 365 apps can only be enabled for your default region

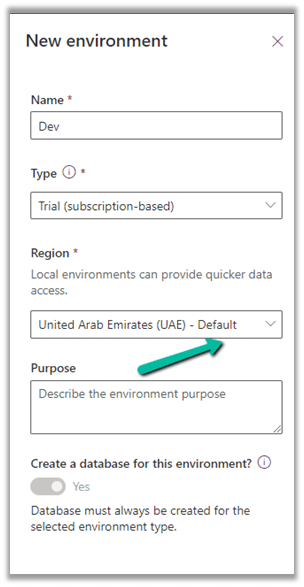
The default region was UAE for the other environments 

Even for the Azure Synapse Link – it was showing the default region as UAE North

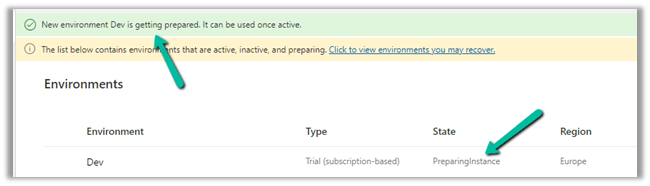
In our case selecting the Region to Europe allowed us to create a Trial (subscription-based).

Get all the details herehttps://docs.microsoft.com/en-us/power-platform/admin/create-environment

https://community.dynamics.com/365/f/dynamics-365-general-forum/395813/dynamics-365-apps-can-only-be-activated-for-your-default-region

Hope it helps..

Advertisements
Advertisements

How to – Optimize Delete operation – Dataverse / Dynamics 365


Recently we had to delete records for one of our entities, and we tried out different combinations of batch sizes and the number of threads with 25000 records as a sample to find the optimum setting.

Below is our sample SSIS Package (uses KingswaySoft Dynamics 365 Tool Kit), it retrieves 25000 record’s GUID (Contact table / entity) and then distributes it equally among 3 different CRM Destination Component running under different users (CRM Connection Managers).

How to – improve data migration performance – SSIS & Azure Data Factory (Dataverse / Dynamics 365)

Below is our Premium Derived Column where we have added a new column with expression IncrementValue()

In Conditional Split component, we are then using this new column added to distrubute the output across three CRM Destination Component, each using a different CRM Connection Managers running under different application users.

We first started with 10 batch size and 20 thread followed by different combinations after that à

Below were our findings ->

Records Count Batch Size Thread Parallel Users Elapsed Time
25000 10 20 3 00:15:58.578
25000 10 15 3 00:14:43.734
25000 10 10 3 00:16:06.438
25000 10 5 3 00:23:52.094
25000 10 15 2 00:18.55.012
25000 10 15 1 00:39:15.828
25000 20 30 1 00:39:12.781

As we can see the Batch size 10 and thread around 15 gave us the best performance. However, evert environment / conditions will would be different so we should try out different combinations before finalizing.

SSIS and Microsoft Dynamics 365

Hope it helps..
Advertisements