How to – Call Dynamics CRM from Azure Functions


Update -26 – Sep- 2018

https://nishantrana.me/2018/09/26/changing-the-target-runtime-version-of-azure-functions/

https://nishantrana.me/2018/09/25/the-type-or-namespace-name-xrm-could-not-be-found-are-you-missing-a-using-directive-or-an-assembly-reference-error-while-using-azure-functions-2-x/


Let us take a look at a simple Azure Function that refers our CRM assemblies and creates contact record in CRM.

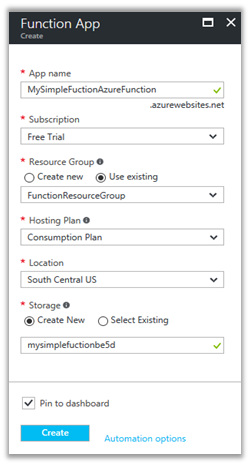
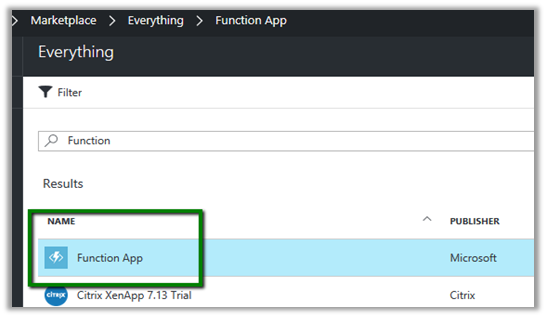
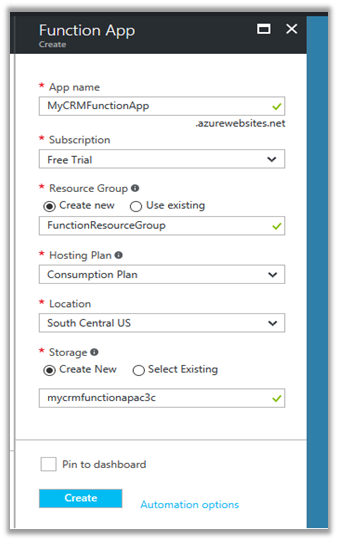
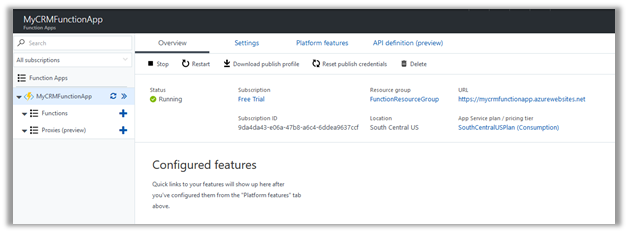
Log in to Azure Portal, search for Function App and create a Function App.

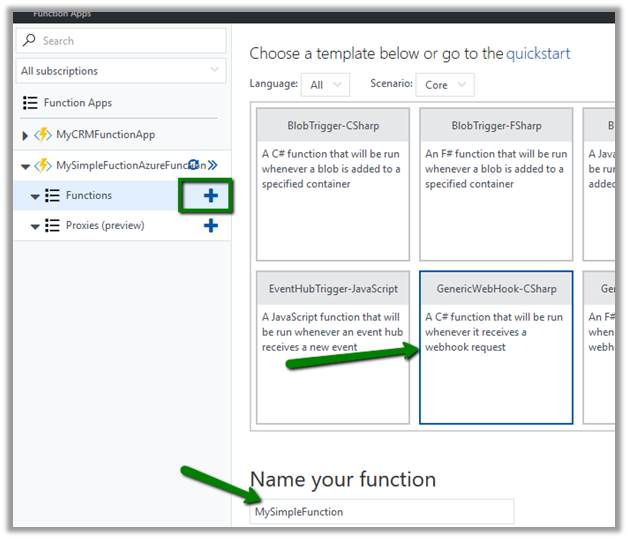
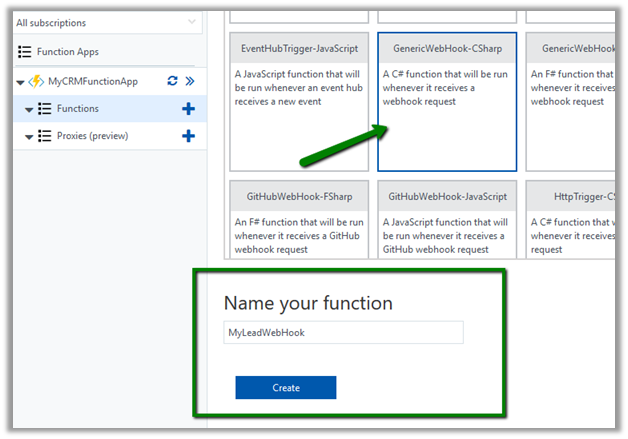
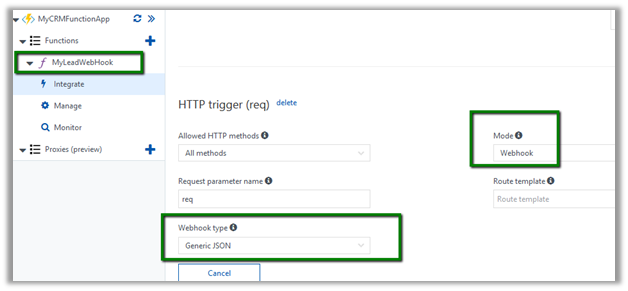
Here we have specified WebHook + API and CSharp Template. Click on Create this function.

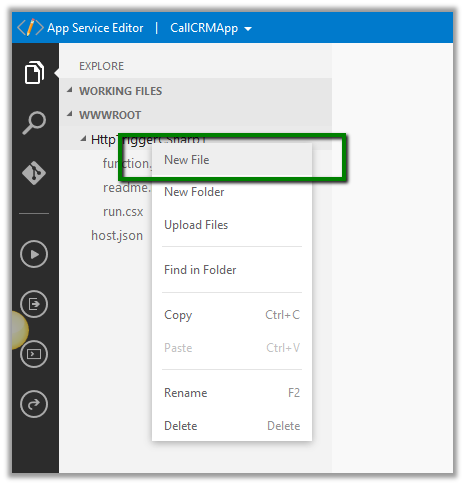
Select the function app, go to Platform features tab and click on App Service Editor.

Right click the function and add a new file named project.json. It is within this file we will refer our Nuget Packages that we need in our function.

https://docs.microsoft.com/en-us/azure/azure-functions/functions-reference-csharp

Here we will reference the following Nuget Package for CRM

https://www.nuget.org/packages/Microsoft.CrmSdk.CoreAssemblies/

</p>
<p>{<br />
"frameworks": {<br />
"net46":{<br />
"dependencies": {<br />
"Microsoft.CrmSdk.CoreAssemblies": "8.2.0.2"<br />
}<br />
}<br />
}<br />
}</p>
<p>

Back in our Function when we click on Save or Run, we can see the required assemblies being installed in our Log.

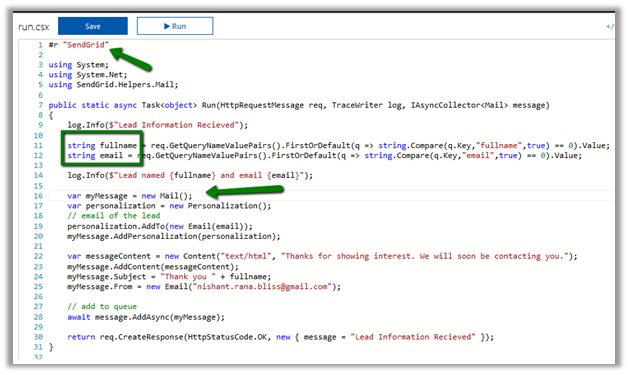
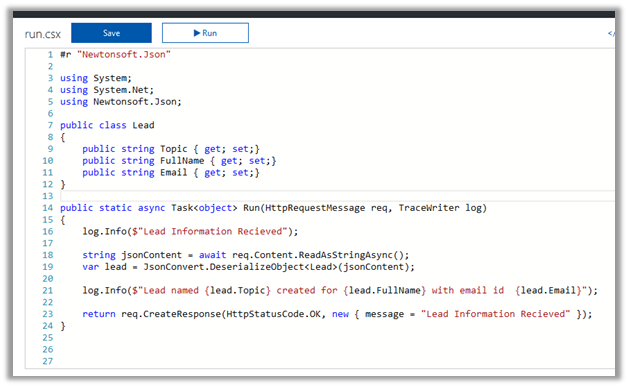
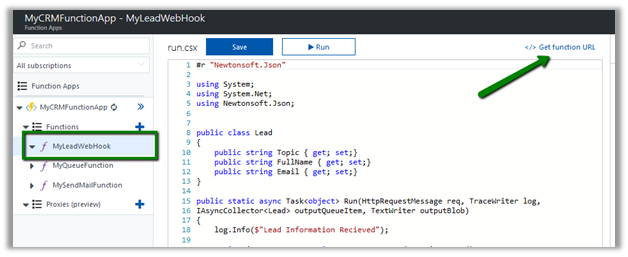
The sample code for the Azure Function (just for simplicity the values are all hardcoded)

</p>
<p>using System.Net;<br />
using Microsoft.Xrm.Sdk;<br />
using Microsoft.Xrm.Sdk.Client;</p>
<p>public static async Task Run(HttpRequestMessage req, TraceWriter log)<br />
{<br />
log.Info("C# HTTP trigger function processed a request.");</p>
<p>// parse query parameter<br />
string firstname = req.GetQueryNameValuePairs()<br />
.FirstOrDefault(q =&gt; string.Compare(q.Key, "firstname", true) == 0)<br />
.Value;</p>
<p>string lastname = req.GetQueryNameValuePairs()<br />
.FirstOrDefault(q =&gt; string.Compare(q.Key, "lastname", true) == 0)<br />
.Value;</p>
<p>IServiceManagement orgServiceManagement = ServiceConfigurationFactory.CreateManagement(new Uri("https://nishutrial.crm.dynamics.com/XRMServices/2011/Organization.svc"));</p>
<p>AuthenticationCredentials authCredentials = new AuthenticationCredentials();<br />
authCredentials.ClientCredentials.UserName.UserName = "abc@abc.onmicrosoft.com";<br />
authCredentials.ClientCredentials.UserName.Password = "*****";<br />
AuthenticationCredentials tokenCredentials = orgServiceManagement.Authenticate(authCredentials);</p>
<p>OrganizationServiceProxy organizationProxy = new OrganizationServiceProxy(orgServiceManagement, tokenCredentials.SecurityTokenResponse);<br />
Entity contact = new Entity("contact");<br />
contact.Attributes["firstname"] = firstname;<br />
contact.Attributes["lastname"] = lastname;<br />
var contactId = organizationProxy.Create(contact);<br />
// Get request body<br />
dynamic data = await req.Content.ReadAsAsync();</p>
<p>string fullname = "";<br />
return fullname == null<br />
? req.CreateResponse(HttpStatusCode.BadRequest, "Please pass a name on the query string or in the request body")<br />
: req.CreateResponse(HttpStatusCode.OK, "Contact created in CRM " + contactId.ToString());<br />
}</p>
<p>

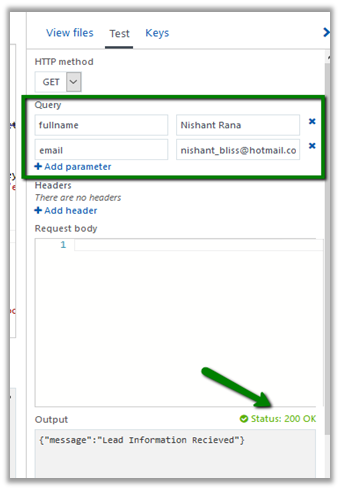
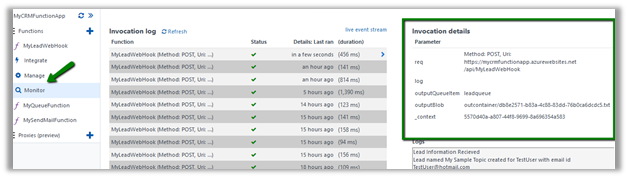
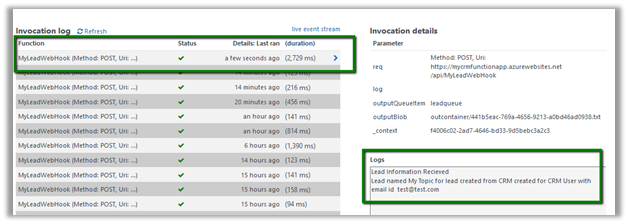
Let us now test our function.

The function expects 2 query string parameter firstname and lastname and creates the contact record in CRM.

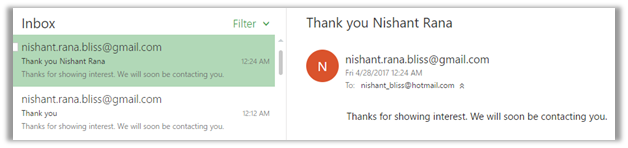
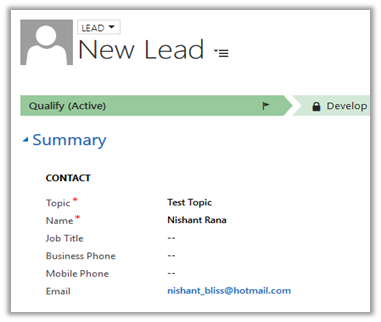
In our CRM, we can see the contact record created.

Hope it helps..


Advertisements

A simple implementation using Azure Functions, Microsoft Flow, Microsoft PowerApps, Dynamics CRM and SendGrid


Let us  implement a simple scenario where we create a lead record in CRM which then talks with Flow (and Power App).

The Flow calls an Azure Function (Custom API) that sends mail to the lead’s email address using SendGrid

1) Let us create an Azure Function that uses SendGrid to send email to the lead’s email address.

Login to Azure Portal and create a new Function App.

https://portal.azure.com

Let us create a Function using Generic Web Hook CSharp template

To keep it simple let us only enable GET method. Go to Integrate tab and in Allowed HTTP Methods Select Selected Methods and check GET.

Also set mode as Standard and Authorization Level as anonymous, which means we do not need a API Key to be passed as query parameter to talk with the function.

Now let us add a new Output

Select SendGrid as the template

Click on Save.

Here we would need to define SendGridApiKey.

Go to SendGrid portal and create a free account over there

https://sendgrid.com

Create and API Key and copy it’s value.

Now go to Application Settings of the Function App and set this key value with SendGridApiKey as the key name.

Now let us go back to our code and update it to work with lead object and Mail class which would be used for sending email using SendGrid API.

Here first we are referring the SendGrid assembly, then getting fullname and email from query string and then creating Mail object.

Save and check the log if the compilation succeeded or not.

Testing our Function.

We can see the mail in the mail box.

This completes our first part.

2) Now let us create the Swagger definition for it which we will use in Power Apps and Microsoft Flows for using this Azure Function as Custom API.

Select our function and click on API definition.

Click on Function.

Update the generated API Definition Template with query parameter details and also test it.

As it is running successfully, click on Export to Power Apps + Flow

This opens up the new section that details the steps we need to follow for using our Azure Function with Power Apps and Microsoft Flow.

There click on Download button.

Click on Go to PowerApps

It opens up the PowerApps portal (asks for log in) and opens the New Connection page.

https://web.powerapps.com

Upload the JSON Definition file for our Azure Function, provide name and description and click on Next.

Click on Create.

Let us quickly test our new connection.

Click on New App in our PowerApps web portal.

Select PowerApps Studio for Web. Let us create a Blank App Phone.

Add a new Data Source and select our Azure Function there.

To get the API Key go to our function and expand API Definition Key.

It works properly.

3) Now let us move to our last step, wherein we use it inside Microsoft Flow and integrate it with Dynamics CRM.

The good thing is to configure the same for Microsoft Flow, we do not have to do any extra step as both Microsoft Flow and PowerApps share the same connection infra.

Go to Microsoft Flow portal

https://flow.microsoft.com/

We can find our Custom API already added there.

Let us create a new flow. Start with Dynamics 365.

When a record is created. Select Organization Name and Leads as the entity and click on Add an Action.

Search for our Custom API.

Select LastName and Email as Dynamic Content from the lead record created.

Click on Create Flow to create the flow.

Unfortunately, we get the below error

Let us go back to our Swagger Definition and update it.

We have updated it as following

Let us quickly test it, import it in Power Apps as new connection and come back to our Flow.

Edit the connection there and specify the API Key as we had done earlier inside Power Apps and update it.

Open Flow and quickly add the required steps and click on Create Flow.

We have successfully created our flow. Now let us test it.

Let us create a new lead record

Our flow runs and sends the mail

That’s it we are done with our simple implementation. The main purpose of this post was to show the integration possibilities which could help us design and implement real world complex scenarios.

Hope it helps..

Calling Azure Functions (GenericWebHook-Csharp) from CRM


In our previous post, we created a simple Azure Function using a free account. (1-hour limitation).

https://nishantrana.me/2017/04/26/starting-with-a-simple-hello-world-azure-functions/

In this post, we’d use our trial Azure account to create a Function App for which we will configure Web Hook trigger and it outputs to Queue and Azure Blog Storage.

We will call this Function from Plugin on Post Create of Lead in CRM Online and pass Lead details to it. This detail will be then passed to Queue and a file inside Azure Blog Storage as Output from the Function.

Open the Azure Portal

https://portal.azure.com

Select Function App.

Create the Function App.

Click on + for Functions to create a new Function.

We’d select GenericWebHook-Csharp template here.

This creates a new Function nme MyLeadWebHook and it has mode set to Webhook and type as Generic JSON.

We can define Post as the only allowed method to call this function as shown below.

Update the code for the function by defining the Lead Object and deserialization logic as shown below.

#r is syntax for referencing the library. Here Newtonsoft.Json library is being referenced for deserialization.

Save and Run to check if it has compiled successfully or not. Click on Test tab to test the function by passing the JSON in the request body.

We can see below that our function has run successfully.

This finishes our Web Hook trigger part. Now let us define the Queue Output to it.

Select Integrate and click on New Output.

Select Azure Queue Storage template here.

Name the queue as leadqueue. This will automatically create a queue name leadqueue.

The parameter name here is outputQueueItem. We will update our code to pass the lead details to this parameter.

Before we update the code for our function let us add new output which saves the Lead details to a text file. Click on new output and select Azure Blog Storage.

Here outputBlob is the parameter to which we need to provide the lead details. In the path outcontainer is the name of the container within Blob and rand-guid generates a random guid for the file name. Here we have added the extension .txt.

Now we have our outputs defined, so let us go back to our code for the function and update it to pass values to both the output parameter one for queue and other for the blob.


#r "Newtonsoft.Json"

using System;
using System.Net;
using Newtonsoft.Json;
public class Lead
{
public string Topic { get; set;}
public string FullName { get; set;}
public string Email { get; set;}
}

public static async Task<object> Run(<span class="hiddenSpellError" pre="" data-mce-bogus="1">HttpRequestMessage</span> req, TraceWriter log, </object>
IAsyncCollector<Lead> outputQueueItem, TextWriter outputBlob)
{
log.Info($"Lead Information Recieved");

string jsonContent = await req.Content.ReadAsStringAsync();
var lead = JsonConvert.DeserializeObject<Lead>(jsonContent);

log.Info($"Lead named {lead.Topic} created for {lead.FullName} with email id {lead.Email}");

// add to queue
await outputQueueItem.AddAsync(lead);

// write to a text file in azure blog storage
outputBlob.WriteLine($"Topic: {lead.Topic}");
outputBlob.WriteLine($"Full Name: {lead.FullName}");
outputBlob.WriteLine($"Email: {lead.Email}");

return req.CreateResponse(HttpStatusCode.OK, new { message = "Lead Information Recieved" });
}

To test the code click on Test and select Run

Click on Monitor tab for the Function and select the log created for our test run. We can see the values for the parameters in the invocation details section.

Now let us write a plugin that runs on Post Create of lead and calls this Function App.

First let us get the URL for our function app. Go to Function and click on Get Function URL.

Our Function URL –

The code parameter is the Key that should be passed while calling the above URL.

Keys tab is where we can configure out Keys.

Below is code for our plugin.


using Microsoft.Xrm.Sdk;
using System;
using System.IO;
using System.Net;
using System.Runtime.Serialization.Json;
using System.Text;

namespace MyTestPlugin
{

public class Lead
{
public string Topic { get; set; }
public string FullName { get; set; }
public string Email { get; set; }
}

public class MyPluginClass : IPlugin
{
public void Execute(IServiceProvider serviceProvider)
{
try
{
// Obtain the execution context from the service provider.
IPluginExecutionContext context = (IPluginExecutionContext)serviceProvider.GetService(typeof(IPluginExecutionContext));

// The InputParameters collection contains all the data passed in the message request.
if (context.InputParameters.Contains("Target") && context.InputParameters["Target"] is Entity)
{
// Obtain the target entity from the input parameters.
Entity entity = (Entity)context.InputParameters["Target"];

using (WebClient client = new WebClient())
{
// get the lead details
var myLead = new Lead();
myLead.Topic = entity.Attributes["subject"].ToString();
myLead.FullName = entity.Attributes["fullname"].ToString();
myLead.Email = entity.Attributes["emailaddress1"].ToString();

DataContractJsonSerializer serializer = new DataContractJsonSerializer(typeof(Lead));
MemoryStream memoryStream = new MemoryStream();
serializer.WriteObject(memoryStream, myLead);
var jsonObject = Encoding.Default.GetString(memoryStream.ToArray());

var webClient = new WebClient();
webClient.Headers[HttpRequestHeader.ContentType] = "application/json";

// our function key
var code = "2QYP6xwCswMNmzJDFJdDE65ed1PdNBOj5Wlu4LbSpeSjs/58h1KLbg==";
// the url for our Azure Function
var serviceUrl = "https://mycrmfunctionapp.azurewebsites.net/api/MyLeadWebHook?code=" + code;

// upload the data using Post mehtod
string response = webClient.UploadString(serviceUrl, jsonObject);
}
}
}
catch (Exception ex)
{
throw new InvalidPluginExecutionException(ex.Message);
}
}
}

}

Let us create our lead record in CRM and test our Azure Function.

We can check the Monitor tab for our Function and check the logs and can see the Lead Information added to queue and also a text file created from our output parameters.

Our text file in the container.

Hope it helps..

How to – Use WebClient to call external service from CRM Online Sandboxed Plugin (HTTP POST and JSON)


Sharing a sample code that can be used to send JSON data using POST to an external service inside CRM Online Plugin. As plugin runs in sandbox mode we cannot reference Newtonsoft’s JSON.NET library http://www.newtonsoft.com/json. The other option could be to use ILMerge, which isn’t that elegant.

Here, basically we are passing some information related to lead to an external service on Post Create of it.

</p>
<p>using Microsoft.Xrm.Sdk;<br />
using System;<br />
using System.IO;<br />
using System.Net;<br />
using System.Runtime.Serialization.Json;<br />
using System.Text;</p>
<p>namespace MyTestPlugin<br />
{</p>
<p> public class Lead<br />
 {<br />
 public string Topic { get; set; }<br />
 public string FullName { get; set; }<br />
 public string Email { get; set; }<br />
 }</p>
<p> public class MyPluginClass : IPlugin<br />
 {<br />
 public void Execute(IServiceProvider serviceProvider)<br />
 {<br />
 try<br />
 {<br />
 // Obtain the execution context from the service provider.<br />
 IPluginExecutionContext context = (IPluginExecutionContext)serviceProvider.GetService(typeof(IPluginExecutionContext));</p>
<p> // The InputParameters collection contains all the data passed in the message request.<br />
 if (context.InputParameters.Contains("Target") &amp;&amp; context.InputParameters["Target"] is Entity)<br />
 {<br />
 // Obtain the target entity from the input parameters.<br />
 Entity entity = (Entity)context.InputParameters["Target"];</p>
<p> using (WebClient client = new WebClient())<br />
 {<br />
 var myLead = new Lead();<br />
 myLead.Topic = entity.Attributes["subject"].ToString();<br />
 myLead.FullName = entity.Attributes["fullname"].ToString();<br />
 myLead.Email = entity.Attributes["emailaddress1"].ToString();</p>
<p> DataContractJsonSerializer serializer = new DataContractJsonSerializer(typeof(Lead));<br />
 MemoryStream memoryStream = new MemoryStream();<br />
 serializer.WriteObject(memoryStream, myLead);<br />
 var jsonObject = Encoding.Default.GetString(memoryStream.ToArray());</p>
<p> var webClient = new WebClient();<br />
 webClient.Headers[HttpRequestHeader.ContentType] = "application/json";<br />
 var code = "key";<br />
 var serviceUrl = "https://xyz.azurewebsites.net/api/mylead?code=" + code;</p>
<p> // upload the data using Post mehtod<br />
 string response = webClient.UploadString(serviceUrl, jsonObject);<br />
 }<br />
 }<br />
 }<br />
 catch (Exception ex)<br />
 {<br />
 throw new InvalidPluginExecutionException(ex.Message);<br />
 }<br />
 }<br />
 }<br />
}<br />

Hope it helps..


Advertisements

Integrating Bot with Dynamics CRM (OAuth 2.0 Authentication)


Let us continue with our previous posts on understanding and implementing a simple bot that interact with Dynamics CRM using Microsoft Bot Framework

Till now we had hard coded our connection to CRM inside the bot application which was used to create lead records in CRM.

In this post, we will use OAuth2 authentication to connect to CRM Service (Web API).

We’d update our bot to use Sign-In Card. It will launch a web browser (web site which redirects user to authenticate to office 365) where user will enter the credentials and on successful authentication it will get the authentication token which it would then use to interact with CRM.

Here we would be using Web Site deployed in Azure that takes care of all the plumbing part.

We will be using Bot State Service here for saving Bot State. User can save bot state in this bot state service and can retrieve it. So, we would be passing the user id to the web site hosted to the azure and after we get the authentication token on successful authorization, we save this information in the bot in the bot state using SetUserData method. Back in our Bot app we will retrieve this authentication token saved in session state using GetUserData method and use it for interacting with CRM Web API.

Let us first create a ASP.NET Web Application which would be use for redirecting the user to authentication and saves the authentication token to the Bot State Service.

This creates our Web Application.

Add the following Microsoft.Bot.Builder Nuget Package in the project.


Also add a View named Authorize, which we will use are redirect URI for our Dynamics 365 App that will be registered to Azure Active Directory.


Before we start writing the code in our controller, we need to register dynamics 365 app with Azure Active Directory.

Follow the below post for that.

https://nishantrana.me/2016/11/13/register-a-dynamics-365-app-with-azure-active-directory/

Now we have our required values i.e. client id, client key and end point URL

Add the following keys in web.config.


Here Client Id, Client Secret and EndPoint Url are the one we got when we registered our Dynamics 365 App. Here Microsoft App Id and Password are for our Bot Application.

https://dev.botframework.com

Update the HomeController.cs and add below action methods Login and Authorize.

</p>
using Microsoft.Bot.Connector;
using Microsoft.IdentityModel.Clients.ActiveDirectory;
using System;
using System.Configuration;
using System.Threading.Tasks;
using System.Web.Mvc;

namespace AzureAuthWebApplication.Controllers
{
public class HomeController : Controller
{
public ActionResult Index()
{
return View();
}
public ActionResult Login(string userid)
{
// string userid in session
Session["botuserid"] = userid;
// CRM Url
string Resource = "https://nishutrial.crm.dynamics.com";

AuthenticationContext authContext = new AuthenticationContext(ConfigurationManager.AppSettings["Authority"]);
var authUri = authContext.GetAuthorizationRequestUrlAsync(Resource, ConfigurationManager.AppSettings["ClientId"],
new Uri(ConfigurationManager.AppSettings["RedirectUri"]), UserIdentifier.AnyUser, null);
return Redirect(authUri.Result.ToString());
}

public async Task<ActionResult> Authorize(string code)
{
AuthenticationContext authContext = new AuthenticationContext(ConfigurationManager.AppSettings["Authority"]);
var authResult = await authContext.AcquireTokenByAuthorizationCodeAsync(
code, new Uri(ConfigurationManager.AppSettings["RedirectUri"]),
new ClientCredential(ConfigurationManager.AppSettings["ClientId"],
ConfigurationManager.AppSettings["ClientSecret"]));

// Saving token in Bot State
var botCredentials = new MicrosoftAppCredentials(ConfigurationManager.AppSettings["MicrosoftAppId"],
ConfigurationManager.AppSettings["MicrosoftAppPassword"]);
var stateClient = new StateClient(botCredentials);
BotState botState = new BotState(stateClient);
BotData botData = new BotData(eTag: "*");
botData.SetProperty<string>("AccessToken", authResult.AccessToken);

// webchat is the channel id. Make sure it is same in the bot application when we get the user data
await stateClient.BotState.SetUserDataAsync("webchat", Session["botuserid"].ToString(), botData);
ViewBag.Message = "Your Token -" + authResult.AccessToken + " User Id - " + Session["botuserid"].ToString();
return View();
}

public ActionResult About()
{
ViewBag.Message = "Your application description page.";

return View();
}

public ActionResult Contact()
{
ViewBag.Message = "Your contact page.";

return View();
}
}
}
<p style="text-align: justify;">

Publish the Web Application to Azure.

Now let us go back to our Bot Application and update the messagecontroller.cs class.

</p>
using System.Net;
using System.Net.Http;
using System.Threading.Tasks;
using System.Web.Http;
using Microsoft.Bot.Builder.Dialogs;
using Microsoft.Bot.Connector;
using Microsoft.Bot.Builder.FormFlow;
using Bot_Application1.Models;
using System;
using Bot_Application1.Dialogs;
using System.Collections.Generic;
using System.Web;
using System.Net.Http.Headers;
using Newtonsoft.Json;
using Newtonsoft.Json.Linq;

namespace Bot_Application1
{
[BotAuthentication]
public class MessagesController : ApiController
{
/// <summary>
/// POST: api/Messages
/// Receive a message from a user and reply to it
/// </summary>
public async Task<HttpResponseMessage> Post([FromBody]Activity activity)
{
if (activity.Type == ActivityTypes.Message)
{
if (activity.Text.ToUpper() == "LOGIN")
{
ConnectorClient connector = new ConnectorClient(new Uri(activity.ServiceUrl));
Activity replyToConversation = activity.CreateReply();
replyToConversation.Recipient = activity.From;
replyToConversation.Type = "message";
replyToConversation.Attachments = new List<Attachment>();

List<CardAction> cardButtons = new List<CardAction>();
CardAction plButton = new CardAction()
{
// ASP.NET Web Application Hosted in Azure
// Pass the user id
Value = "http://azureauthwebapplication20170421122618.azurewebsites.net/Home/Login?userid=" + HttpUtility.UrlEncode(activity.From.Id),
Type = "signin",
Title = "Connect"
};

cardButtons.Add(plButton);

SigninCard plCard = new SigninCard("Please login to Office 365", new List<CardAction>() { plButton });
Attachment plAttachment = plCard.ToAttachment();
replyToConversation.Attachments.Add(plAttachment);
var reply = await connector.Conversations.SendToConversationAsync(replyToConversation);
}
else if (activity.Text.ToUpper() == "GETUSERS")
{
// Get access token from bot state
ConnectorClient connector = new ConnectorClient(new Uri(activity.ServiceUrl));
StateClient stateClient = activity.GetStateClient();
BotState botState = new BotState(stateClient);
BotData botData = await botState.GetUserDataAsync(activity.ChannelId, activity.From.Id);
string token = botData.GetProperty<string>("AccessToken");

var httpClient = new HttpClient();
httpClient.DefaultRequestHeaders.Add("OData-MaxVersion", "4.0");
httpClient.DefaultRequestHeaders.Add("OData-Version", "4.0");
httpClient.DefaultRequestHeaders.Accept.Add(new MediaTypeWithQualityHeaderValue("application/json"));
httpClient.DefaultRequestHeaders.Authorization = new AuthenticationHeaderValue("Bearer", token);

var retrieveResponse =
await httpClient.GetAsync("https://nishutrial.crm.dynamics.com/api/data/v8.1/systemusers?$select=fullname");
if (retrieveResponse.IsSuccessStatusCode)
{
var jRetrieveResponse =
JObject.Parse(retrieveResponse.Content.ReadAsStringAsync().Result);

dynamic systemUserObject = JsonConvert.DeserializeObject(jRetrieveResponse.ToString());

foreach (var data in systemUserObject.value)
{
Activity jsonReply = activity.CreateReply($"System User = {data.fullname.Value}");
await connector.Conversations.ReplyToActivityAsync(jsonReply);
}
}
else
{
Activity reply = activity.CreateReply("Failed to get users.\n\nPlease type \"login\" before you get users.");
await connector.Conversations.ReplyToActivityAsync(reply);
}
}
else
{
ConnectorClient connector = new ConnectorClient(new Uri(activity.ServiceUrl));
Activity reply = activity.CreateReply("# CRM BOT Instructions \n\nlogin --> Login to Office 365\n\ngetusers --> Get all System Users in CRM");
await connector.Conversations.ReplyToActivityAsync(reply);
}
}
else
{
HandleSystemMessage(activity);
}

var response = Request.CreateResponse(HttpStatusCode.OK);
return response;
}

private IDialog<LeadModel> MakeLuisDialog()
{
return Chain.From(() => new LUISDialog(LeadModel.BuildForm));
}

internal static IDialog<LeadModel> MakeRootDialog()
{
return Chain.From(() => FormDialog.FromForm(LeadModel.BuildForm));
}

private Activity HandleSystemMessage(Activity message)
{
if (message.Type == ActivityTypes.DeleteUserData)
{
// Implement user deletion here
// If we handle user deletion, return a real message
}
else if (message.Type == ActivityTypes.ConversationUpdate)
{
// Handle conversation state changes, like members being added and removed
// Use Activity.MembersAdded and Activity.MembersRemoved and Activity.Action for info
// Not available in all channels
}
else if (message.Type == ActivityTypes.ContactRelationUpdate)
{
// Handle add/remove from contact lists
// Activity.From + Activity.Action represent what happened
}
else if (message.Type == ActivityTypes.Typing)
{
// Handle knowing tha the user is typing
}
else if (message.Type == ActivityTypes.Ping)
{
}

return null;
}
}
}
<p style="text-align: justify;">

Publish the Bot to Azure.

Now let us test the Bot.

Go to – https://dev.botframework.com/bots

Open the Bot and click on Test.

Let us start the Chat.

On typing login the bot presents User with the Sign In Card. Click on Connect.

Sign in with your credentials.

Give permission to the app.

On successful sign-in –

Now type in getusers

It brings us all the System Users full name from our CRM Organization.

The extremely informative posts from which I learned about it

https://blogs.msdn.microsoft.com/tsmatsuz/2016/09/06/microsoft-bot-framework-bot-with-authentication-and-signin-login/

https://debajmecrm.com/2016/02/29/knowhow-how-to-execute-web-api-calls-to-microsoft-dynamics-crm-from-an-external-asp-net-web-application/

and following pluralsight training that helped in understanding OAuth and JWT concept.

https://www.pluralsight.com/courses/oauth2-json-web-tokens-openid-connect-introduction

Hope it helps..

Using LUIS AI in Microsoft Bot Framework – Part 2


Let us continue with our previous posts on using Microsoft Bot Framework

In our previous post we had configured, tested and trained our LUIS application.

Here we will update our bot application code and see how it works.

Add a new Dialog class named LUIS Dialog

The class implements LuisDialog interface and has attribute Serializable to it.

We also need to add an attribute LuisModel that takes in model id and subscription key.

To get the model id and subscription key, open the LUIS application we had created. (https://www.luis.ai/)

Get App Id from the Dashboard.

And API key from My Keys section.

Now one by one we will implement logic for each of our Intent, for this we will use LuisIntent Attribute.

Here we have wrote a method for each of the intent that we had configured earlier.

We would need to make following changes to our ModelController.cs to call the LUISDialog

Let us look at the Intent one by one

For Luis Intent – None :-

i.e. when no Intent found or Intent is None.

Here bot will reply with Sorry I do not understand if the intent is none.

Here the work meeska (utterance) is associated to None Intent.

Inside Bot emulator –

For Luis Intent – Greeting :-

If the user types in Hi or Hello the bot will respond with “Please let me know…” as it will figure out that the intent is Greeting.

For Luis Intent – QueryProduct:-

If the user types in “Do you have product1?” the Bot associates it to our Query Product intent as we had trained our LUIS app for this. Here if user asks for Product1, Product2 or Product3 the bot responds that it has those products else it responds with “Sorry we do not have that product”.

QueryProduct Intent associated to Product Entity –

Inside Bot Emulator –

For Luis Intent – Interest:-

For Intent Interest, we call our Form Dialog that we had created in the following post Using FormFlow in Microsoft Bot Framework.

It basically asks user about the product he is interested in, name and description and creates a lead record in CRM.


Interest intent –


The lead record created in CRM.


In the next post, we will see how to publish the application to Azure.

Hope it helps..