Fixed – Bad Request – Error in query syntax while using Xrm.WebAPI


We might get the below error while using Xrm.WebAPI.

‘Bad Request – Error in query syntax.’

One of the reasons could be that while setting up the Lookup field, we haven’t removed the curly brackets.

Use the below function to replace/remove them.

  • let result = myGuid.replace(/[{}]/g, ”);
  • let result = myGuid.replace(“{“, “”).replace(“}”, “”);

Hope it helps..

Advertisements

Fixed – Value must be a data entity record error in Power Apps


We got the below error while trying to use the Relate function – “Value must be a data entity record”


As the error message clearly states and also if we see the syntax, the Relate function expects a record

Below was our formula for OnSelect, which was throwing the error

Here instead of passing the record, we were passing the table in the Relationship which was the reason for the error.

We changed it to store the ThisItem

And also updated the OnSelect

This fixed the issue for us.

Hope this helps..

Advertisements

Fixed – Custom Page not opening or Page doesn’t exist in this app error in the model-driven app (PowerApps)


Recently we created a custom page to be opened from the Ribbon / Command bar, however, the page was not opening for us, even though the function was running properly.

https://learn.microsoft.com/en-us/power-apps/developer/model-driven-apps/clientapi/navigate-to-custom-page-examples

Here we had created the custom page from within the solution area, so we need to add this custom page to our model-driven app. (The other option is to create the page from the Modern App Designer.)

https://learn.microsoft.com/en-us/power-apps/maker/model-driven-apps/add-page-to-model-app#create-or-edit-a-custom-page

Open the app in the Modern App Designer and click on Add Page

Select Use an exiting custom page, select the page and uncheck the Show in navigation option as we are opening this page from the form.

Publish the app.

This time clicking on Open Custom page command/button on the form successfully opened the custom page for us.

Thanks to Andrew (https://butenko.pro/) for the solution.

Hope it helps..


Advertisements

Binding Choice / OptionSet (multiselect) with Combo box in Canvas Apps / Power Apps (DataVerse)


Instead of hardcoding Combo box , we can bind it to the Choice / Option Set field of Dynamics 365 / Dataverse.

Format – Choices(DataSource[@columnname])

Check out the post that explains it – https://debajmecrm.com/how-to-bind-a-multiselect-choice-of-dataverse-to-a-combobox-in-canvas-apps/

Also check out – how to bind and do filter on multiselect combo box – https://youtu.be/5dSk5iOgT68?t=286

To learn about all the properties of Combo box refer – https://www.spguides.com/powerapps-combobox-control/

Hope it helps..

Advertisements

Fix- Multiple levels of many-to-one relationship expansion aren’t supported in PowerApps


We would get this error while trying to get the value of a related entity (lookup) through a related entity (lookup) in the current record using the incorrect formula.

For e.g. here Region is a lookup in the Village, which in turn is a lookup in the Product record (ThisItem).

The solution here is to use the LookUp function

Before

After

ThisItem.Village.Region.Name

LookUp(Villages, Village = ThisItem.Village.Village).Region.Name


Search the Villages table, using the GUID of the Village, and fetch the name of the region lookup field in it.

Hope it helps..

Advertisements

How to – use form capture to integrate with external form in Dynamics 365 Marketing


We’d use form capture option when we want to integrate with external form not not created in Dynamics 365 Marketing .

Let us take a simple example to understand how the form capture works.

Check the previous post on embedding the Dynamics 365 Marketing form on an external page – https://nishantrana.me/2022/11/10/how-to-embed-marketing-form-on-an-external-page/

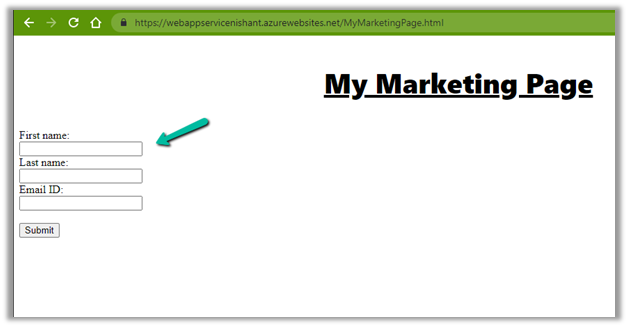
Here we have this simple HTML page having a form in it.

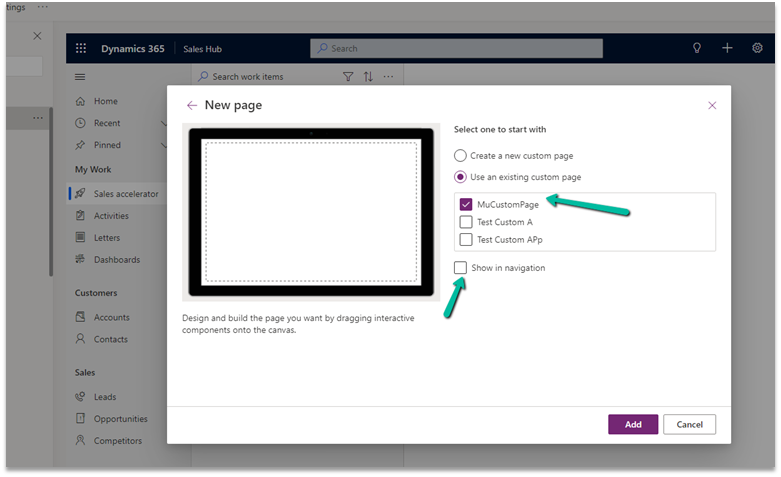
Navigate to Outbound marketing >> Internet Marketing >> Marketing forms

Select Capture Form in the command bar.

Enter the URL of the page which has the form in it.

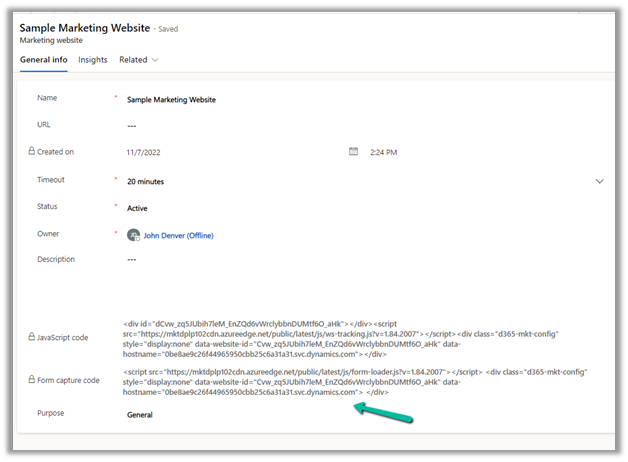
For the verification process to be successful, we need to copy the form capture code to the web page. We can find the form capture code in the Marketing website record.

Else in the next step, it will check for the script and if not found will give the option to use an existing script or generate a new one to copy to that web page.

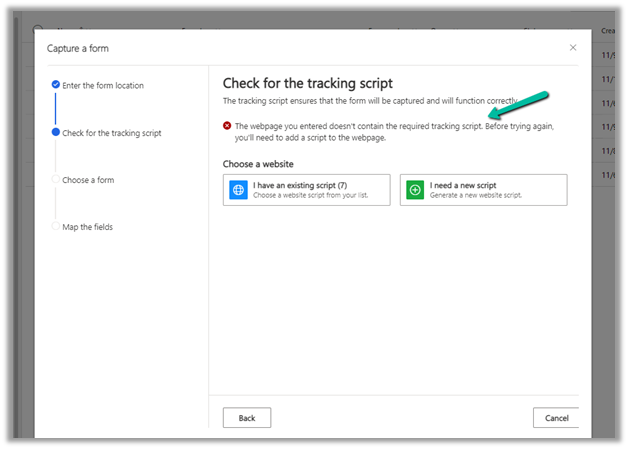
Once we have entered the script, we’d get the message that the tracking script is valid on re-running the verification.

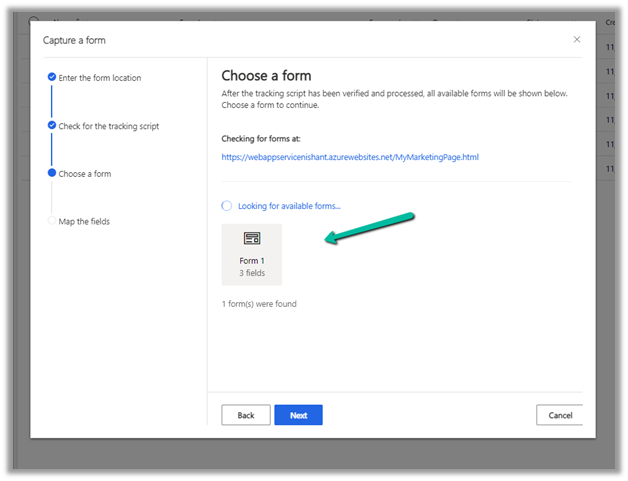
It will identify and load all the forms found on the page. Select the form.

Next map the fields in the form with Dynamics 365 Field, and click on Save and Close.

We can see the website and field mapping details in the marketing form record, with the option of Rescan form and Go live.

Let us Go live with the form.

Let us refresh our page which has the form, and submit the details.

Back in the Submissions tab of the marketing form, we can the submitted values as pending initially.

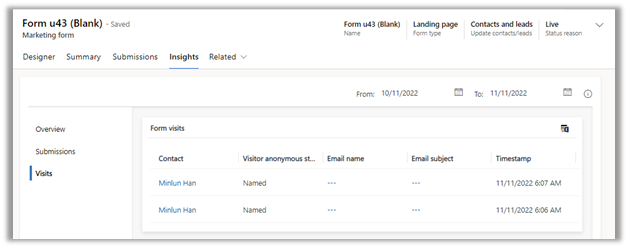
In the Insights, later we can see the form submissions

And Form Visits details

Note – Prefill isn’t supported for Form Capture

Check for more details –

https://vivian.tiiman.com/tip-9-form-capture-quirks-d365-marketing/

https://learn.microsoft.com/en-us/dynamics365/marketing/embed-forms#capture-a-new-external-form

Hope it helps..

Advertisements