How to – Connect to Dynamics 365 Web API using OAuth 2.0 – Client Credentials


For quick reference – https://nishantrana.me/2021/01/06/sample-code-dynamics-365-web-api-organization-service/

In the last post we learned about connecting to Dynamics 365 Web API using Resource Owner Password Credential (ROPC), here we’d be covering the Client Credentials grant.

Check other posts on OAuth 2.0 and Dynamics 365 Web API

OAuth 2.0 with Dynamics 365 CE Web API

Client Credentials grant is designed for the client applications who are the resource owner and when basically there are no users involved, a batch (cron) job or a service using Web API, running in the background, on the server is one such example.

Sample console app to connect to CDS using AuthType – OAuth https://nishantrana.me/2020/11/09/sample-code-to-connect-to-cds-dynamics-365-ce-using-oauth/

Here we will not be using the authorization endpoint, and the client application will be sending its own credential, instead of impersonating a user, directly to the token endpoint. The benefit compared to basic authentication or API keys is that credentials are not being sent with every request, it is only sent while requesting the access tokens along with all the other benefits of using access token – stateless, fine-grained access control, access token lifetime etc.

Let us see an example of using the Client Credentials grant in our console application. Along with the Client Id that we got when we registered our client application in the Azure Active Directory, we would need the Client Secret.

Follow the below steps to generate the Client Secret

Login to Azure Admin Portal

https://portal.azure.com

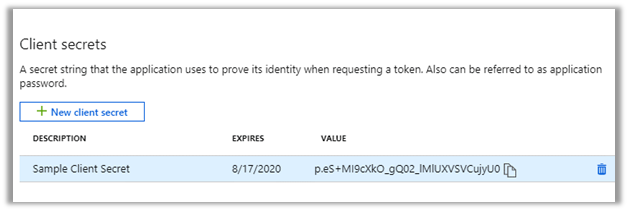
Select the application registered and click on Certificates & secrets option
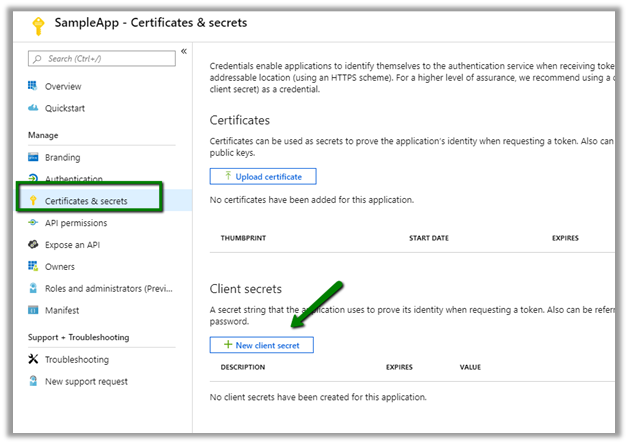

Click on New client secret button to generate the client secret. Copy the generated client secret. Select the expiry as per the need.
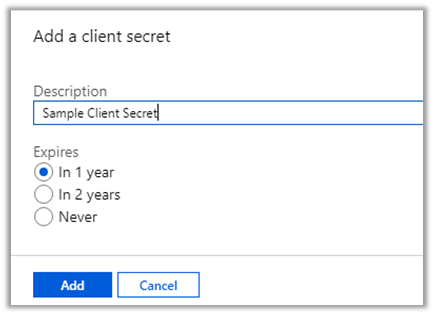
Copy the secret generated and save it, as it won’t be available later when we are navigating here.
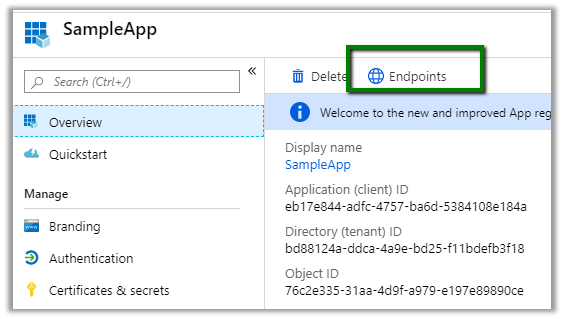
Also, we can get the Authentication Token Endpoint, for that navigate to Overview à Endpoints
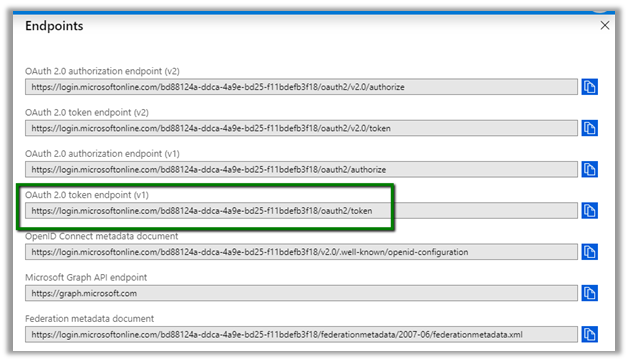
And copy the OAuth 2.0 token endpoint.
Next step is to create the Application User within Dynamics 365 CE corresponding to the client application.

Login to Dynamics 365 CE, Settings à Security à Users àset View as Application Users and click on New button
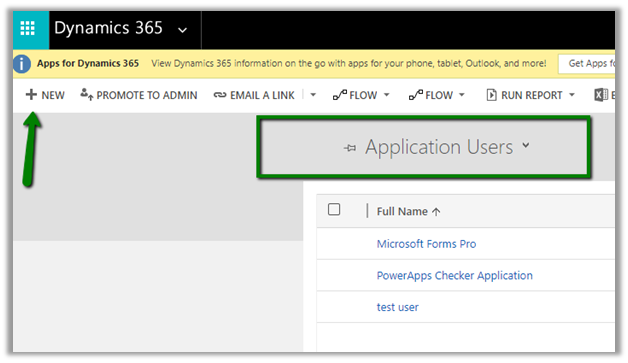
Set Application Id as the Client Id of the Application registered and specify other mandatory values and save the record.
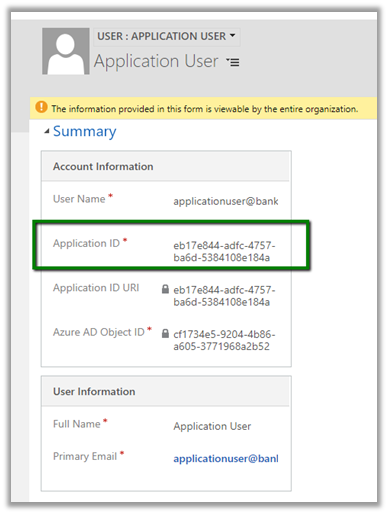
Assign appropriate security role to the new application user added.

Other Sample Code –https://nishantrana.me/2021/01/06/sample-code-dynamics-365-web-api-organization-service/

Sample C# Code à


static void Main(string[] args)
{
// Dynamics CRM Online Instance URL
string resource = "https://bankfabdemo.crm.dynamics.com";

// client id and client secret of the application
ClientCredential clientCrendential = new ClientCredential("eb17e844-adfc-4757-ba6d-5384108e184a",
"p.eS+MI9cXkO_gQ02_lMlUXVSVCujyU0");

// Authenticate the registered application with Azure Active Directory.
AuthenticationContext authContext =
new AuthenticationContext("https://login.microsoftonline.com/bd88124a-ddca-4a9e-bd25-f11bdefb3f18/oauth2/v2.0/token");

AuthenticationResult authResult = authContext.AcquireToken(resource, clientCrendential);
var accessToken = authResult.AccessToken;

// use HttpClient to call the Web API
HttpClient httpClient = new HttpClient();
httpClient.DefaultRequestHeaders.Add("OData-MaxVersion", "4.0");
httpClient.DefaultRequestHeaders.Add("OData-Version", "4.0");
httpClient.DefaultRequestHeaders.Accept.Add(new MediaTypeWithQualityHeaderValue("application/json"));
httpClient.DefaultRequestHeaders.Authorization = new AuthenticationHeaderValue("Bearer", authResult.AccessToken);

httpClient.BaseAddress = new Uri("https://bankfabdemo.crm.dynamics.com/api/data/v9.0/");

var response = httpClient.GetAsync("WhoAmI").Result;
if (response.IsSuccessStatusCode)
{
var userDetails = response.Content.ReadAsStringAsync().Result;
}

}

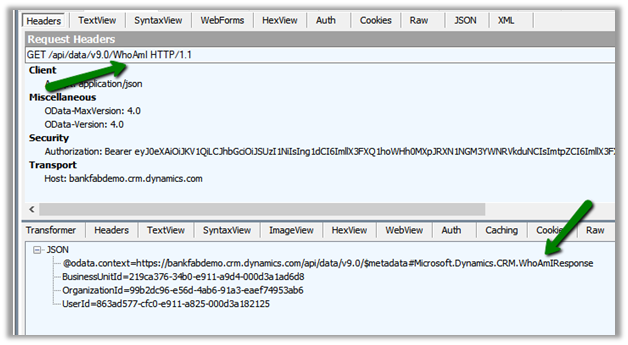
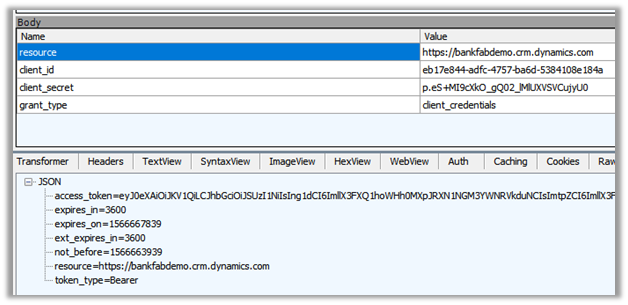
Within Fiddler à
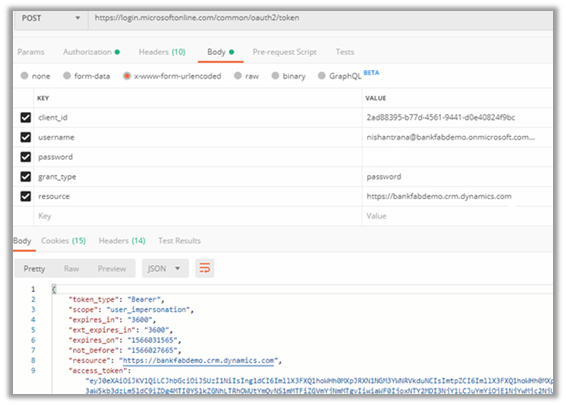
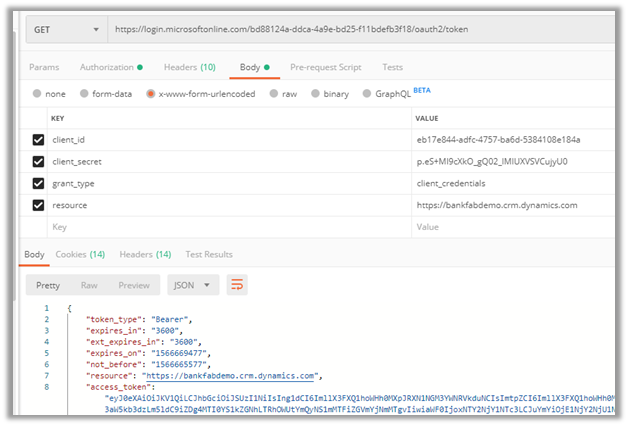
Within Postman à
Sample Code – Dynamics 365 Web API / Organization Service

Hope it helps..

https://docs.microsoft.com/en-us/powerapps/developer/data-platform/xrm-tooling/use-connection-strings-xrm-tooling-connect#connection-string-examples

Below is the example using CrmServiceClient – replace client id, client secret and the URL – 

 string ConnectionString = "AuthType = ClientSecret; " +
                   "ClientId=ad7a1cc4-838b-4270-9c11-29eb1686e203; " +
                   "ClientSecret=m7.H2Di~vizo.jZ0odh-C-85qg70QPfnsI; " +
                   "Url = https://[org].crm.dynamics.com/;";


            CrmServiceClient svc = new CrmServiceClient(ConnectionString);
            
            if (svc.IsReady)
            {
               // perform the logic 
                   
            }
Advertisements
Advertisements

How to – Connect to Dynamics 365 Web API using OAuth 2.0 – Resource Owner Password Credential (ROPC)


The ROPC grant type should only be used in scenario when the Client application is absolutely trusted with user credentials and when redirect based flow are not possible. It was introduced for the Legacy Application for quick migration and is now more or less considered obsolete by OAuth Working group, and ideally should not be used.

In this flow, User enters his credentials (username and password) in the client application, when is then sent to Token Endpoint of the Authorization Server for Access Token request. The client application then gets the access token and call/request the protected resources (Web API) and get response. Here we remove the user from the authorization process and are not using the Authorization endpoint at all. The apps using this flow will lose the benefits of multi-factor authentication MFA and Single Sign-On.

Request à

client_id Client id of the app registered in Azure Active Directory.

We can also use the default client id –

“2ad88395-b77d-4561-9441-d0e40824f9bc” –

which is setup against Dynamics 365 Online instances.

https://www.crmviking.com/2017/08/piggybacking-on-msdyn365.html

username User’s username
password User’s password
grant_type password
resource Dynamics 365 URL

Sample C# Code à

Create the console application and add the following Nuget Package

https://docs.microsoft.com/en-in/azure/active-directory/develop/active-directory-authentication-libraries


static void Main(string[] args)
{
// Dynamics CRM Online Instance URL
string resource = "https://bankfabdemo.crm.dynamics.com";

// ID of the Application Registered
// "2ad88395-b77d-4561-9441-d0e40824f9bc" - Default Client Id which is setup against Dynamics 365 Online instances.
string clientId = "2ad88395-b77d-4561-9441-d0e40824f9bc";

// username and password of the user
UserCredential userCrendential = new UserCredential("nishantrana@bankfabdemo.onmicrosoft.com", "*******");

// Authenticate the registered application with Azure Active Directory.
// Token URL - https://login.microsoftonline.com/common/oauth2/token

AuthenticationContext authContext =
new AuthenticationContext("https://login.windows.net/common");

AuthenticationResult authResult = authContext.AcquireToken(resource, clientId, userCrendential);
var accessToken = authResult.AccessToken;

// use HttpClient to call the Web API
HttpClient httpClient = new HttpClient();
httpClient.DefaultRequestHeaders.Add("OData-MaxVersion", "4.0");
httpClient.DefaultRequestHeaders.Add("OData-Version", "4.0");
httpClient.DefaultRequestHeaders.Accept.Add(new MediaTypeWithQualityHeaderValue("application/json"));
httpClient.DefaultRequestHeaders.Authorization = new AuthenticationHeaderValue("Bearer", authResult.AccessToken);

httpClient.BaseAddress = new Uri("https://bankfabdemo.crm.dynamics.com/api/data/v9.0/");

var response = httpClient.GetAsync("WhoAmI").Result;
if (response.IsSuccessStatusCode)
{
var userDetails = response.Content.ReadAsStringAsync().Result;
}

}

The result: –

Inside Fiddler à

Sample Code – Dynamics 365 Web API / Organization Service

Hope it helps..

Advertisements

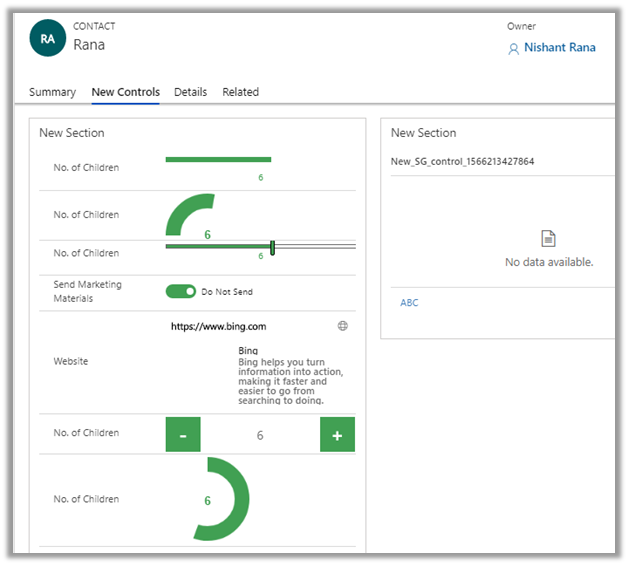
Subgrid, QuickView, Linear Gauge, Arc Knob, Linear Slider controls added in new model-driven form designer (WYSIWYG) in PowerApps


Recently we were trying out the model-driven form designer and noticed the option of adding new input control to the form in it.


Few days back only I wrote about the addition of Subgrid control, however the limitation was that we couldn’t add new subgrid control. But with the new updates, we can now add new subgrid control along with Quick View and other controls also as shown below.

The other option to configure these controls is from the Controls tab of the field properties dialog box.

https://docs.microsoft.com/en-us/dynamics365/customer-engagement/customize/use-custom-controls-data-visualizations

Hope it helps..

Sub-Grid added to the new model-driven form designer (WYSISYG) in PowerApps


Hi,

Microsoft is steadily adding all the essential features to the new model-driven form designer (preview) making it more and more usable and intuitive.

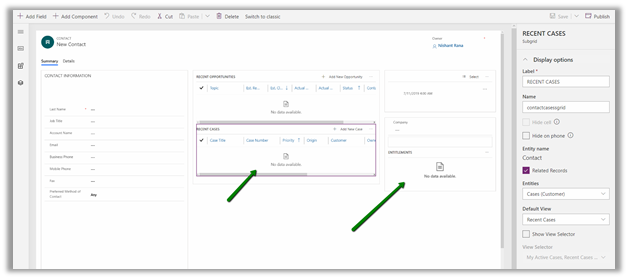
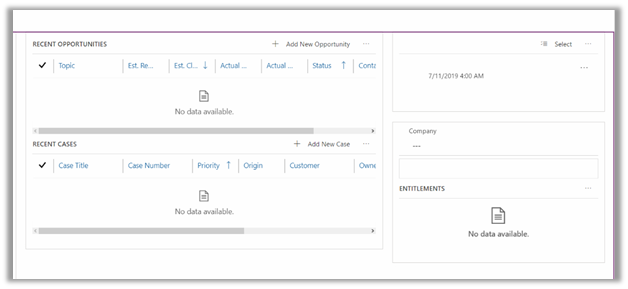
Latest addition is the support for sub-grid as shown below

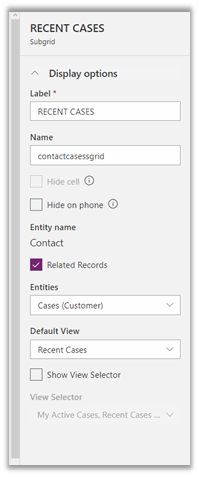
The properties window for the sub-grid

`

We can select the view from either the related entities or view from any of the un-related entity (uncheck Related Records check box).

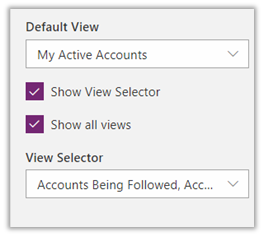
Similarly, we can enable view selectors and can show all the views or selected view as shown below.

We still can’t add new sub-grid to the form in the new form designer, for that we still need to go back to our classic form designer.

Check out below articles for more details –

https://docs.microsoft.com/en-us/powerapps/maker/model-driven-apps/form-designer-overview

The new model-driven form designer WYSISYG Editor

Few improvements in the new model-driven form designer.

Hope it helps..

XrmToolBox – Using User Profile Migration tool for quickly updating User’s security roles on changing the Business Unit


Few weeks back, we Rahul Tiwary and Prashant Maurya developed a tool named User Profile Migration for moving Users along with their respective BU’s, Security Roles and Teams that they are part of from one instance to another.

Our earlier tool User Security Manager provided feature to update the BU, Security Roles, Team, Field Security Profile of the users(s). However when you change the BU of the user, just like our OOB behaviour of Dynamics CRM, all the security roles get removed.

What if we want to quickly update the BU of the user keeping the same the Security Roles assigned. (We need to make sure the new BU has all the same Security Roles, which ideally would be the case if we have created them at the root Business Unit level )

To do that – we can use User Profile Migration tool.

We can download the user profile (xml format) and only update the Business Unit name there and upload the file back in the tool.

Check the step by step guide here

https://rahultiwarydynamiccrmblogs.wordpress.com/2019/05/14/dynamic-crm-user-profile-migration/

Hope it helps..

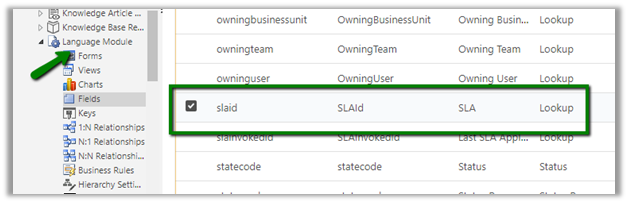
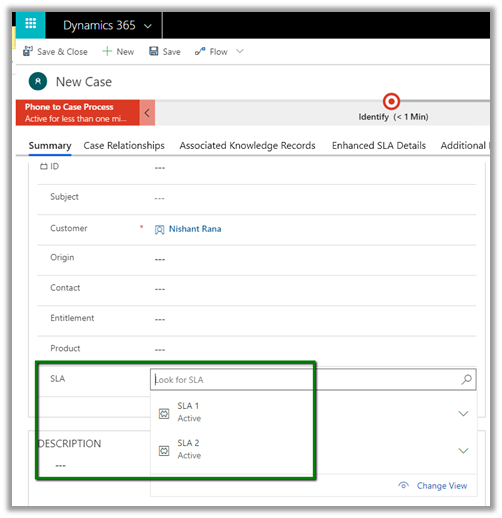
Apply SLA choosing the SLA in the SLA lookup field for the SLA Enabled Entities in Dynamics 365 CE


One of the enhancements that came in SLA (CRM 2016 Update 1), which I feel has got unnoticed by few, is choosing the SLA manually using the SLA lookup field.

As we all know SLA comes already enabled for Case Entity and can be enabled for the below entities

Account, Contact, Order, Invoice, Quote, Opportunity, Lead, Activity Entities.

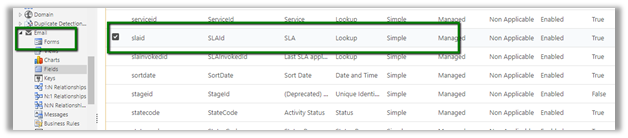
Basically, the above entities have SLA lookup field already created for them.

We can also Enable SLA for custom entities and activities, which will create the SLA lookup field in it.

Add the field on the form and select the appropriate SLA, and that selected SLA will be applied to that record.

It saves us from defining multiple SLA Items for an SLA to be applied as DEFAULT or to use the entitlements to achieve the same.

Hope it helps..