How to – Hide and show controls in Canvas App based on security role of the user (Dataverse / Dynamics 365)


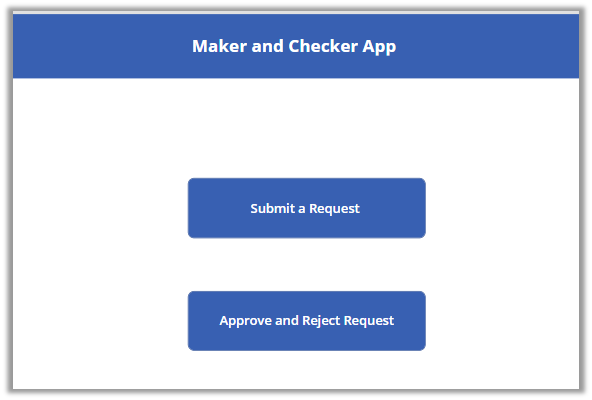
Suppose we have the below Maker and Checker Canvas App, with two button one for raising the request and the other for approving and rejecting the request.

We have below custom security roles created in our Dynamics 365

  • Maker
  • Checker

Here we want Submit a Request button to be visible only to users with Maker security role and the Approve and Reject Request button to users with Checker role.

For this we can write the below formula on Visible property of the button.

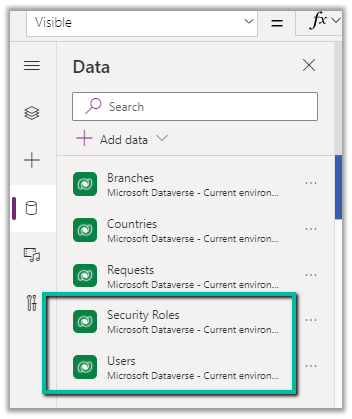
Add the Users and Security Roles data sources first.

If(

LookUp([@’Security Roles’], Name = “Maker”, Role) in Concat(LookUp([@Users], ‘Primary Email’ = User().Email).’Security Roles (systemuserroles_association)’, Role & “;”),

true,

false

)


Based on email address of the user, we are comparing the Maker security role with all the different roles assigned to the user, which we are fetching from systemuserroles_association.

  • User function in Power Apps

https://docs.microsoft.com/en-us/powerapps/maker/canvas-apps/functions/function-user

  • Lookup function in Power Apps

https://docs.microsoft.com/en-us/powerapps/maker/canvas-apps/functions/function-filter-lookup

Hope it helps..

If(LookUp([@'Security Roles'], Name = "Maker", Role) in Concat(LookUp([@Users], 'Primary Email' = User().Email).'Security Roles (systemuserroles_association)', Role & ";"),
true,
false)
Advertisements

Interactive login option in CDS/CRM Connection Manager in KingswaySoft Dynamics 365 Integration Toolkit


With the new release, the CDS/CRM connection manager adds a new Interactive Login option in the CDS/CRM Connection Manager for Authentication Type as OAuth.

Interactive login allows the user to log in using his account details (to establish the connection with CRM) without the need for registering the application in the Azure Active Directory.

This is supposed to be used only during design time.

Enter User Name and the CDS/CRM URL and click on Test Connection.

The login screen pops up, where we can enter the credentials and sign in.

We’d receive the Test connection succeeded message.

Now we are ready to use the CRM Connection.

Now when we will run the package from within the Visual Studio (SSDT), it will again ask for entering the credentials.

The other option is to use the OAuth Type Password along with default Client App ID and Redirect URL

https://docs.microsoft.com/en-us/powerapps/developer/data-platform/xrm-tooling/use-connection-strings-xrm-tooling-connect

Hope it helps..

Advertisements

How to – Enable parent check option during Merge – Dynamics 365


The duplicate detection/merge feature has been optimized in the platform

https://nishantrana.me/2020/10/29/improved-duplicate-detection-and-merge-experience-in-dynamics-365-for-sales-2020-release-wave-2/

and now uses the new interface replacing the legacy web client.

The legacy experience –

The enhanced experience – now with merge option.

Merge allows to select up to 2 records to merge. Selecting more than 2 records to merge gives the below error.

And Merge button will also get disabled.

Below are the different options available while performing Merge.

  • Merge records by choosing fields with data.
  • View fields with conflicting data.
  • Enable Parent check

In case of qualify we are able to select 2 matching records for merge

dd2records

The merge process is always asynchronous. The merge also merges any child records.

As per Microsoft Docs, to find the progress of the cascading operation triggered as part of the merge, navigate to System Jobs in Audit and Logs settings within the Admin portal.

Filter by Cascade Operations

The Enable parent check option, if checked, will result in failure during merge operations if records are deleted while the system job is running. We need to uncheck this option if we want merge to continue even if a record is deleted while the Merge job is running.

There could be other reasons because of which merge operations could fail.

Get all the details here –

https://markcarrington.dev/2020/08/14/msdyn365-internals-async-record-merging/

Hope it helps..

Advertisements

Fixed – We are having trouble loading your form preview. Check to make sure you have access error in Power Apps


While trying to open a form for customization for a custom entity we were getting below error within the maker portal.

The user was an admin user.

The same was the case in both Chrome and Edge browsers.

The only way we could proceed was by switching to classic experience.

Switching to Classic worked

After updating the form in classic and publishing the changes, the form started working properly in the maker portal also.

We were able to customize the form in both Chrome and Edge.

Hope it helps..

How to – Use Advanced lookup in Model-driven Power Apps / Dynamics 365


To enabled Advanced Lookup, log into to Power Platform Admin Center, navigate to

Environment >> [Select Environment] >> Settings >> Behavior

Enable the Lookup behavior and Save.

This adds the Advanced Lookup option in the Lookup dialog.


Clicking on it opens the Advanced Lookup Grid 


We can perform SEARCH within a selected View, CHANGE a view, can FILTER it the results further to show only records owned, ADD a new record, SORT the grid.


The best part is we can open/edit an existing record as well as add new ones without losing the existing context.

Opening an existing record from the result opens the record in the new pop-up window as shown below.

Similarly, the Add new option opens the Quick Create form.

In case of special data type like Party List or Regarding, we can select multiple records of different entities we are presented with.

Similar the option to Add new records list all the tables/entities applicable to that lookup.

Thus the new advanced lookup makes working with Lookup much simpler and effective and we should start adapting / using it.

Blog posts on 2021 Release Wave 1 – Dynamics 365

Hope it helps..

Advertisements

How to – improve data migration performance – SSIS & Azure Data Factory (Dataverse / Dynamics 365)


In one of our projects, we were executing SSIS Packages (KingswaySoft’s Dynamics 365 SSIS Integration Toolkit) under Azure-SSIS Integration Runtime in Azure Data Factory.

Check out –

Deploy and run SSIS Package in Azure Data Factory

Deploy and run SSIS Packages that use KingswaySoft’s SSIS Integration Toolkit on Azure Data Factory.

After trying out different combinations, we eventually settled with batch size as 10 and thread as 15.

https://nishantrana.me/2021/06/08/data-migration-optimum-batch-size-and-threads-for-maximum-throughput-microsoft-dataverse-dynamics-365/

Also, we used multiplexing – running the CRM Destination Component under different application users.

To be precise, 4 in our case and we can increase it get further  improvement in the throughput.

And also based on the recommendation of our Microsoft’s Fast Track Architect we raised a Microsoft ticket to increase the number of web servers allocated from 2 to 3.

Below were our findings,

the earlier run was using batch size as 100 and thread as 20 with the number of servers as 2.

On updating the batch size to 10 and thread as 15 and with the number of servers allocated increased to 3, there was a huge performance gain.

Check the table below – 

The above table is sample run in the sandbox environment, during the final run in production we got the number of servers allocated, increased to 6, gaining further improvement.

Also, check out the below blog post to understand about the affinity cookie and its affect on performance, in case if we doing migration using custom code –

https://markcarrington.dev/2021/05/26/improving-bulk-dataverse-performance-with-enableaffinitycookie/

Hope it helps..

Advertisements