How to – Use SetAutoNumberSeed Action to reset/update the seed for the Autonumber attribute – DataVerse (Dynamics 365 / CRM)


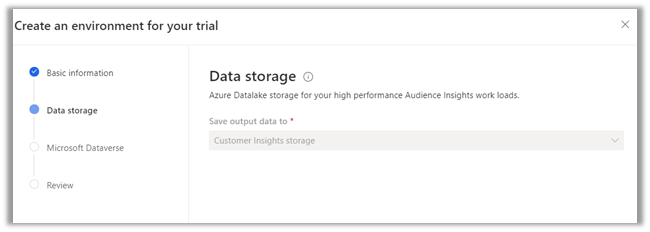
Suppose we have the following Autonumber field created with

Seed value1000 and Format{SEQNUM:4}

Now based on a certain requirement, we want to dynamically / programmatically update / reset the seed value.

For this, we can make use SetAutoNumberSeed Action

Below we can see the auto number set as 1007 on creating a new contact record.

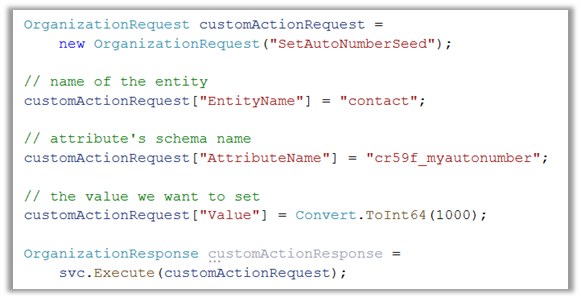
Now to set it back to 1000 we can run the following code –

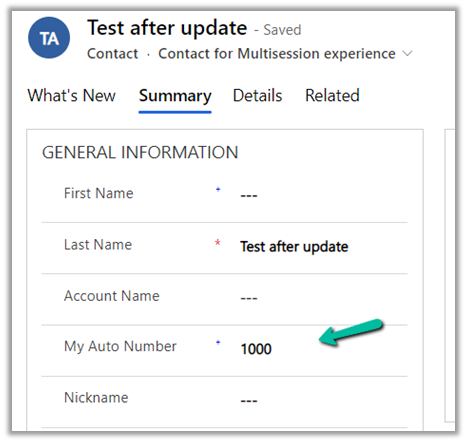
On executing the action, we can see the next contact record having autonumber field set as 1000.

Another example –

On updating the value to 888, and creating a new contact record

Sample code –

                OrganizationRequest customActionRequest =
                    new OrganizationRequest("SetAutoNumberSeed");

                // name of the entity
                customActionRequest["EntityName"] = "contact";

                // attribute's schema name
                customActionRequest["AttributeName"] = "cr59f_myautonumber";

                // the value we want to set
                customActionRequest["Value"] = Convert.ToInt64(888);

                OrganizationResponse customActionResponse = 
                    svc.Execute(customActionRequest);

Check other posts –

https://powerobjects.com/tips-and-tricks/auto-number-d365-version-9/

Hope it helps..

Advertisements

How to – Delete Data Source in Dynamics 365 Customer Insights


While trying to delete a data source we might below error if we have already used it for Match and Merge for defining the customer profile.

“Couldn’t delete data source. To process, remove its entities from: Match, Merge.”

Click on Enrichment

Navigate to Match.

Here also we cannot remove the entities in Unify as we have already used them in Merge.

So let us navigate to Merge.

Select all the fields from the DataSource (CRMDataSource in our case) which we want to delete, and click on Exclude.

Save the changes.

Now navigate back to Match and we will get the option to remove the CRMDataSource.

However, we will still not see the option to save the change as we just have 2 entities there.

Here we can add a different data source’s entity, e.g. we added the contact from our test data source.

And saved the changes.

Now as the last step we need to remove the entity from the Map also.

Click on Edit fields and unselect the entity, followed by Apply.

Navigating back to Data Sources, we were able to delete the Data Source successfully now.

So in short, if we need to delete a data source, which we have configured for customer profile, we need to first remove its references from Merge, Match and than Map.

Hope it helps..

Advertisements

Couldn’t add resource. Microsoft Dataverse is in use error in Dynamics 365 Customer Insights


We might get the below error while trying to add Microsoft Dataverse Data source in Dynamics 365 Customer Insights.

“Coundn’t add resource. Microsoft Dataverse is in use”

As the error message indicates, this is because we have an already existing data source connected to that same organization.

We can edit the Data Source and can add entities to the same connection.

also delete the data source, if its entities are not used in Match and Merge

else we will get the below error message.

“To proceed, remove its entities from: Match, Merge”

In this case we will have to remove the entities from any Merge and Match configuration first.


Hope it helps..

Advertisements

How to – Set up Dynamics 365 Customer Insights Trial


https://nishantrana.me/2022/02/09/how-to-import-data-from-local-data-files-to-dynamics-365-customer-insights/To set up the trial of Customer Insights, open the Dynamics 365 Free Trial Page and scroll down to Dynamics 365 Customer Data Platform section

https://dynamics.microsoft.com/en-gb/dynamics-365-free-trial/

Click on Try for free

Sign in with your work account or the Dynamics 365 trial account created and click on Get Started

As a first step, it asks for specifying the region for the communication preferences.

For the trial, let us choose the Audience Insights option.

It opens the Demo environment having the sample data. We can explore and understand the features with the sample data or we can start a trial.

Let us select the option Start trial in the tool bar to connect it to an existing CRM / Dataverse Environment.


Enter the basic information requested. Make sure you have selected the correct region else you might get unable to create an environment error later.

The data storage option comes as disabled.

Specify the Dataverse / CRM environment’s URL. (here I am logged in with System Administrator user who is also the Global Admin)

Finally, review the information and click on Create.

This will configure a 30 day trial against the CRM / Dataverse environment.

Now we are ready to explore it further.

How to – Import Data from Dataverse / CRM to Dynamics 365 Customer Insights

How to – Import Data from local data files to Dynamics 365 Customer Insights

How to – Unify (Map, Match and Merge) Entities in Dynamics 365 Customer Insights

Hope it helps..

Advertisements

How to – Use AlwaysMoveRecordToOwnerBusinessUnit setting in Dynamics 365 / PowerApps/ Dataverse


The setting – AlwaysMoveRecordToOwnerBusinessUnit allows us to move a user to another business unit without moving all his owned records to that unit.

This makes sure that other users in the new business unit cannot access the user’s records from his previous business unit (unless they have organization-level access / or have a role in that unit / or records are shared)

Also Check –

EnableOwnershipAcrossBusinessUnits setting https://nishantrana.me/2022/01/05/how-to-change-users-business-unit-without-removing-the-security-roles-in-dynamics-365-powerapps-enableownershipacrossbusinessunits-setting/

Modernize Business Units https://nishantrana.me/2022/01/04/modernize-business-units-matrix-data-access-structure-record-ownership-across-business-units-preview-in-dynamics-365-dataverse/

By default this setting is true.

Get the Organization Settings Editor – https://github.com/seanmcne/OrgDbOrgSettings/releases

Let us see the default behavior first, below are the 2 contact records created by User 2 who belongs to BU 1.

Now let us change the Business Unit of User 2 to BU 2.

After changing the BU of the user 2 we have assigned the same security role to the user which he has had in BU 1 that gave him BU level access on the Contact records.

We can see both Owner and Owning Business Unit getting updated as expected.

Now we’d see what will happen if we update the setting AlwaysMoveRecordToOwnerBusinessUnit to False.

But before doing that let us change the business unit of User 2 back to BU 1.

As expected Owning Business Unit is updated back to BU 1

Now let us update the setting to false

This time changing the business unit of User 2 to BU 2 should not update the Owning Business Unit of the contact records owned by User 2 to BU2.

As expected this time the Owning Business Unit remained BU 1.

Based on the true or false value set for AlwaysMoveRecordToOwnerBusinessUnit , we can see the checkbox “Move records to new business unit” either checked or unchecked – but always DISABLED.

If AlwaysMoveRecordToOwnerBusinessUnit is true than – the disabled checkbox is checked – 

cbu

Get more details below –

https://docs.microsoft.com/en-us/powerapps/developer/data-platform/configure-entity-relationship-cascading-behavior#allowed-record-ownership-across-business-unites-is-enabled

Hope it helps..

Advertisements

Modern link sharing UI, co-presence, online status (preview) in the model-driven app (Dynamics 365)


To enable the Collaboration preview feature, log in to the Power Platform Administration Center, select the Environment >> Settings >> Features >> Collaboration


Currently, the following entities are supported – Case, Contact, Account, and Opportunity.

Enabling this feature adds a new section in the command bar for the records, that allows us to see the other users working on the same record.

Here we can see 2 other users working on the same contact record.

We can select the user’s picture to see their status, send an email, start teams chat, and open the contact card.

Send Email opens the default mail app with To populated.

Teams chat opens the team for a chat.

Open contact card opens the contact’s card.

Share allows emailing the link of the current record and sharing the record.

Email link

Clicking on Manage access opens the share records dialog.

Get all the details here –

https://docs.microsoft.com/en-us/powerapps/user/collaboration

Also check – Collaborate using comments –https://nishantrana.me/2021/12/16/collaborate-using-comments-preview-in-modern-app-designer-power-apps-dynamics-365/

Hope it helps.. 

Advertisements