How to – Disable / Read Only fields in Editable Grid control (Dynamics 365 / CRM)


Say for e.g. we have a requirement to make a certain field or column in the Editable Grid as read-only.

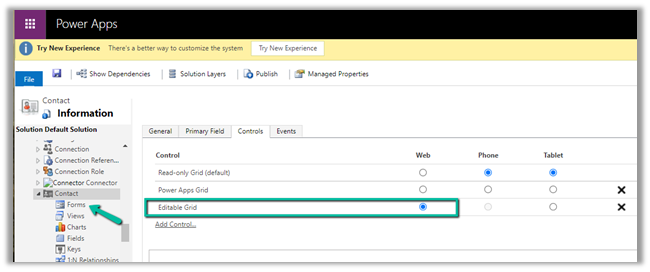
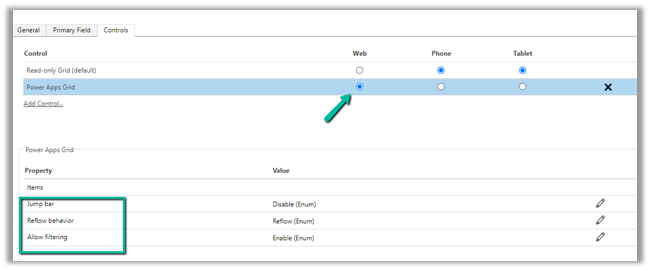
Here we have enabled Editable Grid control for Contact table.

Below are the 2 ways of achieving it –

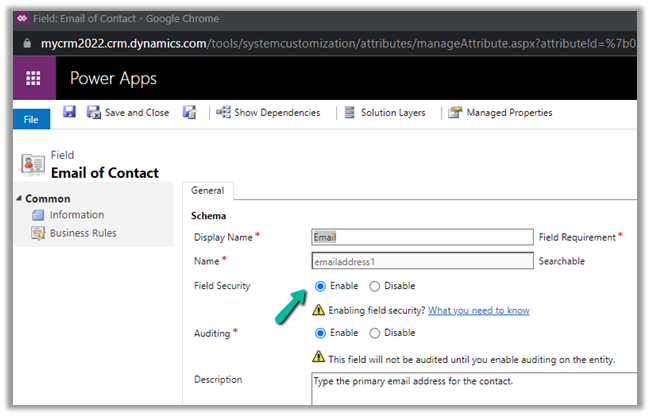
Here we are taking the email field as an example.

  • Field level security

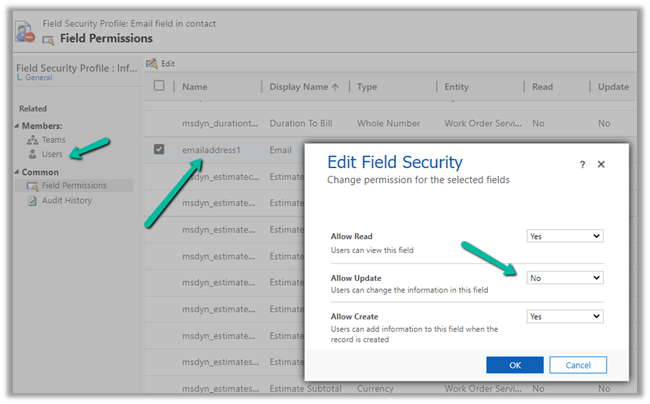
We have enabled Field Security on the Email field.

And we have set Allow Read and Allow Create as Yes and Allow Update as No.

And added the appropriate users or teams to which this profile should apply.

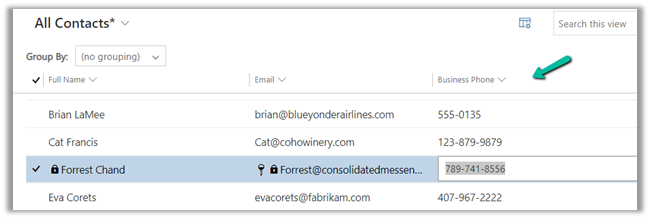
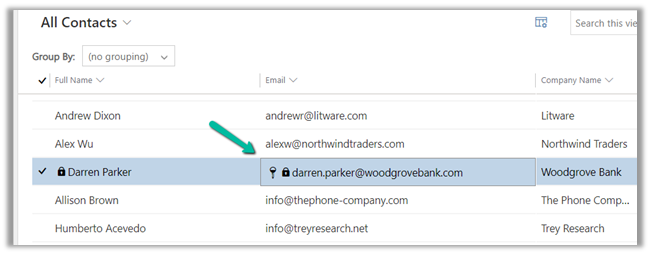
Now when the user tries to make changes in the email field, it comes as locked.

The other fields still come as editable as we have not enabled them for field security.

  • The other option is JavaScript on the OnRecordSelect event

Code –

function onGridRowSelected(context) {
    context
        .getFormContext()
        .getData()
        .getEntity()
        .attributes.forEach(function (attr) {
            if (attr.getName() === "emailaddress1") {
                attr.controls.forEach(function (myField) {
                    myField.setDisabled(true);
                });
            }
        });
}

The result –

Also check  – https://nishantrana.me/2022/02/15/power-apps-grid-control-in-model-driven-apps-dynamics-365-crm/

Hope it helps..

Advertisements

How to – Free up File Usage – Dataverse Storage Capacity (Dynamics 365 / CRM)


Recently we saw File usage for one of the environments reaching around 68 GB.

We managed to bring it down to around 10 GB or so by (Microsoft Support quickly helped us by sharing the required details here)

  • Deleting the System Job of Type Workflow with Status as Successful.
  • We ran Bulk Deletion Job to delete successful and suspended System Jobs.

     Settings >> Data Management >> Bulk Record Deletion

  • We can also delete attachments or emails or notes having attachments either through Advanced Find or Bulk Deletion job if not using them.
  • Uninstalled the Analytics Solution for Sales to delete the analytics data.

https://docs.microsoft.com/en-us/dynamics365/sales/uninstall-sales-insights#how-to-uninstall-sales-insights

  • Disabled the Analytics / Insights for Customer Service Hub.

Customer Service Hub >> Service Management >> Insights (Settings)

Nicely explained here –

https://community.dynamics.com/365/f/dynamics-365-general-forum/416139/customer-guide-how-to-reduce-consumption-of–analytics-tables

Also, check

https://docs.microsoft.com/en-us/power-platform/admin/free-storage-space

Hope it helps..

Advertisements

How to – Immediately (sync)bulk delete AsyncOperation or Workflow System Job records in Dataverse (Dynamics 365 / CRM)


Recently we noticed File usage of some of our environments reaching around 50 GB, and most of it was because of the AsyncOperation table.

async

So to quickly delete the AscyncOperation records the option we can choose is –

Create a new Bulk Record Deletion job from Settings >> Data Management

Select System Jobs table and filter as System Job Type equals Workflow

Select Bulk deletion job start time as Immediately

The Immediately option will only be available –

  • For entity – System Jobs
  • Filter Criteria is System Job type equals Workflow (we can add additional criteria)
  • User has organization-level
    delete rights on AsyncOpertion entity.

This will only delete the AsyncOperation records that are in the completed state of system job type workflow.

It will delete 1 million records whenever it is run. If there are more than 1 million records, it will have to be run again.

The key part is that it will delete the records through direct SQL Execution, so the records will be deleted immediately, rather than each record going through the delete pipeline, thus improving the performance immensely.

Back to our bulk deletion job, we can click on Submit to initiate the deletion.

We encountered a few errors when submitting, the solution was to keep trying, and eventually it will get submitted successfully.

error

After successful submission, we can see all our completed workflow system job records deleted immediately.

Also as it is Sync Job, we will not see it listed in Bulk Record Deletion views.

Get more details here –

https://cloudblogs.microsoft.com/dynamics365/it/2018/06/21/cleaning-up-records-from-the-asyncoperationbase-workflowlogbase-table/

https://docs.microsoft.com/en-us/power-platform/admin/free-storage-space#reduce-file-storage

Hope it helps..

Advertisements

Microsoft.Crm.CrmException: An application user’s access mode cannot be changed error in Dataverse (Dynamics 365 / CRM)


Just a short one –

As the error message suggests “An application user’s access mode cannot be changed “, it is not possible to change the Access mode of an application user from Non-interactive to either administrative or Read-write.

While trying to change the Application User’s Access Mode to Read-Write, the error message –

Get all the details about different type of users –

https://docs.microsoft.com/en-us/power-platform/admin/create-users#user-types

also check – https://community.dynamics.com/365/sales/f/dynamics-365-for-sales-forum/367844/when-uisng-non-interactive-users-when-using-application-users

Hope it helps..

Advertisements

Power Apps grid control in Model-driven apps (Dynamics 365 / CRM)


Power Apps grid control is a new read-only control, now auto-enabled as part of 2022 Release Wave 1 for Model-driven apps.

We can also enable it by navigating to Customization, selecting the entity, then the Controls tab, and clicking on Add Control option.

Select the Power Apps Grid control.


Here we have enabled it for the Web.

The different properties that can be set for the control are –

  • Jump bar – this will be disabled by default.
  • Reflow behavior
  • Allow filtering

With Jump bar disabled –


Enable the jump bar.

After enabling the jump bar, we get the option to filter by alphabets.

It will also support Infinite Scrolling

We can use Edit Columns to add, remove and order the columns for the view

Edit Filters allows us to edit the filters.

Any changes made to the column or filter can be saved as a personal view.

Also, Grid remembers the context, here we have filtered the record by search text = “Blue”

Let us open the first record.

On navigating back, the context is retained.

We can also show and hide the Edit Columns and Edit filters option on views from Power Platform Admin Center >> [Environment] >> Settings >> Features >> Grid and Views section


Hope it helps ..

Advertisements

How to – Import Data from local data files to Dynamics 365 Customer Insights


Continuing our previous posts,

Set up Dynamics 365 Customer Insights Trial

Import Data from Dataverse

here we will import the contact records from a local excel file.

Navigate to Data >> Data Sources and click on Add data source

This time we will select the import method as Microsoft Power Query

Select Excel Workbook as the source.

Select Upload File (preview) option that lets us upload or drag a file directly from the local machine.

It will upload the file to the user’s OneDrive for Business account.

On dragging or uploading the file, we need to specify details for Connection Credentials i.e. create a new connection (if not already existing).

We have the different options for

  • Authentication kind – Anonymous or Organization Account.
  • Privacy Level – None, Private, Organizational, Public.

Let us change the Authentication kind to Organization account (followed by sign-in) and Privacy Level as Public and click on Next.

After successful sign-in, click on Next.

We can also see the file uploaded in the one drive.

Now within the Power Query editor, we have set the first row as a header.

Also, we need to remove the space from the column name (if any).

Save the query and click on Next.

For now, we have set the Refresh Settings as Refresh manually.

We can see the new data source added and being refreshed.

We have just 10 records in our Contact excel file.

It took around 2 hours for refresh to complete.

We can see the contact entity from the excel file added in Entities.

Click on it to see the Attributes.

And the Data

Now we have our contacts data ready from 2 different data sources ready, one from Dataverse and another from excel for the map, match, and merge, which we would do in the next post.

Hope it helps..

Advertisements