Sample Code – Enable / Disable Plugin Step (sdkmessageprocessingstep) Dynamics 365 / Dataverse


Recently we had to disable plugin steps as part of data migration, below is the sample code we can use, either specify the name of the assembly, plugin, or plugin step as we are using the “begins with” condition or make changes as required.

 class Program
    {
        static void Main(string[] args)
        {

            const string ConnectionString = "AuthType = OAuth; " +
                                            "Username = Nishant.Rana@xyz.com; " +
                                            "Password = testxyz; " +
                                            "Url = https://orgname.crm6.dynamics.com;" +
                                            "AppId=51f81489-12ee-4a9e-aaae-a2591f45987d;" +
                                            "RedirectUri=app://58145B91-0C36-4500-8554-080854F2AC97;" +
                                            "LoginPrompt=Auto";


            CrmServiceClient svc = new CrmServiceClient(ConnectionString);

            if (svc.IsReady)
            {
                try
                {
                    // we can specify step / plugin / assembly name
                    var pluginStepAssemblyName = "MyD365.Plugins.Core.Plugin.AssignOwner";
                    // 0 for active and 1 for inactive
                    var pluginStateCode = 0;                   

                    var query = new QueryExpression("sdkmessageprocessingstep");
                    query.ColumnSet = new ColumnSet("name", "sdkmessageprocessingstepid");
                    query.Criteria.AddCondition(new ConditionExpression("name", ConditionOperator.BeginsWith, pluginStepAssemblyName));
                    var sdkMsgProcessStepCollection = svc.RetrieveMultiple(query);

                    foreach (var sdkMsgProcessStep in sdkMsgProcessStepCollection.Entities)
                    {
                        var setStateRequest = new SetStateRequest();
                        setStateRequest.EntityMoniker = new EntityReference("sdkmessageprocessingstep", sdkMsgProcessStep.Id);
                        setStateRequest.State = new OptionSetValue(pluginStateCode);
                        setStateRequest.Status = new OptionSetValue(-1);
                        svc.Execute(setStateRequest);
                    }
                }
                catch (Exception ex)
                {
                    Console.WriteLine("Exception Messainge : {0} ", ex.Message);
                }

            }
        }
    }

Hope it helps..

Advertisements

Fixed – 0x90000010 Can not retrieve view’s metadata (Dynamics 365)


We were recently getting the below error in one of the views in the Dashboard.

0x90000010 Can not retrieve view’s metadata

The issue occurred because we had converted that Dashboard from a personal to System / Public Dashboard using the below wonderful XrmToolbox Plugin, https://www.xrmtoolbox.com/plugins/Carfup.XTBPlugins.PersonalViewsMigration/, which converted it to System Dashboard successfully, however, this was one of the personal views inside that dashboard.

So we converted that personal view to the system view (using the same tool) and then updated the Dashboard to refer to the converted system view, which fixed the issue.

Hope it helps..

Advertisements

Set DefaultSelectedItems of Combobox on App OnStart – Custom Page -Power Apps (Dataverse)


Recently in one of our custom pages, we had to set the default value (DefaultSelectedItems) of the combo box based on one of the lookup fields on the record. We were opening the custom page from the ribbon button on the form.

Below is our function to pass the record’s GUID to the custom page from the button.


    openSearchCustomPage: function (primaryControl, firstPrimaryItemId) {
        var pageInputCustom = {
            pageType: 'custom',
            name: 'custom_searchproduct_570ed',
            entityName: 'lead',
            recordId: firstPrimaryItemId
        };

        var navigationOptions = {
            target: 2,
            position: 1,
            width: 1350
        };

        Xrm.Navigation.navigateTo(pageInputCustom, navigationOptions).then(
            function success(result) {
                console.log(result);
            },
            function error(error) {
                console.log(error);
            }
        );
    }

Next in App’s OnStart, we are setting the GUID of the record to a variable first, and than setting another variable to store the GUID of the Region lookup field on that record.

// text variable passed by the form / webresource/ ribbon
Set(varEnquiryIdWithoutCurlyBraces,GUID(Substitute(Substitute(Param("recordId"),"{",""),"}","")));

// get the Region Of Interest from the Lead / Enquiry ID
// If value present use it for prefiltering the Gallery Items
Set(varRegionOfInterest,LookUp(Enquiries,Lead=varEnquiryIdWithoutCurlyBraces, 'Region of Interest'));

And lastly, for the combo box (Items = Region (custom table)), we are setting the DefaultSelectedItems as follows

LookUp(Regions,Region=varRegionOfInterest.Region)

We also tried using the Filter option, but it was giving incorrect values.

The value on the form –

The value in the Custom Page –

Correct value populated for combo box Region, and incorrect for the one using Filter formula

Hope it helps..

Advertisements

How to – set Calendar View to start the week from Monday – Dynamics 365


By default, if the calendar view is starting on Sunday for the week as shown below, we can update the system settings, to start it on Monday or any other day

From Administration >> System Settings > > Formats >> Customize (Current Format)

Specify the First Day of Week

On update, we can see the view updated to show the week starting from Monday.

Hope it helps..

Advertisements

Configure Facebook Channel – Omnichannel (Dynamics 365 Customer Service)


To set up the Omnichannel –

To setup Facebook Channel,

Login to https://developers.facebook.com/, create a new account or use an existing developer account

Create a new Facebook App

Select the app type as Business

Provide an appropriate name and create the app.

Select Messenger as the Product for the app.

Next either  add an existing page or create a new one and then add the newly created page in the Messenger >> Settings

Here we created a new page and have added that page.

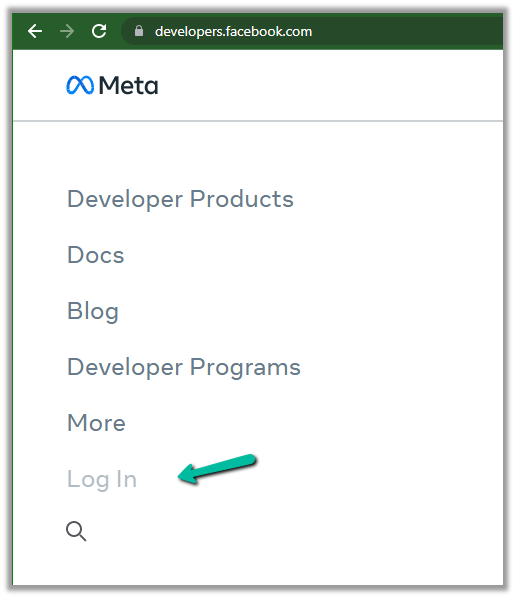
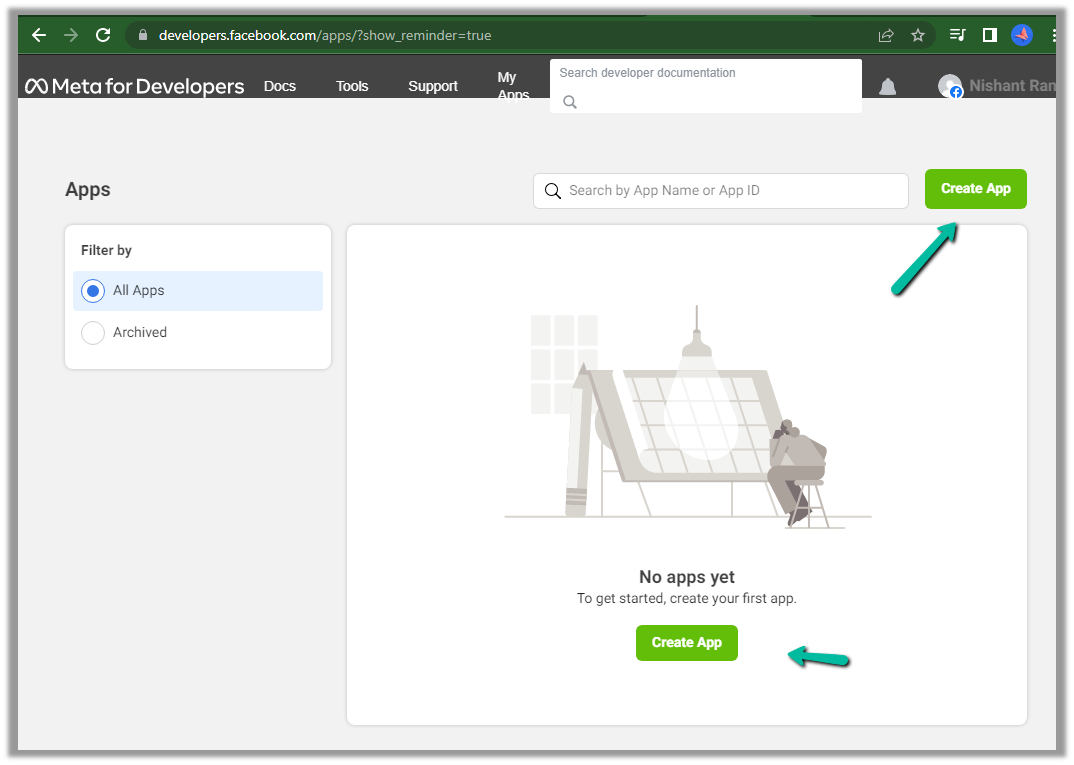
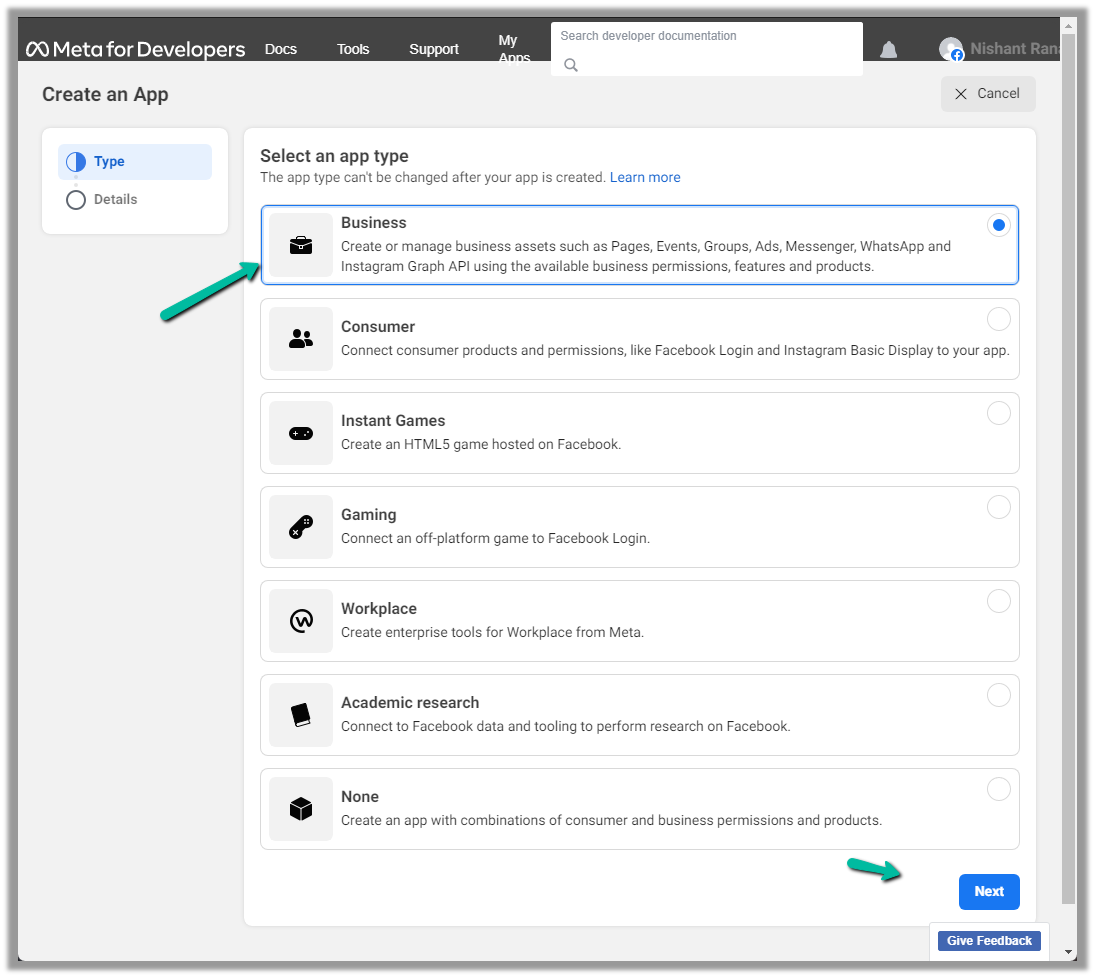
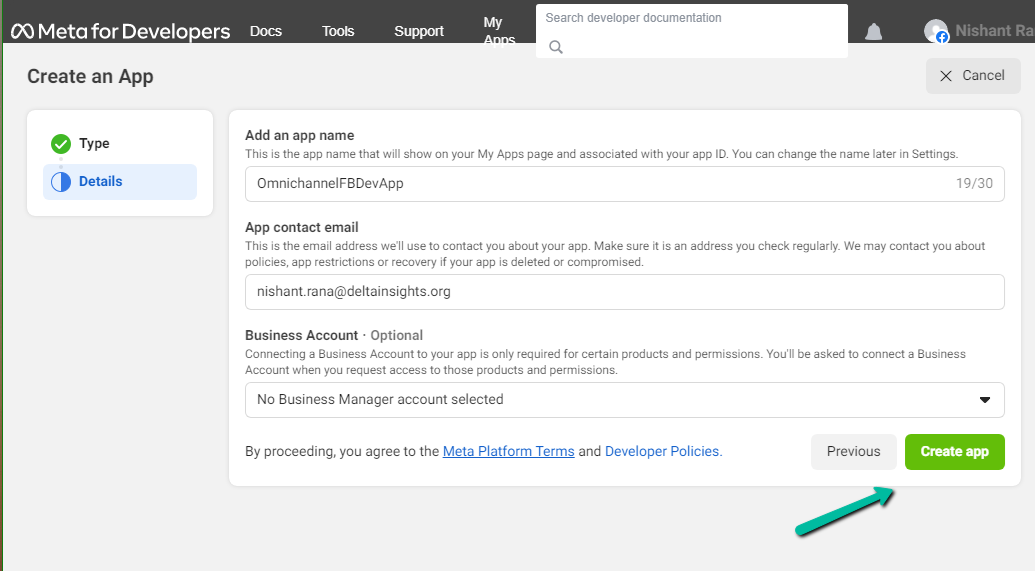
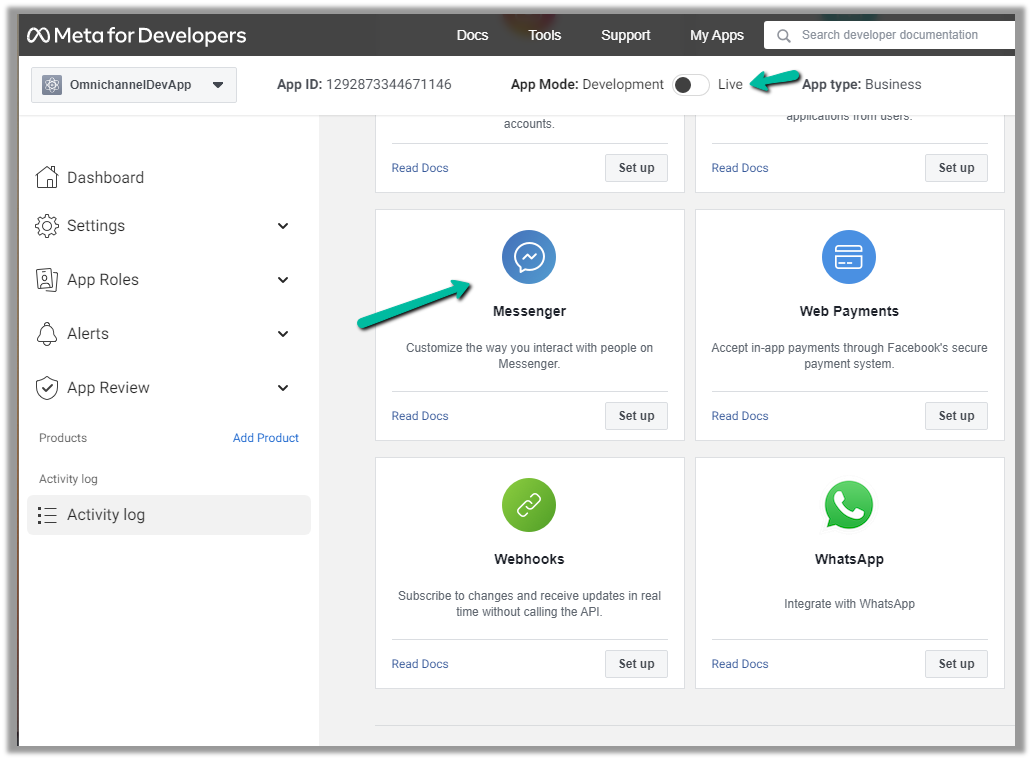
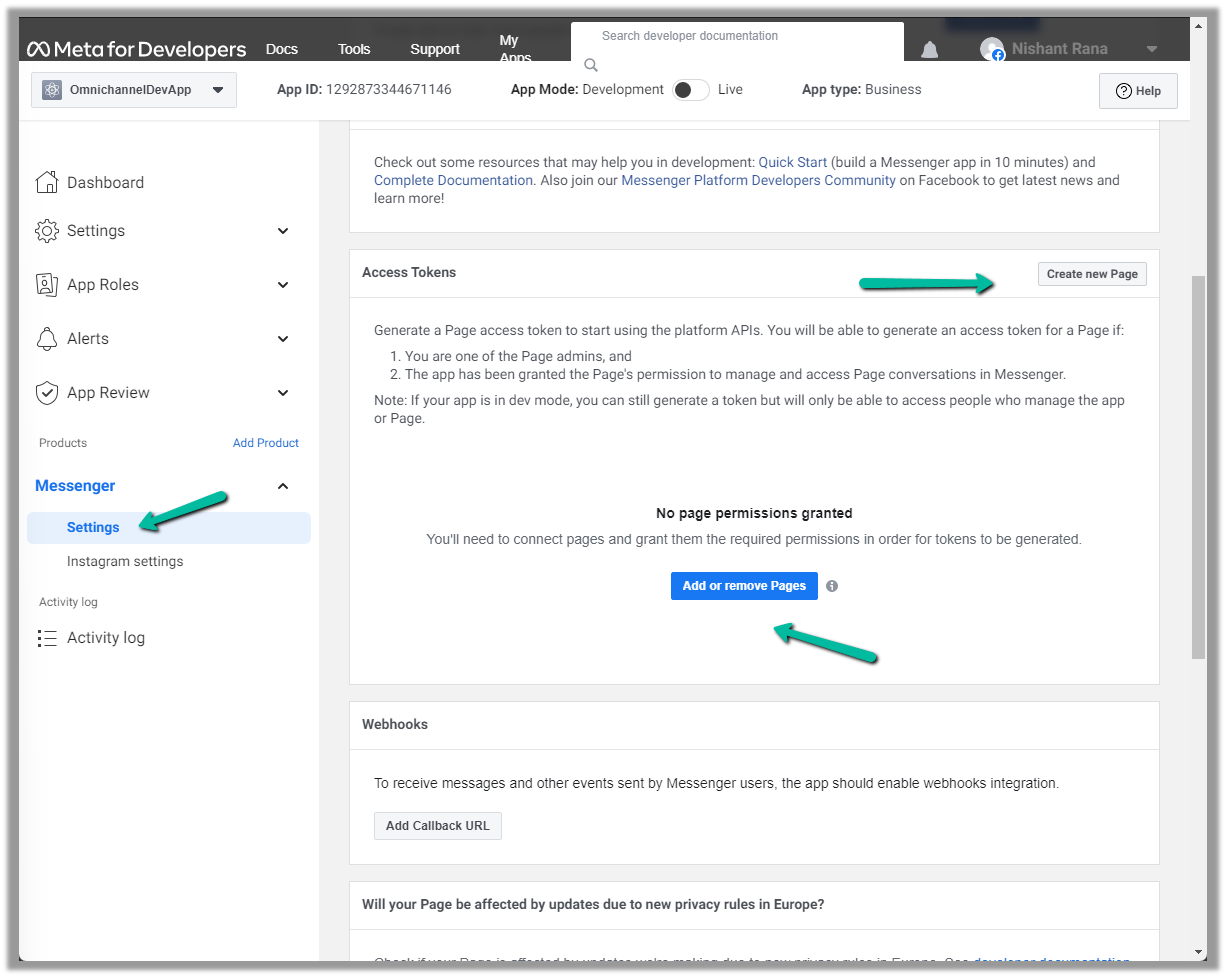
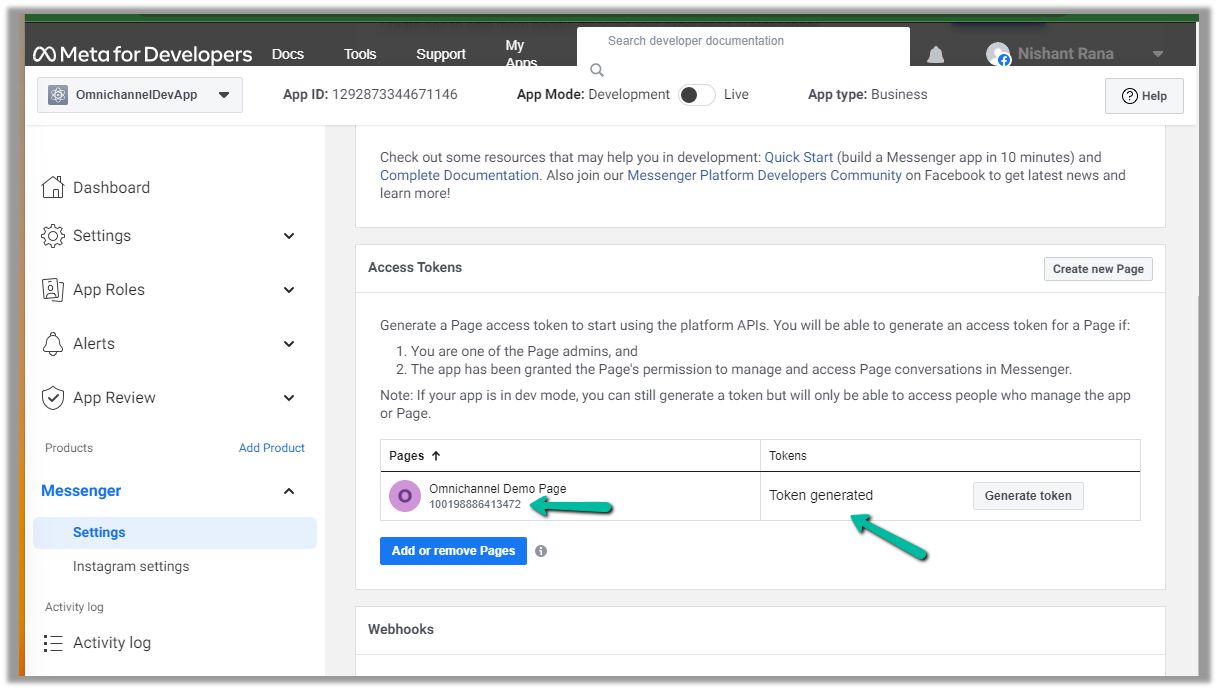
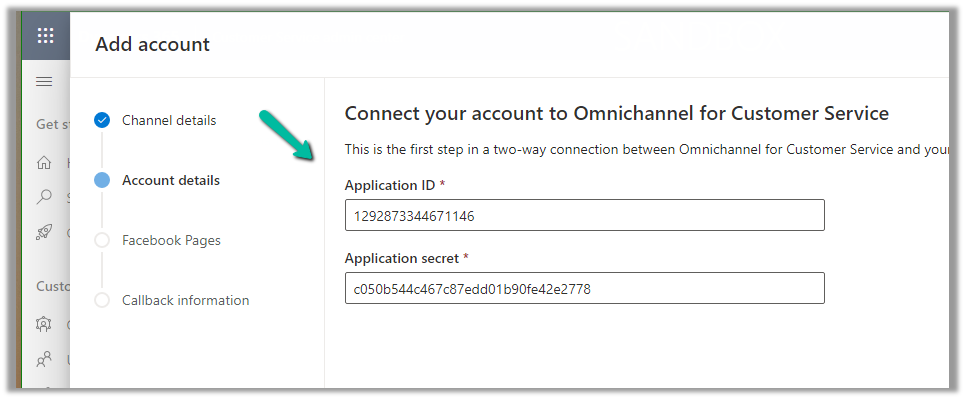
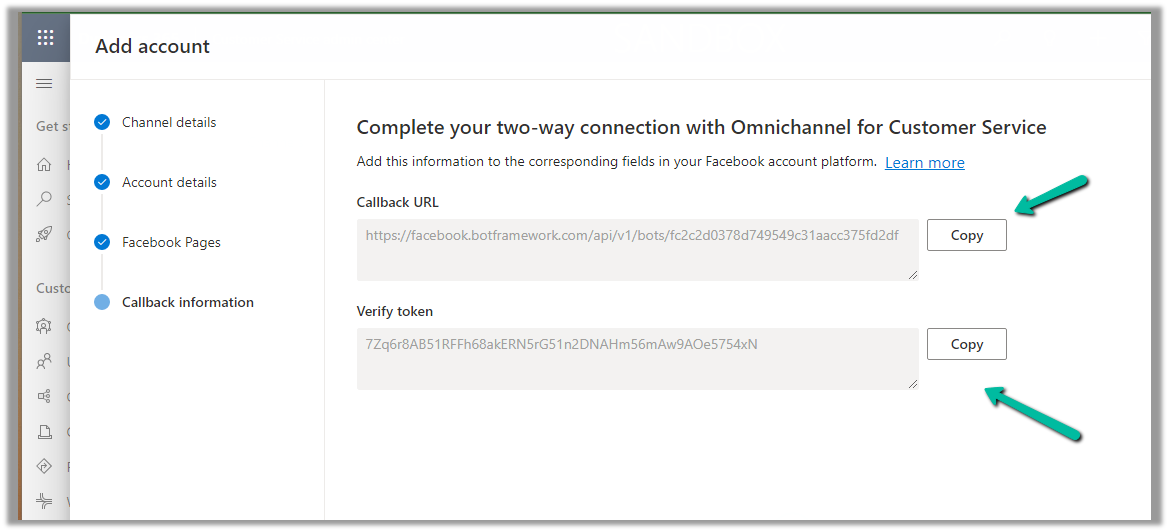
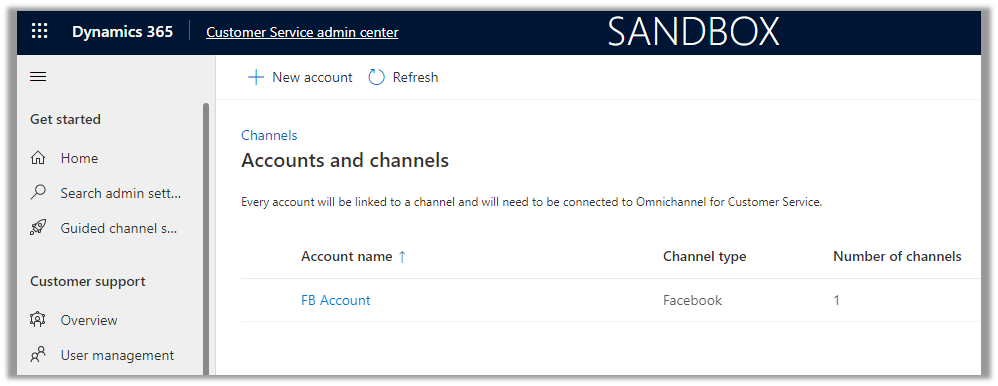
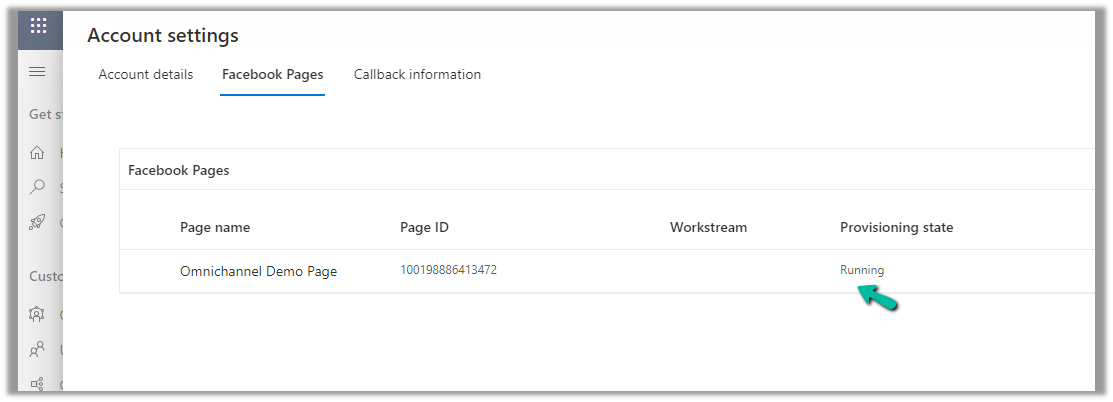
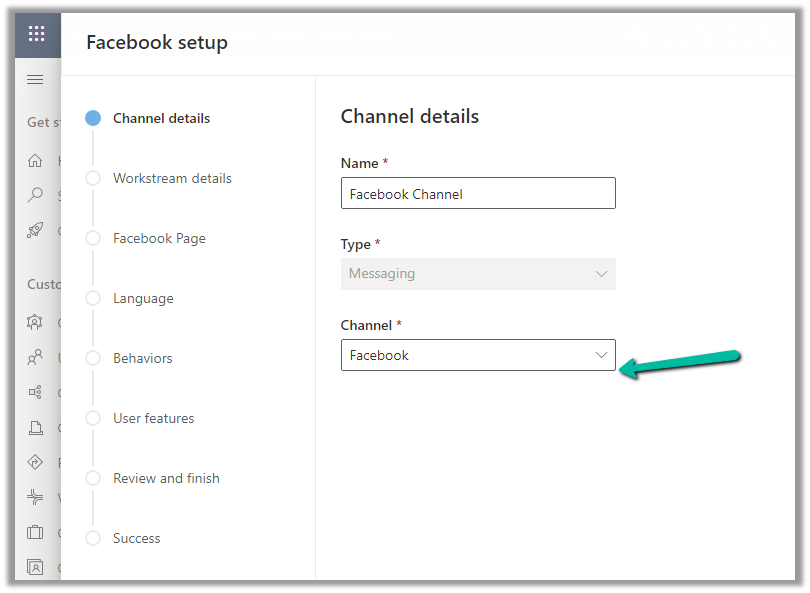
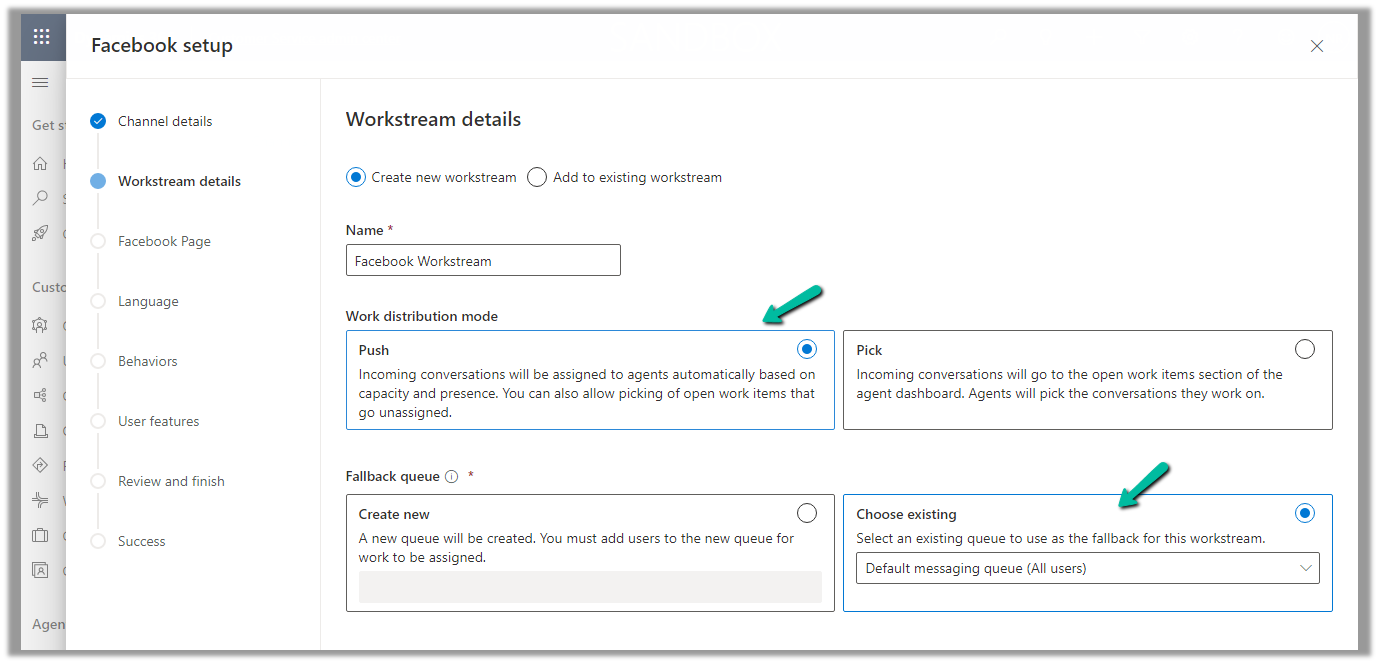
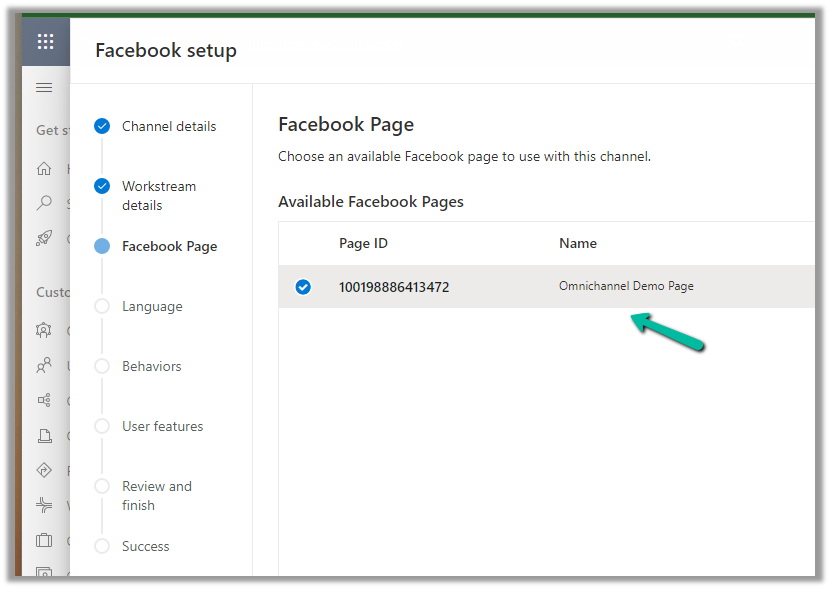
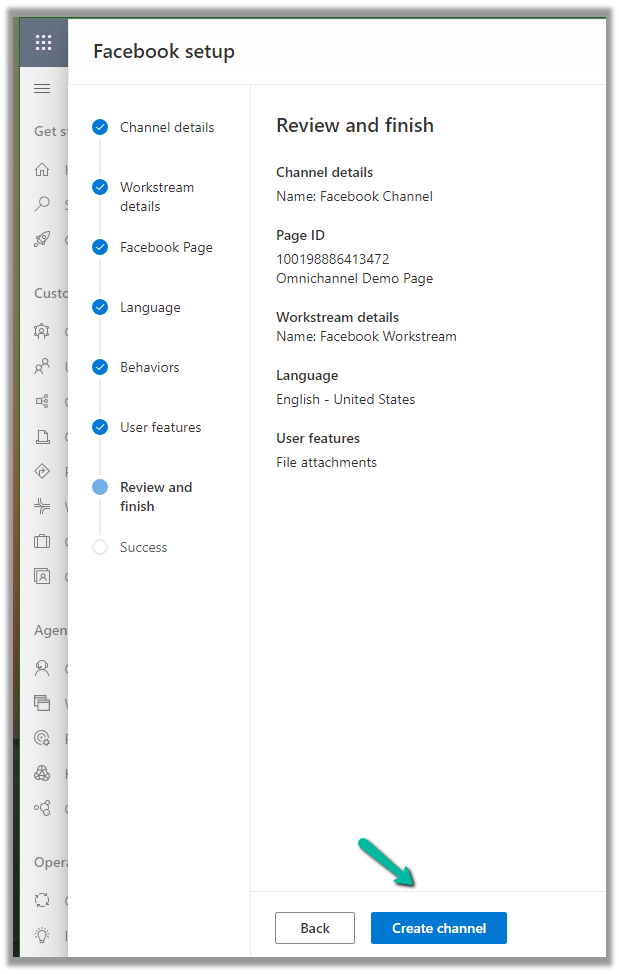
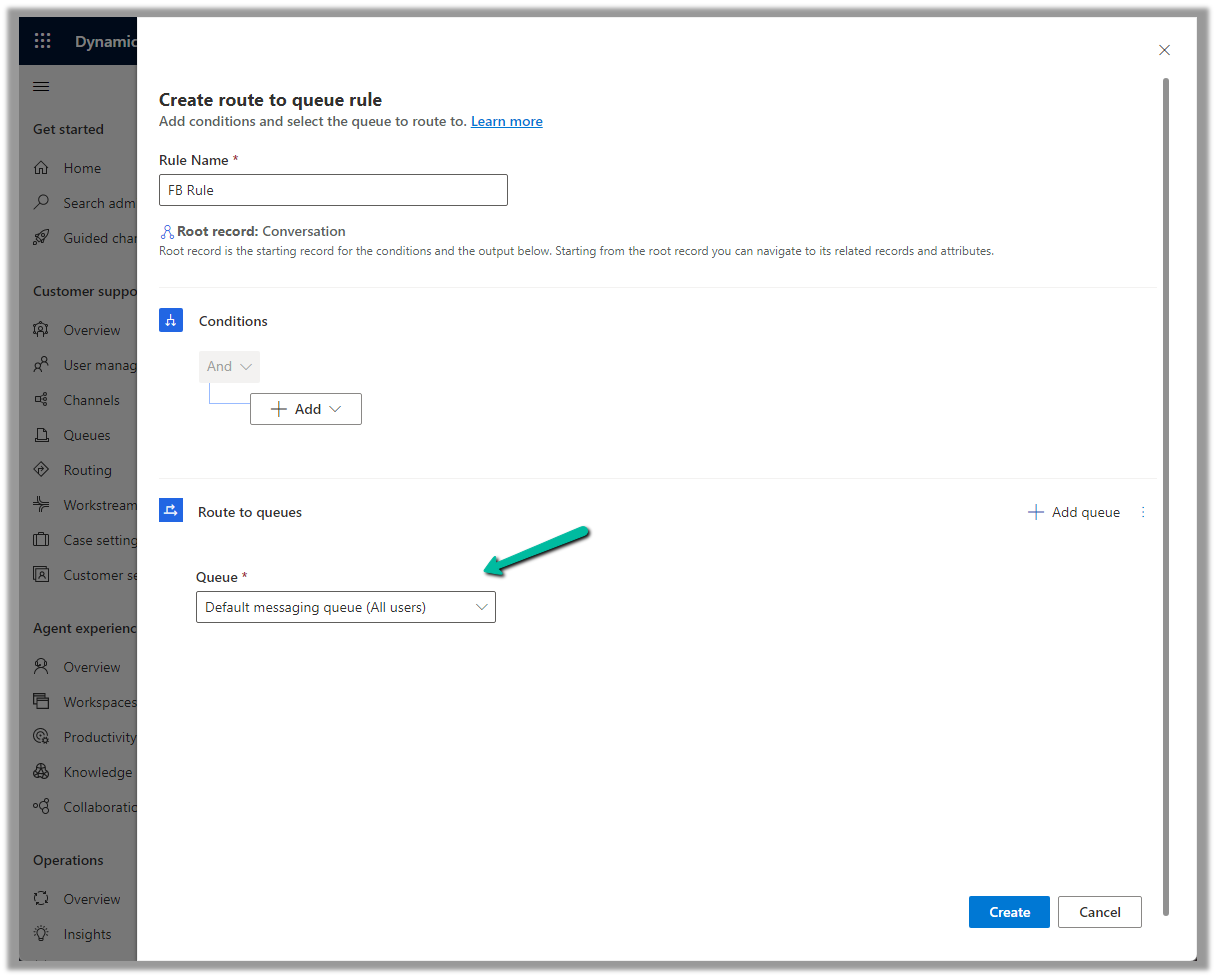
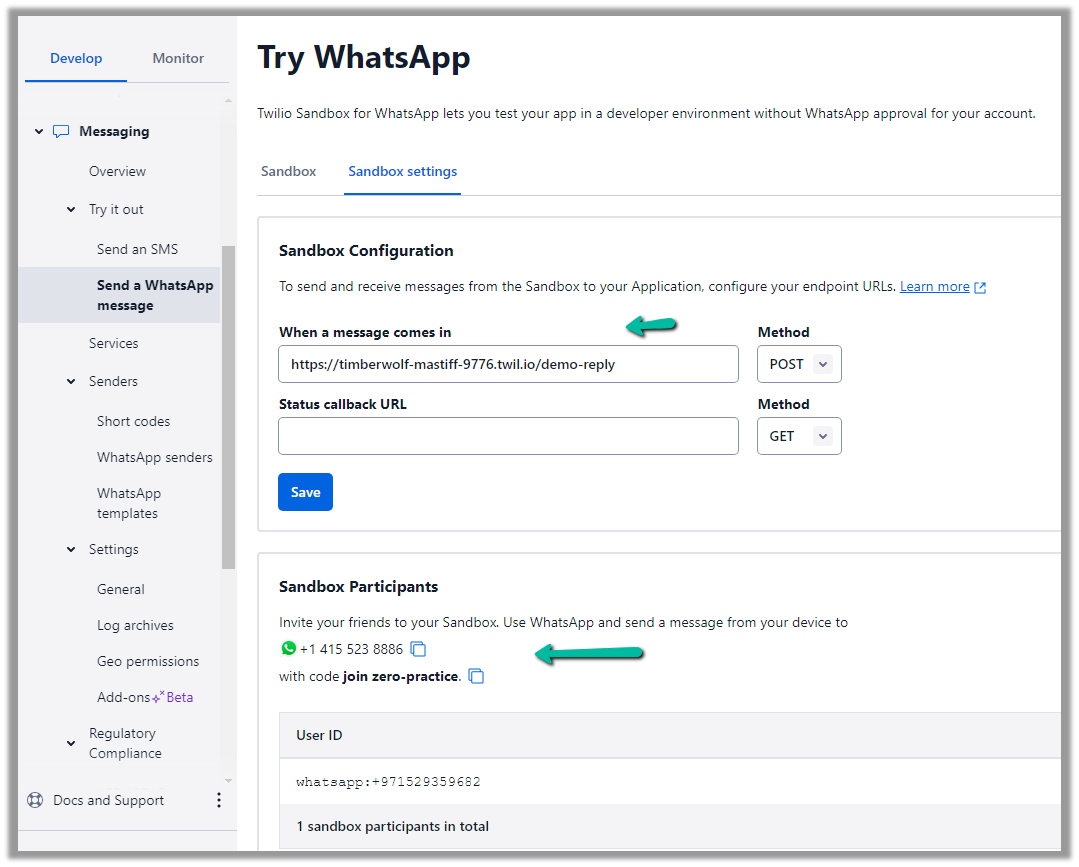
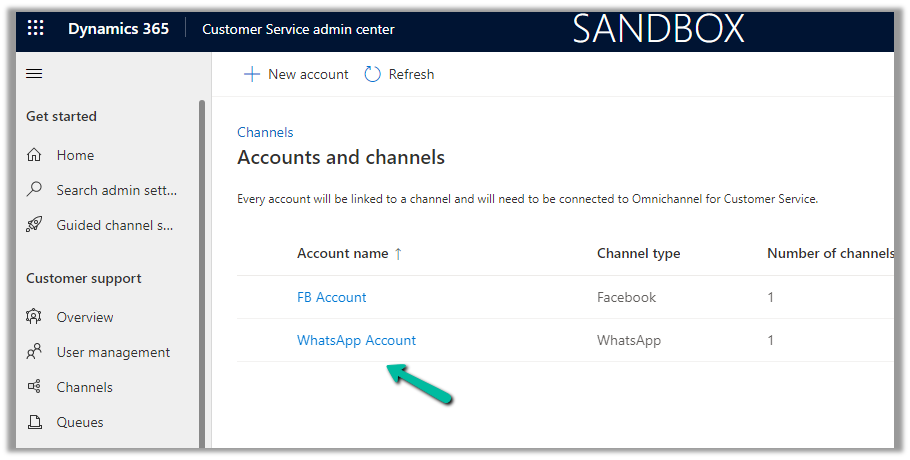
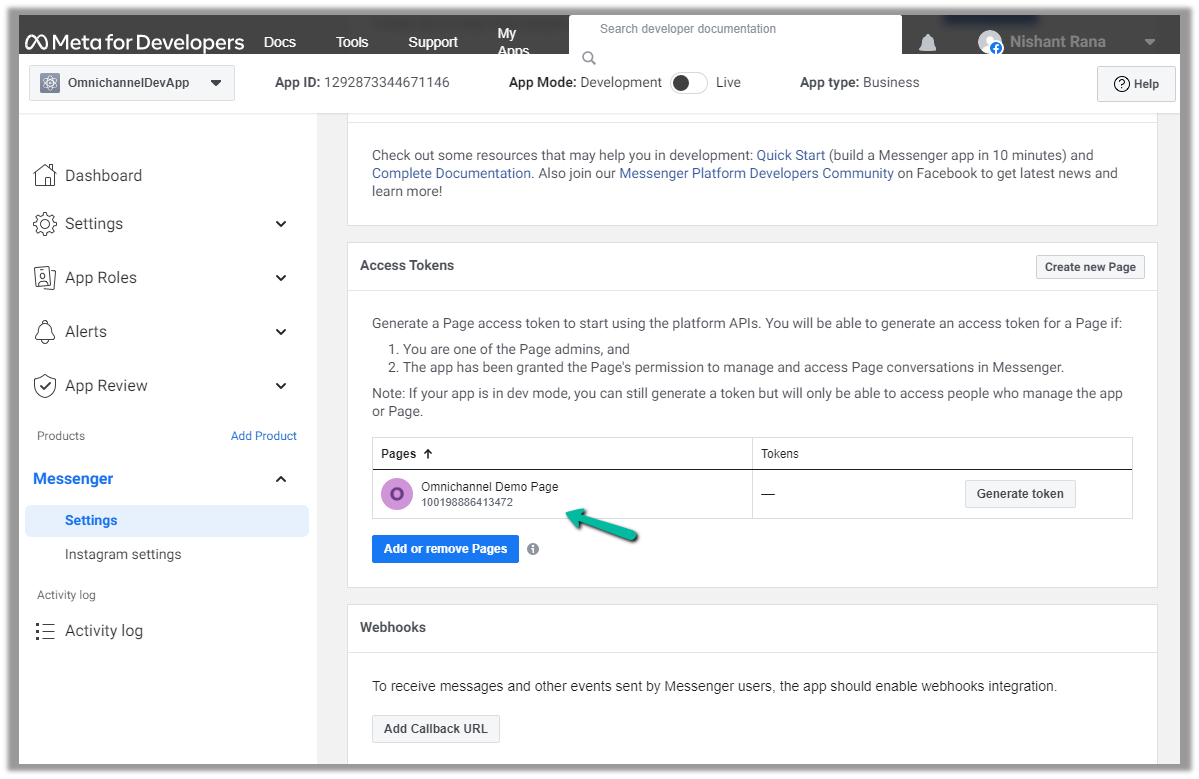
We can also Generate token for the page, which we will use while configuring Facebook Channel in Dynamics 365.

Click on Generate token and copy the token. Also, save the Page Id below the name of the page.

We will also need App ID and App Secret, which we can get from – Settings >> Basic

Next, we add a few test accounts to the app for testing/using the app. (we are not making the app publicly available or live, which would require and approval process)

Navigate to App Roles >> Roles >> Testers (Add Testers)

Back in Customer Service Admin Center, navigate to Customer Support >> Channels >> Messaging Accounts (Manage)

Add a New Account

Click Next and provide the App ID and Application Secret

Add Facebook Page to the account

Provide the Page name, Page ID, and the Page access token.

With the page successfully added, click on Next

Copy the Callback URL and the Token.

Paste this information in the Messenger product added.

Click on Add Callback URL.

Click on Verify and save

This adds the Webhooks details, click on Add Subscriptions for the Page added.

Select messages

We can see the account added.

Open the record, and navigate to the Facebook Pages tab, there we can see the Provisioning state as Running.

Next, we will create a Channel for this Facebook Account.

Navigate to Customer Support >> Channels >> Messaging (Manage) >> Add Channel

Select Channel as Facebook.

Add an existing workstream or create a new workstream.

Next, select the Facebook Page configured in the previous steps.

Language as English.

We can specify custom automated messages and Post Conversation survey settings here.

Specify the File attachments setting and message tag.

Review and if required edit the details and finally click on Create channel to create the Facebook channel

Next open the workstream created, to specify routing rules, work distribution, bot, etc. to route the customers to the queues/agents.

Here we can create a Route to Queue ruleset to route the messages on the Facebook page to a specific Queue.

Create the ruleset record.

Next, Create a rule. We can define the conditions here (right now we are keeping it blank) and routing to the Default messaging Queue (we can create a specific queue and add only the required users).

Make sure you have added users to the Queue and assigned Omnichannel Agent security roles.

We can update the default Work distribution properties.

Now sending the message from the Facebook Messenger, will pop up the notification for the agent logged into Customer Service Workspace.

Accept the notification to start the conversation.

Refer to the below articles-

https://learn.microsoft.com/en-us/dynamics365/customer-service/configure-facebook-channel?tabs=customerserviceadmincenter

Hope it helps..

Advertisements

Configure WhatsApp channel – Omnichannel (Dynamics 365)


To configure the WhatsApp channel, we need to set up the account in the Customer Service Admin Center.

Navigate to Customer Support >> Channels >> Messaging Accounts (Manage)

Select the New Account option there

Select WhatsApp as the channel

Next, we need Account SID and Authentication token.

To get this information we need to create a Twilio Account.

https://www.twilio.com/try-twilio

Navigate to the console and copy the Account ID and Authentication token

https://www.twilio.com/console

Enter Account SID and Authentication token click on Next

Next, we need to add the WhatsApp Name and Phone number

Navigate to Messaging >> Try it out >> Send a WhatsApp message to activate the WhatsApp Sandbox.

Follow the steps there to configure the Sandbox account. (scan the QR code send the Message, and test the Business and User-Initiated message/conversation).

Click on Sandbox setting tab to get more information

Copy the number.

Add the number and click on Next

Copy the URL

Paste that URL in the When a message comes in and save.

We can see our WhatsApp account created, open the record.

We can see our number being shown as Active

With the account active time to now it is time to set up the channel/workstream / queue.

Navigate to Customer Support >> Channels >> Messaging (Manage)

Click on Add Channel and add the details

Enter channel details

We are creating a new workstream

Add the WhatsApp number added

Select the language

Specify the Behaviour (automated messages and approved templates)

Specify the user features (attachments)

Review and Finish and Create the channel.

Open the workstream and specify routing rule/fallback queue/work distribution/associate bots etc details

We will create a ruleset to route the message to the queue

We have the below route-to-queue rule created to route to the default queue which has all the omnichannel agents added to it. (In an actual scenario, we would add the conditions and create a specific Advanced Queue).

We are leaving the rest of the settings/configuration as default.

Now is the time to test.

Let us log in to the Customer Service Workspace as an agent and from the registered sandbox participant number added send a message.

We are done with our configuration.

Get all the details

Hope it helps..

Advertisements