Sharing a sample code which we can use to upload files to Azure Blog Storage from within a CRM Online Plugin. Here we’d be making use of the REST API to simplify things (instead of using Windows Azure Storage library) in our Plugin.
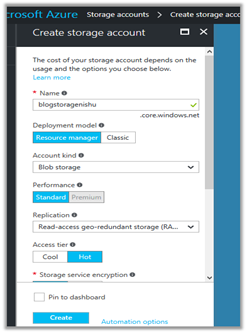
First, we will be creating a storage account of type blob storage and a container inside it.
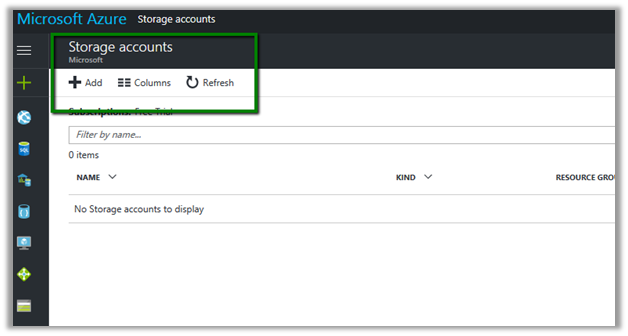
Log in to Azure Portal
https://portal.azure.com
Click on Add to add a new storage account.
Create a new container in it to store the blob files
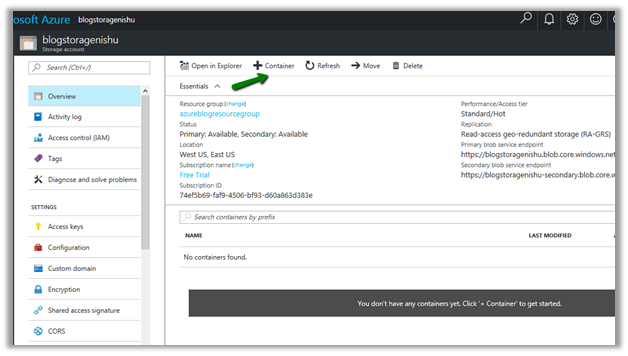

In Azure Portal – Storage Account, go to Access Keys and copy the key
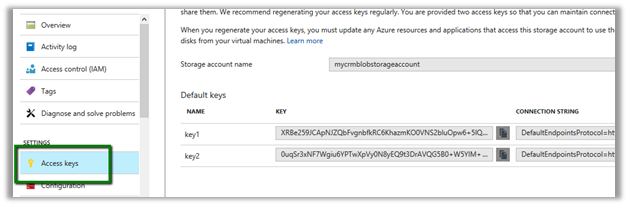
And also note down the storage account name and container name which will be used to construct the URL.

We can also go to container, select its properties and copy the url.

Here we have written the plugin on Create of Annotation, which then retrieves the attachment and uploads its content to the container.
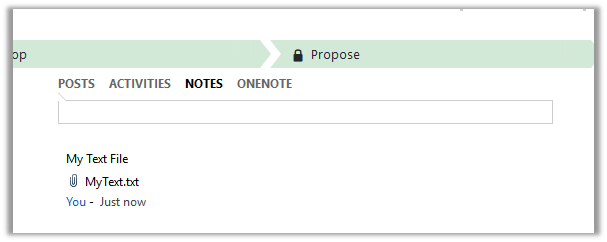
Let us first see it in action.
We have created a new note and attached a text file to it.
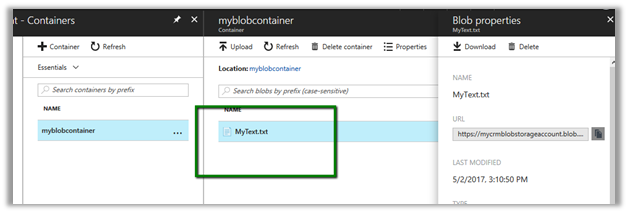
Going back to our portal, we can see the file in our container.
The sample code for the plugin.
<br />
using Microsoft.Xrm.Sdk;<br />
using System;<br />
using System.IO;<br />
using System.Net;<br />
using System.Security.Cryptography;<br />
using System.Text;<br />
namespace MyTestPlugin<br />
{</p>
<p>public class UploadFile : IPlugin<br />
{<br />
public void Execute(IServiceProvider serviceProvider)<br />
{<br />
try<br />
{<br />
// Obtain the execution context from the service provider.<br />
IPluginExecutionContext context = (IPluginExecutionContext)serviceProvider.GetService(typeof(IPluginExecutionContext));</p>
<p>// The InputParameters collection contains all the data passed in the message request.<br />
if (context.InputParameters.Contains("Target") && context.InputParameters["Target"] is Entity)<br />
{<br />
// Obtain the target entity from the input parameters.<br />
Entity noteEntity = (Entity)context.InputParameters["Target"];<br />
byte[] doumentBody = Convert.FromBase64String(noteEntity.Attributes["documentbody"].ToString());<br />
string content = Encoding.UTF8.GetString(doumentBody);<br />
string fileName = noteEntity.Attributes["filename"].ToString();</p>
<p>// Upload the attached text file to Azure Blog Container<br />
UploadFileToAzureBlobStorage(content, fileName);</p>
<p>}<br />
}<br />
catch (Exception ex)<br />
{<br />
throw new InvalidPluginExecutionException(ex.Message);<br />
}<br />
}</p>
<p>void UploadFileToAzureBlobStorage(string content, string fileName)<br />
{</p>
<p>string storageKey = "storagekey";<br />
string storageAccount = "storageaccountname";<br />
string containerName = "strogaecontaninername";<br />
string blobName = fileName;</p>
<p>string method = "PUT";<br />
string sampleContent = content;<br />
int contentLength = Encoding.UTF8.GetByteCount(sampleContent);</p>
<p>string requestUri = $"https://{storageAccount}.blob.core.windows.net/{containerName}/{blobName}";</p>
<p>HttpWebRequest request = (HttpWebRequest)WebRequest.Create(requestUri);</p>
<p>string now = DateTime.UtcNow.ToString("R");</p>
<p>request.Method = method;<br />
request.ContentType = "text/plain; charset=UTF-8";<br />
request.ContentLength = contentLength;</p>
<p>request.Headers.Add("x-ms-version", "2015-12-11");<br />
request.Headers.Add("x-ms-date", now);<br />
request.Headers.Add("x-ms-blob-type", "BlockBlob");<br />
request.Headers.Add("Authorization", AuthorizationHeader(method, now, request, storageAccount, storageKey, containerName, blobName));</p>
<p>using (Stream requestStream = request.GetRequestStream())<br />
{<br />
requestStream.Write(Encoding.UTF8.GetBytes(sampleContent), 0, contentLength);<br />
}</p>
<p>using (HttpWebResponse resp = (HttpWebResponse)request.GetResponse())<br />
{<br />
if(resp.StatusCode == HttpStatusCode.OK)<br />
{<br />
// successfully uploaded<br />
}<br />
}</p>
<p>}</p>
<p>public string AuthorizationHeader(string method, string now, HttpWebRequest request, string storageAccount, string storageKey, string containerName, string blobName)<br />
{<br />
string headerResource = $"x-ms-blob-type:BlockBlob\nx-ms-date:{now}\nx-ms-version:2015-12-11";<br />
string urlResource = $"/{storageAccount}/{containerName}/{blobName}";<br />
string stringToSign = $"{method}\n\n\n{request.ContentLength}\n\n{request.ContentType}\n\n\n\n\n\n\n{headerResource}\n{urlResource}";</p>
<p>HMACSHA256 hmac = new HMACSHA256(Convert.FromBase64String(storageKey));<br />
string signature = Convert.ToBase64String(hmac.ComputeHash(Encoding.UTF8.GetBytes(stringToSign)));</p>
<p>String AuthorizationHeader = String.Format("{0} {1}:{2}", "SharedKey", storageAccount, signature);<br />
return AuthorizationHeader;<br />
}<br />
}</p>
<p>}</p>
<p>
Hope it helps.