How to – Delete Data Source in Dynamics 365 Customer Insights


While trying to delete a data source we might below error if we have already used it for Match and Merge for defining the customer profile.

“Couldn’t delete data source. To process, remove its entities from: Match, Merge.”

Click on Enrichment

Navigate to Match.

Here also we cannot remove the entities in Unify as we have already used them in Merge.

So let us navigate to Merge.

Select all the fields from the DataSource (CRMDataSource in our case) which we want to delete, and click on Exclude.

Save the changes.

Now navigate back to Match and we will get the option to remove the CRMDataSource.

However, we will still not see the option to save the change as we just have 2 entities there.

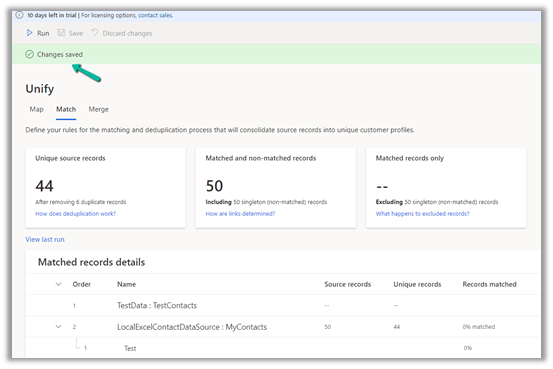
Here we can add a different data source’s entity, e.g. we added the contact from our test data source.

And saved the changes.

Now as the last step we need to remove the entity from the Map also.

Click on Edit fields and unselect the entity, followed by Apply.

Navigating back to Data Sources, we were able to delete the Data Source successfully now.

So in short, if we need to delete a data source, which we have configured for customer profile, we need to first remove its references from Merge, Match and than Map.

Hope it helps..

Advertisements

How to – Delete Audit data by entity / table, date, user access, and specify retention duration – updates in Dataverse (Dynamics 365 / CRM)


Recently we saw a new update in our sandbox environments with regards to Audits.

Login to Power Platform Admin Center, select an environment.

We can see a new section Auditing added.

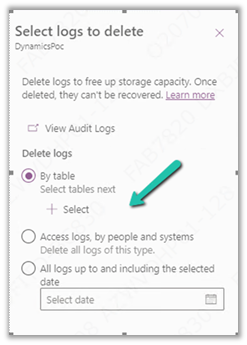
Click on Delete logs allows us to –

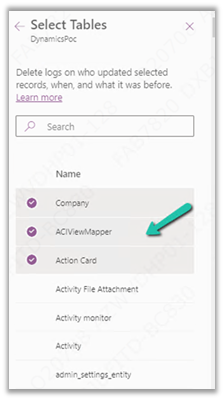
  • Delete logs by Table

We can select the tables there.

  • Delete only access logs data.
  • Delete logs up to the selected date.

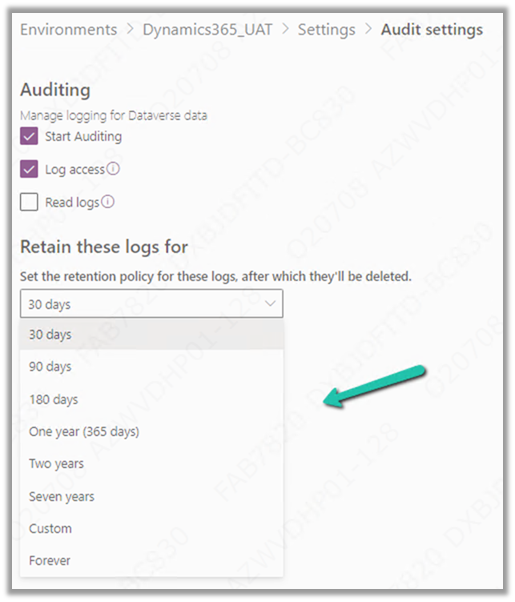
And now we can also manage or specify the retention duration for the audit log.

These are very useful updates to the Audit feature in the platform which more or less have been similar since CRM 3.0 days.

Check other posts on Audit – 

https://nishantrana.me/2021/08/31/audit-entity-table-few-key-points-dynamics-365-power-apps/

https://nishantrana.me/2021/05/17/how-to-export-the-audit-history-values-from-dynamics-365/

https://nishantrana.me/2018/10/08/using-kingswaysofts-cds-crm-source-component-to-get-audit-information-in-dynamics-365-ce-ssis/

How to – Use RetrieveAttributeChangeHistoryRequest to get audit data for an attribute (Dataverse/ Dynamics 365/ CRM) – Nishant Rana’s Weblog

Hope it helps..

Advertisements

How to – Import Data from Dataverse / CRM to Dynamics 365 Customer Insights


In the last post, we had set up the trial version of Dynamics 365 Customer Insights.

https://nishantrana.me/2022/01/26/how-to-set-up-dynamics-365-customer-insights-trial/

Currently, our trial instance has no data.

We can ingest data into Dynamics 365 Customer Insights from Microsoft Dataverse either using Microsoft Power Query (Dataverse Connector)

or Microsoft Dataverse import method.

The Microsoft Dataverse import method doesn’t copy the data into the Customer Insights / Audience Insights Data Lake, however, it doesn’t allow for Extract, Transform, Load (ETL) as in the case of Microsoft Power Query data source.

Select Audience Insights >> Data >> Data Sources >> Choose your import method – Microsoft Dataverse

Provide a name to the data source and click on Next.

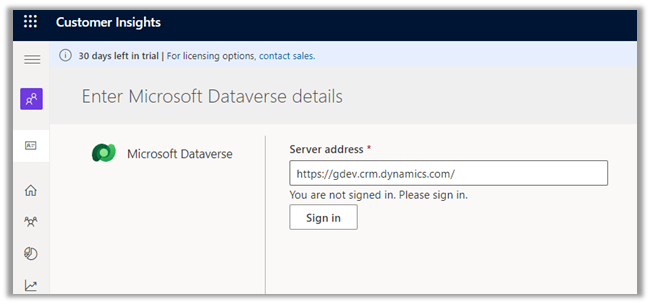
Enter the Server address, Sign in, and click on Next.

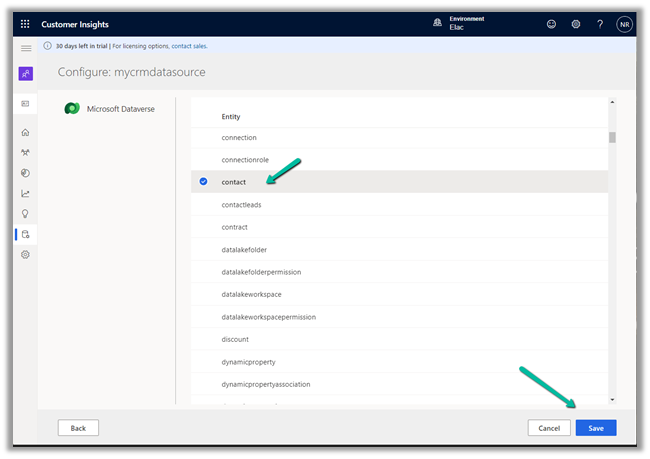
Select the Entity, here we have selected the contact entity for now.

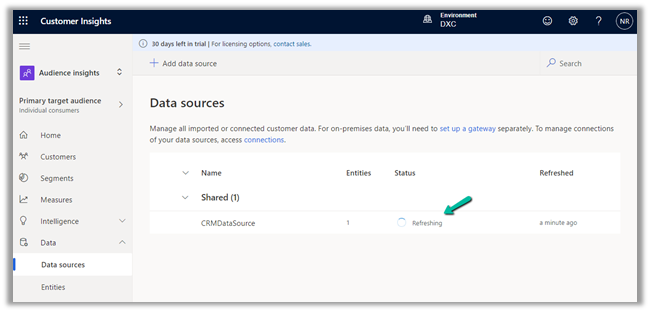
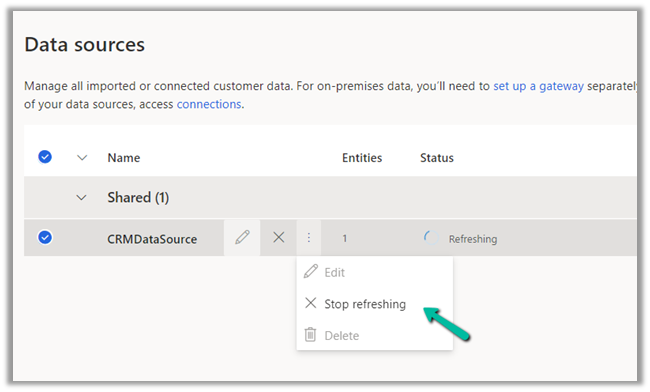
We can see the data source is being refreshed.

We have the option of stopping the refresh.

We are having 100 records in our contact entity inside CRM.

It took around 5 hours for the refresh to complete successfully.

We have the option of Edit, Refresh and Delete on the Data Source after the successful refresh.

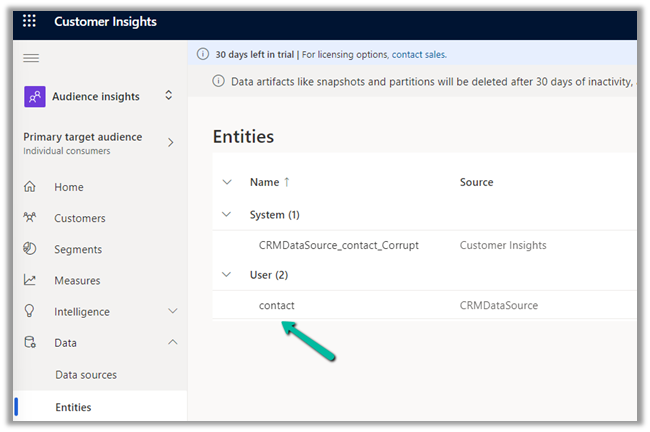
We can see the contact entity available within Data >> Entities section

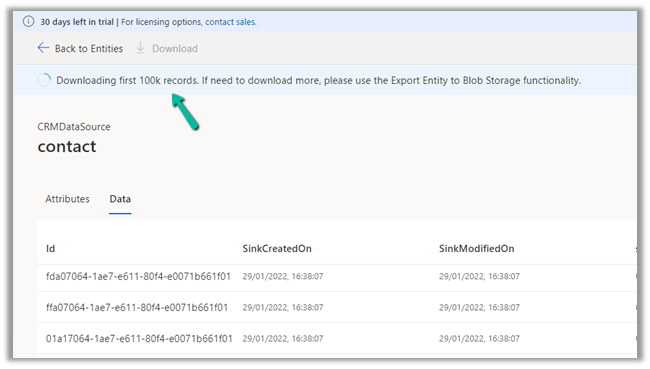
Clicking on contact, we can see the Attributes used and Data in it as well as the option to download the data.

The download will be downloading the first 100K records.

Now when it comes to creating a unified customer profile through (MMM) i.e. mapping, matching, and merging, it requires a minimum of 2 entities to be there, to generate the Customer Profile.

In the next post, we will import some sample contact data from a local excel file and use it for further configuring our customer profile.

How to – Import Data from local data files to Dynamics 365 Customer Insights

How to – Unify (Map, Match and Merge) Entities in Dynamics 365 Customer Insights

Hope it helps..

Advertisements

How to – change user’s business unit without removing the security roles in Dynamics 365 / PowerApps (EnableOwnershipAcrossBusinessUnits setting)


When we change the user’s business unit, all the current security roles of the users are removed and we need to assign the roles again to the user. This has always been the default behavior. 

Also check – Modernize Business Units –  https://nishantrana.me/2022/01/04/modernize-business-units-matrix-data-access-structure-record-ownership-across-business-units-preview-in-dynamics-365-dataverse/

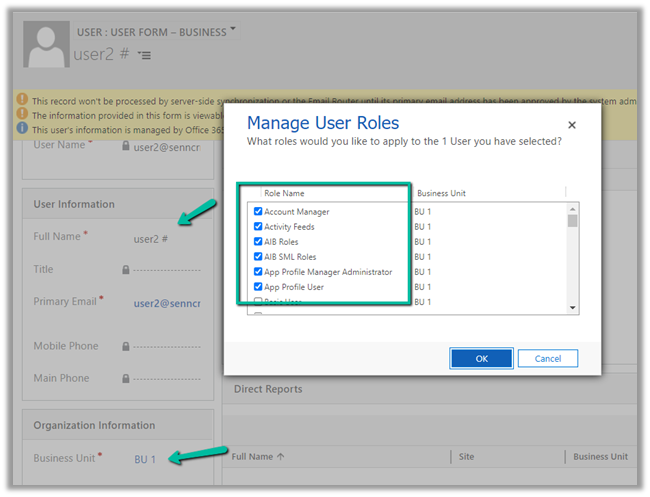
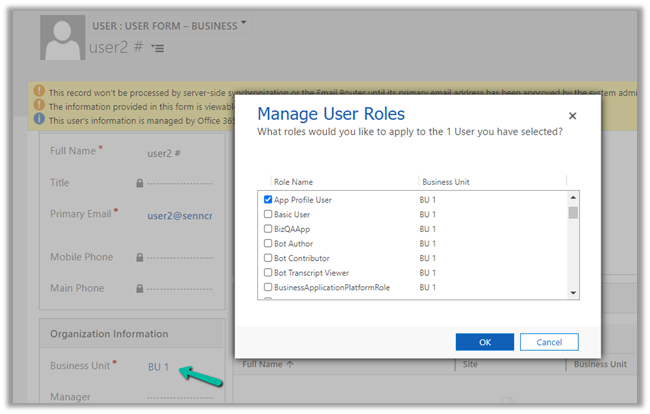
For E.g. below user User 2 belongs to Business Unit – BU 1 and has the following security roles assigned.

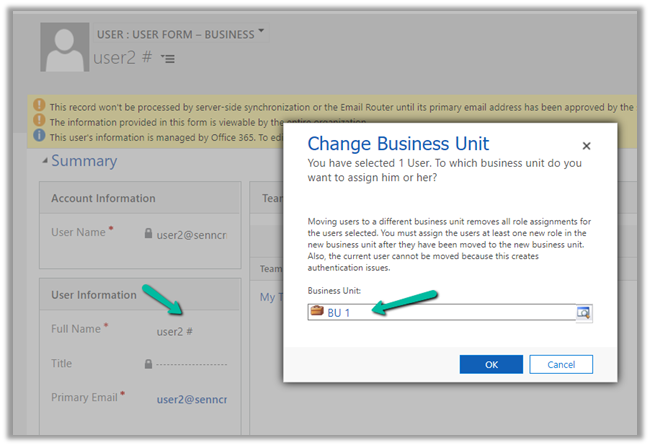
Now changing the user’s business unit to BU 2

will remove all his security roles assigned.

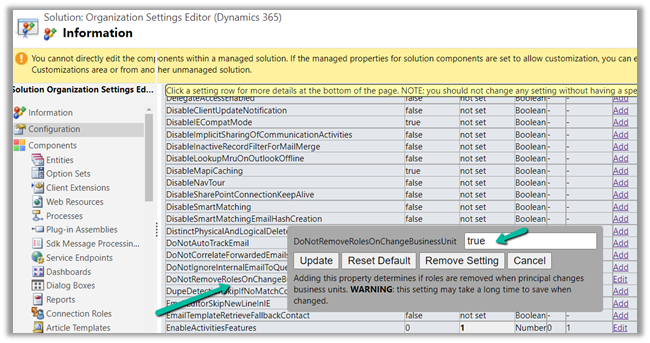
We can now override this behavior by updating the new option /setting added

DoNotRemoveRolesOnChangeBusinessUnit(this property determines if roles are removed when the principal changes business units) through the
Organization Settings Editor tool

After we have installed the managed solution, we can update the setting and set it as true

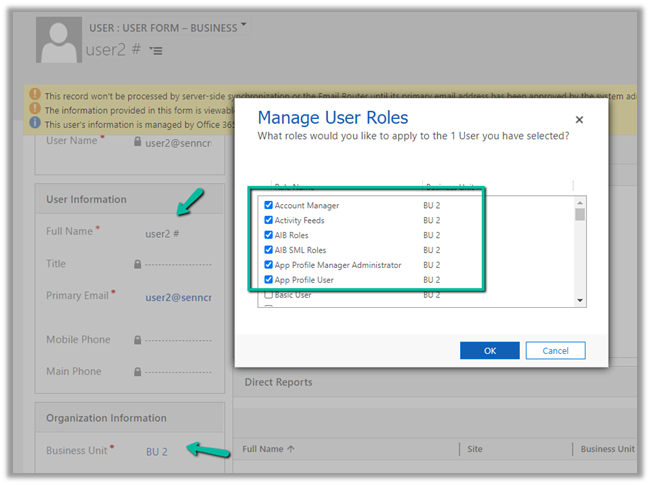
Let us assign the security roles to User 2 in BU 2.

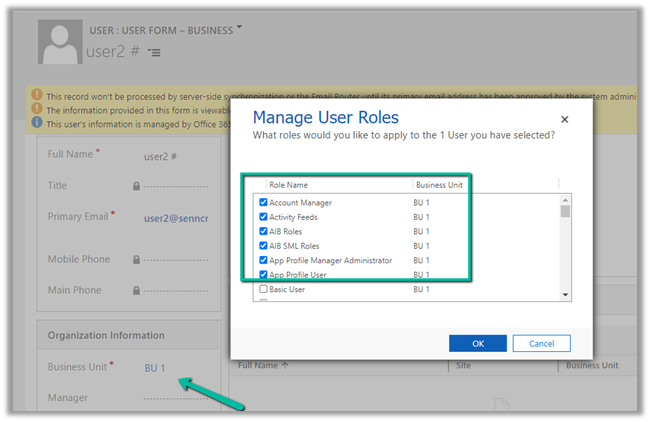
Let us now change the BU of user 2 back to BU 1.


As expected after updating that setting – DoNotRemoveRolesOnChangeBusinessUnit– as true – we can see the security roles still intact, even on the change of Business Unit for the user.

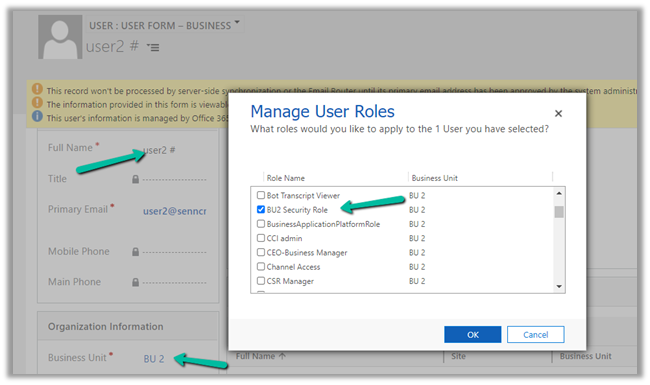
What happens if user 2 is assigned a security role – BU2 Security Role, which is created in BU 2 Business unit and is not available in BU 1.

Let us change the business unit to BU 1.

As expected BU2 security role is not available in BU 1, so that role is not assigned, only the common security role coming from parent BU remains intact.

Hope it helps..

Advertisements

Understanding Queues in Dynamics 365 Customer Service (refresher)


  • What are Queues?

Queues are containers to store, organize, prioritize and monitor the progress of work items or queue items.

  • Which entity/table can be enabled for the queues?

All customizable entities can be enabled for queues.

Below we are enabling it for the lead entity.

Enabling it for the lead now allows lead records to be added to the queue.

  • By default, which entities are enabled for Queue?      Appointment, Campaignactivity, CampaignResponse, Email, Fax, Incident. Letter, PhoneCall, RecurringAppointmentMaster, ServiceAppointment, SocialActivity, Task
  • How do we create a Queue?

A queue is automatically created for each user and team. They can also be referred to as system queues as they are created by the system.

Below is the Queue created for each of the users.

User Queue –

Team Queue –
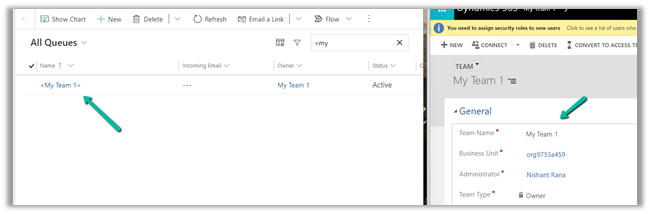
The Team queue will have the same members as in the team.
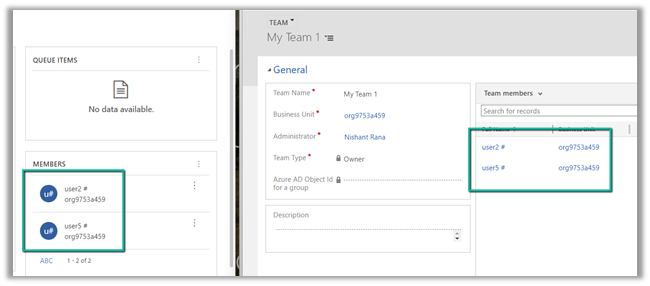
Adding and removing the members from the Team will add and remove the members from the Queue also.

However it is not vice versa, that is, adding or removing members from the queue will not remove it from the team.

Here we are removing User 5 from Team’s queue –

On removing the member from the queue, the member is still there in the Team.

Adding user 6 in the Team will add it to the queue’s member.
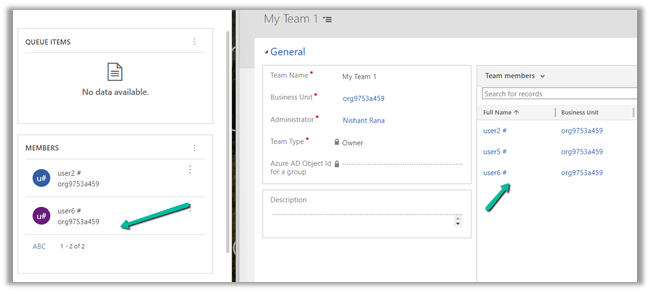
The above automatically created queue is of type Private.

The private queue for the user is only available to the user and the private team queues are visible to only the team owner and members of that team.

  • What are the different types of queues?

The queue can be either of type private or public.

Public queues are available across the application and are created when you need work to be acted upon across the different users, unlike Private queues whose queue items are only accessible to the members of that queue.

E.g. one public queue can be created for high-priority cases, others could be for lesser priority items or there could be different public queues based on geography or product.

  • How do we create queues?

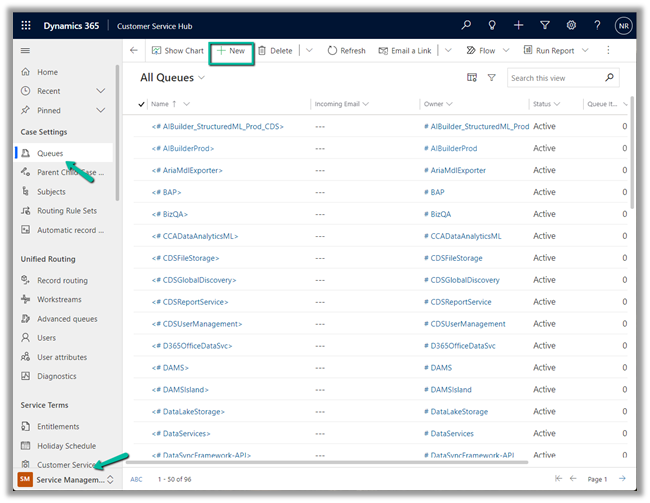
To create Queues, navigate to Service Management >> Queues in Customer Service.

Select New.
Below we have created a Public Queue.
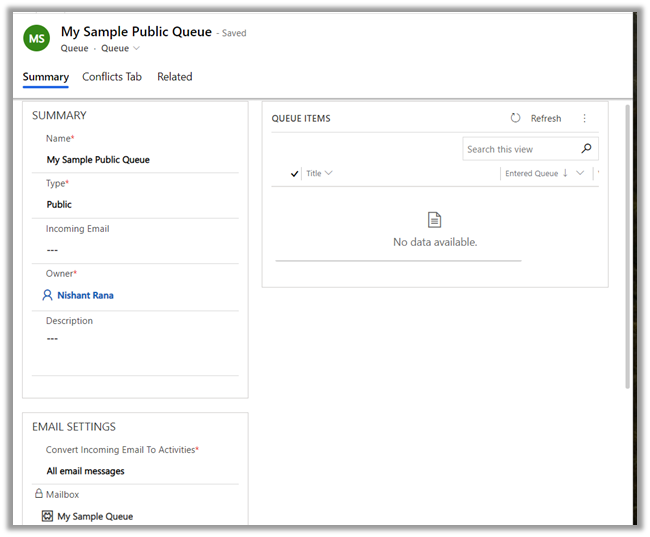
Notice that we do not have the option to add members to a public queue, unlike a private queue.

Also, incoming email value can be specified for the queue, and based on the email settings – queue items would be created for the mail received.

Check below article for more details on the same –

https://crmkeeper.com/2020/04/20/dynamics-365-queue-setup-with-shared-mailbox/

https://nishantrana.me/2017/07/26/using-shared-mailbox-and-queue-in-crm-for-implementing-generic-email-address-in-dynamics-365-and-exchange-online/

https://nishantrana.me/2021/09/28/tracking-email-and-automatic-record-creation-personal-options-in-dynamics-365/

  • Now with the queue created private and public both, how do we add records/items to it?

Say we want to add a particular lead record, here we can navigate to view for the lead or open an individual lead record and select the option Add to Queue
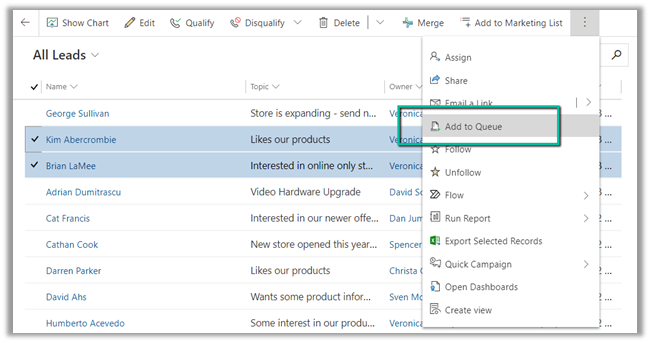
By default, it loads the Business Queues –
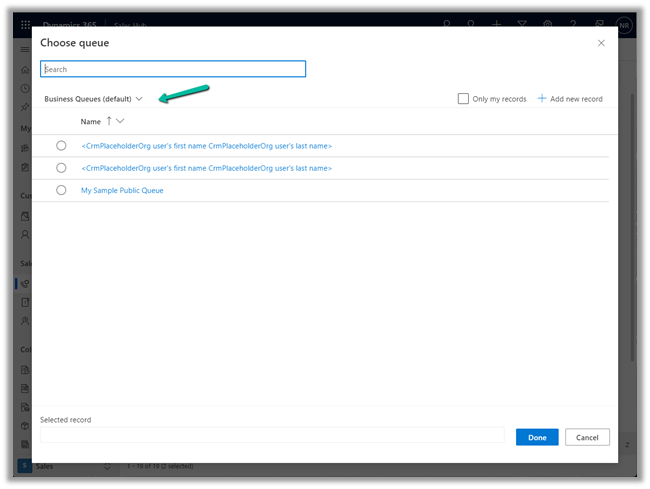
Below are the other Lookup Views available –
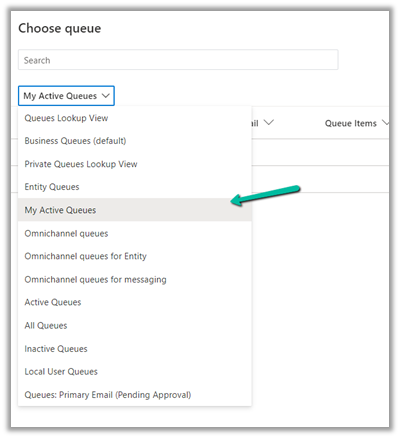
Let us assign it to the My Sample Public Queue we created earlier.

Back in the Queues area, we will have Items I am working on System View and Queues I’m a member of filter set by default.
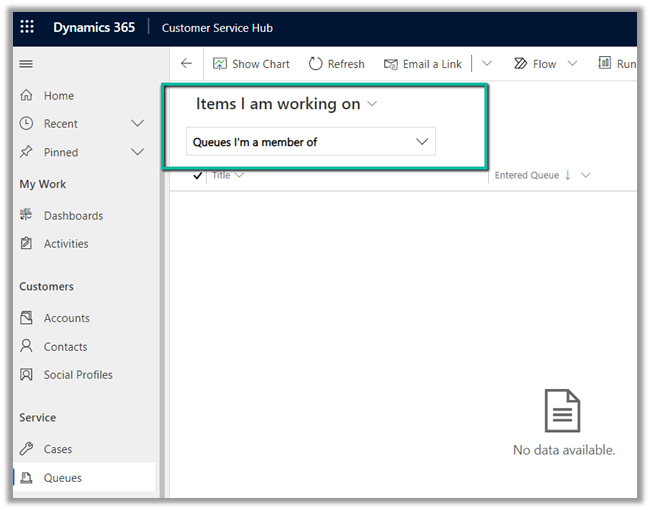
As those are lead records are not yet picked for working on them, they are not available in the above view.

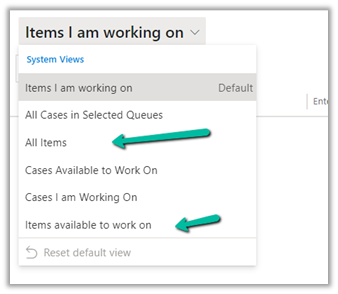
Let us change it to either All Items or Items available to work on and filter to either My Sample Public Queue, All Queues, or All Public Queues for the lead records / queue item to show up.
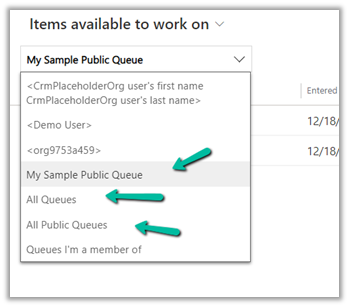
We can see the queue items (lead records) available to work on.

  • How can we change the default view for the Queue Items?

By using the Set current view as my default option.
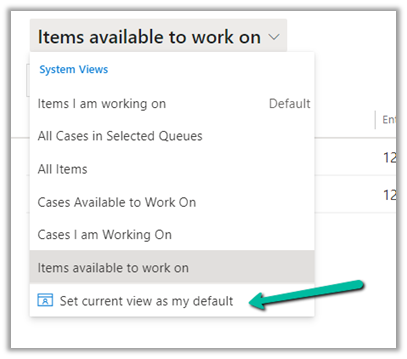
  • Can we create more system views or hide the existing ones?

Yes navigate to View (Queue Items) inside the customization area, from there we can create new views, edit, activate, deactivate existing views.

E.g. we can create a new public view, that has filter criteria to show only the records of type lead.

  • How do we pick the items from the queue to work on?

Using the Pick command.
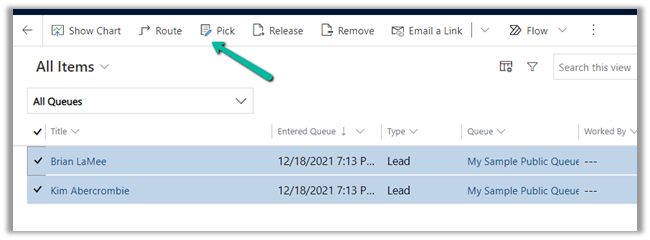
  • What happens when we pick a record from the queue?

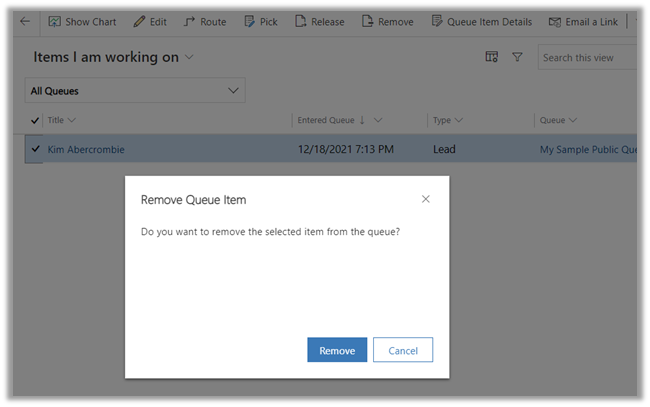
A dialog box appears which informs that the item will be assigned to you and also the option to remove the item(s) from the queue.
Here we have selected the lead record with Title – Kim Abercrombie.

Let us leave it at No and click on Pick.

We can see the owner getting updated.
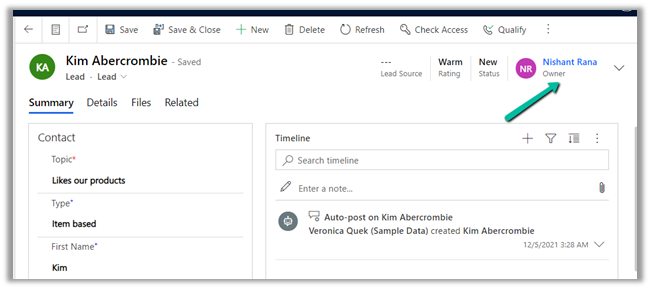
And the below details in the queue item record.

Worked by, Entered Queue and Modified on details updated.
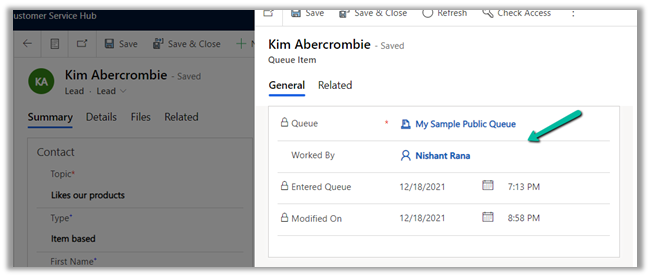
And also as we had opted No for Remove the item from the Queue.

The item will be available on All Items view, but won’t be available on Items available to work on.

  • What happens when we Release the Item?
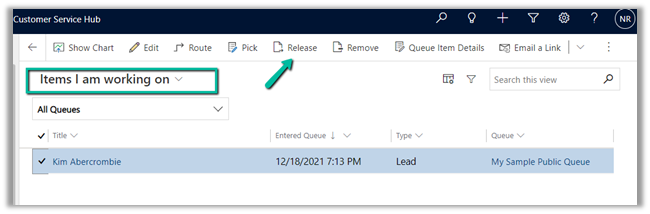
A dialog box appears that informs that the item will be assigned back to the queue’s owner and other members can pick up.
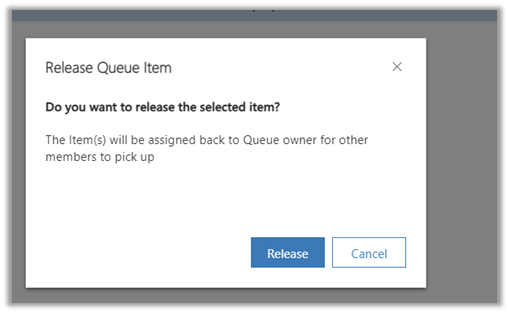
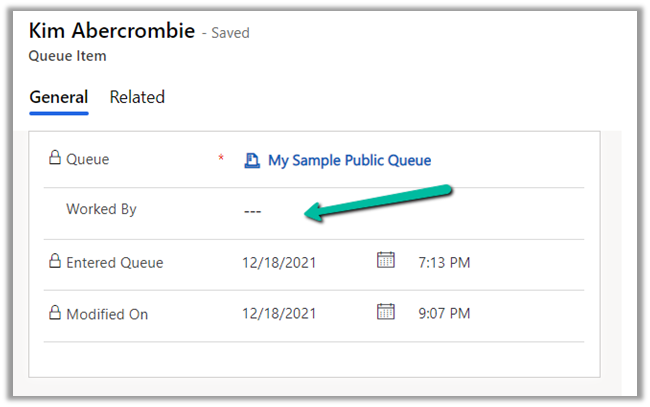
As expected the Item is added back to the queue.

And the Worked By field is set as blank for the queue item.
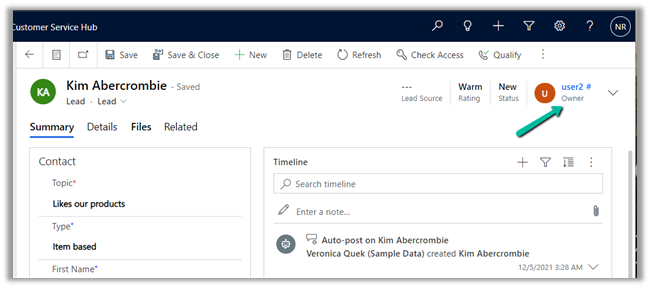
Also, the owner of the record is set to the queue owner.
  • What happens when we Remove the record instead of the Release command?

Now let us pick the same lead record again, and this time we will Remove it instead of Release.
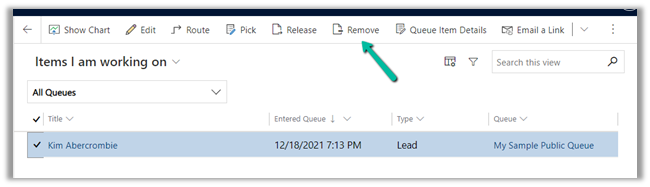
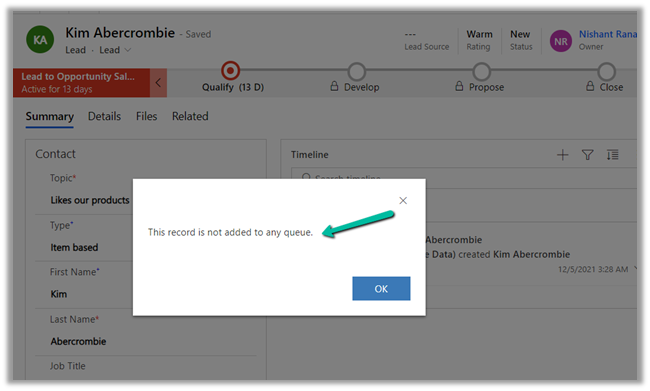
This Remove option removes the Queue Item (a lead record) from the Queue. (My Sample Public Queue) in this case.

On checking the Queue Item Details for the record, we will get the below message.
Get all the details here –

https://docs.microsoft.com/en-us/dynamics365/customer-service/work-with-queues

https://neilparkhurst.com/2021/06/02/mb-230-microsoft-dynamics-365-customer-service-queues/

Also check – 

https://nishantrana.me/2020/09/18/queue-item-details-change-in-dynamics-365-2020-release-wave-2/

Hope it helps..

Advertisements

Using Force Sync User to sync PowerApp / CRM users – Power Platform / Dynamics 365


Recently in one of our trial environments, some of the users were not showing up in the Enabled Users view in Dynamics 365, although the users were having appropriate licenses assigned to them. (was more than 24 hours)

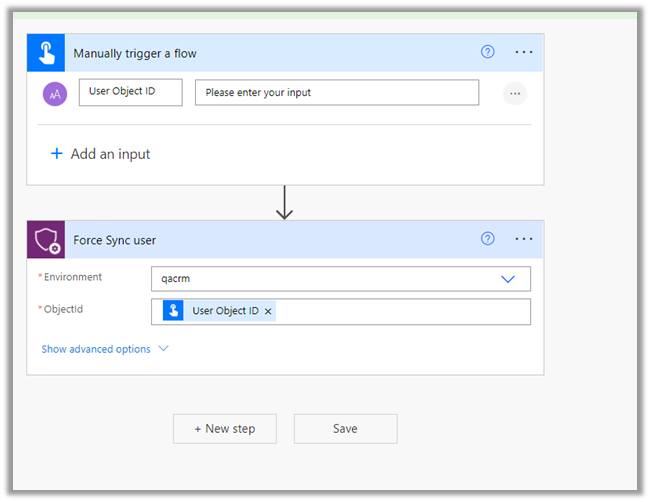
In such a scenario we can use Force Sync user action of Power Platform Management Connector.

https://docs.microsoft.com/en-us/connectors/powerplatformforadmins/

For Force Sync users, we will be passing the object id of the user and selecting the appropriate environment.

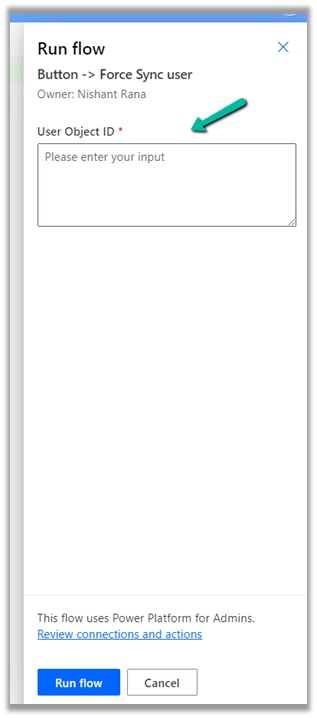
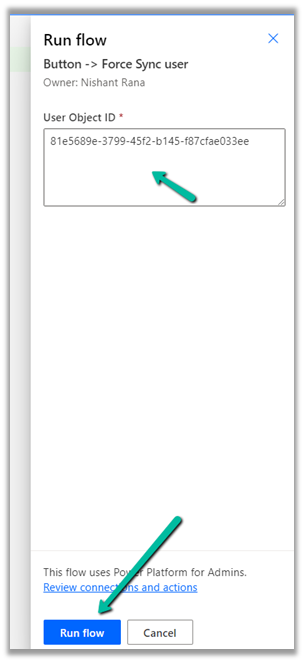
Run the flow manually.

It asks for the Object Id of user.

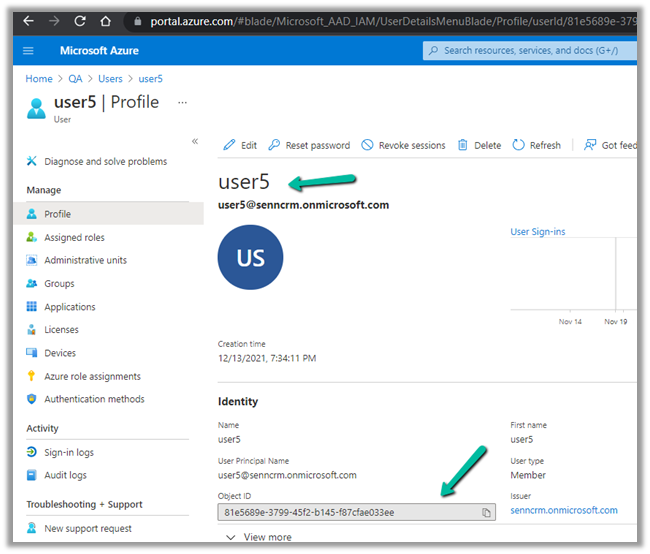
Inside Azure Portal >> Azure Active Directory >> Users, get the Object Id of the user

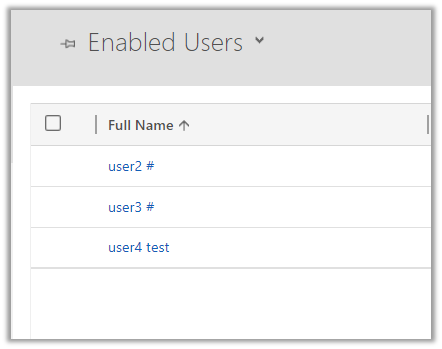
Currently, we have below 3 users in CRM

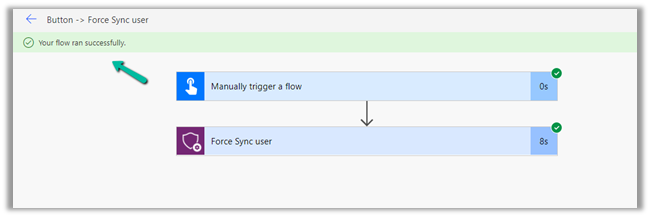
Let us run the flow.

Wait for the flow to complete.

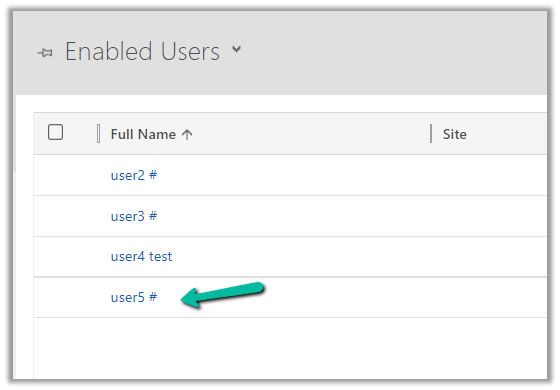
After successful execution of the flow, back in CRM, we can see user 5 added to the list of enabled users.

In case we are using a security group for the environment we can make use of the below Power Automate Template, it takes the security group’s object id as input and loops through each of the members and applies Force Sync user action.

We can also make use of PowerShell cmdlets to achieve the same

https://nishantrana.me/2021/01/20/force-sync-users-from-azure-ad-to-dynamics-crm/

Force Sync Azure Active Directory Group members to specified CDS instance

Hope it helps..

Advertisements