How to Enable Microsoft 365 Copilot in Model-Driven Apps


Microsoft 365 Copilot brings conversational AI directly into Model-Driven Apps, allowing users to ask natural language questions about Dataverse data, quickly locate records, and improve productivity without leaving the application.

In this post, we walk through the steps we follow to enable Microsoft 365 Copilot in a Model-Driven App, covering the tenant, environment, and application-level configuration required before the feature becomes available.
What We Need Before We Start

  • Microsoft 365 Administrator permissions for tenant-level Copilot settings.
  • Power Platform Administrator access to the target environment.
  • Dataverse Search enabled for the environment (Default or On).
  • Sufficient Dataverse database capacity — Microsoft 365 Copilot for Model-Driven Apps relies on Dataverse Search indexing, and turning it on can increase capacity consumption.
  • Appropriate licensing (covered in Step 4 below).

Step 1: Enable Dataverse Data in Microsoft 365 Copilot (Tenant Level)

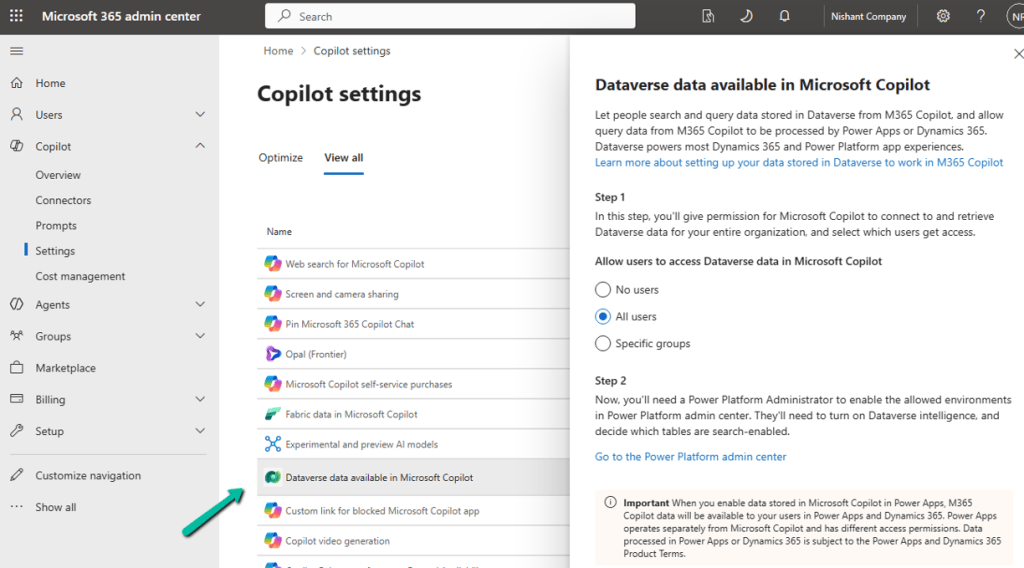
Sign in to the Microsoft 365 Admin Center → Copilot → Settings, and locate Dataverse data available in Microsoft 365 Copilot.

Turn it on and choose either All Users or Specific Groups, then Save.

This is a tenant-level setting; it must be enabled before users can access Dataverse data through Microsoft 365 Copilot.
Step 2: Enable Dataverse Search for the Environment

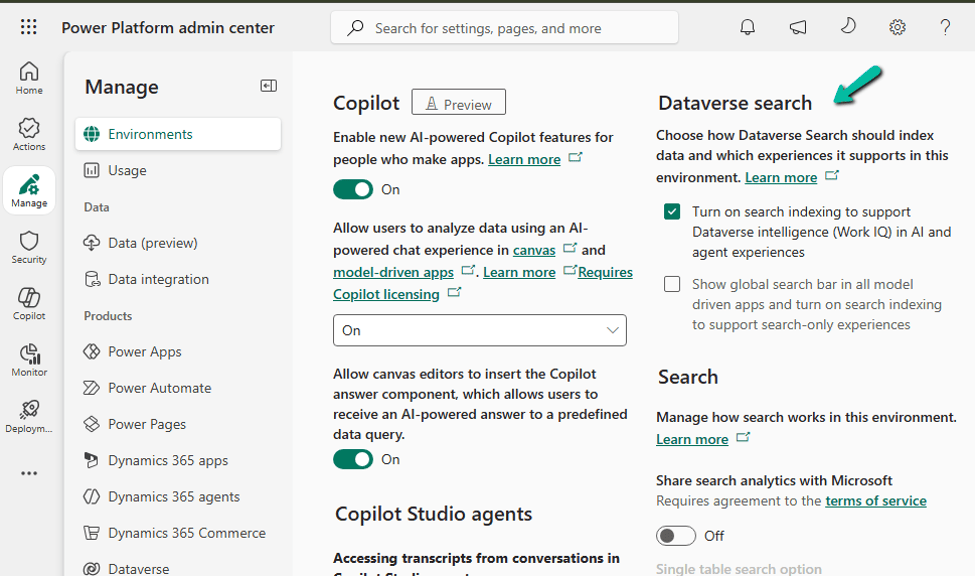
Go to Power Platform Admin Center → Environments → select the environment → Settings → Product → Features, and set Dataverse Search to On, then save.

Dataverse Search is what powers the indexing behind Copilot’s answers, so this has to be on before Copilot can ground its responses in your table data.
Step 3: Verify Dataverse Capacity

Since Microsoft 365 Copilot for Model-Driven Apps relies on Dataverse Search indexing, make sure the environment has enough Dataverse database capacity to support indexing, semantic search, and the Copilot queries themselves. Check this under Power Platform Admin Center → Licensing → Capacity add-on for the environment before rolling this out to a production environment with a large dataset.

Step 4: Verify Licensing

Licensing depends on where the app lives:

  • Power Apps (Custom Model-Driven Apps) — users need a Power Apps Premium license together with a Microsoft 365 Copilot license.
  • Dynamics 365 apps — users need a qualifying Dynamics 365 Enterprise or Premium license. A Microsoft 365 Copilot license is also required to unlock advanced Work IQ capabilities beyond standard Dataverse grounding.

Worth confirming this with your licensing/procurement team before you promise the feature to end users — a missing Microsoft 365 Copilot license is one of the most common reasons Copilot doesn’t show up for a user even after everything else is configured correctly.

Step 5: Enable Microsoft 365 Copilot for the Environment

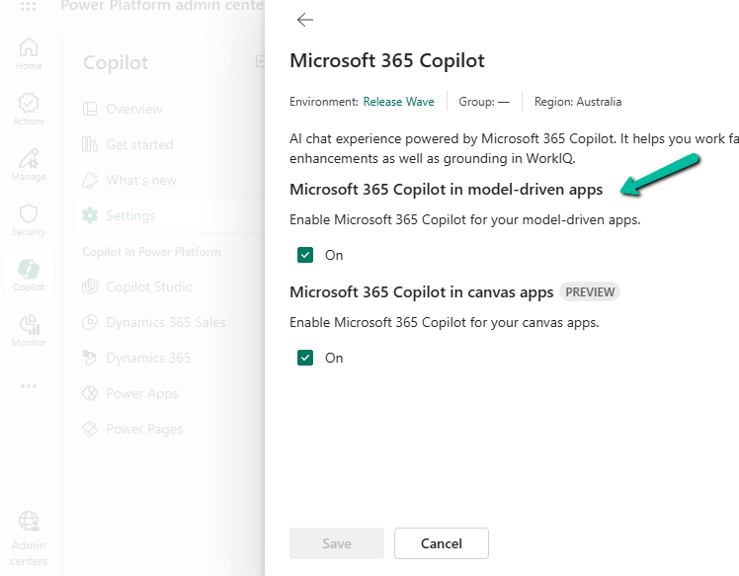
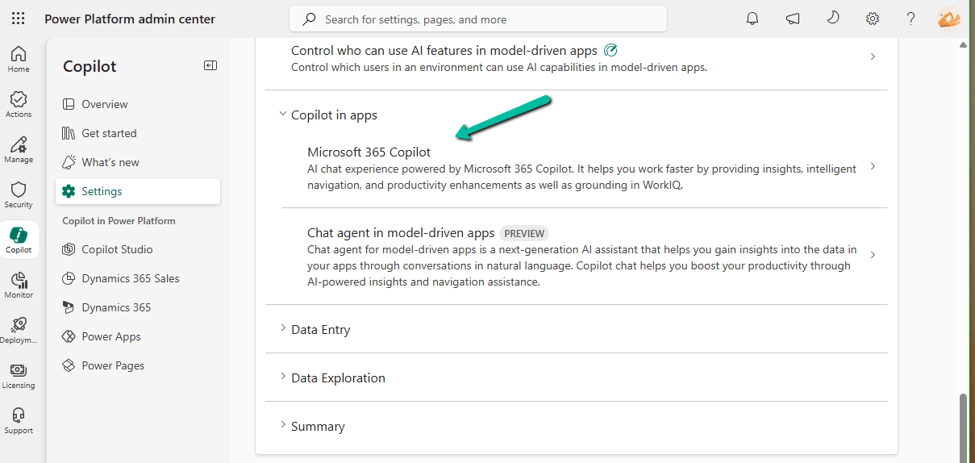
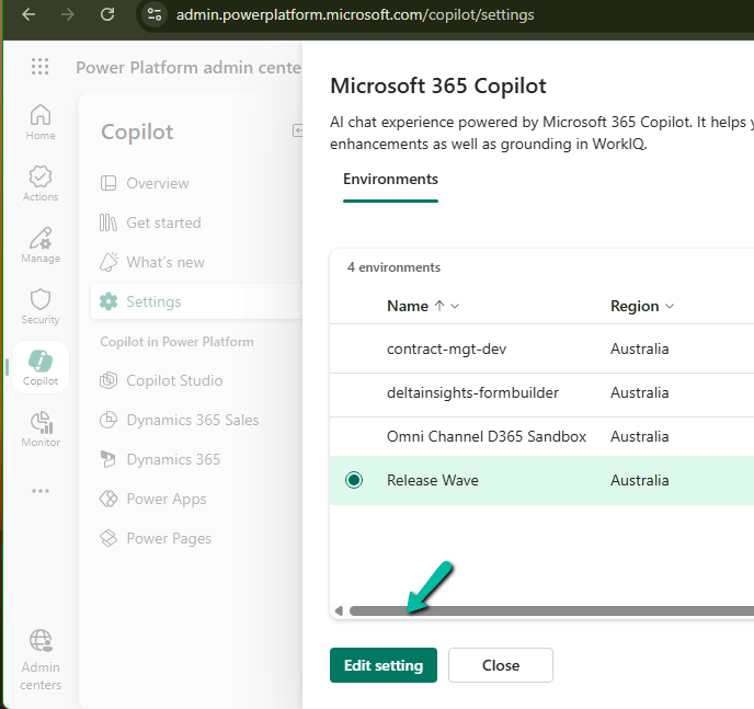
Go to Power Platform Admin Center → Copilot → Settings. Under Power Apps, expand Copilot in Apps, choose Microsoft 365 Copilot, select the environment (or environment group), select Edit Setting, turn it On, and Save.
Step 6: Enable It for the Model-Driven App

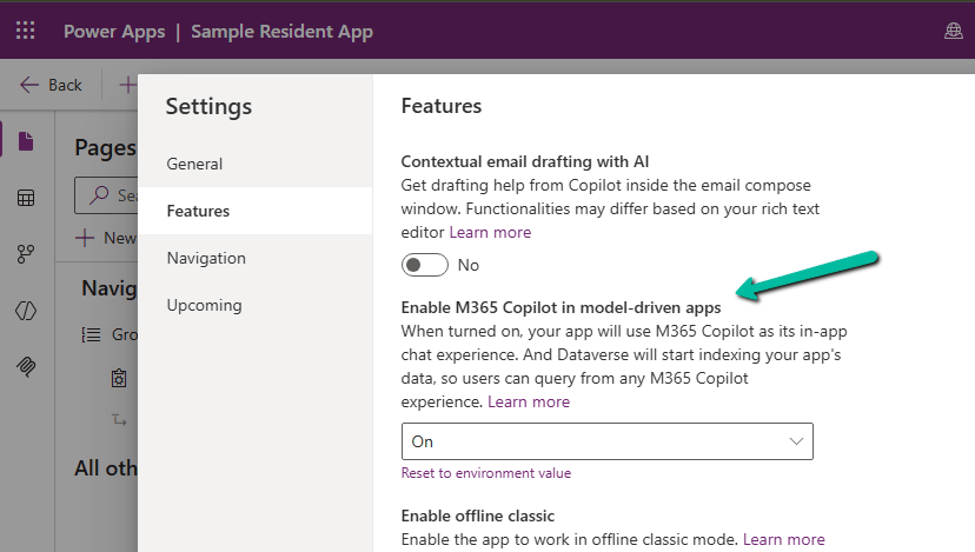
Open the app in the Power Apps Maker Portal → Settings → Features, set M365 Copilot in model-driven apps to On, then Save and Publish the app.
Enable It for All Model-Driven Apps in an Environment

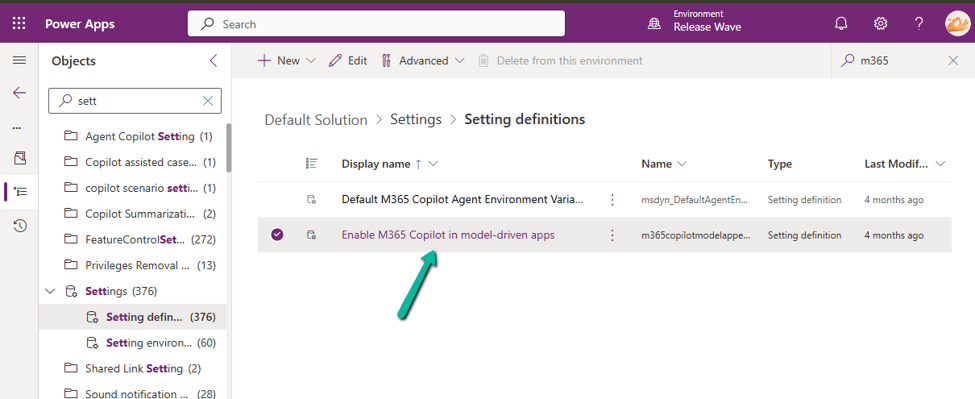
If you’d rather turn this on once instead of app by app, open the Default Solution → Objects → Settings, locate Enable M365 Copilot in model-driven apps, add the value if it doesn’t already exist, set it to 2, Save, and Publish the change.
What Users Will See

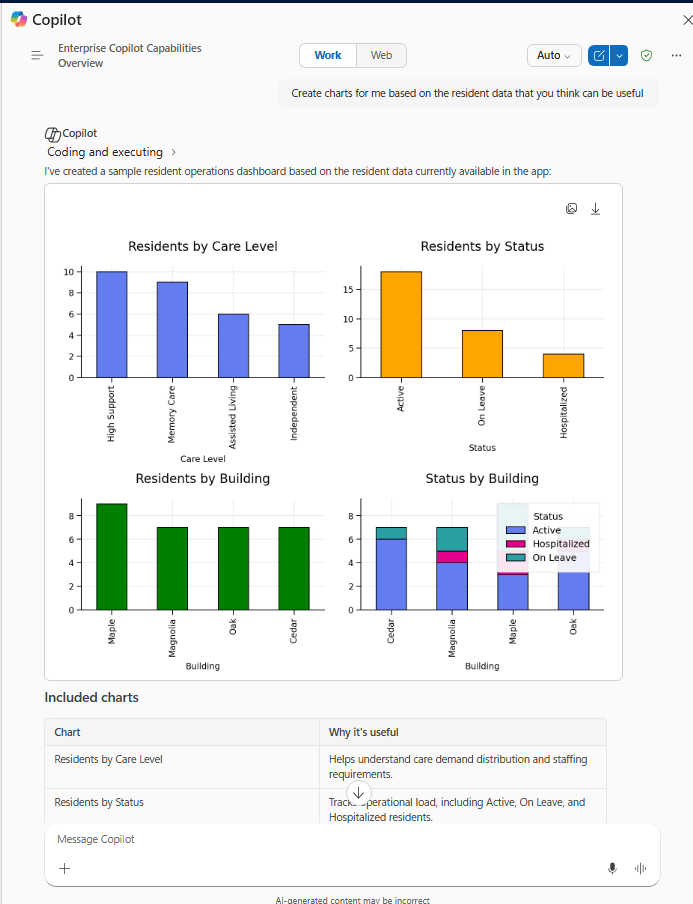
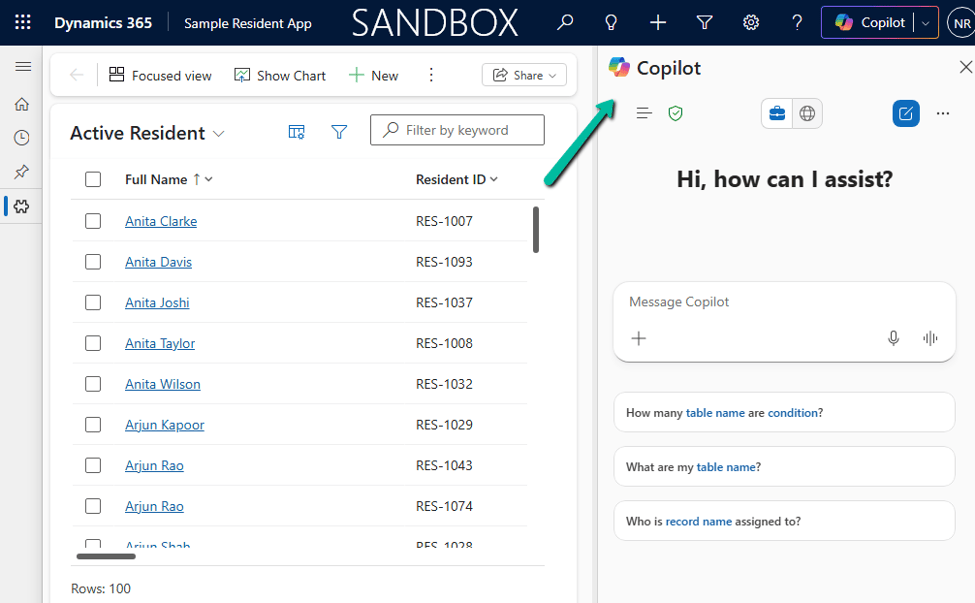
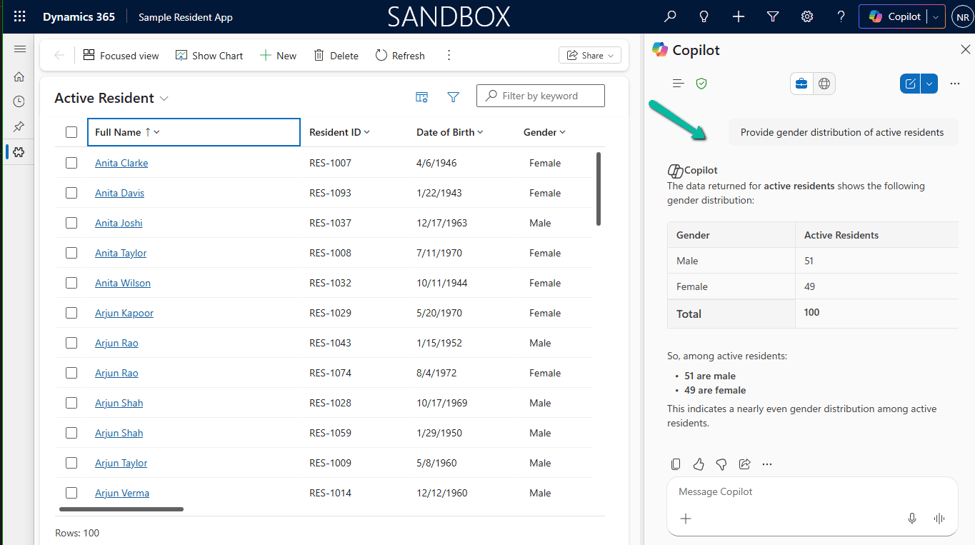
Once everything is configured, users can open Copilot → Chat from the top-right corner of the Model-Driven App and start asking natural language questions about Dataverse records.

The current experience is read-only by default: Copilot can find and summarize data, but it can’t make changes on the user’s behalf unless you’ve customized it with an agent. It’s also worth knowing that Microsoft 365 Copilot for Model-Driven Apps isn’t available in the Power Apps mobile app yet.
Microsoft 365 Copilot vs. Copilot Chat: What’s Changing?

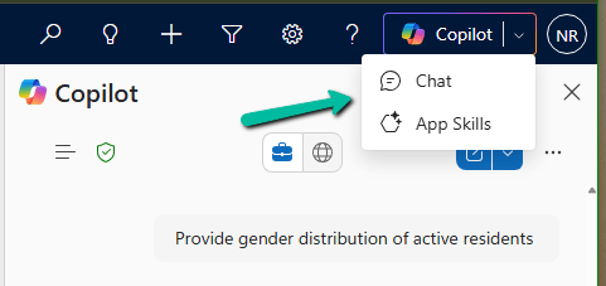
If you’ve previously enabled Copilot Chat in Model-Driven Apps, you’ll now see two options in the Copilot menu: Chat and App Skills. This is part of Microsoft’s transition to Microsoft 365 Copilot, which is becoming the standard AI experience across Power Apps and Dynamics 365.
AreaMicrosoft 365 Copilot (Chat)Copilot Chat (App Skills)
StatusRecommended, actively evolvingBeing deprecated
AvailabilityPower Apps and Dynamics 365Preview in Power Apps
Dataverse queriesYesYes
NavigationYesYes
Future directionMicrosoft’s strategic platformTransitioning out

Deprecation Timeline

Microsoft has announced that Copilot Chat in Model-Driven Apps, for Power Apps environments not enabled for Dynamics 365 apps, began its deprecation starting in January 2026. During the transition period, organizations can enable either one or both experiences while users migrate.

What Users Will See During the Transition

  • Chat opens Microsoft 365 Copilot.
  • App Skills opens the legacy Copilot Chat experience.
  • Both experiences can coexist during the transition.

Recommendation

For new implementations, enable Microsoft 365 Copilot rather than investing further in the legacy Copilot Chat experience. Since Microsoft is standardizing AI experiences across Power Apps and Dynamics 365 around Microsoft 365 Copilot, adopting it now saves you a migration later and gives users access to the latest Dataverse-grounded capabilities, including Work IQ where licensed.

Reference Links

Hope it helps..

Advertisements

AB-100 Last-Minute Revision Cheat Sheet (Microsoft Agentic AI Business Solutions Architect)


Recently, I cleared the Microsoft Certified: Architecting Agentic AI Business Solutions (AB-100) exam.

While preparing, I ended up creating this one-page Architect’s Compass for my last-minute revision. Instead of memorizing every Microsoft service, I grouped similar services so I could quickly decide which one fits a business scenario.

I’m sharing it here in case it helps someone preparing for AB-100.

Get it here !

How to Read the Architect’s Compass

Don’t read it from left to right like a textbook. Start by identifying what the question is asking you to do, then jump to the matching section.

1. Cost & Business Value

Estimate → Pricing Calculator. Ownership → TCO Calculator. Actual Spend → Cost Management.

2. Knowledge Retrieval

Dataverse = Single Source of Truth. Azure AI Search = Search across multiple sources.

3. Prompt & Model Quality

Prompt Flow builds. Evaluation grades.

4. Microsoft 365

Entra ID = Identity. Microsoft Graph = Microsoft 365 data.

5. Security & Governance

Purview = Data governance. Azure Policy = Infrastructure governance.

6. Copilot Studio

Fallback = Unknown intent. Escalate = Human handoff.

7. Azure AI Foundry

Hub shares. Project builds. Endpoint serves.

8. Monitoring

Analytics = Business. Application Insights = Technical. Log Analytics = Cross-agent. Azure Monitor = Infrastructure.

Don’t Memorize. Recognize.

The biggest takeaway from my preparation was recognizing decision patterns instead of memorizing isolated features.

My Last-Minute Checklist

  • Dataverse = SSOT
  • Managed Solution = Production
  • Entra ID = Identity
  • Graph = Microsoft 365 Data
  • Purview = Data Governance
  • Hub → Project → Endpoint
  • Pricing vs TCO vs Cost Management
  • Fallback ≠ Escalate

Hope it helps..

Visualize Data in a View with Copilot (Preview) – Dataverse / Dynamics 365


The copilot-powered data visualization in views feature, currently in preview, allows us to generate quick and insightful charts from Dataverse table views using natural language. We can select a table view and ask Copilot to generate visualizations, making data interpretation easier.

  • Natural Language Queries – Ask Copilot in simple terms to generate relevant charts.
  • Multiple Chart Types – Bar charts, pie charts, line graphs, and more.
  • Instant Insights – No need to build reports; visualize directly from your data view.
  • Interactive Refinements – Modify the chart type or tweak the data selection.

To enable it, for the environment, navigate to Settings >> Features and enable Natural Language Grid and View Search.

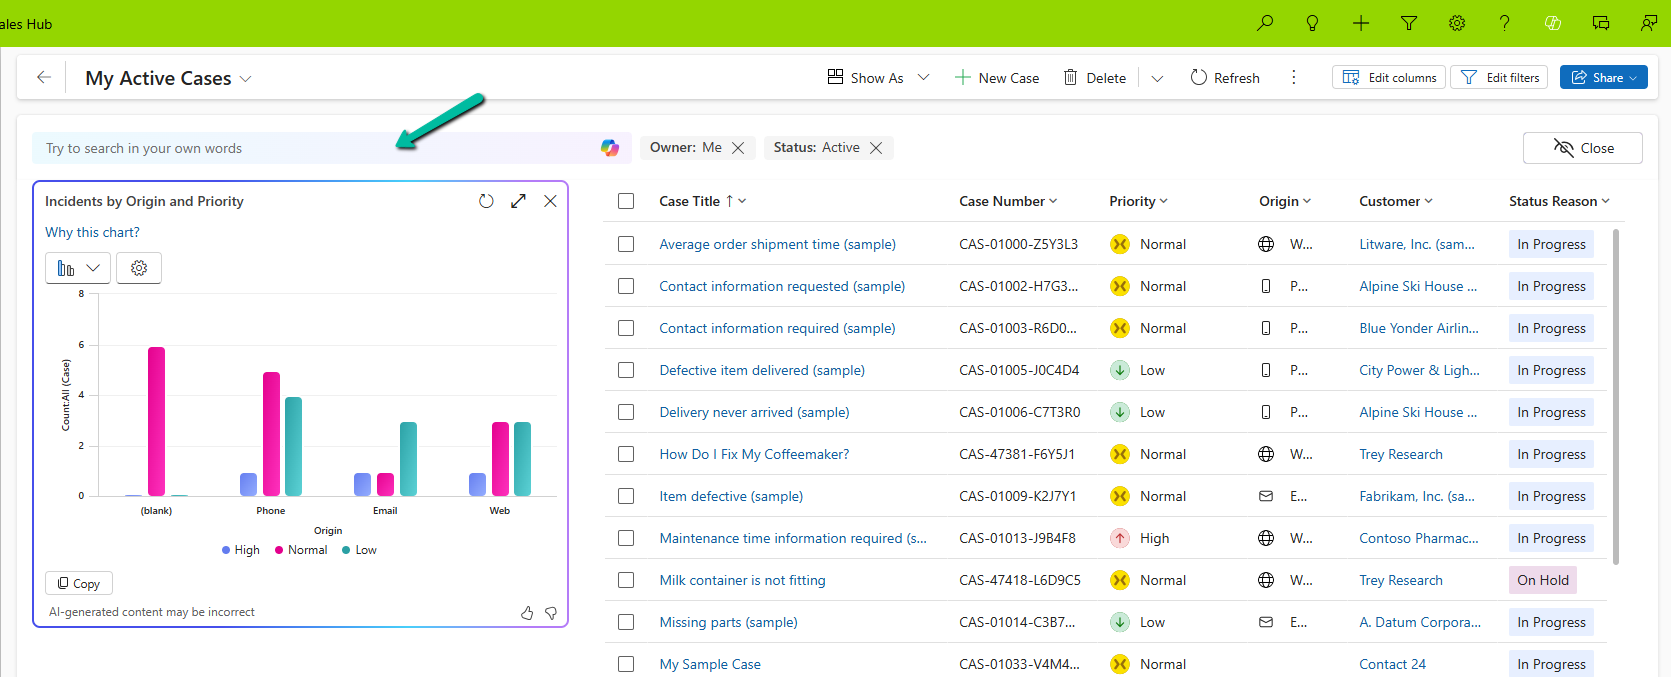
We can see the Visualize button added to the views.

A screenshot of a computer

AI-generated content may be incorrect.

It generates the Chart based on the data in the view.

A screenshot of a computer

AI-generated content may be incorrect.

Selecting a particular area filters the data in the view accordingly.

We also have the option to change the chart type, copy the chart, expand the view, etc.

A screenshot of a computer screen

AI-generated content may be incorrect.

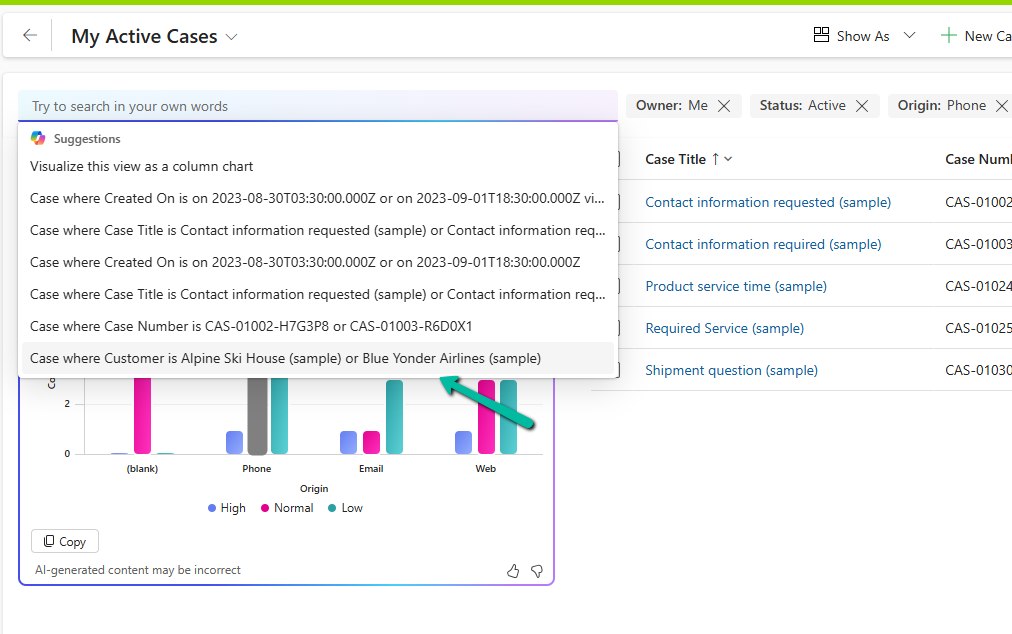
We can also use natural language to specify the data or can select AI-generated suggestions for the views.

More on Natural Language Grid and View Search – https://nishantrana.me/2025/02/04/check-out-the-natural-language-grid-and-view-search/

A screenshot of a computer

AI-generated content may be incorrect.

Here we selected/specified the query “Cases where customer is Alpine Ski House” and the Chart and View updated accordingly.

A screenshot of a computer

AI-generated content may be incorrect.

This Copilot-driven data visualization feature is a game-changer for users who need quick insights from their data without setting up complex reports. With just a few clicks and simple queries, Power Apps can now deliver meaningful charts on the fly.

Get more information

Hope it helps..

Advertisements

How to – Configure Copilot Row Summary for tables main form – Dataverse / Dynamics 365


We all know how frustrating it can be to dig through records just to find key details. With AI-generated record summaries, users can instantly access important information—saving time, reducing effort, and boosting productivity.

We can now create AI-powered record summaries for any table in Power Apps using a simple, guided prompt builder. We get to choose the fields and details that matter most, ensuring users see the right information briefly. There’s even an online testing option to fine-tune the summary before rolling it out. Once set up, the record summary will be readily available in forms, making information access effortless.

To enable it inside the Power Platform Admin Center, select an environment and navigate to

Environment >> Settings >> Features >> AI insights cards

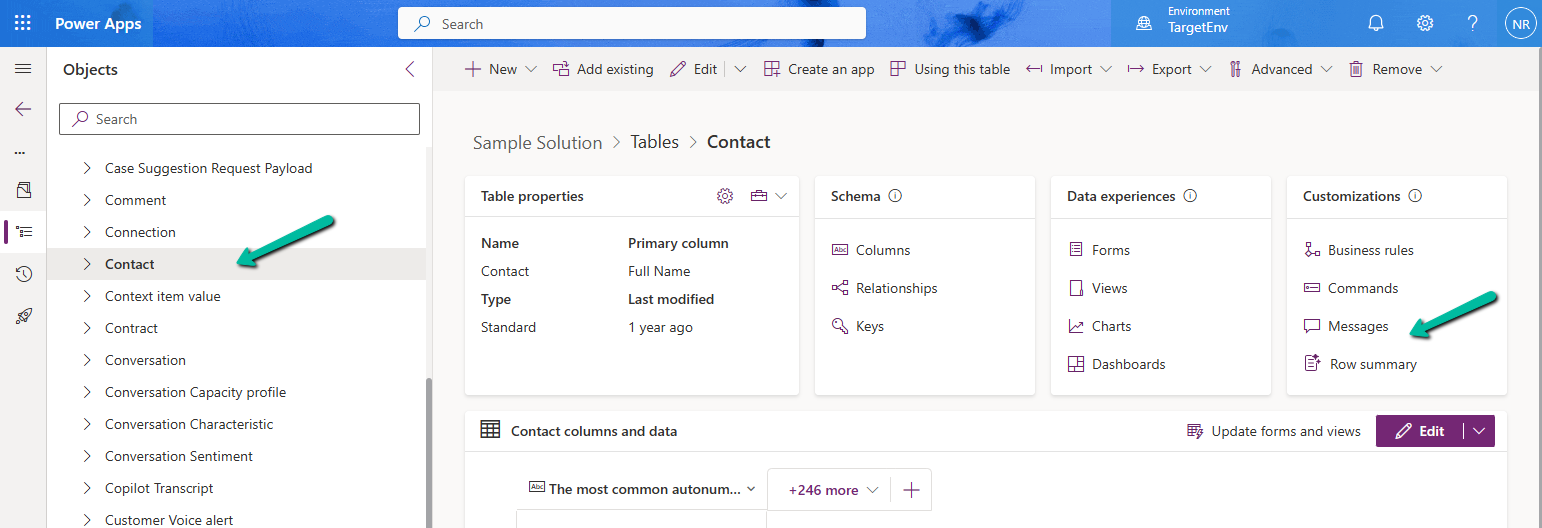
Inside Maker Portal, select the table, and from the Customizations section select the Row summary option.

A screenshot of a computer

AI-generated content may be incorrect.

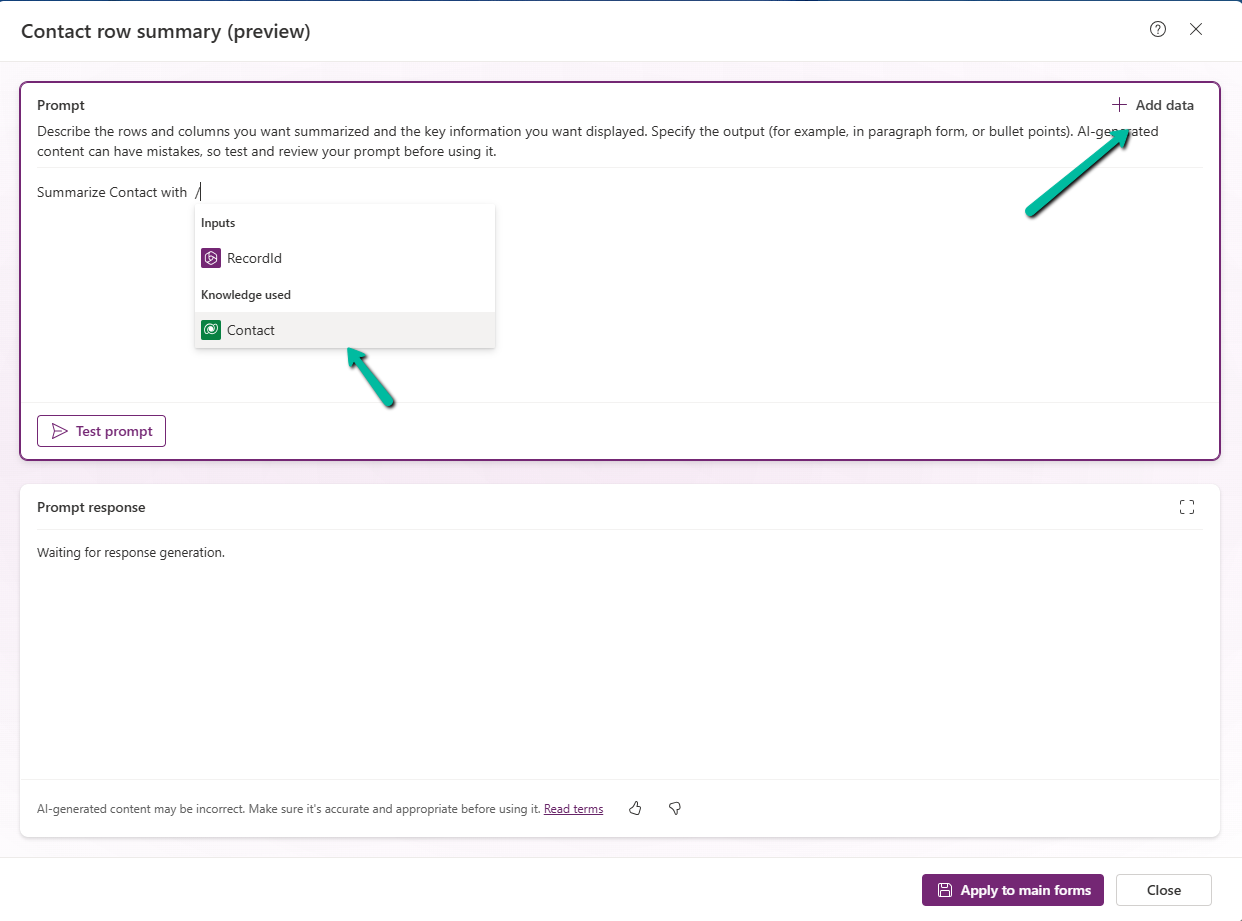
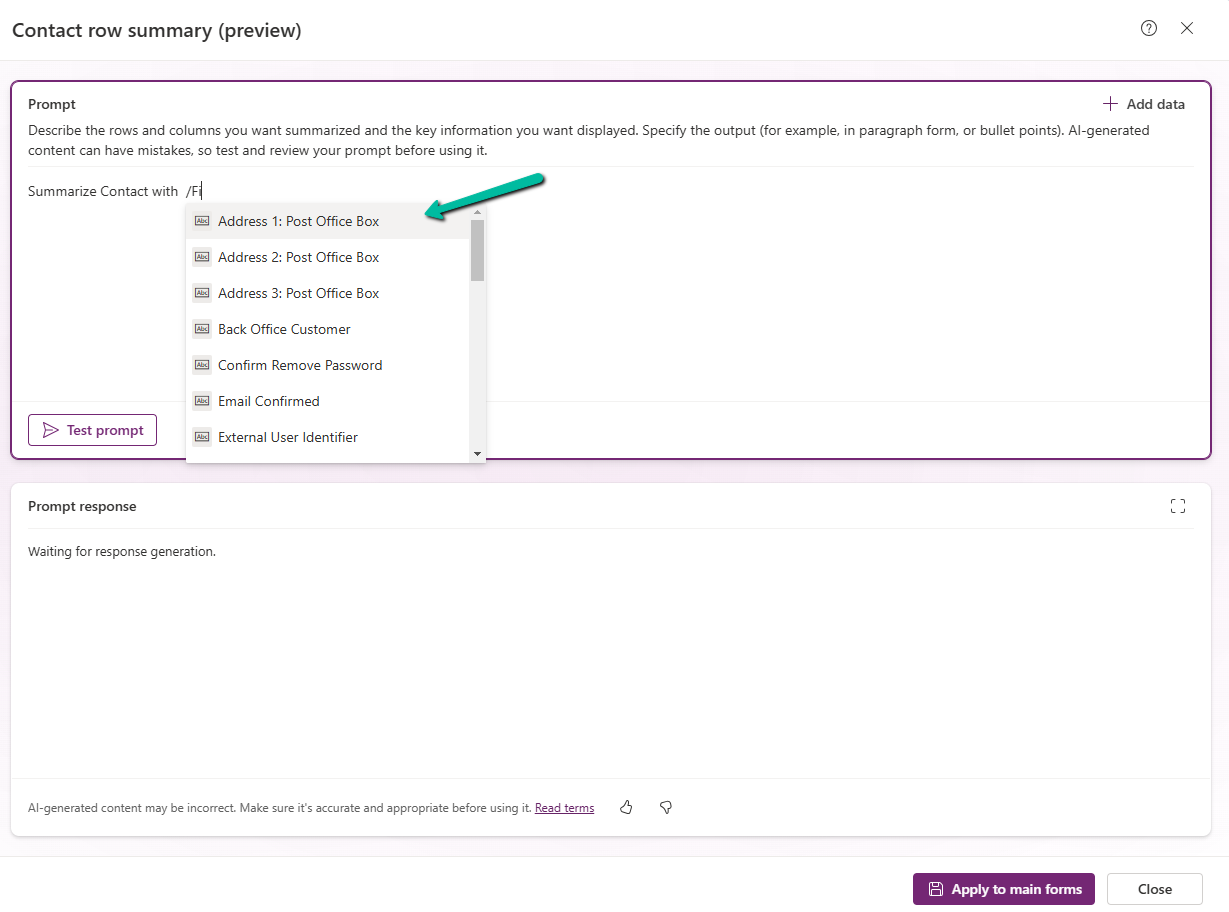
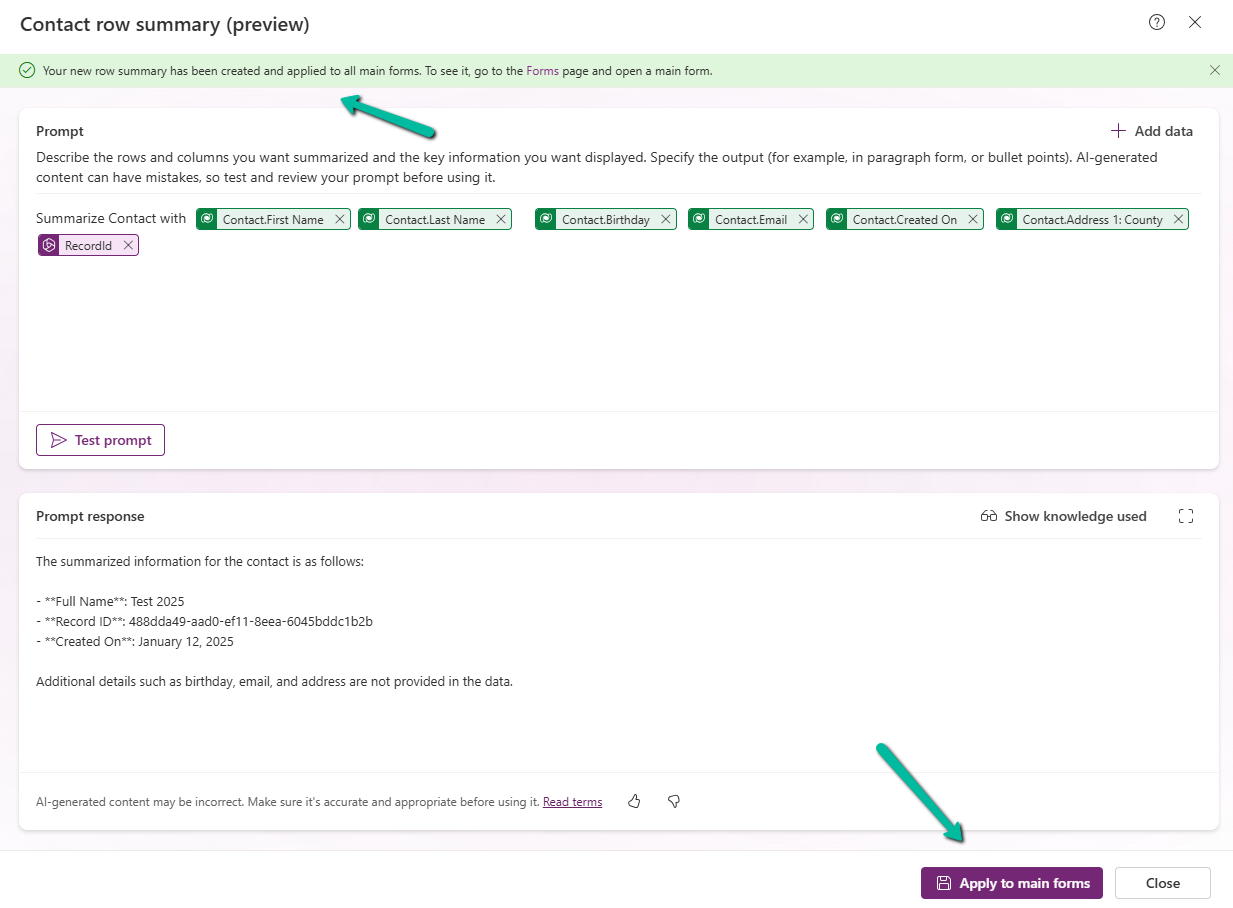
In the Prompt box, we can specify the columns we want to include as part of the summary.

We can click on +Add data to do so can type the name of the field after “/”

A screenshot of a computer

AI-generated content may be incorrect.
A screenshot of a computer

AI-generated content may be incorrect.

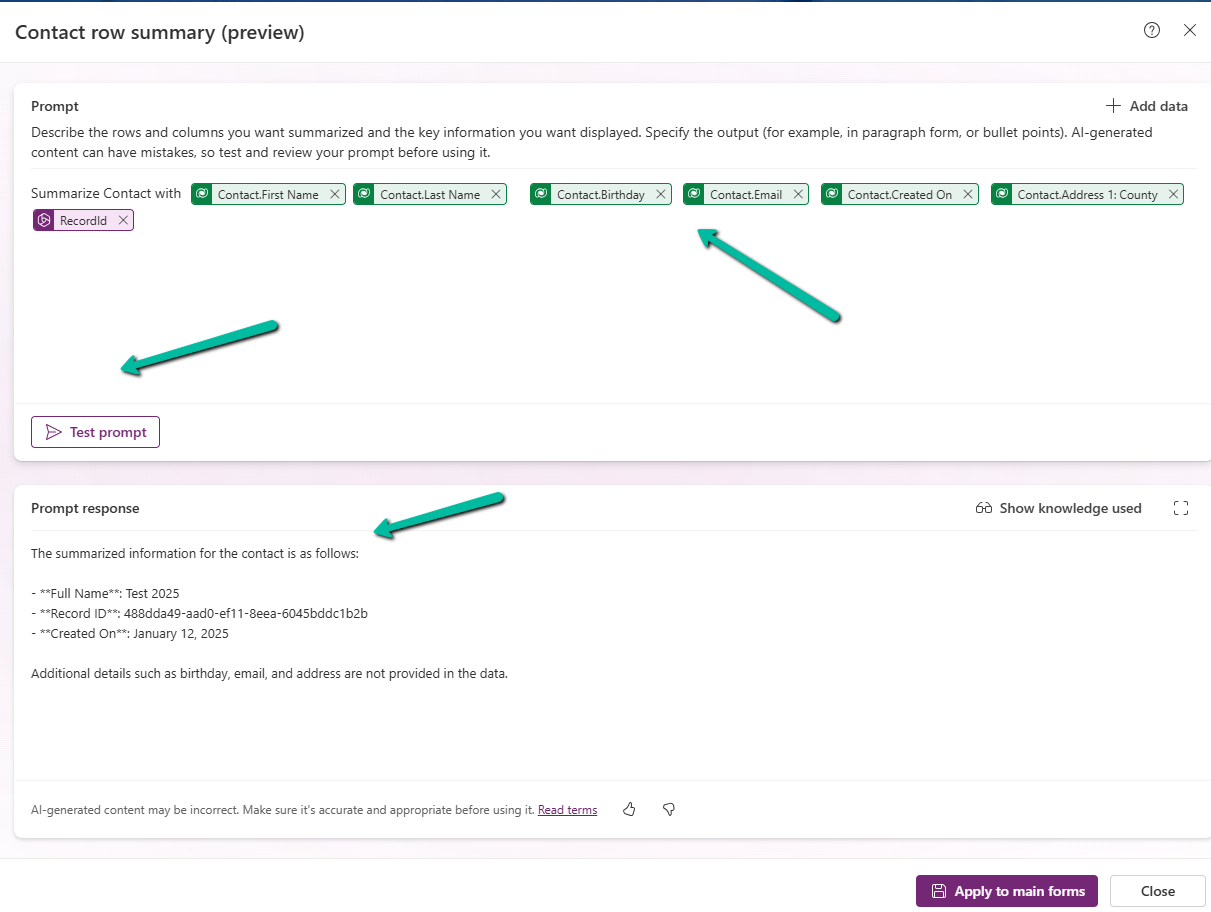
After specifying the fields, we can click on the Test prompt to see the response. And can fine tune it further.

A screenshot of a computer

AI-generated content may be incorrect.

Clicking on Apply to main forms applies to all the main forms for the table.

A screenshot of a computer

AI-generated content may be incorrect.

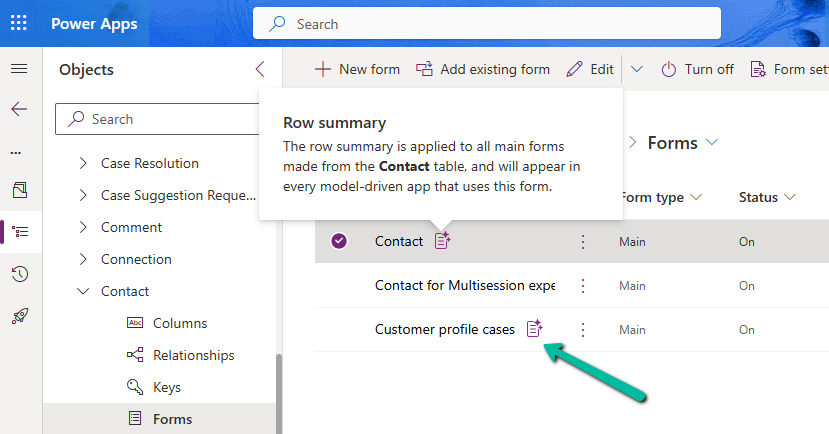
We can see the icon added next to the main forms.

A screenshot of a computer

AI-generated content may be incorrect.

The Row summary toolbar allows us to show, hide, and edit the summary.

A screenshot of a computer

AI-generated content may be incorrect.

Publish the changes.

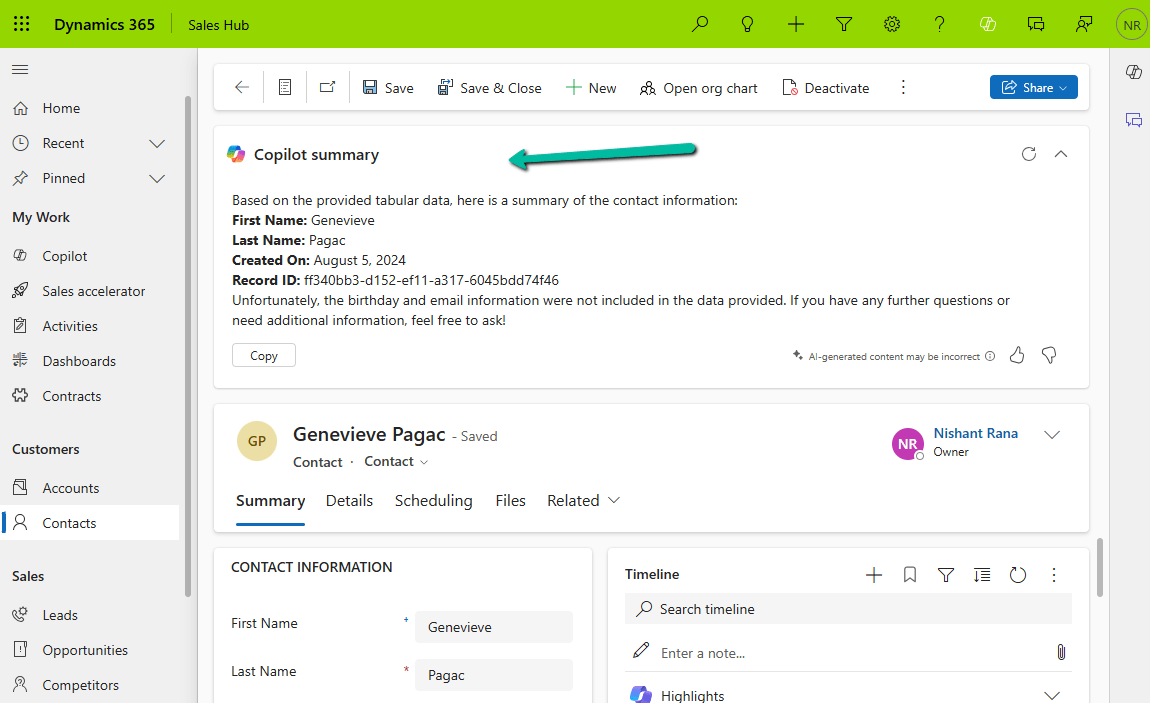
Below we can see the summary generated for the Contact’s main forms.

Get more details.

Hope it helps..

Advertisements

Check Out the Natural Language Grid and View search


The new Smart Grid Preview feature allows us to find, filter, and sort data with natural language.

To enable it navigate to Environment >> Settings >> Features inside Power Platform Admin Center and turn on Natural Language Grid and View Search.

A screenshot of a computer

Description automatically generated

After enabling it we will see a search box on the grid page where we can type in questions about our data in plain English.

A screenshot of a computer

Description automatically generated

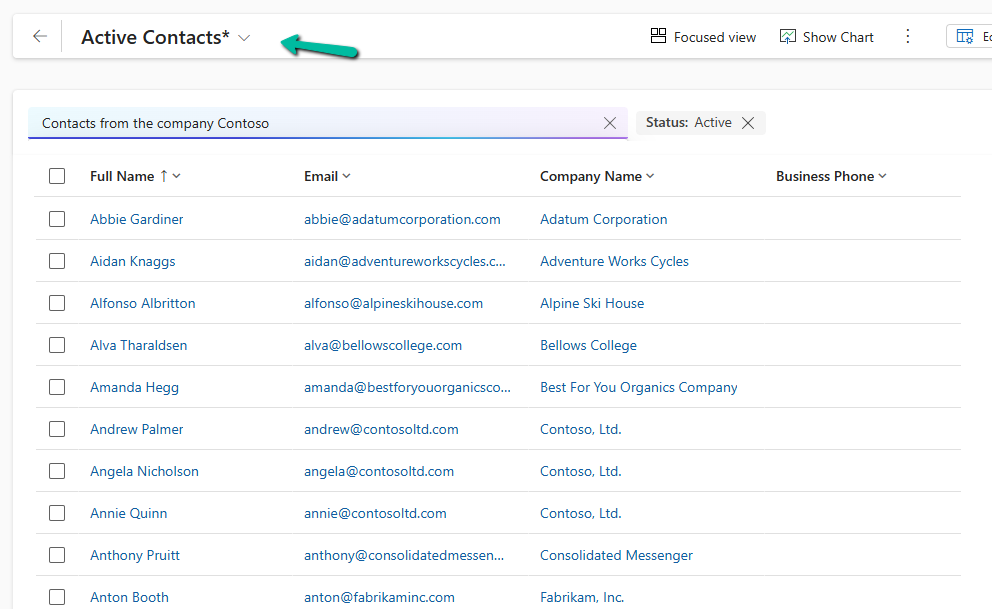
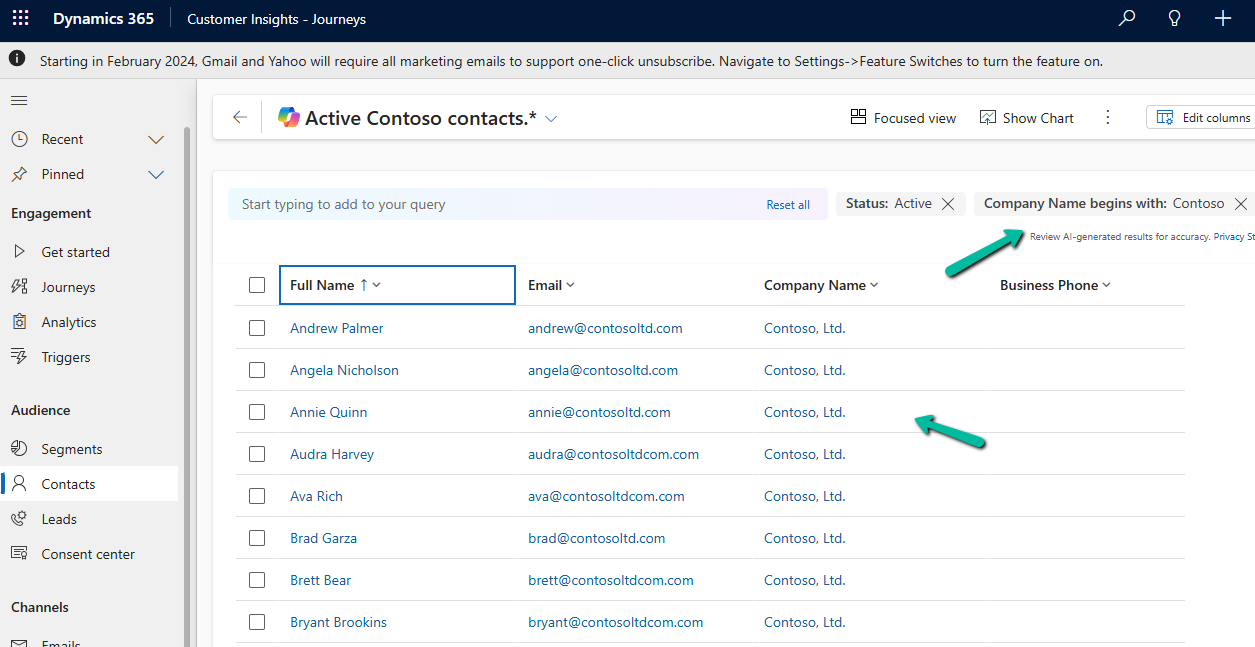
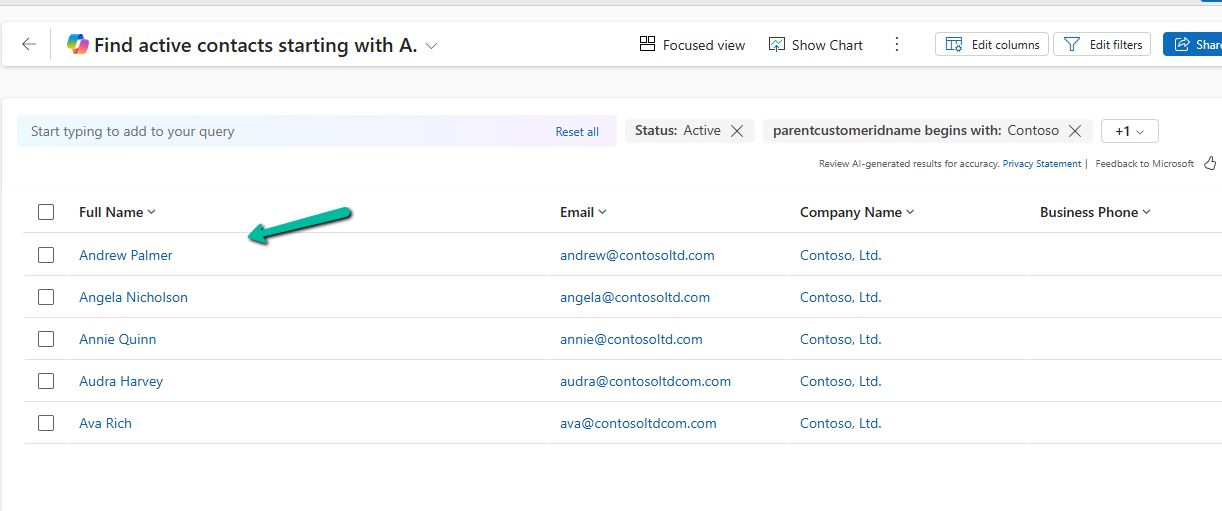
Let’s say we need to find “Contacts from the company Contoso”. Normally, this would mean defining the filters/query. But with the Smart Grid’s natural language search, we just type the request, and the system filters the view accordingly.

A screenshot of a computer

Description automatically generated

The result –

A screenshot of a computer

Description automatically generated

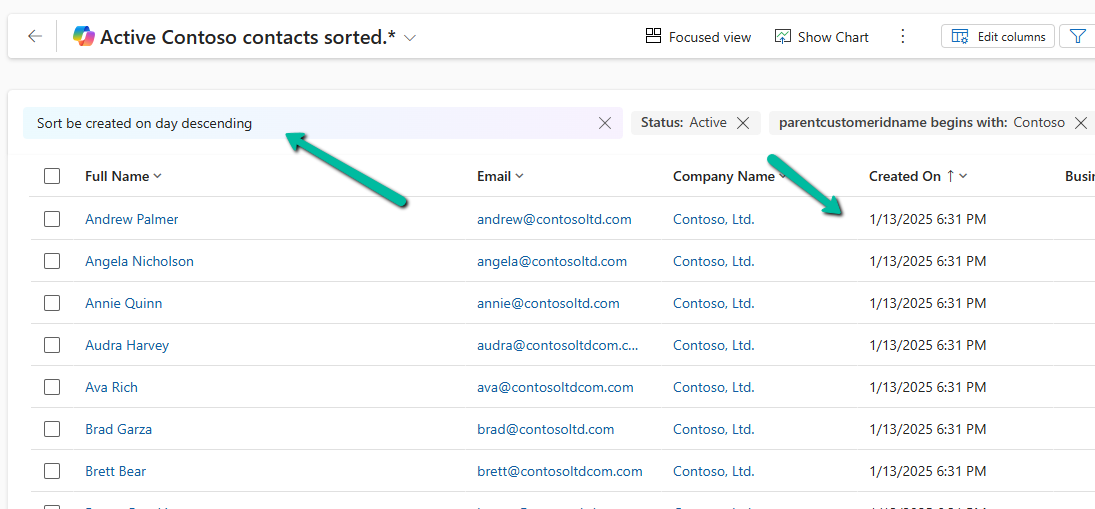
We can also use it to sort data.

A screenshot of a computer

Description automatically generated

Another example

A screenshot of a computer

Description automatically generated

The result –

A screenshot of a computer

Description automatically generated

Using natural language search has loads of benefits:

  • Ease of Use: Do complex searches without needing to be tech-savvy.
  • Speed: Find what you need quickly without navigating through multiple filters.
  • Accessibility: Makes data interaction easy for everyone, even if you’re not a tech pro.

As it’s still in preview, there are a few things the Smart Grid Preview doesn’t support yet:

  • Query Aggregation
  • Query Grouping
  • Adding Columns

Remember, it’s still a work in progress and not ready for full production use.

Get more details here

Hope it helps ..

Advertisements

Using Copilot to Create and Explain Formulas – Power Apps


Using the new features – Create a formula (preview) and Explain this formula we can now easily write, edit, and understand formulas in Power Apps.

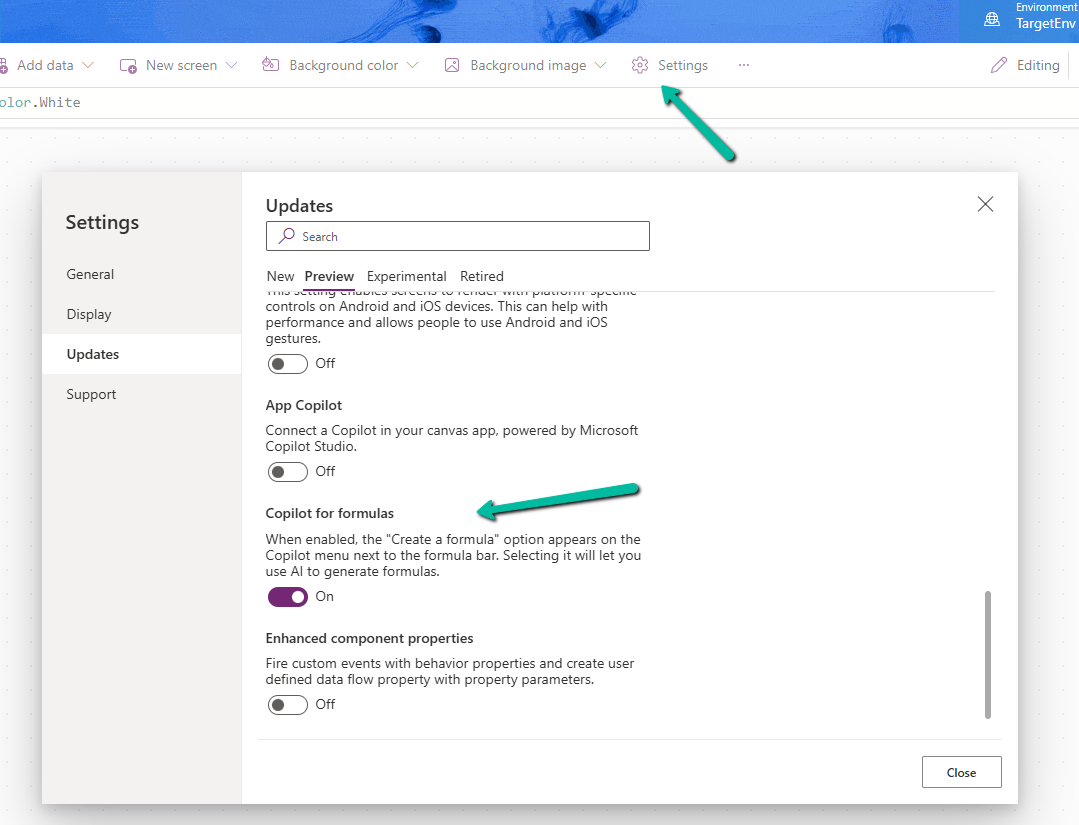
To enable it, navigate to switch on – Settings >> Updates >> Preview >> Copilot for formulas

Here in the sample app below, we are trying to set the Items property of the Gallery using Create a formula. Here our gallery control is bound to Cases as the data source.

A screenshot of a computer

Description automatically generated

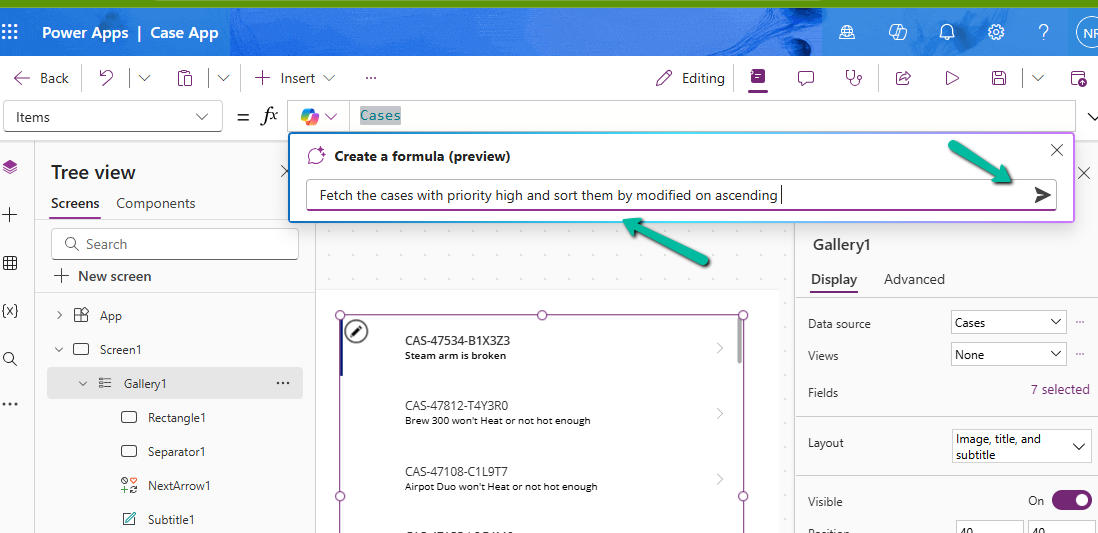
We can describe what formula we need in plain language.

A screenshot of a computer

Description automatically generated

We can see it generating the formula for us. We have the option to Apply, Discard, and Copy it.

A computer screen with a blue background

Description automatically generated

Here we have applied the generated formula.

A screenshot of a computer

Description automatically generated

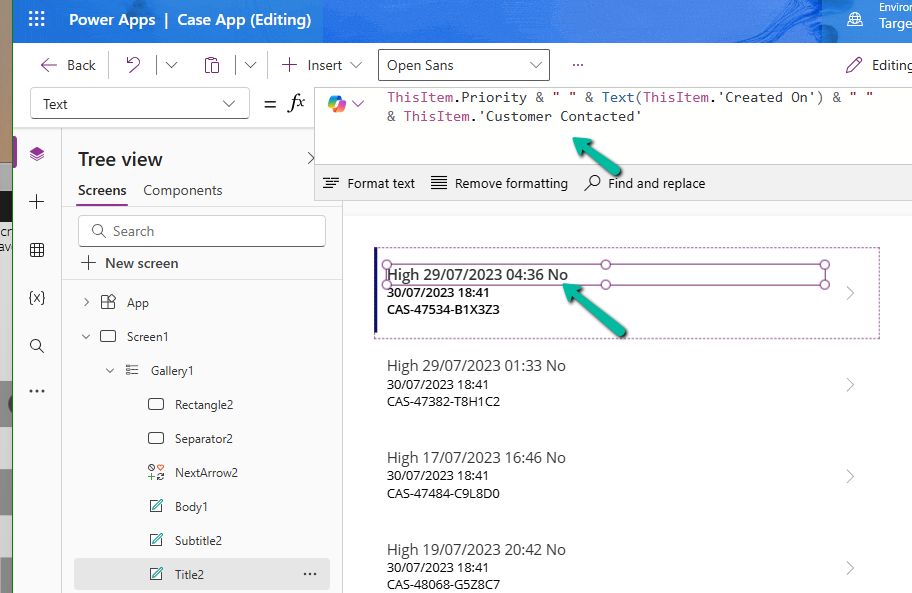
Another example is where we are setting the Text property.

Here instead of the customer name it considered the Customer Contacted field. So basically we need to review the formula generated.

A screenshot of a computer

Description automatically generated

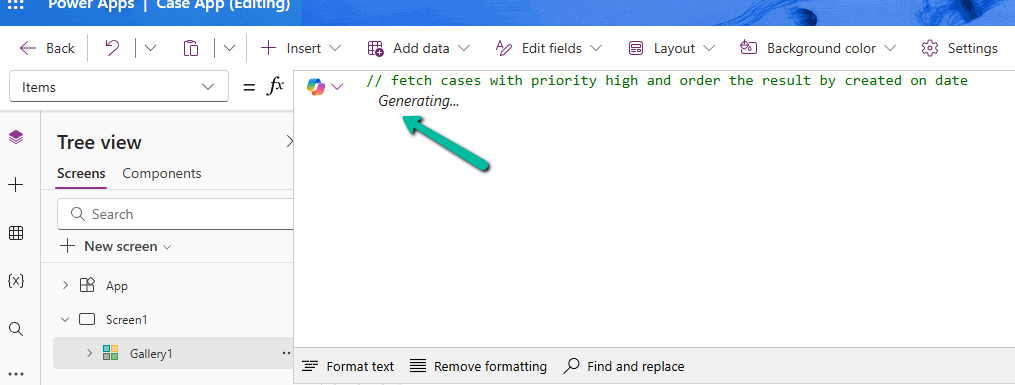
We can also generate formula from code comments as show below. Simply type the comment and wait for formula to be generated or otherwise press Enter.

The result

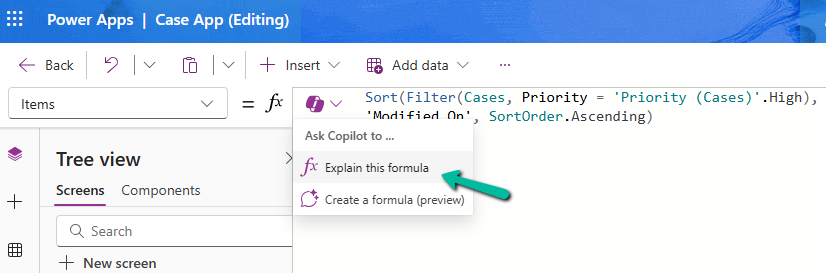
Next using Explain this formula we can use the copilot’s ability to explain the formula in plain language.

The result

A screenshot of a computer

Description automatically generated

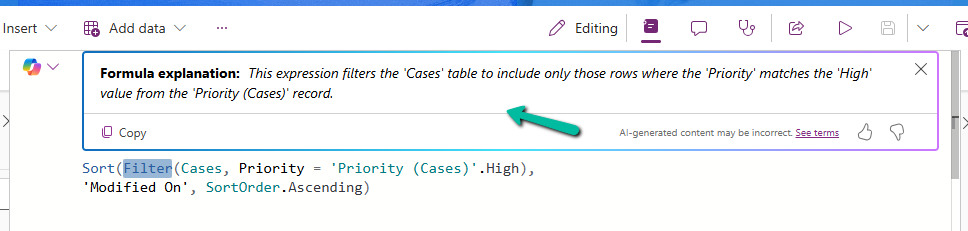
We can also select specific parts of the formula for explanation.

Below we have selected the Filter keyword and Explain this selection option.

A computer screen with text and arrows pointing to the right

Description automatically generated

The result

A screenshot of a computer

Description automatically generated

Similarly, on selecting SortOrder

A computer screen shot of a computer screen

Description automatically generated

The result

A close-up of a text

Description automatically generated

Get all the details here

Hope it helps..

Advertisements