How to – Use Business Rules to Disable / Read-only fields in Editable Grid (Dynamics 365 / CRM)


In the previous post, we saw how to use Field Level Security and JavaScript to disable field/column in the Editable Grid Control.

How to – Disable / Read Only fields in Editable Grid control (Dynamics 365 / CRM) – Nishant Rana’s Weblog

We can also use Business Rules to achieve the same.

Here we will be disabling the email field.

Below is our sample business rule to lock the email field.

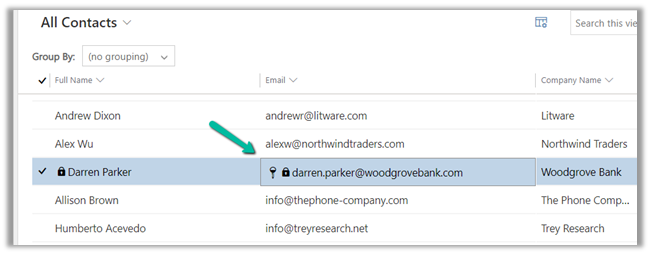
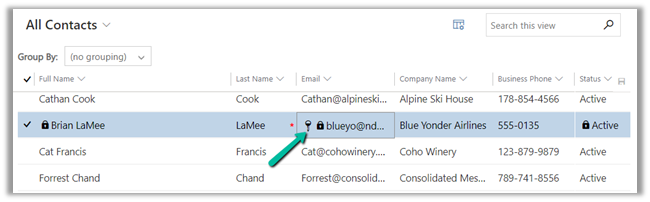
The result – we have the field locked/disabled in the editable grid control.
Couple of things we need to take care of

1st the field that we are using in the condition inside business rule, last name in our case, should be there in the view.

And the Scope of the Business Rule should be either – Entity or All Forms.

Also check  – https://nishantrana.me/2022/02/15/power-apps-grid-control-in-model-driven-apps-dynamics-365-crm/

Hope it helps..

Advertisements

How to – Disable / Read Only fields in Editable Grid control (Dynamics 365 / CRM)


Say for e.g. we have a requirement to make a certain field or column in the Editable Grid as read-only.

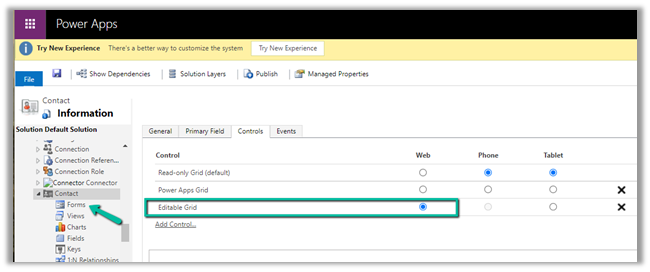
Here we have enabled Editable Grid control for Contact table.

Below are the 2 ways of achieving it –

Here we are taking the email field as an example.

  • Field level security –

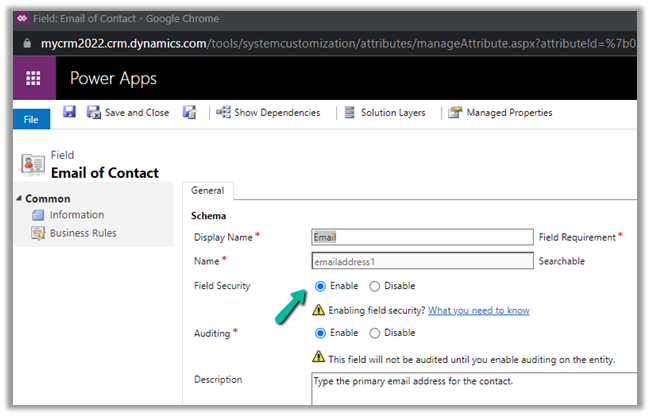
We have enabled Field Security on the Email field.

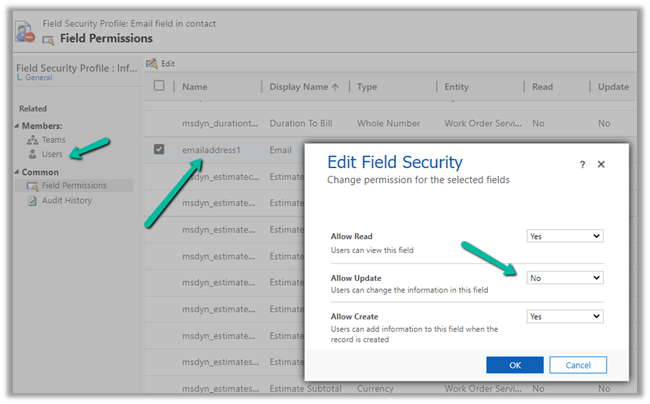
And we have set Allow Read and Allow Create as Yes and Allow Update as No.

And added the appropriate users or teams to which this profile should apply.

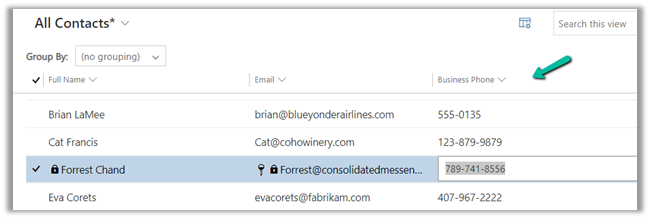
Now when the user tries to make changes in the email field, it comes as locked.

The other fields still come as editable as we have not enabled them for field security.

  • The other option is JavaScript on the OnRecordSelect event

Code –

function onGridRowSelected(context) {
    context
        .getFormContext()
        .getData()
        .getEntity()
        .attributes.forEach(function (attr) {
            if (attr.getName() === "emailaddress1") {
                attr.controls.forEach(function (myField) {
                    myField.setDisabled(true);
                });
            }
        });
}

The result –

Also check  – https://nishantrana.me/2022/02/15/power-apps-grid-control-in-model-driven-apps-dynamics-365-crm/

Hope it helps..

Advertisements

Sample Code – Update format of Autonumber attribute in Dataverse (Dynamics 365 / CRM)


At times we may have a requirement to update the format of the Auto Number dynamically / programmatically so that the new set of records take up the new format.

Let us understand through a simple example.

Right now for the below field, we have the auto-number format set as

{SEQNUM:4}


Below is the sample code to update the auto-number format programmatically.

It makes use of our RetrieveAttribute and UpdateAttribute requests.

https://docs.microsoft.com/en-us/dynamics365/customerengagement/on-premises/developer/create-auto-number-attributes?view=op-9-1#autonumberformat-options

We have retrieved the attribute then have specified a new auto number format, followed by update request.

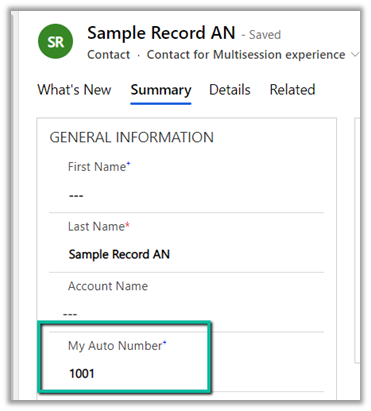
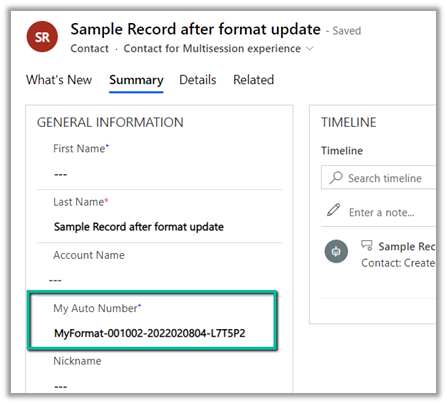
After executing the above code successfully, and creating a new contact record we can see the new number generated as per the specified format.

Sample Code –

        string ConnectionString = "AuthType = OAuth; " +
              "AppId=51f81489-12ee-4a9e-aaae-a2591f45987d; " +
              "Username=test@test.onmicrosoft.com; " +
              "Password=test; " +
              "RedirectUri=app://58145B91-0C36-4500-8554-080854F2AC97;" +
              "Url = https://test.crm.dynamics.com/;";


        CrmServiceClient svc = new CrmServiceClient(ConnectionString);

        if (svc.IsReady)
        {
            var retAttributeRequest = ((RetrieveAttributeResponse)
                             svc.Execute(new RetrieveAttributeRequest
                             {
                                 EntityLogicalName = "contact",
                                 LogicalName = "cr59f_myautonumber",
                                 RetrieveAsIfPublished = true
                             })).AttributeMetadata;

            retAttributeRequest.AutoNumberFormat = "MyFormat-{SEQNUM:6}-{DATETIMEUTC:yyyyMMddhh}-{RANDSTRING:6}";

            var updateAttrRequest = new UpdateAttributeRequest
            {
                EntityName = "contact",
                Attribute = retAttributeRequest
            };

            var updateAttrResponse = (UpdateAttributeResponse)
                svc.Execute(updateAttrRequest);

Check other posts on Auto Number attribute –

Hope it helps..

Advertisements

Power Apps grid control in Model-driven apps (Dynamics 365 / CRM)


Power Apps grid control is a new read-only control, now auto-enabled as part of 2022 Release Wave 1 for Model-driven apps.

We can also enable it by navigating to Customization, selecting the entity, then the Controls tab, and clicking on Add Control option.

Select the Power Apps Grid control.


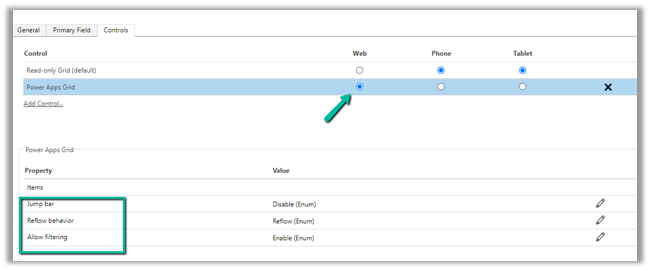
Here we have enabled it for the Web.

The different properties that can be set for the control are –

  • Jump bar – this will be disabled by default.
  • Reflow behavior
  • Allow filtering

With Jump bar disabled –


Enable the jump bar.

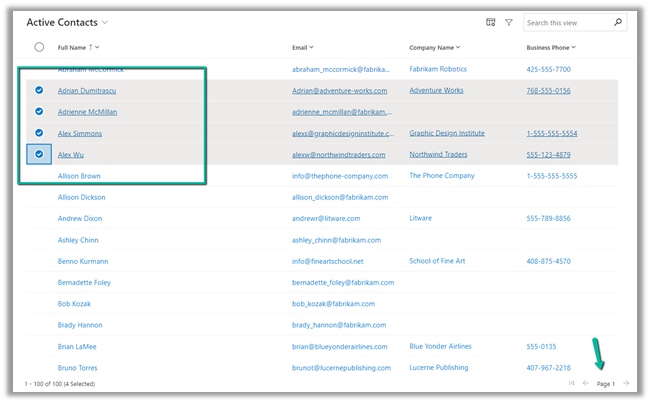
After enabling the jump bar, we get the option to filter by alphabets.

It will also support Infinite Scrolling

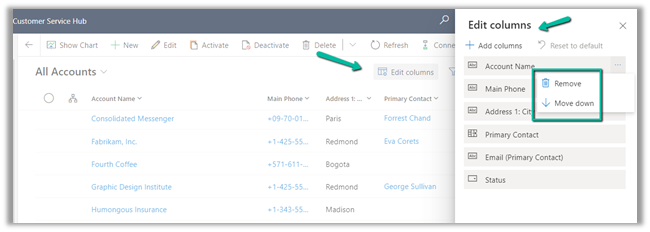
We can use Edit Columns to add, remove and order the columns for the view

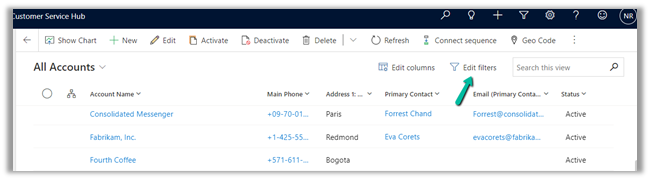
Edit Filters allows us to edit the filters.

Any changes made to the column or filter can be saved as a personal view.

Also, Grid remembers the context, here we have filtered the record by search text = “Blue”

Let us open the first record.

On navigating back, the context is retained.

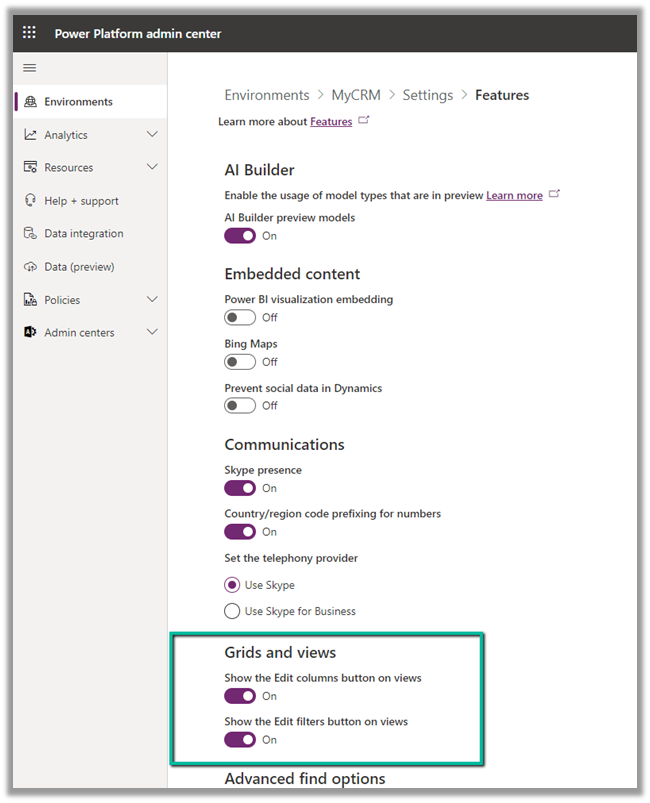
We can also show and hide the Edit Columns and Edit filters option on views from Power Platform Admin Center >> [Environment] >> Settings >> Features >> Grid and Views section


Hope it helps ..

Advertisements

Manage and share views in Modern Advanced Find – Dataverse (Dynamics 365 / CRM)


Let us have a quick look at this new feature introduced as part of 2022 Release Wave 1.

Make sure we have updated the environment to 2022 Release Wave 1.

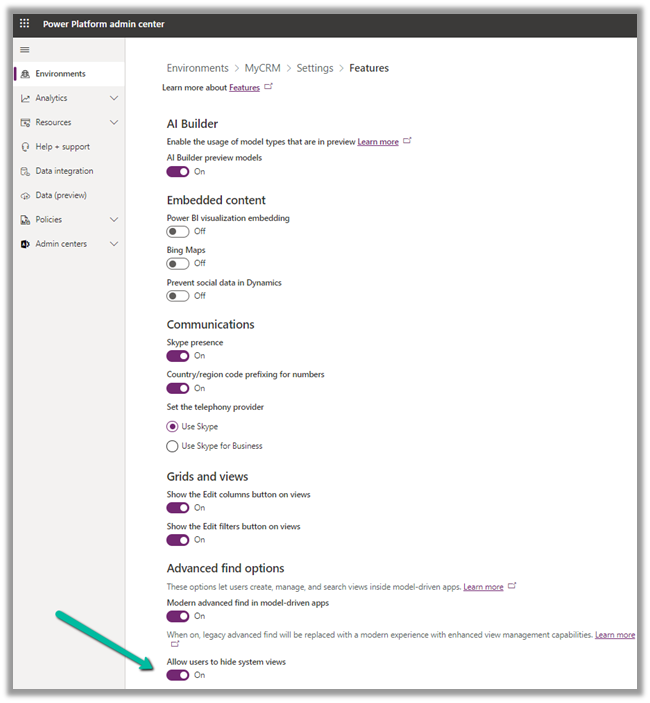
Then navigate to [Environment] >> Settings >> Features

Switch On – Modern Advanced Find and Allow users to hide system view 


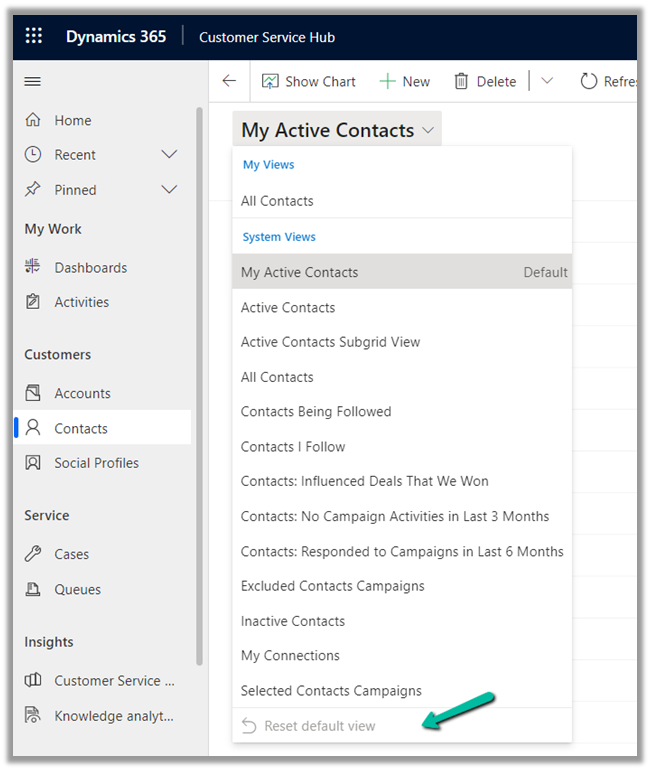
Reset Default View
is the only option available before we switch on the Modern Advanced find feature.


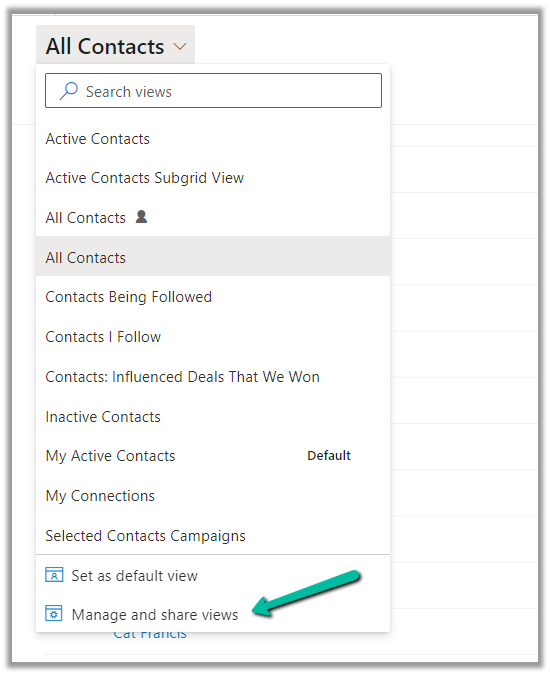
After enabling the Modern Advanced Find feature –

We get the option to Search Views as well as Manage and share views


Search Views – It allows us to filter / search within the views.


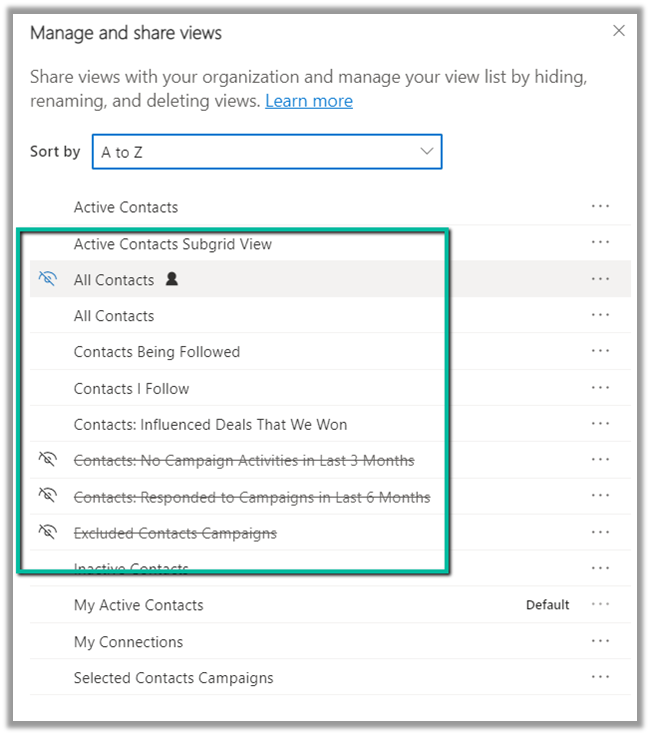
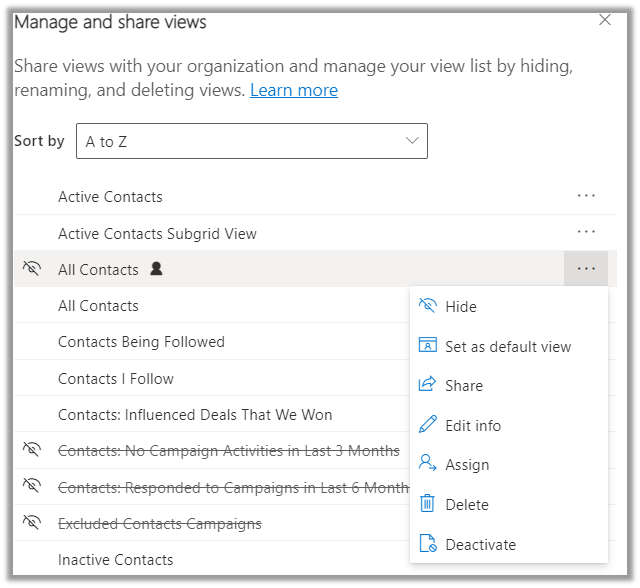
Manage and share views – It opens the dialog listing the views.


We can sort by

  • Personal before system, A to Z
  • System before personal, A to Z
  • A to Z


To hide a view we can select hover and select the option to hide.

With Allow users to hide system views  option switched on, the user has the option to hide system view also, else he could only hide the personal views.


For System Views, we have the option to either Hide or Set as a default view.

For Personal Views, we have more options like 

Hide, Set as default view, Share etc. as shown below.

Learn everything about the new Modern Advanced Find View  – https://jukkaniiranen.com/2022/02/modern-advanced-find-test-drive/

https://powerapps.microsoft.com/en-us/blog/modern-advanced-find-with-enhanced-view-management-in-model-driven-apps/

Hope it helps..

Advertisements

How to – Use SetAutoNumberSeed Action to reset/update the seed for the Autonumber attribute – DataVerse (Dynamics 365 / CRM)


Suppose we have the following Autonumber field created with

Seed value – 1000 and Format – {SEQNUM:4}

Now based on a certain requirement, we want to dynamically / programmatically update / reset the seed value.

For this, we can make use SetAutoNumberSeed Action

Below we can see the auto number set as 1007 on creating a new contact record.

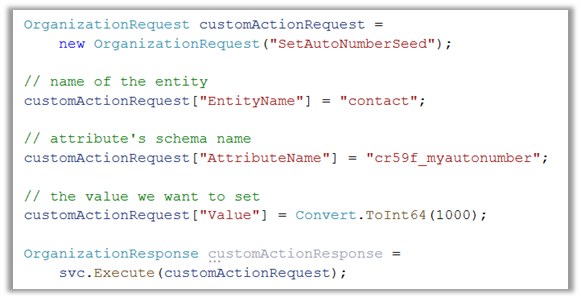
Now to set it back to 1000 we can run the following code –

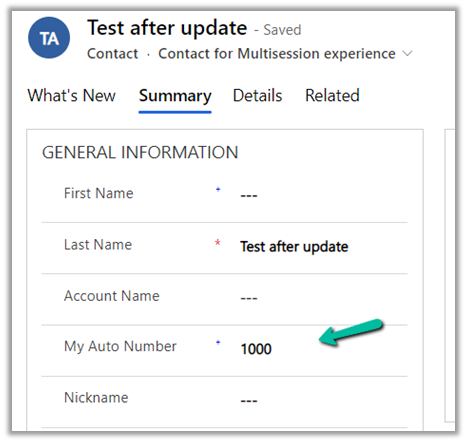
On executing the action, we can see the next contact record having autonumber field set as 1000.

Another example –

On updating the value to 888, and creating a new contact record

Sample code –

                OrganizationRequest customActionRequest =
                    new OrganizationRequest("SetAutoNumberSeed");

                // name of the entity
                customActionRequest["EntityName"] = "contact";

                // attribute's schema name
                customActionRequest["AttributeName"] = "cr59f_myautonumber";

                // the value we want to set
                customActionRequest["Value"] = Convert.ToInt64(888);

                OrganizationResponse customActionResponse = 
                    svc.Execute(customActionRequest);

Check other posts –

https://powerobjects.com/tips-and-tricks/auto-number-d365-version-9/

Hope it helps..

Advertisements