How to – Authenticate Domain in Dynamics 365 Marketing


Domain authentication is required for marketing email messages and for hosting the marketing form externally. Authentication of the email domain confirms that you have been approved by the organization to send messages on their behalf, this also increases the deliverability of the email. And in the case of an externally embedded form, domain authentication establishes that you own the domain, which is also required for the pre-filling of the form to work.

Best practices for email marketing

When Marketing is installed, we can see a default pre-authenticated domain (ending in – dyn365mktg.com) already added. We can use it for testing and demo purpose.

Here using Test send we are sending an email that uses the from address using the pre-authenticated default domain.

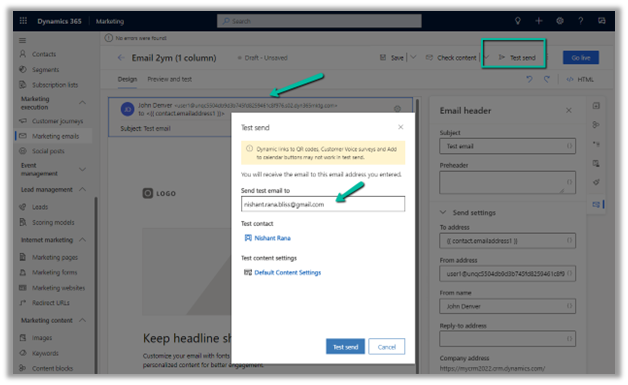
We can see the email received from marketing.

Now let us add a new domain record and authenticate/configure it for both External Form Hosting and Email Sending.

Navigate to Settings >> Email marketing >> Domains and create a new record.

Enter the domain name and check both the enable form hosting and email options.

If we uncheck Enable email sending, we will be only presented with the option of Verify ownership.

Click on Add will take us to the next screen having the TXT type DNS record/ownership key to be added to the DNS provider’s portal.

Clicking on Next will take us to the CNAME DNS records details, to be added to the DNS Zone

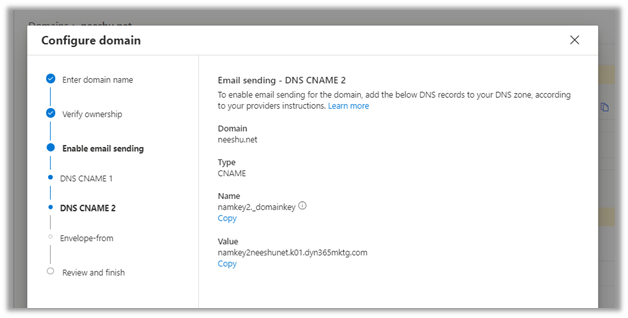
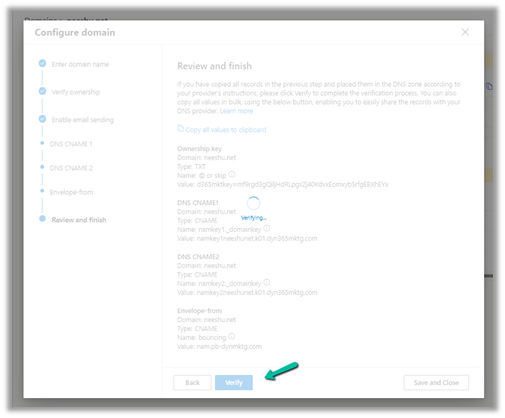
In the last step, we are again presented with all the DNS records to be placed in the DNS zone, along with the option to Verify or Save and Close the record for later verification.

Let us add these DNS records in our DNS Zone (here we are using Azure DNS Zone, the process would be similar in case of another DNS provider/ Site) and click on Verify.

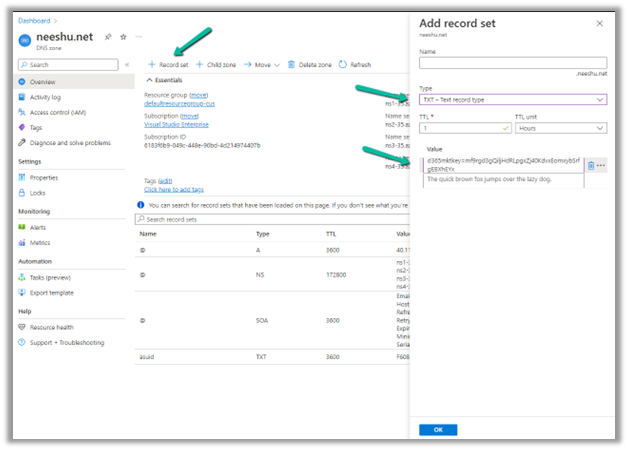
Similarly, add the remaining DNS records.

With all the DNS records added, let us click on Verify-in Configure Domain wizard.

Here we can also Save and close the configure domain wizard and do the verification later by opening the record created.

On successful verification –

Here we have successfully configured the domain as shown by confirmed and verified status.

Read more about it here

Authenticate your domains

Real-time marketing domain authentication

And to learn more about Dynamics 365 Marketing  – https://meganvwalker.com/category/dynamics-marketing/ 

Hope it helps..

Advertisements

How to – configure website tracking in Dynamics 365 Marketing


We can create a website record in Dynamics 365 Marketing to trace visitors to the website.

To setup Dynamics 365 Marketing (trial) – https://nishantrana.me/2021/11/13/step-by-step-configure-dynamics-365-marketing-in-a-dataverse-environment

Navigate to Outbound marketing >> Internet Marketing >> Marketing websites and create a new marketing website record.

Marketing will record closely grouped visits from a single browser as a single session. A new session will start after the timeout specified period of inactivity – 20 min is the default.

On saving the record, JavaScript Code and Form capture code is generated. The URL field and Description are for entering details for the website record for our use, it doesn’t affect the codes generated.

JavaScript code can be added to any page that we want to track. We can reuse the same code across multiple pages or can have different website records (code) for each page as per our requirements. JavaScript uses cookies for tracking, the users will remain anonymous till they register themselves through the landing page.

Form capture code is used when we want to integrate with a form created externally. We will look at it in later posts when we discuss marketing forms.

Below we have added the JavaScript code to one of the HTML pages inside Visual Studio.

Let us open the page in the browser.

Go to Insights >> Visits in the marketing website record, we can see the visits being tracked.

Now we have published the page in the Azure App Service, just to see what details are captured this time.

This time we can see it tracking the Page Address, unlike last time when we were running it locally.

If the user has registered through the landing page (through marketing form submission, which we’d cover in the next post), we will get more details about the visitor as shown below.

Within the overview section, we can get a few more details as shown below.

Hope it helps..

Advertisements

How to – configure Outbound Calling – Dynamics 365 Omnichannel for Customer Service


For setting up Outbound calling we need to first set up a phone number that will be used for outbound calling.

This would help – https://nishantrana.me/2022/10/17/how-to-set-up-omnichannel-voice-using-azure-communication-service-acs/

In a nutshell below are the steps we are going to perform –

  1. Configure Phone Number for outbound calling.
  2. Define a queue of type voice for outbound calling or use an existing queue.
  3. Configure outbound capacity profile and add users.
  4. Create an outbound profile using the phone number, queue, and outbound capacity profile.

Next click on Edit for the phone number added.

Select Make calls for the phone number and save the changes (if not already done) for enabling outbound calling.

Next select Setup for the phone number.

Select Create a profile to create an outbound profile. For agents to make an outbound call they must be assigned or added to an outbound capacity profile.

https://learn.microsoft.com/en-gb/dynamics365/customer-service/configure-outbound-inbound-profiles

For each phone number, we need to define an outbound profile.

Clicking on Create profile will take us to the page for creating the new outbound profile. We can also navigate there directly through – Advanced Settings >> Agent Experience >> Outbound and Inbound Profile >> Manage


Before we can create a
new outbound profile, we need to have Queue and Capacity Profile in place.

Here we have a Queue named Default Voice Queue of type Voice created and a user added to it.


For creating a Capacity profile, navigate to User Attributes >> Capacity Profile >> Manage


Here we have a capacity profile named – Default voice outbound with the users added to it.


With the Phone Number, Voice Type – Queue, and Capacity Profile defined, let us now create the new outbound profile.

Navigate to – Advanced Settings >> Agent Experience >> Outbound and Inbound Profile >> Manage

Select + New profile

Specify the Profile name and Profile type as Outbound.

Add the phone number and specify the Outbound
info required.

Specify Outbound behaviours

Click on Next and check the details in the summary and Save and close to create the outbound profile record.

Now with the configuration done, agents can make calls by clicking the Launch
Dialer.

Or from the Mobile Phone field, they can click on the Phone icon.

It launches the Dialer, with the phone number populated.

Lastly, we can also assign a Phone Number to a user, which allows him to make calls using that number. (toll-free numbers cannot be assigned)

https://learn.microsoft.com/en-us/dynamics365/customer-service/voice-channel-outbound-calling?tabs=omnichanneladmincenter#assign-personal-phone-numbers-to-agents

https://learn.microsoft.com/en-us/dynamics365/customer-service/voice-channel-outbound-calling?tabs=omnichanneladmincenter

With all the proper configurations in place, we were able to make an outbound call using the phone number configured as shown below.

Please check – https://neilparkhurst.com/2022/04/05/omnichannel-for-customer-service-outbound-voice-calling/

https://learn.microsoft.com/en-us/dynamics365/customer-service/voice-channel-outbound-calling?tabs=customerserviceadmincenter

Hope it helps..

Advertisements

How to – quickly find Tenant Id https://www.whatismytenantid.com/


Recently we had to find the tenant id, usually, we will log in to Azure Portal and within Azure Active Directory we will get the tenant id.

However, in this case, we only had the user’s email address.

So we had https://www.whatismytenantid.com/ to help us here.

Just enter the domain name, and click on Find my tenant ID.

The result –

The corresponding PowerShell script – https://craigporteous.com/azure-tenant-id-powershell/

Hope it helps..

Advertisements

Fixed – The reference assemblies for. NETFramework,Version=v4.6.2 were not found. To resolve this, install the Developer Pack (SDK/Targeting Pack) for this framework version or retarget your application


Recently while trying to use the Power Platform Toolshttps://learn.microsoft.com/en-us/power-apps/developer/data-platform/tools/devtools-install , got the below error in Visual Studio 2019. (not supported for VS 2022)


To fix it either you can, open Visual Studio Installer and select Modify and select the appropriate developer pack.


Or as specified in the error message, open https://aka.ms/msbuild/developerpacks, and download the appropriate Developer pack from there.


This fixed the issue –


Hope it helps..

Advertisements

Workstreams Overview – part 1 – Dynamics 365 Customer Service / Omnichannel


Workstreams can be defined as records or settings, where we can set up the channel, and define routing rules, work distribution, and bots to route work items to the appropriate queue/agents.

Workstream can be of 3 different types – Messaging, Record, and Voice.

For Messaging we can specify the below channels – Apple messages for business, Chat, Custom, Facebook, Google’s Business Messages, LINE, SMS, Twitter, WeChat, and WhatsApp.

  • For Messaging Type as Channel, we can specify Work Distribution Mode as either Push or Pick.

We also need to specify a Fallback Queue, this Queue will be used if no matching queues are found based on the routing rules.

In the case of the Chat channel, we have the option of making chats persistent, so any new messages from the customer will be routed to the same queue and same agent if available or the next best agent.

For all other channel types, we have the same Work Distribution mode and Fallback queue option.

  • For the workstream type as Record, we can select the entities with queues enabled. The remaining option of work distribution mode and fallback queue remains the same.

For the record routing to work, we need to make sure Unified Routing is switched on in the environment.

And the entity is enabled for record routing.

  • For the workstream type as Voice, we have the voice channel selected as default and disabled.

The only difference is in the distribution mode, where we do not have the option of Pick.

In a nutshell –

Workstream Type 

Channel 

Additional Information 

Messaging 

Apple Message for Business, Chat, Custom, Facebook, Google’s Business Messages, LINE, Microsoft Teams, SMS, Twitter, WeChat, WhatsApp 

For Chat, we have an additional option to make chats persistent.

https://learn.microsoft.com/en-us/dynamics365/customer-service/persistent-chat

Push and Pick – Work distribution mode. 

Record 

Entities With Queue and Record Routing enabled

Push and Pick – Work distribution mode 

Voice 

Voice Call (default / disabled) 

Only Push distribution mode. 

In coming blog posts we’d delve deep into the workstreams configuration.

Hope it helps..

Advertisements