Data Migration – Optimum batch size and threads for maximum throughput – Microsoft Dataverse (Dynamics 365)


For one of our projects, we were trying to figure out the optimum batch size and threads while using the CDS/CRM Destination component of KingswaySoft.

https://www.kingswaysoft.com/products/ssis-integration-toolkit-for-microsoft-dynamics-365/help-manual/crm/destination

Now with Service Protection API limits in place, to get the maximum throughput the first point to consider is User Multiplexing.

Nicely explained here à

https://powerplatform.se/fast-data-management-in-a-limited-cds-world/

We are using the Conditional Split component to divide the load among the different CDS Destination Components which are running under different application users (using different CDS Connection Manager)

In the below data flow, we have 5 different CDS Destination components, each using a different Connection Manager configured using different users.

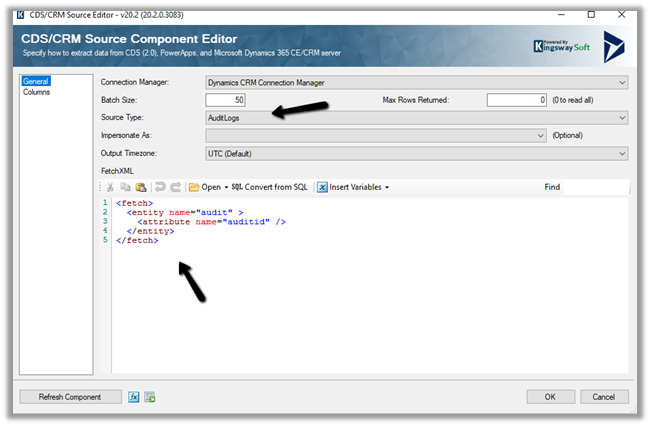
Here we took 50000 records as a sample for ContactCreate operation with 3 and 5
CDS Destination Component.

Below were our findings à

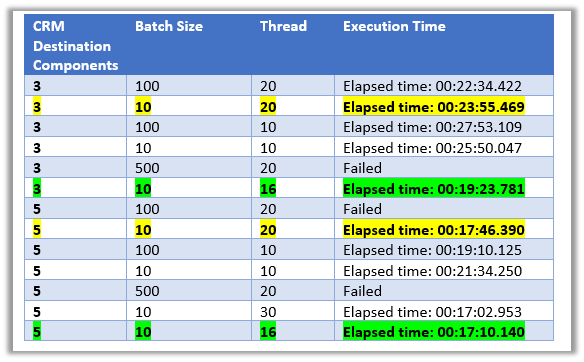
As suggested in the article, batch size as 10 and thread as 16 seem to give the best performance.

The trick is here to use as many threads as possible running under different users.

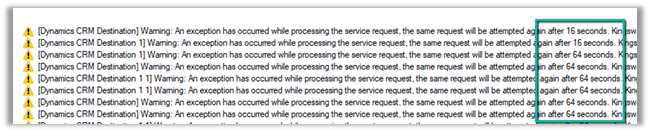
The CDS Destination component of KingswaySoft handles the server-side throttling automatically, it will follow the instruction and wait before trying again the same request.

On trying with 500 as the batch size, we got the error.

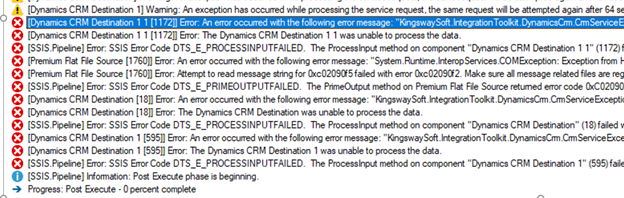
[Dynamics CRM Destination [18]] Error: An error occurred with the following error message: KingswaySoft.IntegrationToolkit.DynamicsCrm.CrmServiceException: CRM service call returned an error: The operation has timed out (Error Type / Reason: Timeout, Detailed Message: The operation has timed out) (SSIS Integration Toolkit for Microsoft Dynamics 365, v20.2.0.3083 – DtsDebugHost, 15.0.2000.128)KingswaySoft.IntegrationToolkit.DynamicsCrm.WebAPI.WebApiServiceException : The operation has timed out (Error Type / Reason: Timeout, Detailed Message: The operation has timed out)System.Net.WebException (Status Reason: Timeout): The operation has timed out”.

So basically try out the different combinations to get the maximum throughput.

Also check à

https://www.kingswaysoft.com/products/ssis-integration-toolkit-for-microsoft-dynamics-365/help-manual/crm/destination

I think below will still be relevant but for CRM On-Premise

https://nishantrana.me/2018/12/19/optimum-batch-size-and-thread-while-deleting-records-using-ssis-integration-toolkit-for-microsoft-dynamics-365/

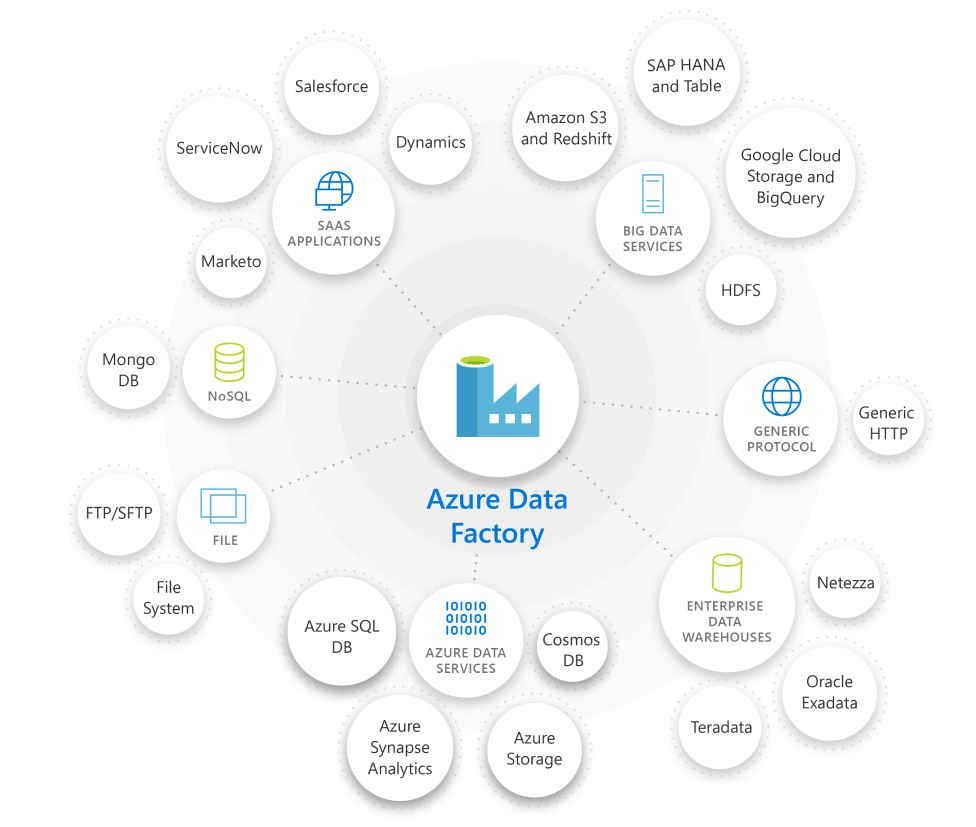
Batch Size and Copy of Paralleism for Azure Data Factory and Microsoft Dataverse

https://nishantrana.me/2021/05/25/write-batch-size-data-integration-unit-and-degree-of-copy-parallelism-in-azure-data-factory-for-dynamics-crm-365-dataset/

More articles on KingswaySoft and Dynamics 365 / Dataverse

https://nishantrana.me/2018/11/26/ssis-and-microsoft-dynamics-365/

Hope it helps..

Advertisements

How to – Enable Notification in Model-Driven App (Dynamics 365)


By making use of appsetting and settingdefinition table, we can enable notifications in the Model-Driven App. (not sure if it is documented somewhere / or supported way) – so try in a trial environment.

I think the supported way is through customization.xml 

https://docs.microsoft.com/en-us/powerapps/developer/model-driven-apps/clientapi/reference/events/form-onsave#enable-async-onsave-using-app-setting

Thanks to the below post and tweets by Mehdi EL Amri, which describes the steps to be followed.

https://xrmtricks.com/2021/05/26/a-glance-of-the-onload-event-on-a-model-driven-app-form-async-onload-event/

Basically, we need to add a new record inside appsetting table which will have reference to the settingdefinitionid of that particular setting (Alert notification early access) inside settingdefinition table along with id of the app to which we want it to be associated.

  • Let us get the settingdefinitionid for Allow notification early access.

  • App Id for the Sales Hub.

  • Here we are creating a new record through a console application

  • parentappmoduleid – appid of the model driven app
  • settingdefinitionid – id of the specific setting
  • uniquename – name
  • value – set as true

Now let us create a flow on the creation of contact which will send the notification. (create the notification record)

On creating the contact record, we can see the notification inside our Sales Hub.

Settings allow us to enable/disable toasts and set the toast duration as shown below

Hope it helps..


Advertisements

Azure Synapse Link / Export to Data Lake Service – Performance (initial sync)


Recently we configured the Export to Data Lake service for one of our projects.

Just sharing the performance, we got during the initial sync.

Entity

Count

Contact

2,36,2581

Custom entity

1,61,3554

The sync started at 11:47 A.M and was completed around 4:50 P.M. – around 5 hours i.e. 300 minutes

Let us consider total records synced as 3975000 – 1613446 + 2362581 + 2 = 3976029.

So the performance here comes down to

  • 795000 records per hour
  • 13250 records per minutes
  • 220 records per second.

Of course, it will vary depending on the specific environment, table / entity type, attributes in it etc. it gives us a rough idea.

Hope it helps..

Advertisements

Advanced configuration settings – Azure Synapse Link / Export to Data Lake service (Dataverse/ Dynamics 365)


The Export to Data Lake service now has some Advanced configuration settings available.

To learn more on Export to Data Lake service

https://nishantrana.me/2020/12/10/posts-on-azure-data-lake/

The new settings allow us to configure how the DataVerse / CRM table data is written to Azure Data Lake.

  • In-Place update or upsert (default)
  • Append Only

With the in-place update, the default setting, the file will contain the full data set, and any update in the source will update the same in the synced CSV file or the data partition, similarly, any record deleted will delete the row from the data partition, unlike Append Only where a new row will be added in case of both update and delete.

For huge volume of data, Microsoft recommends opting for Append only mode. This mode is also preferable when an organization wants to incrementally review the changed data.

The other option is to define the data partition strategy.

  • By Month (default)
  • By Year

With this option, files generated are partitioned by either year or more granular month-wise, which can be specified per-table basis.

Microsoft recommends Monthly partition if data volume is high.

Now, let us see it in action.

For the Lead table, we haven’t selected the option for advanced configuration settings and are going by default.

  • Append Only – No
  • Partition Strategy – Month

For contact, we have enabled the advanced configuration settings and opted for Partition Strategy as Year.

For Account , we have opted for Append Only as true, for which the Partition strategy option is disabled and set as Year.

The final configuration à

Within the container inside the Storage Account, we can see corresponding folders created per table/entity along with model.json as shown below.

Let us explore the Lead folder –

We can see 2 CSV created with format YYYY-MM.csv i.e. having the month part in it because we had specified Partition Strategy as Month i.e. the default value.

For Contact and Account, the Pattern Strategy was Year, so we have files generated in format YYYY.csv

Let us update one of the lead records by appending ‘Updated’ in the last name field.

After the successful sync,

we can see the record updated in the .csv / partition.

The same is the case with the contact record.

Now let us update an account record, it had Append Only specified as Yes.

Here we update the Account Name field from Litware to Litware Updated.

After the sync

We can see a new row appended with the updated record along with the original record.

Let us delete the same account record

As expected, being Append Only mode, we can see a new row added for the Litware record.

We have 2 additional rows apart from the original row, one created for update and the other for delete action.

Export to Data Lake service is Microsoft’s recommended way of synchronizing Dataverse Data with external storage, and we can see them continuously investing and adding enhancements to it.

Get all the details here –

https://docs.microsoft.com/en-us/powerapps/maker/data-platform/export-to-data-lake#data-partition-strategy

Hope it helps..

Retrieving security role privileges changes (audit) using KingswaySoft’s Dynamics 365 SSIS Integration Toolkit


We can specify Source Type as AuditLogs within the CDS Source Component Editor of KingswaySoft to fetch the Audit information.

Get the details :- https://nishantrana.me/2018/10/08/using-kingswaysofts-cds-crm-source-component-to-get-audit-information-in-dynamics-365-ce-ssis/

The Souce TypeAuditLogs includes Output type – Audit Details (Role Privileges), which can be used to fetch any audit information related to security roles.

Audit Details (Role Privileges) contains 4 columns, which we have mapped to columns in excel.

  • AuditId
  • OldRolePrivileges
  • NewRolePrivileges
  • InvalidRolePrivileges

Let us execute the package

The output à

Here, the 1st row is when a new security role was created, the 2nd row is when an existing security role was updated and 3rd row is when a security role was deleted.

To get the complete information we need to combine this information (id which is auditid – first column) with the Primary output.

The columns of the Primary Output

After mapping, let us run the package with the Primary Output type.

Here below we can see the complete details by combining both the output using the auditid column

Note – to get the Audit Details (Role Privileges), we need to use SOAP – Service End Point type.

Also refer –

http://mscrmshop.blogspot.com/2016/06/auditing-security-roles-in-crm.html

http://www.kingswaysoft.com/blog/2019/10/16/Extracting-Audit-Logs-for-Multiple-CRM-Entities

https://nishantrana.me/2018/11/26/ssis-and-microsoft-dynamics-365/

https://community.dynamics.com/crm/b/mscrmcustomization/posts/ms-crm-audit-database-table-details

Hope it helps..

Advertisements

Write batch size, data integration unit, and degree of copy parallelism in Azure Data Factory for Dynamics CRM / 365 Dataset


Let us take a simple example where we are moving contact records (.CSV) stored in Azure File Share to Dataverse or Dynamics 365 (UPSERT).

CSV file has 50000 sample contact records (generated using https://extendsclass.com/csv-generator.html) stored in Azure File Storage.

Another option of generating sample data

https://nishantrana.me/2020/05/26/using-data-spawner-component-ssis-to-generate-sample-data-in-dynamics-365/

The Source in our Data Factory pipeline.

The Sink is our Dynamics 365 / Dataverse sandbox environment, here we are using the Upsert write behavior.

For the Sink, the default Write batch size is 10.

Max concurrent connections specify the upper limit of concurrent connections that can be specified.

Below is our Mapping configuration

The Settings tab for the pipeline, allows us to specify,

Data Integration Unit specifies is the powerfulness of the copy execution.

Degree of copy parallelism specifies the parallel thread to be used.

Let us run the pipeline with the default values.

  • Write Batch Size (Sink) – 10
  • Degree of copy parallelism – 10
  • Data integration unit – Auto (4)

The results à It took around 58 minutes to create 50K contact records.

We then ran the pipeline few more times by specifying the different batch sizes and degree of copy parallelism.

We kept Max concurrent connections as blank and Data Integration Unit as Auto. (during our testing even if we are setting it to higher values, the used DIUs value as always 4)

Below are the results we got à

Write Batch Size Degree of copy parallelism Data Integration Unit (Auto) Total Time (Minutes)
100 8 4 35
100 16 4 29
1000 32 4 35
       
250 8 4 35
250 16 4 25
250 32 4 55
       
500 8 4 38
500 16 4 29
500 32 4 28
       
750 8 4 37
750 16 4 25
750 32 4 17
       
999 8 4 36
999 16 4 30
999 32 4 20

The results show that increasing the batch size and degree of copy parallelism improves the performance in our scenario.

Ideally, we should run a few tests with different combinations before settling for a specific configuration as it could vary.

On trying to set the batch size to more than 1000,

We would get the below error à
ExecuteMultiple Request batch size exeeds the maximum batch size allowed.

Also refer –

Optimizing Data Migrationhttps://community.dynamics.com/crm/b/crminthefield/posts/optimizing-data-migration-integration-with-power-platform

Using Data Factory with Dynamics 365https://nishantrana.me/2020/10/21/posts-on-azure-data-factory/

Optimum batch size with SSIShttps://nishantrana.me/2018/06/04/optimum-batch-size-while-using-ssis-integration-toolkit-for-microsoft-dynamics-365/

Hope it helps..

Advertisements