Dataverse Custom API – Global and Entity (Binding Type) example


We can define the Custom API’s binding type as Global, Entity, or Entity Collection. In this post, we can see how a Global and Entity binding type Custom API can be defined, write a corresponding plugin, and then invoke/test through Postman.

We can create Custom API through Plugin Registration Tool, Power Apps, Code, Solution files, and or can use XrmToolBox Plugin – Custom API Manager.

Below we have defined a Custom API name custom_GlobalAPI, with binding type as Global and one Request (input) parameter and Response (output) Property of type string.

Below is how we define the plugin type for it and can access the input and output parameters through context.

To test it we can use the XrmToolBox Custom API Tester plugin as shown below

And from Postman, once we have the access token, we can call the Custom API as shown below.

Now for a Bound Custom API, we have the following definition. It is bound to the Contact table and has one input parameter and one output parameter similar to our Global Custom API.

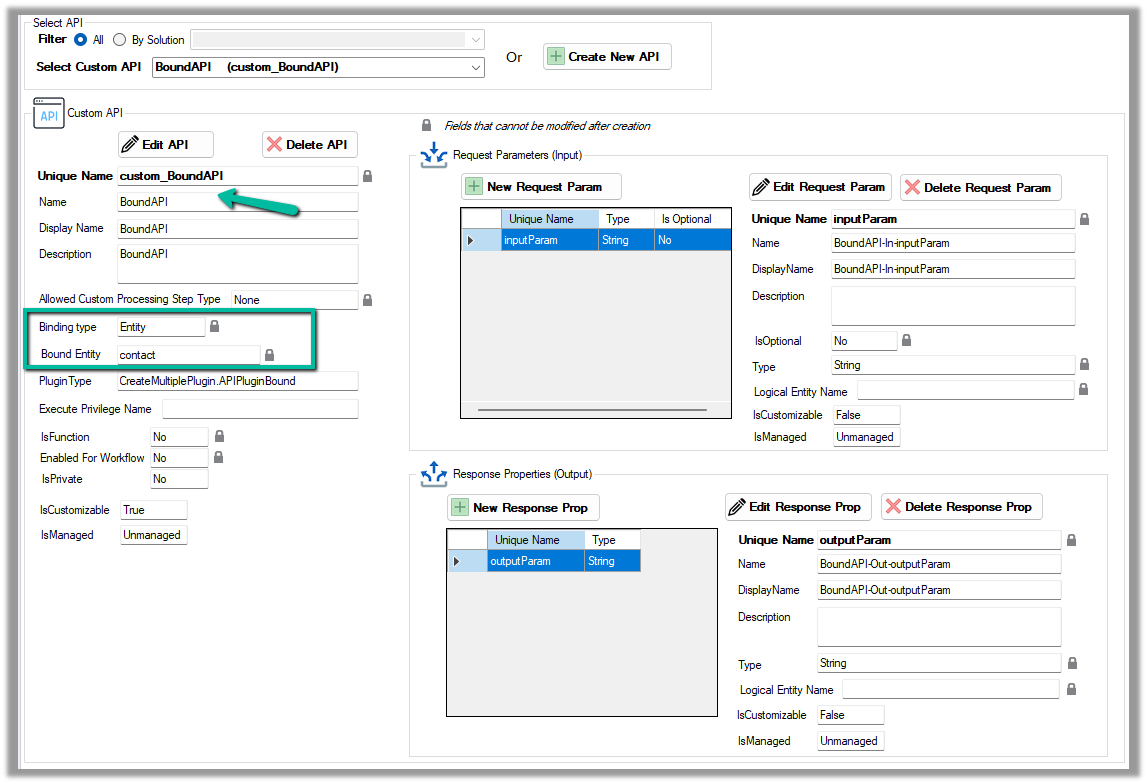
Below is how we define the plugin type for it, and can access the input and output parameters similar to Global Custom API.

However, in the case of binding type Entity, we will have the Request parameter named Target of type Entity Reference for the bound entity added automatically.

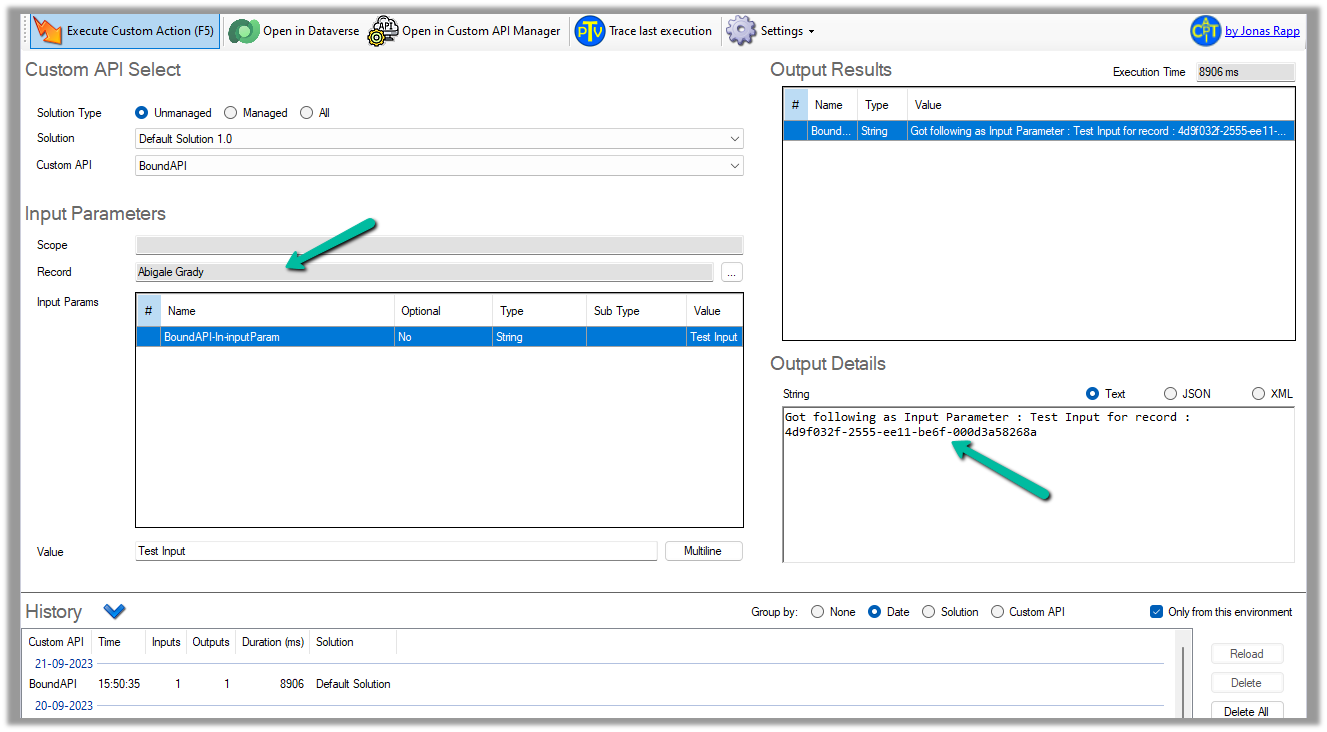
We can test it using the Custom API Tester plugin, however as it is bound type, we need to select/specify the contact record (the table it is bound to), before we can execute it.

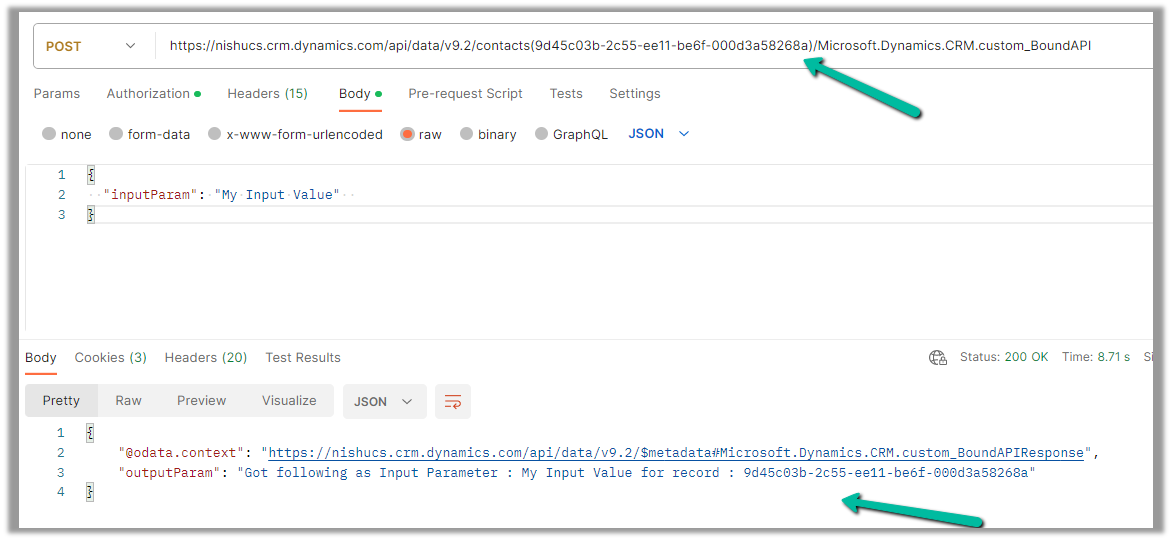
To call it from Postman, we need to use the fully qualified name i.e. Microsoft.Dynamics.CRM.[unique name of the Custom API] unlike Global one.

 public class APIPluginGlobal : IPlugin
    {
        public void Execute(IServiceProvider serviceProvider)
        {
            ITracingService tracingService = (ITracingService)serviceProvider.GetService(typeof(ITracingService));
            IPluginExecutionContext context = (IPluginExecutionContext)serviceProvider.GetService(typeof(IPluginExecutionContext));
            IOrganizationServiceFactory factory = (IOrganizationServiceFactory)serviceProvider.GetService(typeof(IOrganizationServiceFactory));
            IOrganizationService orgService = factory.CreateOrganizationService(context.UserId);

            try
            {
                tracingService.Trace("start plugin execution: {0}", this.GetType().FullName);

                // check for the message name i.e. Unique Name of the Custom API
                if (context.MessageName.Equals("custom_GlobalAPI", StringComparison.OrdinalIgnoreCase))
                {
                    // check for the request parameter in the inputparamters of the context 
                    if (context.InputParameters.Contains("inputParam"))
                    {
                        // get the value of the input parameter
                        string inputValue = context.InputParameters["inputParam"].ToString();
                        // set the value of response property through outputparameters 
                        context.OutputParameters["outputParam"] = "Got following value as Input : " + inputValue;
                    }
                }

                tracingService.Trace("end plugin execution: {0}", this.GetType().FullName);
            }
            catch (System.ServiceModel.FaultException<OrganizationServiceFault> ex)
            {
                tracingService.Trace(ex.Detail.Message);
                throw;
            }
            catch (Exception ex)
            {
                tracingService.Trace(ex.ToString());
                throw;
            }
        }
    }
public class APIPluginBound : IPlugin
    {
        public void Execute(IServiceProvider serviceProvider)
        {
            ITracingService tracingService = (ITracingService)serviceProvider.GetService(typeof(ITracingService));
            IPluginExecutionContext context = (IPluginExecutionContext)serviceProvider.GetService(typeof(IPluginExecutionContext));
            IOrganizationServiceFactory factory = (IOrganizationServiceFactory)serviceProvider.GetService(typeof(IOrganizationServiceFactory));
            IOrganizationService orgService = factory.CreateOrganizationService(context.UserId);

            try
            {
                tracingService.Trace("start plugin execution: {0}", this.GetType().FullName);

                // unique name of the custom api
                if (context.MessageName.Equals("custom_BoundAPI", StringComparison.OrdinalIgnoreCase))
                {
                    // Target property of type Entity Reference
                    if (context.InputParameters.Contains("Target") &&
                        context.InputParameters["Target"] is EntityReference)
                    {
                        var contact = (EntityReference)context.InputParameters["Target"];
                        // access the input request parameter
                        if (context.InputParameters.Contains("inputParam"))
                        {
                            string inputValue = context.InputParameters["inputParam"].ToString();
                            // set the output parameter value
                            context.OutputParameters["outputParam"] = "Got following as Input Parameter : " + inputValue
                                + " for record : " + contact.Id.ToString();
                        }
                    }
                }

                tracingService.Trace("end plugin execution: {0}", this.GetType().FullName);
            }
            catch (System.ServiceModel.FaultException<OrganizationServiceFault> ex)
            {
                tracingService.Trace(ex.Detail.Message);
                throw;
            }
            catch (Exception ex)
            {
                tracingService.Trace(ex.ToString());
                throw;
            }
        }
    }

Hope it helps..

Advertisements

Link and Create a case, contact, and account from a notes record in Timeline– Dynamics 365 / Dataverse


From the notes in the timeline, now we can link an existing note to an existing case, contact, or account record (this will unlink it from the current record) and also create either a new case, contact, or account record.

To configure it, open the Notes property of the Timeline section in the form.

Below we can see the different properties we can configure.

  • Enable the Link to Table Command
  • Enable the Tables to be connected.

Here we are enabling the Contact table, and then specfiying the Quick Create Form to be used while creating the new contact record, and also the mapping of the title and description field of the Notes. We have the same configuration for Case and Account.

Save and publish the changes.

We can now see the option to Link to record for the notes.

We get the option to search for an existing record (it will show results from tables connected).

Clicking on Advanced opens the lookup dialog.

On Associating to an existing record, the notes get linked to the new record and unlinked to the current record.

We can see the notes record associated with the contact record and removed from the existing case record.

We can also use the plus + sign to create new records of the tables connected from the notes.

Account, Case, and Contact in this case.

This opens the Quick Create form, with the title and description field of the notes mapped.

After the new record gets created, we are again presented with the option to Unlink that existing note from the current record.

Below we can see the new record with the note associated with it.

Get all the details here

Hope it helps..

Advertisements

How to – Permanently delete users in the Power Platform (Dataverse / Dynamics 365)


To delete the user from Power Platform, we need to enable the following feature – Delete disabled users.

Before enabling this feature we can see the following Views for the Users.

After enabling Delete disabled users, we can see 2 new views added,

  • Users not in Microsoft Entra ID but exist in the environment.
  • Users not in Microsoft Entra ID and soft deleted in the environment.

Also currently we can see 3 users (enabled) in the environment.

Now let us delete the test 1 user from the Microsoft 365 Admin Center.

The deleted user and its data can be restored up to 30 days (soft delete)

Inside Power Platform Admin Center, we can see the user account being disabled (and soft delete state in AD)

If we try to delete the record, we will get the below error that use is present in AD in the state SoftDeleted. Please permanently delete the user in Azure first.

Let us permanently delete the user in Azure AD.

Login to Azure Portal or Microsoft Entra admin center, select Users
>> Deleted Users

Select the user (deleted) and click on Delete Permanently.

On Refreshing the user, we get the message that the user does not exist in the AD, and also user record is now moved to the “Users not in Microsoft Entra ID but exist in the environment” view.

Let us try deleting the user record from CRM now.

This time user records get deleted (soft delete) successfully.

Within the Power Platform Admin Center, we can see the user record moved to “Users not in Microsoft Entra ID and soft deleted in the environment”

Similar to Azure Active Directory or Microsoft Entra, now we get the option to permanently delete users from the Power Platform Admin Center after soft delete.

Get all the details here

Hope it helps..

Advertisements

ERROR REQUESTING Token FROM THE Authentication context – General ADAL Error (Dataverse / Dynamics 365)


We might get the below error while connecting to the Dataverse Web API using the client ID and client secret.

AADSTS700016: Application with identifier ‘6d8ff73a-27ef-443c-b524-d8b69ae87580’ was not found in the directory ‘w72tk’. This can happen if the application has not been installed by the administrator of the tenant or consented to by any user in the tenant. You may have sent your authentication request to the wrong tenant.

This could be if we have specified wrong Client or App Id.

Check the correct App Id either from Azure you can also refer to the correponding Application User created for it.

Hope it helps..

Advertisements

Use Copilot to create a journey – Dynamics 365 Marketing


We can make use of Copilot to create a journey for us, using everyday conversational language.

To enable it, navigate to

Settings >> Overview >> Feature Switches >> Journey (Copilot)

Let us see it in action, by creating a new journey record.

We get the option to select predefined
examples to start with.

Here we have selected the last example “When a contact submits a marketing form, assign a phone call….”

On selecting it, we are presented with the option to specify the Trigger.


We have selected the existing Marketing Form Submitted trigger record here.

After specifying the trigger, we get the option to specify the marketing form or to leave it empty to run it for all the form submissions and also the audience type, which could be either Contact or Lead.

Clicking on Submit gives the option to review and then eventually Create Journey.

Clicking on Create Journey generates the journey for us.

We can review the journey, add any further content required, modify it, etc.

For example, we need to specify the follow-up email to be sent, before we can save and publish it.

Once we are done with defining the journey, we can publish it.

Get more details here.

Hope it helps..

Advertisements

Using xMultiple along with User Multiplexing for improved performance – KingswaySoft SSIS Integration Toolkit (Dataverse / Dynamics 365)


Let us continue our previous post, where we observed performance improvements by using User Multiplexing

Now let us try making use of the xMultiple feature (CreateMultiple, UpdateMultiple, and CreateMultiple messages) of the CRM / CDS Destination Component.

We have updated the Batch Size to 100 to trigger the xMultiple

However this time we got the service throttling error, and it took around 17:45 minutes.

Let us try decreasing the batch size to 50 (to trigger xMultiple), keeping the thread the same as 20, and User Multiplexing with 5 Application users.

No throttling warning this time and took around 10:42 minutes.

Now let us try the same setup, for a custom table instead of a standard table.

Here we have run our package to create 20K records, with User
Multiplexing ( 5 Application users), Batch Size 10, and 20 Threads for our custom table named My Table.

It took around 3:04 minutes.

Let us increase the batch size to 100, to get the xMultiple enabled.

It took 1:06 minutes.

Let us set the batch size to 500

It took around 42 seconds.

And with 1000 batch size – 1:04 seconds

We can see huge performance improvements using xMultiple when it comes to a custom table.

So I think to get the performance improvements for the standard table we could stick with Batch Size – 10, Thread10-20, and increase the number of users (Multiplexing).

But for the custom table, we could increase the batch size to either 100 or 500 to make use of xMultiple along with Multiplexing.

Hope it helps.

Advertisements