How to – Enable inbox for agents in Dynamics 365 Customer Service Workspace / Omnichannel


Inbox view in the agent workspace allows agents to quickly perform a preliminary assessment of the service requests coming from different channels for a timely response. Agents can view cases, conversations, and activities assigned in the inbox tab.

To enable inbox for the agents, inside the Customer Service admin center

Navigate to Agent Experience >> Workspaces >> Agent Experience profiles >> Manage


We can create new profiles or can add users to any of the existing profile that has inbox enabled

E.g. Customer Service Trial profile has the inbox enabled.

Below is the agent experience profile record, that doesn’t have inbox enabled.

Let us add one of the users to the below profile.

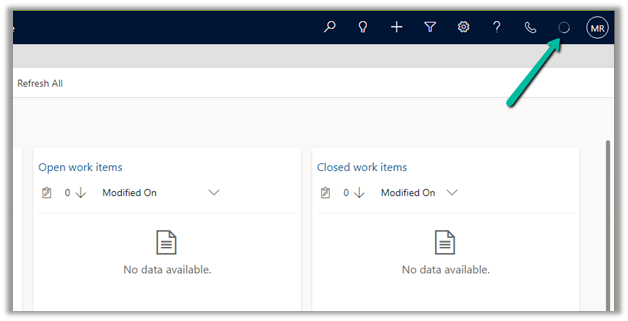
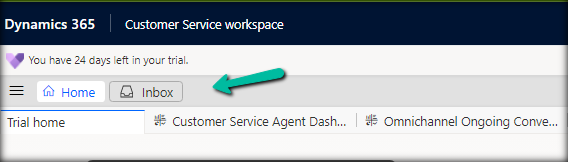
The Customer Service workspace before the user’s inbox is enabled. We can only see the Home tab.

After adding the user to the profile.

The agent can see the Inbox tab.

The agents can see the views configured in the profile inside the inbox tab.

Read more about Configuring the Inbox

To learn more about Voicemail- https://neilparkhurst.com/2022/11/08/omnichannel-for-customer-service-voicemail/

Hope it helps.

Advertisements

Manage Custom Presence – Dynamics 365 Customer Service (Omnichannel)


To manage presences, navigate to Customer Service Admin Center >> Agent Experience >> Productivity >> Custom Presence

Out of the box we have the following presences.

Only the below presences will be available for the agents to select.

The inactive and offline statuses will be automatically set by the system.

Although we can deactivate the presence, that doesn’t remove it for the agents.

The agents can still see all the presence statuses.

We cannot delete the default presence; we will get the below error if we try to delete them.

We can edit the Presence text for the default presence.

For the agent –

We can create custom presences that are based on the existing base status.

For the agents –


Unlike default presence, we can delete the custom presence status.

Hope it helps..

Advertisements

How to – enable marketing interactions in lead and contact timeline – Dynamics 365 Marketing


To view marketing interactions, we need to add a custom connector to the timeline of the lead and the contact form. This step is only required if we are using custom forms and not the out-the-box marketing forms for lead and contact.

The OOB Form already has this connector defined.

Open the form for customization, select the timeline control, scroll down to Advanced >> Additional Settings >> Custom connectors, and click on Add connector.

Specify Constructor and Resource Path and save the record.

  • Constructor: msdynmkt_DynamicsMktTimelineInteractionAnalytics.TimelineInteractionAnalyticsResource
  • Resource path: msdynmkt_DynamicsMktTimelineInteractionAnalytics

Save the form and publish it.

We can see the marketing interactions being displayed in the timeline.

Hope it helps..

Advertisements

Use Command checker (ribbondebug=true) to identify the Ribbon Customizations Issue – Dataverse / Dynamics 365


Appending ribbondebug=true to the record’s URL adds the new Command checker button in the command bar, which could help us in troubleshooting any unexpected behavior with ribbon.

More on this – https://powerapps.microsoft.com/en-us/blog/introducing-command-checker-for-model-app-ribbons/

Recently we added one enable rule to an existing button (Go Live) in the Customer Journey table. The rule was calling a JavaScript web resource based on the security role assigned to the user hiding or showing the button on the form.

Click on the Command checker to open the window on the side pane, where we can then select our button.

In the command properties tab, we can see our custom enable rule showing an error.

Also here clicking in View rule definition solution layers provides us the detail that this rule has been added as part of an unmanaged layer.

Clicking on the Unmanaged layer further provides us with the definition of the enable rule.

Going back to the error, we figured out that the function was missing from the web resource, and adding the function fixed the issue for us.

Back in the Command checker, we can see the custom Enable Rule getting evaluated correctly.

Check the Troubleshooting Guide

Hope it helps..

Advertisements

Solved – Presence not loading in Omnichannel for Customer Service / Customer Service workspace


Recently in one of the environments, the presence was not loading for the agents.

To fix it, we had to update the Channel URL to point to the correct organization name.

Before –

https://oc-cdn-ocprod.azureedge.net/convcontrol/ChatControl.htm?uci=true&clientName=zfp&cloudType=Public&env=prod&ocBaseUrl=https://unq614e23c1ccc540f3a9bf2f80c99d9-crm.omnichannelengagementhub.com&ucilib=https://orged4e3d70.crm.dynamics.com/webresources/Widget/msdyn_ciLibrary.js

After –

https://oc-cdn-ocprod.azureedge.net/convcontrol/ChatControl.htm?uci=true&clientName=zfp&cloudType=Public&env=prod&ocBaseUrl=https://unq614e23c1ccc540f3a9bf2f80c99d9-crm.omnichannelengagementhub.com&ucilib=https://gcst.crm.dynamics.com/webresources/Widget/msdyn_ciLibrary.js

Verify the Unique Name used in ocBaseUrl and Orgname from Settings >> Customizations >> Developer Resources

On correcting the URL in the Omnichannel record (Channel Integration framework 2.0 Providers)– we can see the presence loading.

The cause for the issue was we had recently updated the environment’s URL from the Power Platform Admin Center.

Check for more details –

https://tinyurl.com/3488m6p2

The presence not loading.

Hope it helps..

Advertisements

Install Voice Channel in Omnichannel – Dynamics 365 Customer Service


Make sure all the prerequisites are in place –

https://learn.microsoft.com/en-us/dynamics365/customer-service/omnichannel-provision-license#prerequisites

Login to Power Platform Admin Center >> Environments

https://admin.powerplatform.microsoft.com/environments

Select Resources >> Dynamics 365 apps

Select Manage for Omnichannel for Customer Service – Telephony


It will open Dynamics 365 Administration Center | Omnichannel page

Click on Add environment

Select the required environment and click on Next.

If we do not have the required subscription for a particular channel we will get the below error

Next for Voice, select Add Voice along with Voice and Messaging preview terms.

Keep clicking on Next till confirmation (add other channels if required)

The confirmation page will show all the selections and details.

Clicking on Finish starts the installation process.

After around 1.5 -2 hours or so we could see the installation being successful.

If we want to add another channel e.g. SMS, select the SMS tab and save to start the process.

This starts the update

After an hour or so we see the status as installed for both Voice and SMS.

On opening the Customer Service Admin Center app, we can see the option of getting started with a voice demo.

Assign the account you are using the Omnichannel Agent and Omnichannel Admin role (even if you are a system administrator you need this role to start with the voice demo, admin to configure and agent to test)

It will create the workstreams, acquire a phone number, create a voice channel, power virtual agent, etc. for the demo

After around 2 minutes or so, we will have our voice demo setup done.

We can open the agent app which is either Omnichannel for Customer Service or Customer Service Workspace App and can call the phone number configured to test the application.

We can see the following workstreams created for Voice and Voicemail channels.

The demo telephony workstream 1 

The agent receiving the notification

*At times we have faced an issue when there is a bot configured, so in case you are facing any issues, try removing the bot from the workstream

Hope it helps..

Advertisements

Nishant Rana's Weblog

Everything related to Microsoft .NET Technology

Skip to content ↓