Manage and share views in Modern Advanced Find – Dataverse (Dynamics 365 / CRM)


Let us have a quick look at this new feature introduced as part of 2022 Release Wave 1.

Make sure we have updated the environment to 2022 Release Wave 1.

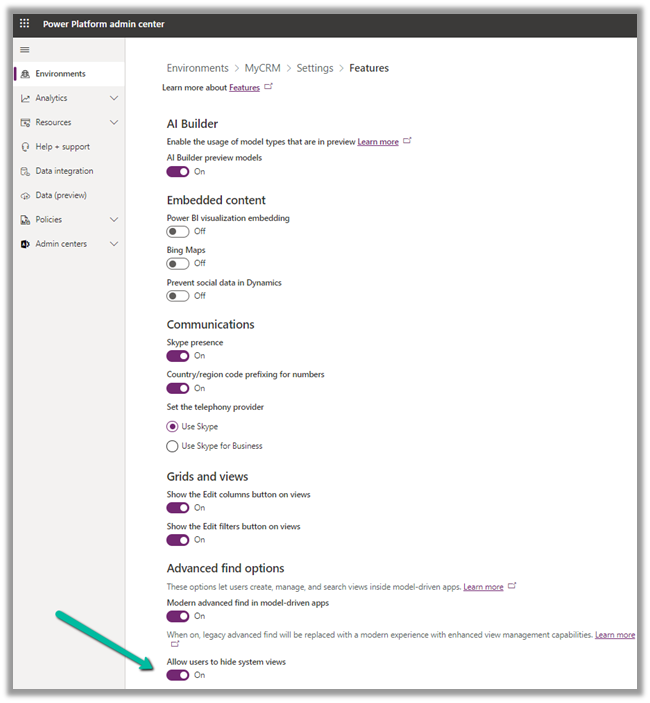
Then navigate to [Environment] >> Settings >> Features

Switch On – Modern Advanced Find and Allow users to hide system view 


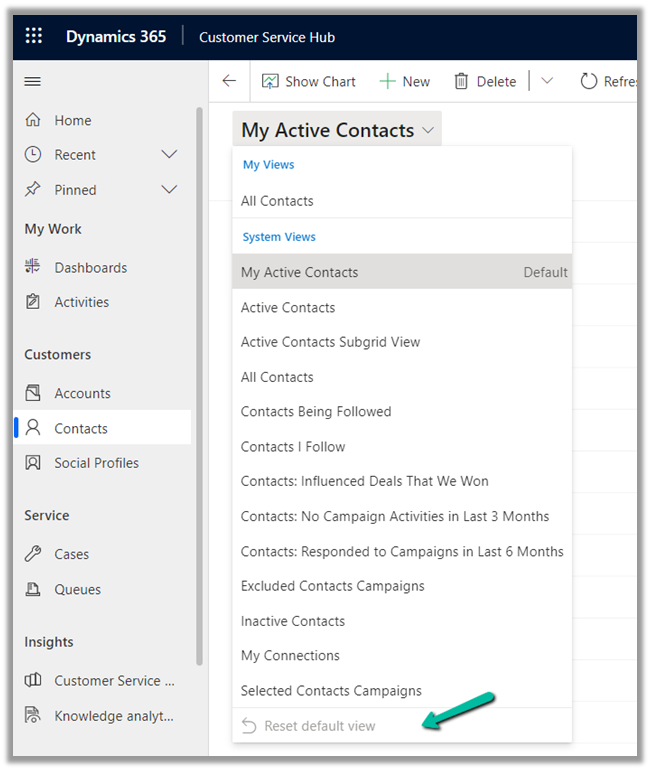
Reset Default View
is the only option available before we switch on the Modern Advanced find feature.


After enabling the Modern Advanced Find feature

We get the option to Search Views as well as Manage and share views


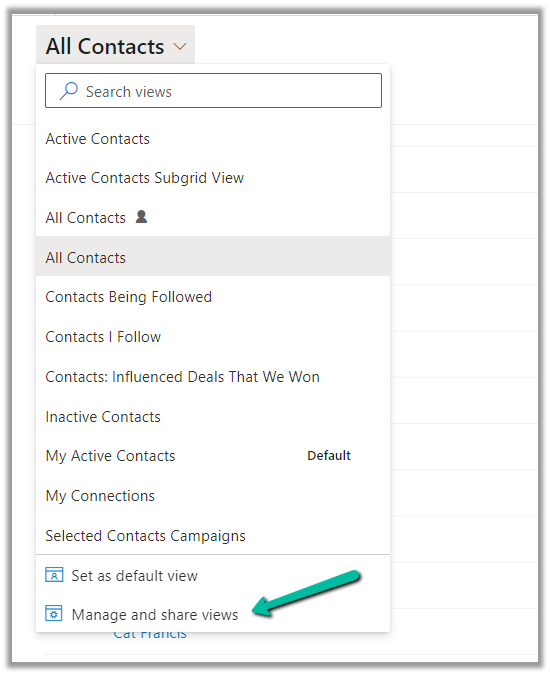
Search Views – It allows us to filter / search within the views.


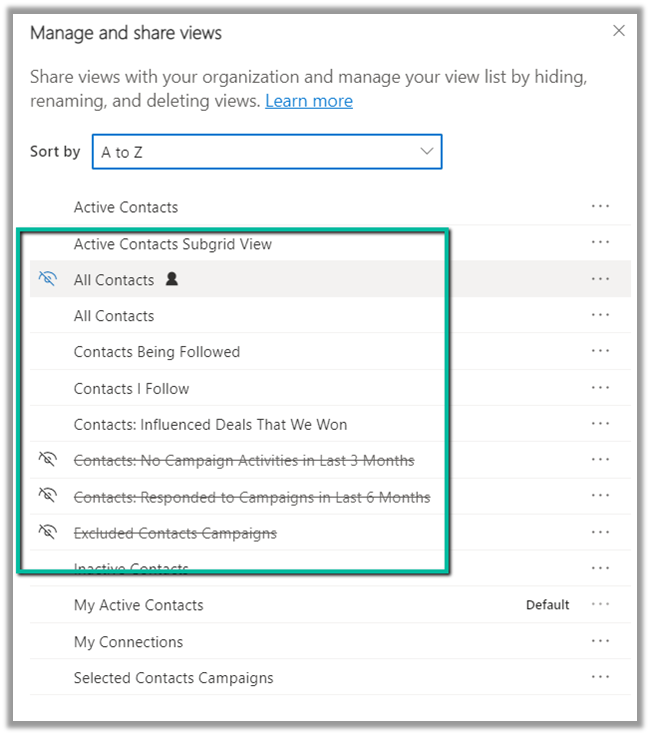
Manage and share views – It opens the dialog listing the views.


We can sort by

  • Personal before system, A to Z
  • System before personal, A to Z
  • A to Z


To hide a view we can select hover and select the option to hide.

With Allow users to hide system views  option switched on, the user has the option to hide system view also, else he could only hide the personal views.


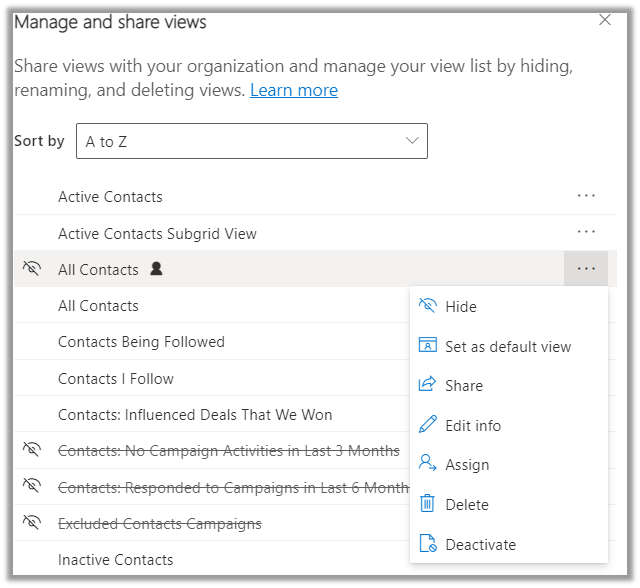
For System Views, we have the option to either Hide or Set as a default view.

For Personal Views, we have more options like 

Hide, Set as default view, Share etc. as shown below.

Learn everything about the new Modern Advanced Find View  – https://jukkaniiranen.com/2022/02/modern-advanced-find-test-drive/

https://powerapps.microsoft.com/en-us/blog/modern-advanced-find-with-enhanced-view-management-in-model-driven-apps/

Hope it helps..

Advertisements

How to – Use SetAutoNumberSeed Action to reset/update the seed for the Autonumber attribute – DataVerse (Dynamics 365 / CRM)


Suppose we have the following Autonumber field created with

Seed value1000 and Format{SEQNUM:4}

Now based on a certain requirement, we want to dynamically / programmatically update / reset the seed value.

For this, we can make use SetAutoNumberSeed Action

Below we can see the auto number set as 1007 on creating a new contact record.

Now to set it back to 1000 we can run the following code –

On executing the action, we can see the next contact record having autonumber field set as 1000.

Another example –

On updating the value to 888, and creating a new contact record

Sample code –

                OrganizationRequest customActionRequest =
                    new OrganizationRequest("SetAutoNumberSeed");

                // name of the entity
                customActionRequest["EntityName"] = "contact";

                // attribute's schema name
                customActionRequest["AttributeName"] = "cr59f_myautonumber";

                // the value we want to set
                customActionRequest["Value"] = Convert.ToInt64(888);

                OrganizationResponse customActionResponse = 
                    svc.Execute(customActionRequest);

Check other posts –

https://powerobjects.com/tips-and-tricks/auto-number-d365-version-9/

Hope it helps..

Advertisements

How to – Delete Audit data by entity / table, date, user access, and specify retention duration – updates in Dataverse (Dynamics 365 / CRM)


Recently we saw a new update in our sandbox environments with regards to Audits.

Login to Power Platform Admin Center, select an environment.

We can see a new section Auditing added.

Click on Delete logs allows us to –

  • Delete logs by Table

We can select the tables there.

  • Delete only access logs data.
  • Delete logs up to the selected date.

And now we can also manage or specify the retention duration for the audit log.

These are very useful updates to the Audit feature in the platform which more or less have been similar since CRM 3.0 days.

Check other posts on Audit – 

https://nishantrana.me/2021/08/31/audit-entity-table-few-key-points-dynamics-365-power-apps/

https://nishantrana.me/2021/05/17/how-to-export-the-audit-history-values-from-dynamics-365/

https://nishantrana.me/2018/10/08/using-kingswaysofts-cds-crm-source-component-to-get-audit-information-in-dynamics-365-ce-ssis/

How to – Use RetrieveAttributeChangeHistoryRequest to get audit data for an attribute (Dataverse/ Dynamics 365/ CRM) – Nishant Rana’s Weblog

Hope it helps..

Advertisements

How to – Import Data from Dataverse / CRM to Dynamics 365 Customer Insights


In the last post, we had set up the trial version of Dynamics 365 Customer Insights.

https://nishantrana.me/2022/01/26/how-to-set-up-dynamics-365-customer-insights-trial/

Currently, our trial instance has no data.

We can ingest data into Dynamics 365 Customer Insights from Microsoft Dataverse either using Microsoft Power Query (Dataverse Connector)

or Microsoft Dataverse import method.

The Microsoft Dataverse import method doesn’t copy the data into the Customer Insights / Audience Insights Data Lake, however, it doesn’t allow for Extract, Transform, Load (ETL) as in the case of Microsoft Power Query data source.

Select Audience Insights >> Data >> Data Sources >> Choose your import method – Microsoft Dataverse

Provide a name to the data source and click on Next.

Enter the Server address, Sign in, and click on Next.

Select the Entity, here we have selected the contact entity for now.

We can see the data source is being refreshed.

We have the option of stopping the refresh.

We are having 100 records in our contact entity inside CRM.

It took around 5 hours for the refresh to complete successfully.

We have the option of Edit, Refresh and Delete on the Data Source after the successful refresh.

We can see the contact entity available within Data >> Entities section

Clicking on contact, we can see the Attributes used and Data in it as well as the option to download the data.

The download will be downloading the first 100K records.

Now when it comes to creating a unified customer profile through (MMM) i.e. mapping, matching, and merging, it requires a minimum of 2 entities to be there, to generate the Customer Profile.

In the next post, we will import some sample contact data from a local excel file and use it for further configuring our customer profile.

How to – Import Data from local data files to Dynamics 365 Customer Insights

How to – Unify (Map, Match and Merge) Entities in Dynamics 365 Customer Insights

Hope it helps..

Advertisements

How to – Use Do until and Delay in Power Automate


Let us take a simple example to understand the usage of the Do unit with Delay control in Power Automate.

“When a Case Record’s Priority is updated to High until the case is resolved we want to perform certain action e.g. send a notification email or call an action etc. every 2 minutes or so.”

This is how the final flow looks like –

First is the trigger, when the case record is modified, i.e. priority code field with value as 1.

Next, initialize a Boolean type variable as false, this will be used within the Do until loop condition.

  • Next, add the Do until control with the condition – ConditionMet i.e. the variable is equal to true.
  • Followed by Delay action, here we have specified a 2-minute delay.
  • Next, we are retrieving the same record to check the condition, this is required to get the updated value within the loop.
  • Condition is – is the case resolved? i.e. Status is equal to 1.
  • If Yes then we are setting the variable as true to come out of the do until loop.
  • If No then we perform any action, like send an email notification, reminder or call any action, etc.

The Current Iteration Index of Do unit holds the value of the current index starting from 0. Here we are updating the case title with the index just for testing.

To see it in action, let us Test the flow.

Updating the priority of the case to high triggers the flow.

After a delay of 6 minutes, we can see the Case Title updated with the current index i.e. 2 as it has iterated 3 times starting from 0.

Let us now resolve the case.

We can see our flow successfully completed after the 4th iteration after the case is resolved.

Also refer –

https://techwizard.cloud/2018/05/20/microsoft-flow-mystery-of-do-until-loop/

https://www.futurelearn.com/info/courses/cloudswyft-msft-dynamics-365-power-platform-auto/0/steps/208142

Hope it helps.

Advertisements

Solved – Flow run timed out. Please try again in Power Automate (Microsoft Flow)


While testing one of the flows which was having “Do until” action in it, we ran across the below error.

Error – Flow run timed out. Please try again.

However, while navigating to the run history we can still see the flow running, and has run for over 30 minutes. That’s the default behavior.

Refer to this – https://powerusers.microsoft.com/t5/General-Power-Automate/Flow-run-timed-out/m-p/713628#M58900

Hope it helps..

Advertisements