Use the new Associated Grid Control to display details of other tables in subgrids – Model-driven App / Dynamics 365


With the Associated Grid Control we can configure and show up four subgrids in the form, making it a more intuitive and cleaner form layout, with ease of navigation.

Below we are adding the Associated Grid Control component to the Contact’s form.

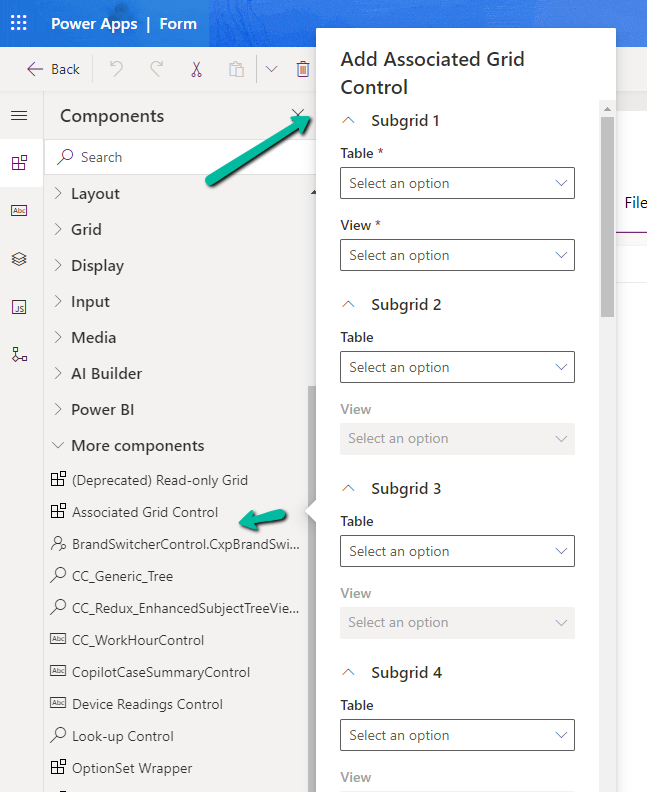
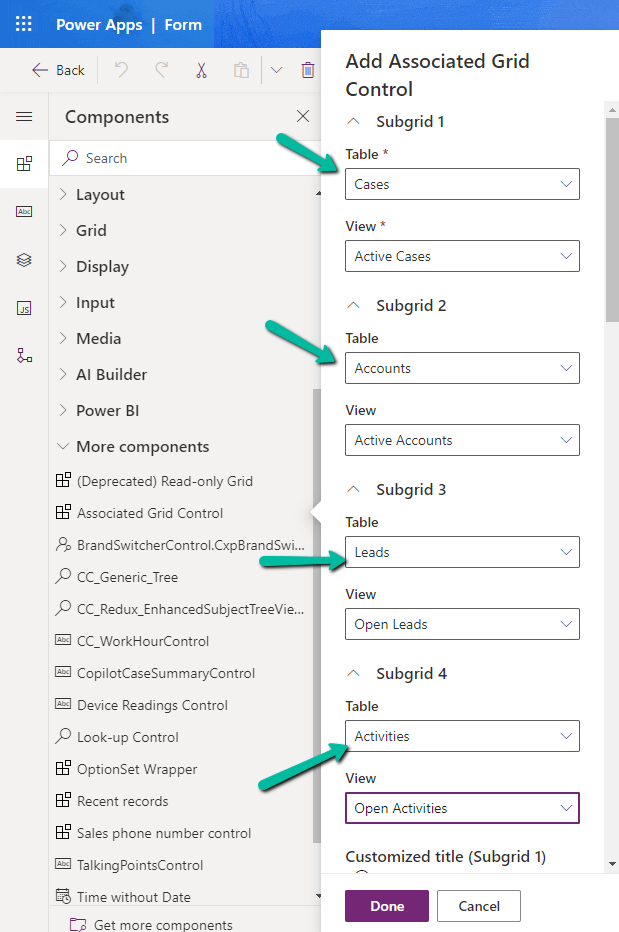
Here we have specified the Subgrid Tables and Views to begin with.

A screenshot of a computer

Description automatically generated

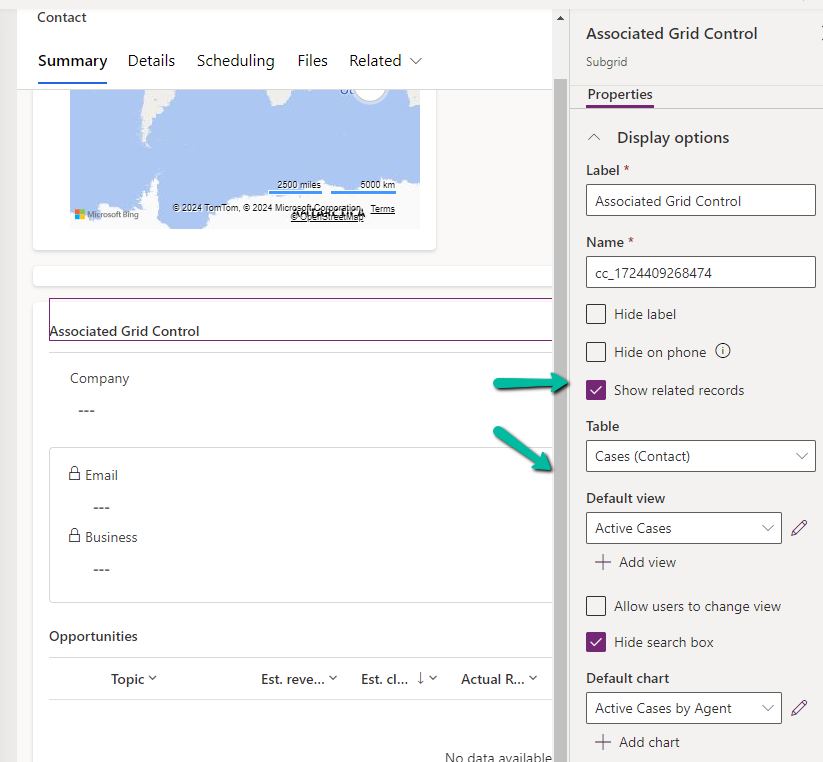
For the 1st subgrid specified we can set the specific options from the properties pane. Here let us try checking the Show related rows properties for the cases subgrid.

On doing so, we get the below message.

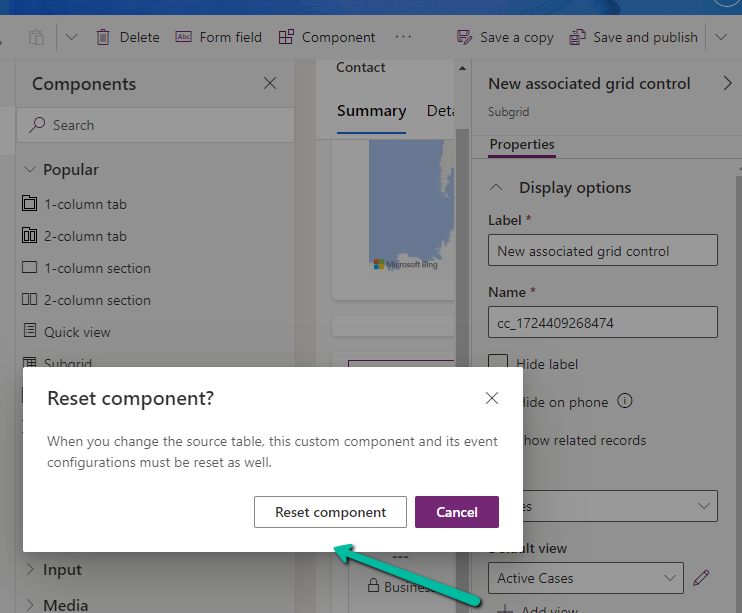
It basically reset the 1st subgrid’s table to Accounts from Case, the rest of the configuration remains unchanged.

A screenshot of a computer

Description automatically generated

Let us change it back to Cases and select the appropriate view.

A screenshot of a contact page

Description automatically generated

Let us save and publish the change.

Now in the Contact form we can see the grid control with 4 different subgrids as configured.

The Active Cases shows the associated cases.

A screenshot of a computer

Description automatically generated

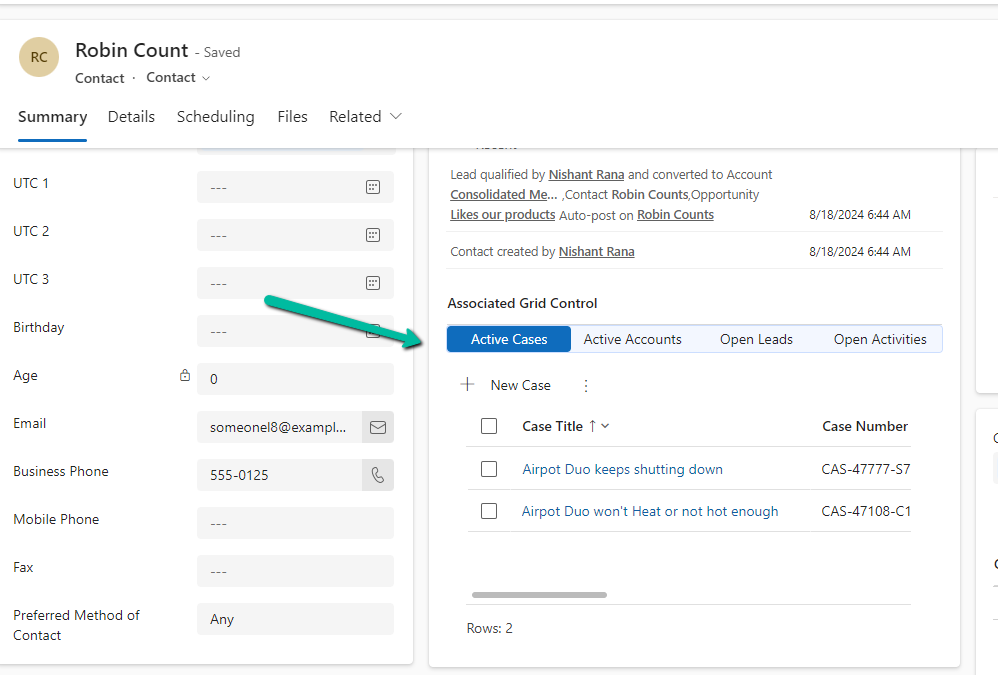
However, that is not the case with other subgrids as they show all the records.

A screenshot of a computer

Description automatically generated

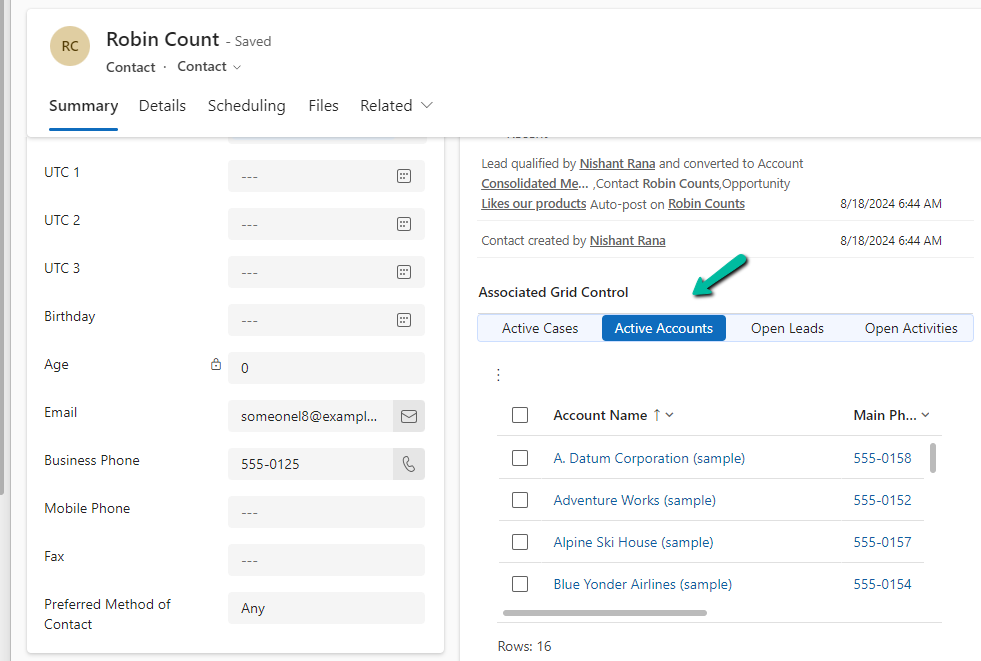
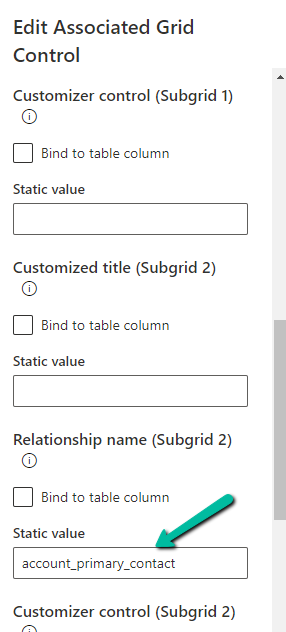
To filter it to show the associated records we need to specify the relationship name while configuring the component.

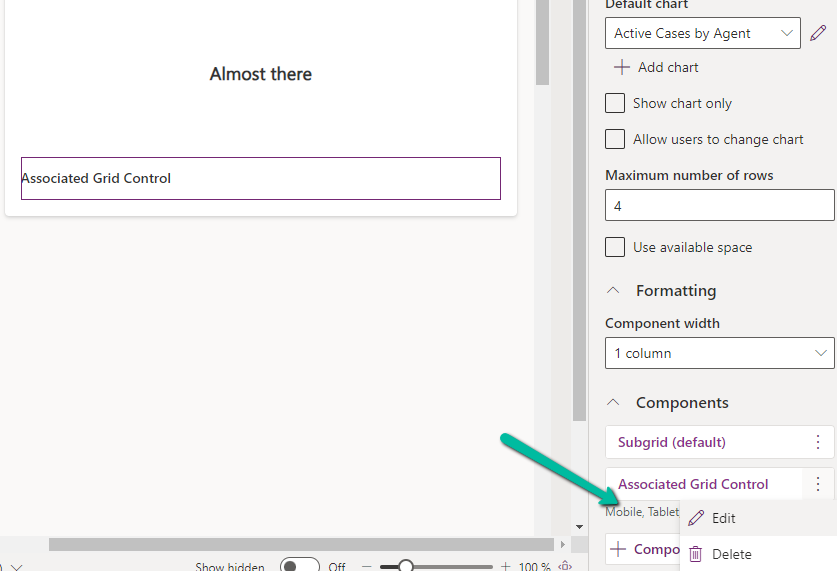
Let us edit the component.

A screenshot of a computer

Description automatically generated

Below we specified the relationship name for the subgrid 2 i.e Accounts.

A screenshot of a computer

Description automatically generated

As expected, this time we can see Active Accounts filtered to show only those account records where the contact is associated as the primary contact.

A screenshot of a computer
Description automatically generated

Get all the details here

Also check –

Due Open Activities Control – https://nishantrana.me/2023/05/09/due-open-activities-control-dynamics-365/

Notes Control – https://nishantrana.me/2023/05/10/notes-control-dynamics-365/

Attachment Control – https://nishantrana.me/2023/05/08/new-attachment-control-dynamics-365/

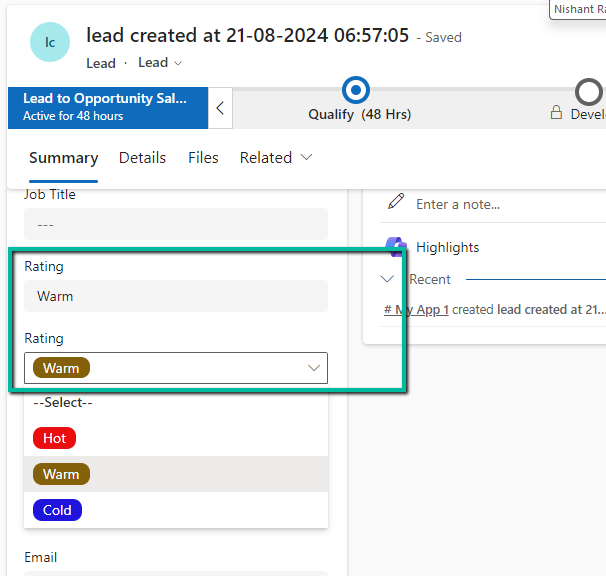
OptionSet Wrapper Component – Use OptionSet Wrapper component to show color-coded options on the form

Hope it helps..

Advertisements

Use OptionSet Wrapper component to show color-coded options on the form – Model-driven apps/ Dynamics 365


We can make use of the OptionSet Wrapper component to show color-coded options on the form for the choices or option set fields.

Below we have added the Option Set wrapper component to the Rating field of the lead in the Lead (Main) form.

We can see the field added but do not see any colors for it.

A screenshot of a contact form

Description automatically generated

This is because it uses the color defined for that column, which wasn’t defined out of the box for that field.

We then defined the colors as shown below for different choices / options.

After saving and publishing our changes, we were able to see the corresponding color for the choices.

A screenshot of a computer

Description automatically generated

Also check –

Hope it helps..

Advertisements

New Lead Qualification Experience – Dynamics 365 Sales


To enable the new lead experience, navigate to App Settings >> Lead + opportunity management in the Sales Hub App.

A screenshot of a computer

Description automatically generated

On enabling it, we get the option to specify whether the Account, Contact, and Opportunity records are created automatically or the user (seller) has the option to specify which record to create.

We also see the option to Copilot summarizing the case once a lead is qualified.

For opportunity, if we select Seller, we get an additional option to modify the Opportunity form by adding or removing fields and also the option to allow a maximum of 5 new opportunities during lead qualification.

A screenshot of a computer

Description automatically generated

Clicking on the Add or remove fields link opens the Opportunity qualify lead form for customization.

A screenshot of a computer

Description automatically generated

Let us see it in action.

On clicking the Qualify command, we can see the new Qualify lead dialog opened in the side pane.

It gives us the option to create a new Account, Contact, and/or Opportunity record.

A screenshot of a computer

Description automatically generated

For Account and Contact, we can specify an existing record or select none if we do not want the Account and Contact record to be created.

A screenshot of a computer

Description automatically generated

For opportunity, we can click on edit icon to update the details of the opportunity record to be created. It will open the Opportunity qualify lead form.

A screenshot of a computer

Description automatically generated

Similarly clicking on + New opportunity allows us to specify a value for the new opportunity record.

A screenshot of a computer

Description automatically generated

As we had selected the option of a maximum of 5 opportunities, we got the below message on trying to specify the 6th opportunity record.

“You can’t add more than 5 opportunities.”

A screenshot of a computer

Description automatically generated

Let us click on Qualify.

We can see below details, the link to the records generated, and the summary.

A screenshot of a computer screen

Description automatically generated

Clicking on Finish opens the 1st opportunity record. We can also see the summary added to it.

A screenshot of a computer

Description automatically generated

On setting all the options to Automatic,

A screenshot of a computer

Description automatically generated

we can see the below details in the Qualify lead dialog, all as read-only information.

Get all the details here

Hope it helps..

Advertisements

Turn on failed or You need a Microsoft Dynamics 365 license to continue error while trying to Activate a Workflow – Dynamics 365 / Dataverse


Recently while trying to Activate a Workflow we got the below error –

Turn on failed. The user with SystemUserId=xxxxxxxx-483e-eb11-bf70-000d3a795b83 in OrganizationContext=xxxxxxxx-a88f-4f40-b654-7bab4d5c1f95 is not licensed. Please contact your system administrator to add license to this user for the action to succeed. SystemUserAccessMode=0 is not either of (NonInteractive=4, SetupUser=1). User IsDisabled=True, IsLicensed=False. ImpersonatingSystemUserId=xxxxxxxx-9fe2-47b8-84a9-d87c65dc9dfd.

The user account through which we were trying to do so had a System Administrator role, however, it turned out that it was because of the Owner of the Workflow. The system user record set as Owner of the workflow was Inactive.

A screenshot of a computer

Description automatically generated

Assigning it to the other active user, fixed the issue for us.

We were able to activate the Workflow than.

Hope it helps..

Advertisements

The plug-in execution failed because the Sandbox Worker process crashed. This is typically due to an error in the plug-in code – Dataverse / Dynamics 365


Recently we got the below exception for one of our plugins.

Message: The plug-in execution failed because the Sandbox Worker process crashed. This is typically due to an error in the plug-in code. Please refer to this document: https://go.microsoft.com/fwlink/?linkid=2189390
Microsoft.Xrm.RemotePlugin.Grpc.ExceptionHandlers.SandboxFabricWorkerCommunicationException: Error communicating with SandboxFabric Worker —> Grpc.Core.RpcException: Status(StatusCode=”DeadlineExceeded”, Detail=”Deadline Exceeded”

If we refer to Microsoft Documentation below seems to be the cause of the issue in our case.

In our scenario, we had a Plugin that was Asynchronous and it was triggered on the Post Update of Work Order Service task. The plugin will fetch all the attachments (to notes associated with inspection attachments > inspection response > work order service task). There were many Service Tasks having more than 20 attachments exceeding 100 mb size total.

We were doing bulk updates which triggered the plugin creating too many requests eventually leading to that error.

Get more details – Error “Sandbox Worker Process Crashed”

Also, check – https://cloudblogs.microsoft.com/dynamics365/it/2017/02/20/microsoft-dynamics-365-online-asynchronous-service-quotas/

Hope it helps..

Advertisements

Fixed – System.InvalidOperationException: Message size exceeded when attempting to send response to sandbox. Message Size 123 Mb. Max Allowed 128974848 Mb (Dataverse / Dynamics 365 )


Recently we got the below exception for one of our plugins
Message: System.InvalidOperationException: Message size exceeded when attempting to send response to sandbox. Message Size 123 Mb. Max Allowed 128974848 Mb.

Below is the code where we were getting the error. We were retrieving the notes records associated with the inspection response/inspection attachments. (Dynamics 365 Field Service)

And if we had a total of all attachments to it more than 100 mb it was failing.

Below is the test Work Order Service Task record for which we were getting the error.

There were a couple of other attachments also to it making a total of more than 100 Mb.

Here to fix the error instead of fetching all the note details at once and then processing the notes attachments, we updated our logic to process the notes attachments one by one.

Hope it helps..

Advertisements