How to – Delete the elastic table records (Dataverse)


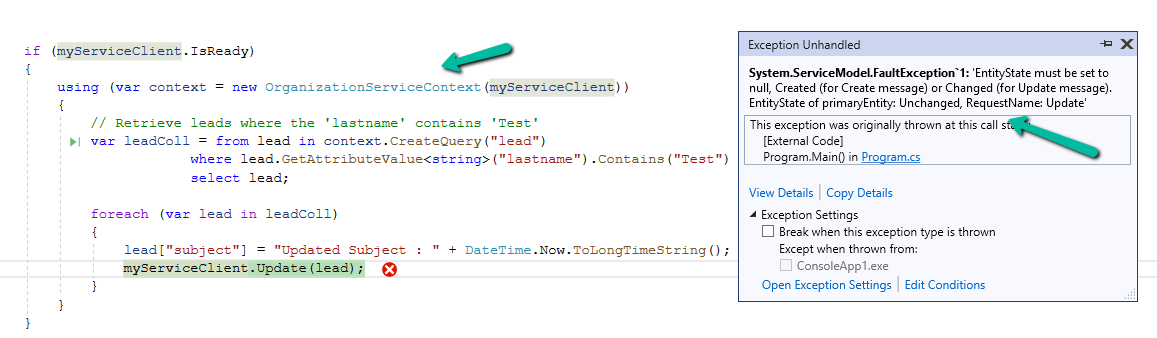
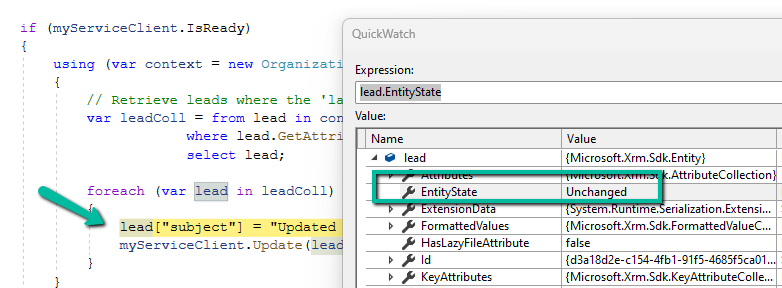
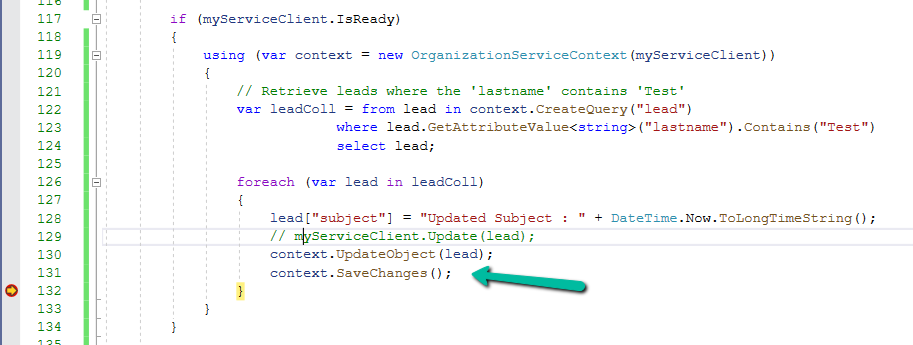
Recently we wrote an SSIS package to delete the Elastic Table records using KingswaySoft’s Integration Toolkit for Dynamics 365.

A screenshot of a computer

Description automatically generated

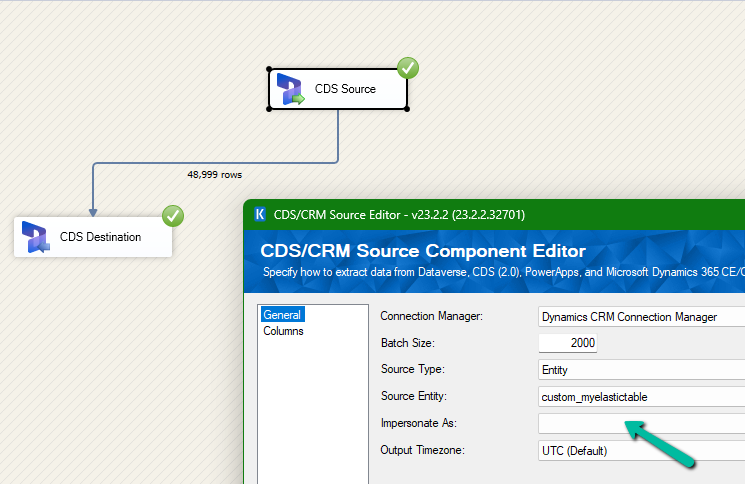
We had mapped the primary field for deletion and the package was also showing success.

A screenshot of a computer

Description automatically generated

However back in our CRM / Sales Hub app, we saw that none of the records were deleted (total – 48999)

A screenshot of a computer

Description automatically generated

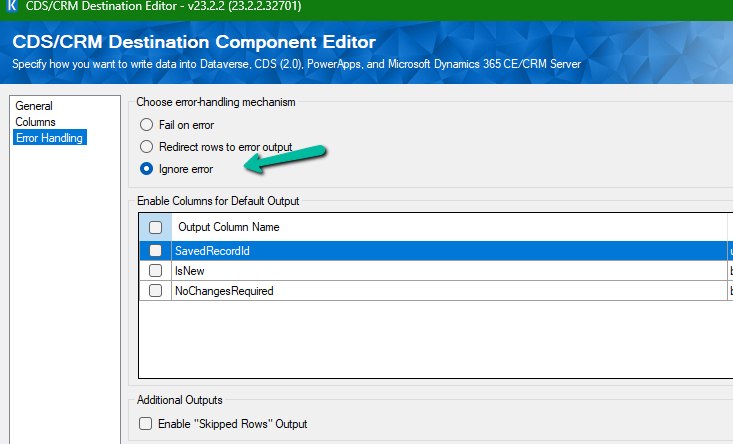
The reason it was showing success is that we had specified the Ignore Error option in our CDS Destination component.

A screenshot of a computer

Description automatically generated

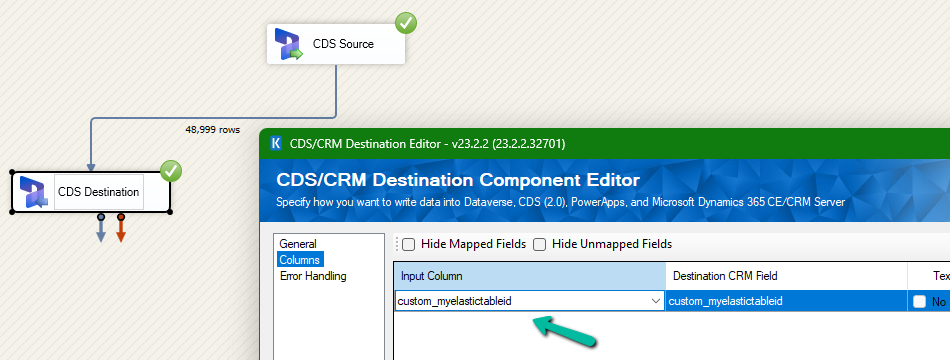
Then we created 2 more records but didn’t specify the partition ID for them.

A screenshot of a computer

Description automatically generated

This time on the successful run of the package we can see those 2 new records getting deleted for which we didn’t specify any partition ID i.e. Test 1 and Test 2 records were deleted successfully.

A screenshot of a computer

Description automatically generated

If we check the Microsoft docs it mentions that we need to include the partition ID using the alternate key to delete those records using the DeleteMultiple request.

Could not find a way to specify an Alternate Key in the CDS Destination component for the Delete message and if we try deleting the records one by one instead of using the DeleteMultiple request we get the below error.

A screenshot of a computer

Description automatically generated
A screenshot of a computer

Description automatically generated

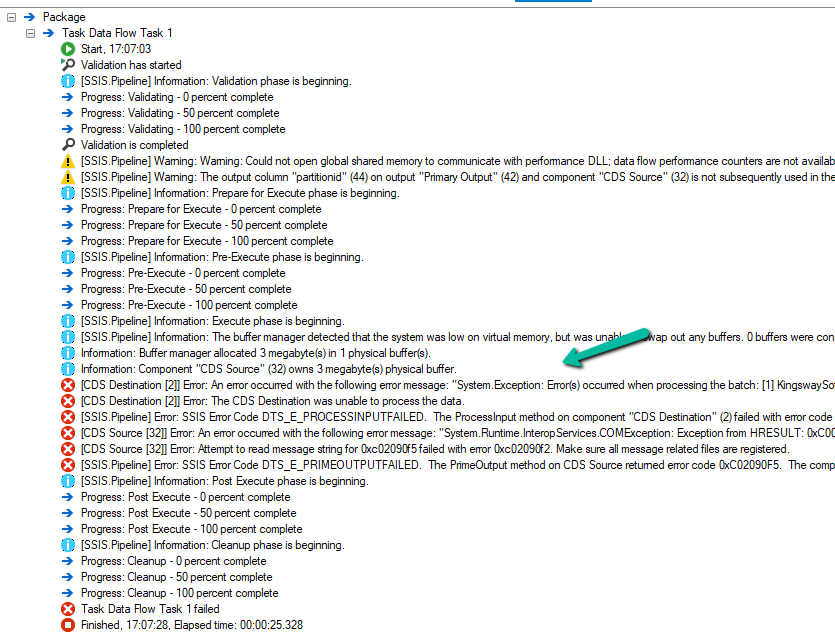
[CDS Destination [2]] Error: An error occurred with the following error message: “System.Exception: Error(s) occurred when processing the batch: [1] KingswaySoft.IntegrationToolkit.DynamicsCrm.WebAPI.WebApiServiceException: The remote server returned an error: (404) Not Found. (Error Type / Reason: NotFound, Detailed Message: {“error”:{“code”:”0x80040217″,”message”:”The HTTP status code of the response was not expected (404).\n\nStatus: 404\nResponse: \n{\”error\”:{\”message\”:\”Could not find item ‘b3a70971-9674-ef11-a671-6045bdfe58ee’.\”,\”details\”:[{\”message\”:\”\\r\\nErrors : [\\r\\n \\\”Resource Not Found. Learn more: https://aka.ms/cosmosdb-tsg-not-found\\\”\\r\\n]\\r\\n\”}]}}”}}) (SSIS Integration Toolkit for Microsoft Dynamics 365, v23.2.2.32701 – DtsDebugHost, v16.0.5270.0)System.Net.WebException

As expected, using CrmServiceClient also if we do not include partitionid we will get the below error for the records that have partition id specified.

The HTTP status code of the response was not expected (404).

Response:

{“error”:{“message”:”Could not find item ‘b3a70971-9674-ef11-a671-6045bdfe58ee’.”,”details”:[{“message”:”\r\nErrors : [\r\n \”Resource Not Found. Learn more: https://aka.ms/cosmosdb-tsg-not-found\”\r\n]\r\n”}]}}

Here we can specify the partitionId parameter to delete those records having the partitionId specified in the DeleteRequest

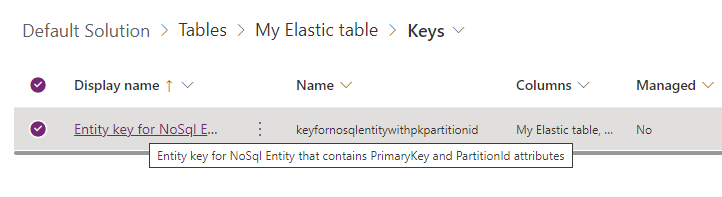
For DeleteMultiple Request we need to provide the alternate key as shown below.

A screen shot of a computer code

Description automatically generated

We will have the alternate key auto-created by the system when we create an elastic table.
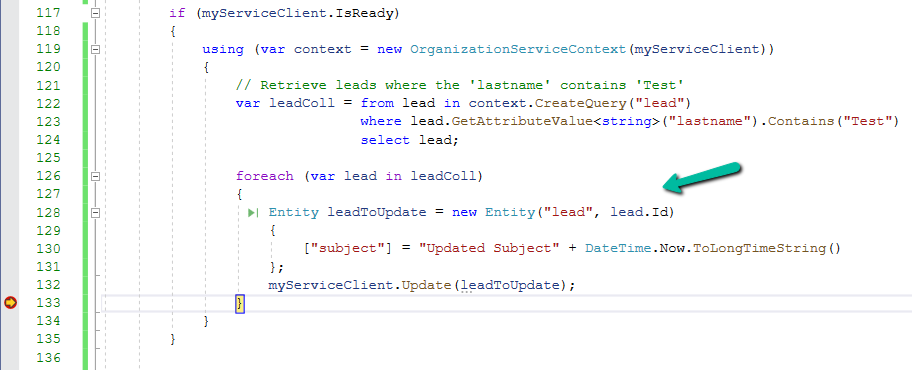
Sample Code –

 var myServiceClient = new CrmServiceClient(connectionString);
        var query = new QueryExpression("custom_myelastictable");
        query.ColumnSet.AddColumns("custom_name", "partitionid");
        var myElasticTableCollection = myServiceClient.RetrieveMultiple(query);
        var lstEntityRefCollection = new EntityReferenceCollection();

        // Delete Request
        foreach (var elasticTable in myElasticTableCollection.Entities)
        {
            var deleteRequest = new DeleteRequest();
            deleteRequest.Target = new EntityReference("custom_myelastictable", elasticTable.Id);
            deleteRequest.Parameters["partitionId"] = elasticTable.Attributes["partitionid"];
            var response = myServiceClient.Execute(deleteRequest);
        }

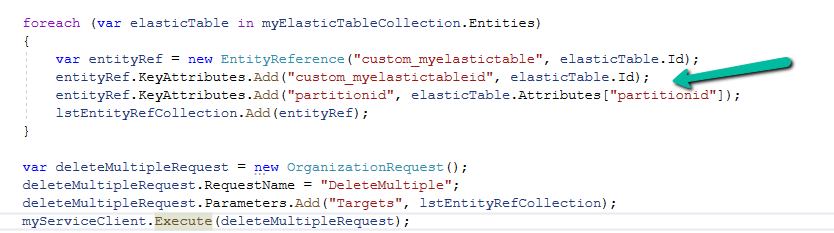
        // DeleteMultiple Request 
       
        foreach (var elasticTable in myElasticTableCollection.Entities)
        {
            var entityRef = new EntityReference("custom_myelastictable", elasticTable.Id);
            entityRef.KeyAttributes.Add("custom_myelastictableid", elasticTable.Id);
            entityRef.KeyAttributes.Add("partitionid", elasticTable.Attributes["partitionid"]);
            lstEntityRefCollection.Add(entityRef);
        }

        var deleteMultipleRequest = new OrganizationRequest();
        deleteMultipleRequest.RequestName = "DeleteMultiple";
        deleteMultipleRequest.Parameters.Add("Targets", lstEntityRefCollection);
        myServiceClient.Execute(deleteMultipleRequest);

Hope it helps..

Advertisements

Fixed – EntityState must be set to null, Created (for Create message) or Changed (for Update message) exception in Dataverse / Dynamics 365


We might get this error while trying to update one of the records.

Exception Message: EntityState must be set to null, Created (for Create message) or Changed (for Update message).

EntityState of primaryEntity: Unchanged, RequestName: Update

ErrorCode: -2147220989

A computer screen shot of a computer

Description automatically generated

The error occurs when OrganizationServiceContext tries to update an entity that has not been marked as modified. The EntityState remains Unchanged, and Dataverse expects it to be Changed or null for update operations.

OrganizationServiceContext automatically tracks entities’ states. When we retrieve an entity, it is set to Unchanged by default.

If we modify the entity without informing the context (e.g., using UpdateObject()), the context still thinks the entity is Unchanged, leading to this error during the update process.

A screenshot of a computer

Description automatically generated

This error typically happens within OrganizationServiceContext since it relies on internal state-tracking mechanisms, with IOrganizationService (e.g., Retrieve or RetrieveMultiple), we typically don’t run into this error because entities retrieved via IOrganizationService aren’t tracked in the same way.

There are 2 ways to resolve this error.

  1. Use UpdateObject, it explicitly tells the context that the entity has been changed followed by SaveChanges() to commit the changes.
A computer screen shot of a program

Description automatically generated

2. Create a new Entity object for update.

Sample Code –

 if (myServiceClient.IsReady)
        {
            using (var context = new OrganizationServiceContext(myServiceClient))
            {
                // Retrieve leads where the 'lastname' contains 'Test'
                var leadColl = from lead in context.CreateQuery("lead")
                               where lead.GetAttributeValue<string>("lastname").Contains("Test")
                               select lead;

                // use Update Object
                foreach (var lead in leadColl)
                {
                    lead.Attributes["subject"] = "Updated Subject" + DateTime.Now.ToLongTimeString();
                    context.UpdateObject(lead);
                    context.SaveChanges();
                }

                // or create a new Entity object
                foreach (var lead in leadColl)
                {
                    Entity leadToUpdate = new Entity("lead", lead.Id)
                    {
                        ["subject"] = "Updated Subject" + DateTime.Now.ToLongTimeString()
                    };
                    myServiceClient.Update(leadToUpdate);
                }     
            }
        }

Hope it helps..

Advertisements

Add line break / new line for description field of Email – Dataverse / Power Automate


In one of our requirements, we wanted to create/send an email on the creation/update of the case with the description of the email same as the description of the case.

In our Case record, for the description, we have the line break (\n) specified.

A screenshot of a computer

Description automatically generated
A screenshot of a computer

Description automatically generated

However, for the email created, we see the line break ignored.

A screenshot of a computer

Description automatically generated

To fix this we might think of applying the below formula by replacing “\n” with “”.

replace(triggerOutputs()?[‘body/description’],’\n’,’
‘)

A screenshot of a computer

Description automatically generated
A screenshot of a computer

Description automatically generated

On triggering our flow after these changes.

A screenshot of a computer

Description automatically generated

We still do not see the line break added in the description of the email.

This is because the ‘/n’ character is ignored by the replace formula.

To fix this we need to first initialize a variable for the new line of type string by hitting/pressing the Enter button for the Value.

A screenshot of a computer

Description automatically generated

Next comes our formula where we will use this variable.

replace(triggerOutputs()?[‘body/description’],variables(‘varNewLine’),’
‘)

A screenshot of a computer

Description automatically generated

Triggering the flow now –

A screenshot of a phone

Description automatically generated

generates the proper email description with line break.

A screenshot of a email form

Description automatically generated

The helpful post – https://tomriha.com/how-to-replace-new-line-n-in-a-power-automate-expression/

Hope it helps..

Advertisements

Use JavaScript to enable / disable a field only if the Stage is Active in Business Process Flow – Dynamics 365 / Dataverse


Recently we had a requirement to set some of the fields in our business process flow to be enabled only if that stage is active.

E.g. We want to Identify Sales Team field to be Enabled only if the Propose stage is active, else we want to set it as read-only.

A screenshot of a computer

Description automatically generated

We can use the below JScript to achieve the same.

A screen shot of a computer program

Description automatically generated

Because the Propose stage is Inactive we have Identify Sales Team as read only.

A screenshot of a computer

Description automatically generated

On moving to the Propose stage, we can see the field being enabled back.

A screenshot of a computer

Description automatically generated

The key steps are –

In the onload of the form associate your function/logic to the OnStage change method of the Process object.

formContext.data.process.addOnStageChange(CheckStageAndToggleFieldBPF);

Next, check for the active stage ID.

Here to get the active stage ID, open the business process flow and get its Guid.

A computer screen with a green arrow pointing to a black box

Description automatically generated

Then using the awesome SQL4CDS XrmToolBox plugin get the Guid of the particular stage.

A screenshot of a computer

Description automatically generated
function OnLoad(executionContext)
{
	 var formContext = executionContext.getFormContext();
	 formContext.data.process.addOnStageChange(CheckStageAndToggleFieldBPF);
	 CheckStageAndToggleFieldBPF(executionContext);
}

 function CheckStageAndToggleFieldBPF(executionContext) {

        var formContext = executionContext.getFormContext();     
        var activeStage = formContext.data.process.getActiveStage();
        var activeStageId = activeStage.getId();		
        var stagePropose = "3a275c22-fc45-4e89-97fc-41e5ec578743";
     
        if (activeStageId.toLowerCase() === stagePropose) {          
                formContext.getControl("header_process_identifypursuitteam").setDisabled(false);                 
        }
        else {
            formContext.getControl("header_process_identifypursuitteam").setDisabled(true);
        }       
  }
select processidname,stagename, processstageid  from processstage 
where processid = '919E14D1-6489-4852-ABD0-A63A6ECAAC5D'

Also if we have the same fields used in multiple places / stages in the Business Process Flow, we will have the suffix added to the fields, so we need to refer the field appropriately in our script.

  • header_process_identifypursuitteam
  • header_process_identifypursuitteam_1
  • header_process_identifypursuitteam_2

Also check – https://www.c-sharpcorner.com/blogs/options-for-locking-field-on-business-process-flow

Hope it helps..

Advertisements

Use the new Associated Grid Control to display details of other tables in subgrids – Model-driven App / Dynamics 365


With the Associated Grid Control we can configure and show up four subgrids in the form, making it a more intuitive and cleaner form layout, with ease of navigation.

Below we are adding the Associated Grid Control component to the Contact’s form.

Here we have specified the Subgrid Tables and Views to begin with.

A screenshot of a computer

Description automatically generated

For the 1st subgrid specified we can set the specific options from the properties pane. Here let us try checking the Show related rows properties for the cases subgrid.

On doing so, we get the below message.

It basically reset the 1st subgrid’s table to Accounts from Case, the rest of the configuration remains unchanged.

A screenshot of a computer

Description automatically generated

Let us change it back to Cases and select the appropriate view.

A screenshot of a contact page

Description automatically generated

Let us save and publish the change.

Now in the Contact form we can see the grid control with 4 different subgrids as configured.

The Active Cases shows the associated cases.

A screenshot of a computer

Description automatically generated

However, that is not the case with other subgrids as they show all the records.

A screenshot of a computer

Description automatically generated

To filter it to show the associated records we need to specify the relationship name while configuring the component.

Let us edit the component.

A screenshot of a computer

Description automatically generated

Below we specified the relationship name for the subgrid 2 i.e Accounts.

A screenshot of a computer

Description automatically generated

As expected, this time we can see Active Accounts filtered to show only those account records where the contact is associated as the primary contact.

A screenshot of a computer
Description automatically generated

Get all the details here

Also check –

Due Open Activities Control – https://nishantrana.me/2023/05/09/due-open-activities-control-dynamics-365/

Notes Control – https://nishantrana.me/2023/05/10/notes-control-dynamics-365/

Attachment Control – https://nishantrana.me/2023/05/08/new-attachment-control-dynamics-365/

OptionSet Wrapper Component – Use OptionSet Wrapper component to show color-coded options on the form

Hope it helps..

Advertisements

Use OptionSet Wrapper component to show color-coded options on the form – Model-driven apps/ Dynamics 365


We can make use of the OptionSet Wrapper component to show color-coded options on the form for the choices or option set fields.

Below we have added the Option Set wrapper component to the Rating field of the lead in the Lead (Main) form.

We can see the field added but do not see any colors for it.

A screenshot of a contact form

Description automatically generated

This is because it uses the color defined for that column, which wasn’t defined out of the box for that field.

We then defined the colors as shown below for different choices / options.

After saving and publishing our changes, we were able to see the corresponding color for the choices.

A screenshot of a computer

Description automatically generated

Also check –

Hope it helps..

Advertisements