Sample Code – Capture / Record lead qualification date – Dynamics 365 / Dataverse


Recently we had a requirement to capture the date when a lead is qualified. Here we can create a new date time attribute to capture the lead qualification date and update this field either through workflow, flow, or plugin on lead qualification.

Status Code = 3 (Qualified)
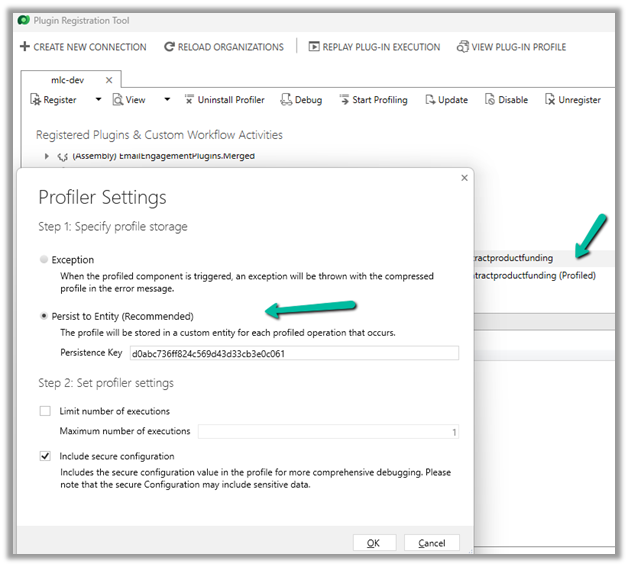
We implemented a plugin on PreOperationUpdate of lead, with filtering attributes as the state code.

Below is the sample code for the plugin  –

 public void Execute(IServiceProvider serviceProvider)
        {
            ITracingService tracingService = (ITracingService)serviceProvider.GetService(typeof(ITracingService));
            IPluginExecutionContext context = (IPluginExecutionContext)serviceProvider.GetService(typeof(IPluginExecutionContext));
         
            try
            {
                tracingService.Trace("start plugin execution: {0}", this.GetType().FullName);
                // plugin is in pre update stage of lead
                if (context.InputParameters.Contains("Target") && context.InputParameters["Target"] is Entity &&
                    context.MessageName.Equals("update", StringComparison.OrdinalIgnoreCase) &&
                   context.Stage == 20)   
                {
                    var leadEntity = (Entity)context.InputParameters["Target"];
                    if(leadEntity.LogicalName == "lead")
                    {
                        if(leadEntity.Attributes.Contains("statuscode") && 
                            ((OptionSetValue)leadEntity.Attributes["statuscode"]).Value == 3
                            )
                        {
                            tracingService.Trace("Lead with Id {0} is getting qualified at {1}", 
                                leadEntity.Id.ToString(), DateTime.UtcNow);
								
							// the custom date time field to capture the qualification date 
                            leadEntity["custom_qualificationdate"] = DateTime.UtcNow;                         
                        }
                    }                 

                }

                tracingService.Trace("end plugin execution: {0}", this.GetType().FullName);
            }
            catch (System.ServiceModel.FaultException<OrganizationServiceFault> ex)
            {
                tracingService.Trace(ex.Detail.Message);
                throw;
            }
            catch (Exception ex)
            {
                tracingService.Trace(ex.ToString());
                throw;
            }
        }

Hope it helps..

Advertisements

How to – Filter using related table(lookup)’s Multi Choices or MultiSelect Option Set column– PowerApps / Dataverse / Dynamics 365


Continuing our previous example, here we have added a new choice field in Table B.

Here Table A has a lookup of Table B which has the new multichoice column added to it. (Also Table B has a lookup of Table C in it)

Based on the values selected in the multiple-choice field’s combo box we will filter the gallery.

The syntax to bind the multichoice column to the combo box.

Choices(Table[@choicecolumn])

First, for the Items property of the Main Gallery, we have added the new column ColorChoices to Table A using the AddColumns and the Lookup function.

Then filtered based on selected items of the combo color choices, using the new ColorChoices column added.

ChoiceColumn[@Value] in comboBox.SelectedItems

We have also used the newly added ColorChoices column to bind it to the gallery inside the main gallery as it would have multiple values.

The result –

Thanks to –

Hope it helps..

Advertisements

InvalidPluginExecutionException error dialog not showing up – Dynamis 365 / Dataverse


One of the reasons why throwing the InvalidPluginExecutionException doesn’t show up error dialog could be that you would have Profiled that step with profile storage as Persist to Entity.


Stop Profiling and it should work as expected.

error

Check for more details on InvalidPluginExecutionException

https://learn.microsoft.com/en-us/power-apps/developer/data-platform/handle-exceptions#cancelling-the-current-operation

https://learn.microsoft.com/en-us/power-apps/developer/data-platform/best-practices/business-logic/use-invalidpluginexecutionexception-plugin-workflow-activities

Hope it helps..

Advertisements

Fixed – Bad Request – Error in query syntax while using Xrm.WebAPI


We might get the below error while using Xrm.WebAPI.

‘Bad Request – Error in query syntax.’

One of the reasons could be that while setting up the Lookup field, we haven’t removed the curly brackets.

Use the below function to replace/remove them.

  • let result = myGuid.replace(/[{}]/g, ”);
  • let result = myGuid.replace(“{“, “”).replace(“}”, “”);

Hope it helps..

Advertisements

How to – Configure Azure Event Grid System Topic and Subscription to enable Call recording and SMS in Dynamics 365 Omnichannel Voice


Azure Communication Services uses Azure Event Grid to send real-time event notifications for chat, telephony, video, SMS, and voice calling events.

Azure Event Grid will then route the event messages to the subscribers, one of them being the Azure Application we registered while configuring the Voice channel.

https://nishantrana.me/2022/10/17/how-to-set-up-omnichannel-voice-using-azure-communication-service-acs/

We had specified the Azure App id and tenant id while connecting to ACS from Dynamics 365 as the Event grid app id and Event grid app tenant id.

  • So first we need to register Azure Event Grid System Topic for our app to listen to Azure Communication Service Events.
  • Next, we need to subscribe to specific events for call recording, sms, etc by creating Azure Event Grid Subscriptions.

Login to Azure Portal, create a new Event Grid System
Topic as shown below

Specify Azure Communication Services as Topic Types and for Resource select the Azure Communication Service resource created earlier.

Create the Event System Grid Topic.

Navigate to the topic created, and next create an Event Subscription there.

Provide the below details

File to Event Types = Recording File Status Updated

The other event types available are –

For the webhook’s endpoint, navigate back to the Omnichannel Admin Center,

From the Phone Number >> Advanced Settings copy the WebHook Endpoint URL.

Paste it there and navigate to the Additional features tab.

Check AAD Authentication and specify Tenant ID and AAD Application ID or URI, the same details that were specified while connecting ACS from Dynamics 365 as event grid app id and event grid app tenant id.

additionaltab

Click on Create and we are now done with the required setup.

We got the below error while creating the Azure Event Subscription https://nishantrana.me/2022/12/15/fixed-deployment-has-failed-with-the-following-error-codewebhookaadappaccesscheckcategorymessageaccess-check-failed-for-webhook-aad-app-with-error-subscribers-client-user/

Back inside Dynamics 365 Customer Service Workspace, we can see both the inbound and the outbound call getting recorded.

Thanks to this wonderful post that helped us in configuring it – https://triciasinclair.com/2022/04/25/setting-up-omnichannel-voice-using-azure-communication-service/

Also, check – https://learn.microsoft.com/en-us/dynamics365/customer-service/voice-channel-connect-existing-resource?tabs=customerserviceadmincenter#enable-call-recording-and-sms-services

https://triciasinclair.com/2021/01/27/d365-customer-service-voice-channel/

https://neilparkhurst.com/2022/08/11/omnichannel-for-customer-service-collection-2/

Hope it helps..

Advertisements

Fixed – Custom Page not opening or Page doesn’t exist in this app error in the model-driven app (PowerApps)


Recently we created a custom page to be opened from the Ribbon / Command bar, however, the page was not opening for us, even though the function was running properly.

https://learn.microsoft.com/en-us/power-apps/developer/model-driven-apps/clientapi/navigate-to-custom-page-examples

Here we had created the custom page from within the solution area, so we need to add this custom page to our model-driven app. (The other option is to create the page from the Modern App Designer.)

https://learn.microsoft.com/en-us/power-apps/maker/model-driven-apps/add-page-to-model-app#create-or-edit-a-custom-page

Open the app in the Modern App Designer and click on Add Page

Select Use an exiting custom page, select the page and uncheck the Show in navigation option as we are opening this page from the form.

Publish the app.

This time clicking on Open Custom page command/button on the form successfully opened the custom page for us.

Thanks to Andrew (https://butenko.pro/) for the solution.

Hope it helps..


Advertisements