Route Case (routecase) attribute and msdyn_ApplyRoutingRuleEntityRecord Action in Dynamics 365 Customer Service


The case entity/table in Dynamics 365 CE has a Boolean type field named Route Case.

It has a default value as Yes.

On manually creating the record from the user interface, although Route Case shows the default value as Yes

On saving the record, the value changes to No, the field is also locked.

So basically no routing rules are applied when a case record is created from the user interface.

To apply routing rules, we need to use the “Save and Route” option

Or “Apply Routing Rule” command from the Grid

This also however will not update or set the Route Case field to Yes on the case record.

Now if we create the case record programmatically, the field would be set and saved with its default values as Yes.

The same goes for cases created from Flow.

Route Case is set to Yes.

So basically routing rules will be triggered on the records created from outside the User Interface as Route Case will be set Yes for those records.

Now if we want to run the routing rules against the case record created from the user interface, we can make use of the following action –

msdyn_ApplyRoutingRuleEntityRecord

Within Flow –

Within Plugin or any custom code–

msdyn_ApplyRoutingRuleEntityRecord can be used for other entities apart from the case.

In the case of Case entity, we can also make use ApplyRoutingRule action also.


Hope it helps..


Advertisements

Fixed – Error code: ‘UserNotMemberOfCdsSecurityGroup’. Error Message: ‘The user ‘xyz’ cannot be created in Microsoft Dataverse because the account is not a member of group ‘abc’


We would get this error within Power Automate Approval Flow if we are using Security Group to control access to Dynamics 365 Environment and are sending Approval to a user who is not a member of that security group.

Below is the User within the Tenant but is not member of the My CRM Group Security Group associated with that Environment.

The Security Group – My CRM Group – assigned to Environment against which flow  is created.

So to fix the issue, as the error message indicates, we need to add the user to the Security group.

After adding the user to the Security Group, the flow runs successfully

Also, the User (unlicensed in our case) gets added to CRM with Approvals
User security role as shown below.

Check other posts on Approvals – 

Approvals – Power Automate & Dynamics 365

Hope it helps..


Advertisements

{Power 2021 – Wave 2} Dataverse search 101: The new way to search in Dataverse


deepeshsomani2013's avatarMSDYNAMICSBLOG BY DEEPESH

Microsoft has recently introduced a great feature which is the new cool way to search in Dataverse – Its termed as Dataverse search.

How to enable it?

Production environments: Enabled by default

Non-Production environments: Navigate to Power platform Admin centre and you can enable the setting which is highlighted below:

clip_image002

Tip: Scroll down and don’t forget to hit the Save button on the above screen after enabling it. It will take some time first time you enable this feature(Indexes are being created in the background) – so wait for a while for awesomeness

What tables are enabled by default?

21 in total are enabled by default, here is the list:

Without D365 Apps enabled:

Account (8)
Contact (11)
Goal (19)
Goal Metric (3)
Knowledge Article (56)

With D365 Apps enabled:

Campaign (2)
Campaign Activity (4)
Campaign Response (6)
Case (5)
Competitor (1)
Contract (7)
Invoice (4)
Lead (6)
Marketing List…

View original post 485 more words

Using DataSourceInfo and RecordInfo function for checking permissions for a Dataverse table or record in Canvas App


DataSourceInfo function can be used to check the Table / Entity level permission.

We can check for Create, Read, Edit, and Delete Permission and can disable, hide and show the corresponding create, edit and delete buttons for the users.

  • DataSourceInfo.CreatePermission
  • DataSourceInfo. DeletePermission
  • DataSourceInfo. EditPermission
  • DataSourceInfo. ReadPermission

DataSourceInfo function can also be used to obtain information about a particular column of the data source like Display Name, Max Length, Max Value, Min Length, Required.

https://www.inogic.com/blog/2020/11/how-to-use-datasourceinfo-in-canvas-app/

  • DataSourceInfo.DisplayName
  • DataSourceInfo.MaxLength
  • DataSourceInfo.MaxValue
  • DataSourceInfo.MinValue
  • DataSourceInfo.Required


Similarly, the RecordInfo function can be used to get the information about the record of a Dataverse data source.

We can check for the Read, Edit, and Delete Permission.

  • RecordInfo. ReadPermission
  • RecordInfo. EditPermission
  • RecordInfo.DeletePermission

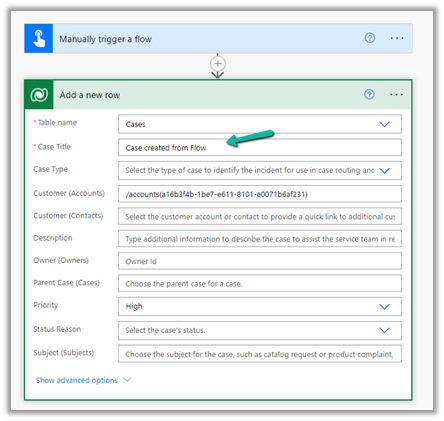
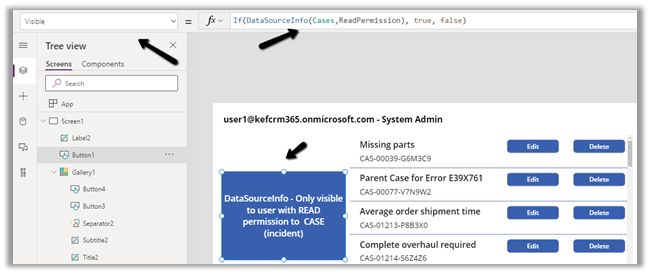
Hide Show control based on Security Role in Canvas App

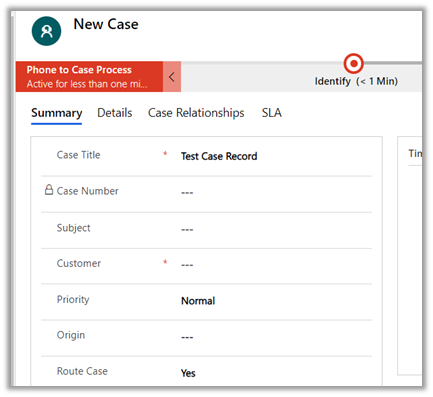
Here for our sample Canvas App we have a button and a Gallery  having Data source as Cases

1 

Visible    

Button

If(DataSourceInfo(Cases,DataSourceInfo.ReadPermission), true, false)

2 

Visible   

Edit

If(RecordInfo(Gallery1.Selected, RecordInfo.EditPermission),true, false)

3 

Visible    

Delete

If(RecordInfo(Gallery1.Selected, RecordInfo.DeletePermission),true, false)

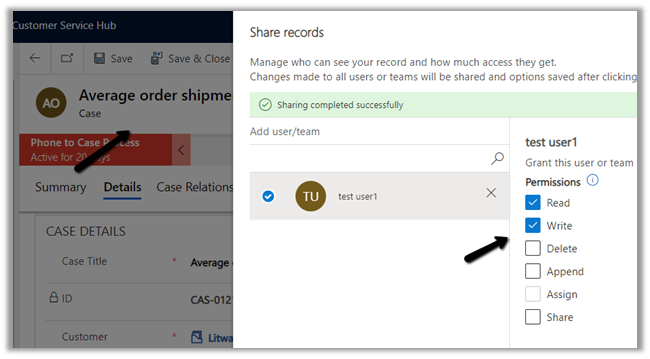
Now to test it, we have assigned the below custom security role/rights to another user – Test User 1 (along with Basic User security role)

i.e. Read, Write and Delete permission at the User Level on Case.

We have also shared the Average order shipment time record with Test User 1 assigning him the Write Permission.

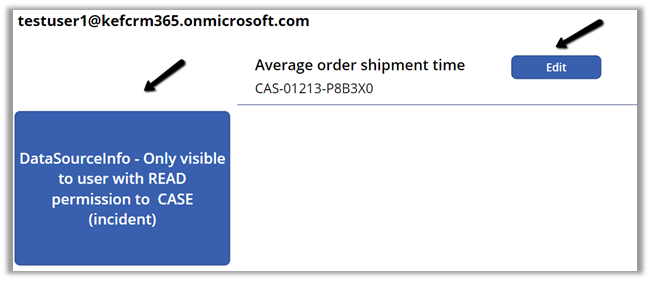
Now when Test User 1 will open the Canvas App, the first button will be visible as he has the Read permission on the Case table.

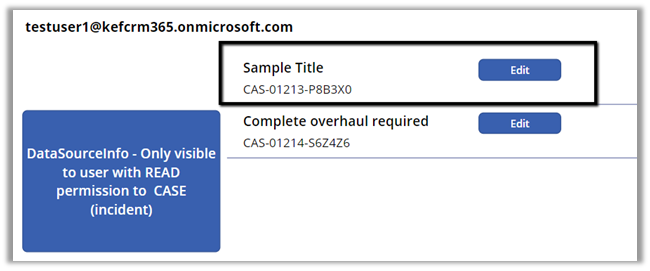
In the gallery only the one record shared will be visible along with the Edit button on the same.

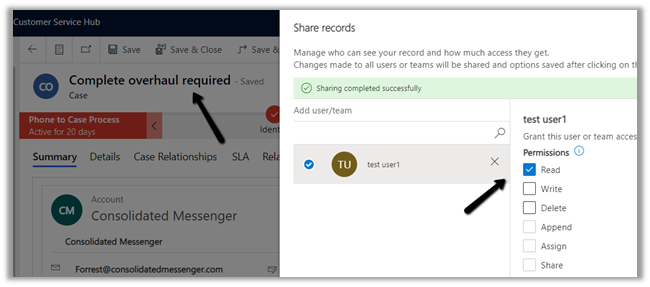
Let us just share one more case record with only Read permission to Test User 1.

We can see the record displayed for Test User 1.

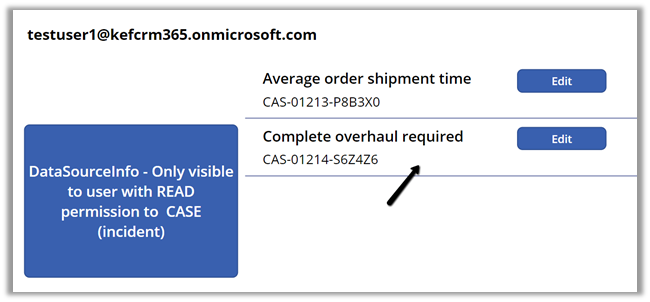
It shows the Edit button for the new record, although we shared the record with the Read permission.

We have the following formula for the Edit button’s OnSelect

Patch(Cases, LookUp(Cases,’Case Number’ = lblCaseNumber.Text), {‘Case Title’:”Sample Title”})

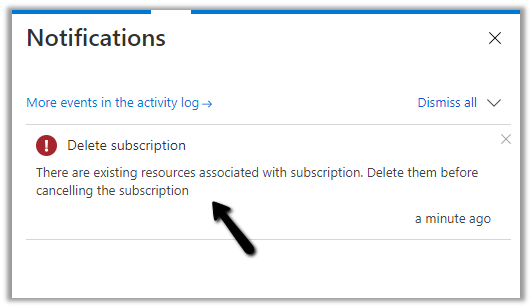
So clicking on Edit for the new record shared ‘Complete overhaul required‘ gives the below Permission error

Now pressing the same edit button for the ‘Average order shipment time’ record will update the record (set title as Sample Title) as it was shared with Write permission with Test User 1.

Get all the details here –

https://docs.microsoft.com/en-us/powerapps/maker/canvas-apps/functions/function-datasourceinfo

https://docs.microsoft.com/en-us/powerapps/maker/canvas-apps/functions/function-recordinfo

Hope it helps..

Advertisements

Use TemplateFill property to highlight selected item in Gallery – Canvas App


To highlight the selected item inside a gallery control, we can use its TemplateFill property.

The default value is

RGBA(0,0,0,0)

Change it to

If(ThisItem.IsSelected,RGBA(114, 189, 125, 1))

The result à

Pick color from – https://rgbacolorpicker.com/

Hope it helps..

Advertisements

Can’t delete billing profile. This is the only billing profile in the billing account- Azure (Trial)


Recently our Azure Subscription using free credit had expired and we wanted to remove the card details associated with the billing.

If we try to Detach it (and if the card is being used as the default payment), it will give us the below message

Cost Management >> Payment Methods > > Detach

There are active or disabled Azure subscriptions on this billing profile. To detach this payment method, cancel and then delete all such subscriptions.​”

And if we trying to delete the billing profile

Cost Management >> Billing profiles


We would get the below message


So first we need to delete the subscription here.

Now again we can only delete the free trial subscription after 3 days of canceling it. So we would have to try deleting the subscription after 3 days.


Trying after 3 days,


will give us the option to delete the subscription


But as we have the resources associated we will have to delete the resources first.


Navigate to All resources and delete the resources first.


After deleting the resources, deleting the subscription will be successful

Let us now try to detach the card again.

This time the Azure Subscription existing message was gone as we had deleted it, however, we were still not able to detach and it was asking to wait until the end of the billing period.


Instead of waiting till the end of the billing period – next we tried the below option

https://docs.microsoft.com/en-us/azure/cost-management-billing/manage/cancel-azure-subscription#how-do-i-delete-my-azure-account


i.e. Deleting the Azure AD Account. (through another admin user’s account)


After successful delete, we can see all the options disabled.


So basically the fastest way to remove your personal information from the Azure Free Trial is to cancel the subscription, delete it and then DELETE the account/user.

Hope it helps..

Advertisements

Nishant Rana's Weblog

Everything related to Microsoft .NET Technology

Skip to content ↓