How to – Embed a canvas app on a model-driven app in Dynamics 365


Let us start with some of the key points about the embedded canvas app

  • The embedded canvas app is now generally available. During preview.
  • The embedded canvas app supported sub grid control in preview, which is now no longer available.
  • The canvas app custom control is only supported for the Unified Interface Web client type. It doesn’t support Phone and Tablet client types.
  • We can only have 1 canvas app on the form. We can have multiple embedded canvas app but only 1 of them could be enabled.
  • It is recommended to have an embedded canvas app on a required field else it will not refresh on any change in the data on the host model-driven form.
  • The embedded app can only be created from the host model-driven form.
  • The existing canvas app cannot be used as an embedded canvas app.

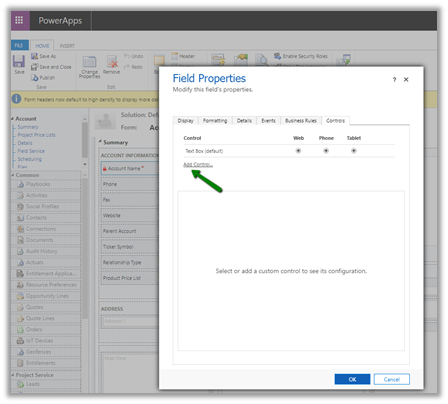
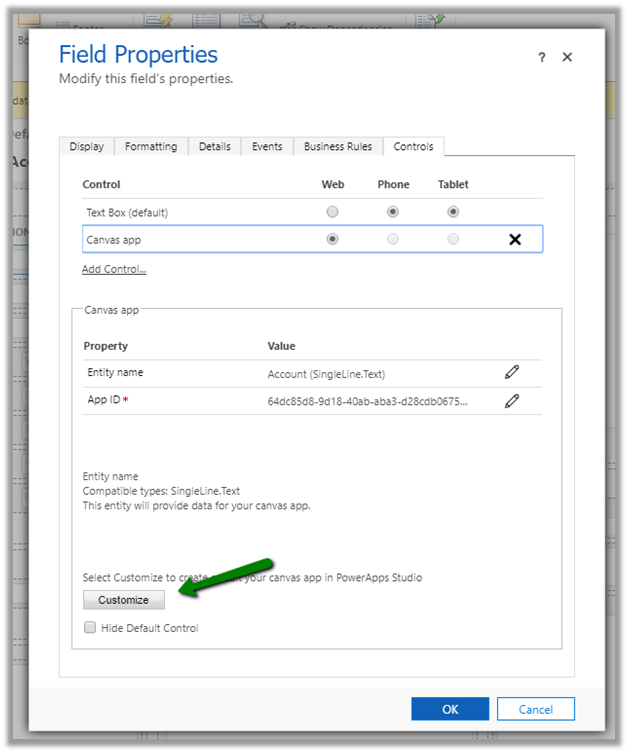
To create the canvas app custom control, select the controls tab in the Field Properties dialog, and click on Add Control.

Select Canvas app in App Control dialog.

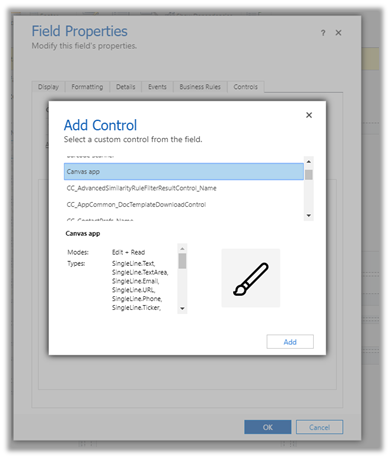
  • The Canvas app will have Web client selected as default and Phone and Tablet option will be greyed out.
  • Entity Name shows the name of the field that is associated with it.
  • App ID will be populated when the app is created.

Clicking on Customize opens the PowerApps Studio.

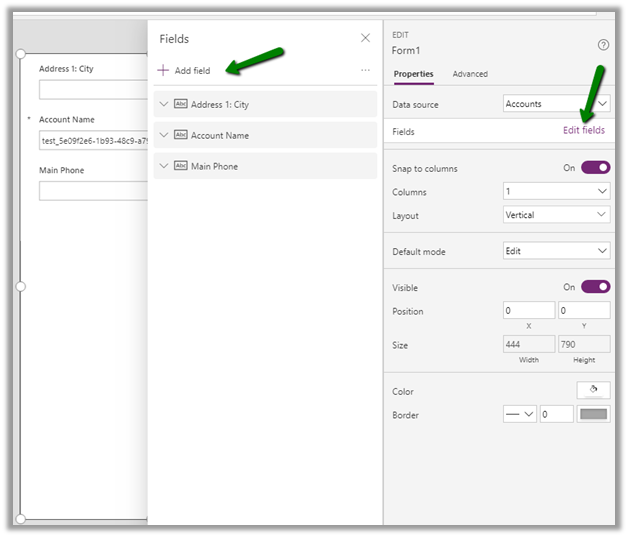
We can see the canvas app form control added to the canvas app.

We can see the fields for city, name, and phone already added to it.

ModelDrivenFormIntegration is a special control that is responsible for bringing the contextual data from the form to the embedded canvas app.

Using Edit Fields option, we can add, remove, edit, reorder the fields of the data source.

Just for the simplicity let us keep the app as it is.

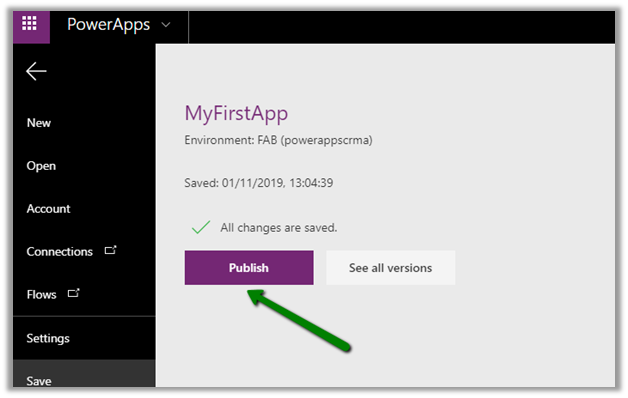
Click on File à Save à The cloud (Save to PowerApps)

On a successful save, we can see the App ID generated.

Uncheck Display label on the form, save and publish the customization.

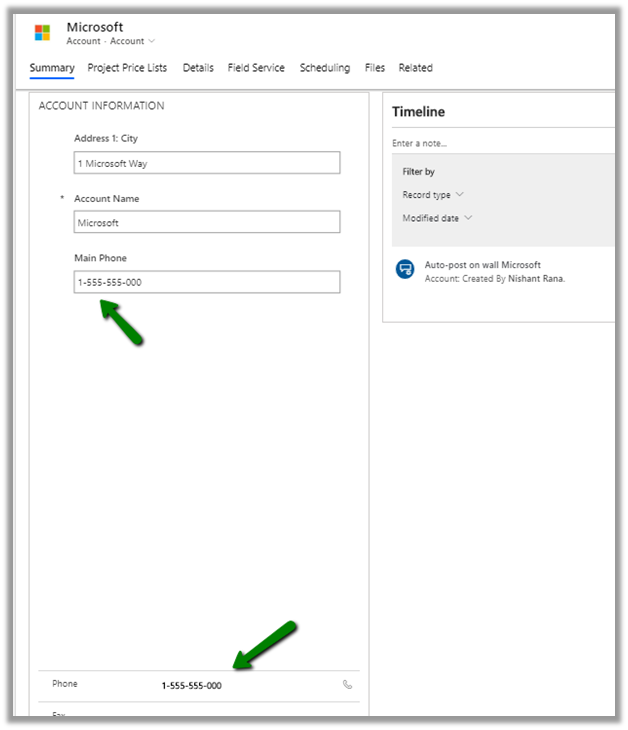
Changing the value in the Phone field in the form and saving the form changes the value inside the canvas app form control.

To Edit the canvas form control, we need to follow the same steps, open the field properties, controls tab and click on Customize

After making the changes inside PowerApps studio, save and publish the changes.

The other Dynamics CRM User say poweruser2 will get the below error message when they open the same form if the app is not shared with them.

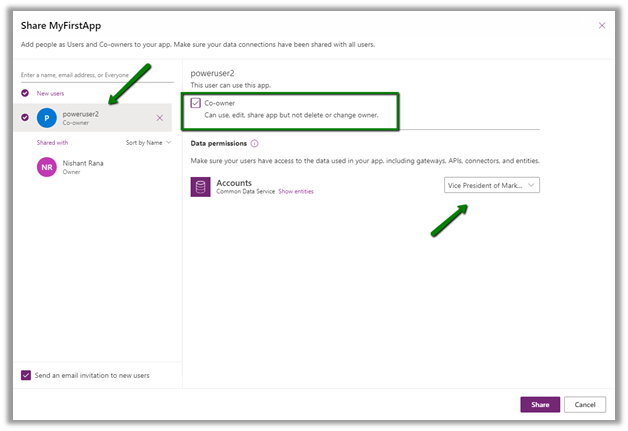
The app can be shared with specific users, security groups or everyone within the organization. The users should have appropriate security roles to access the entities and also appropriate permissions on the cloud services that are being used as part of the canvas app.

There are no privileges specific to the canvas app within Dynamics 365 CE

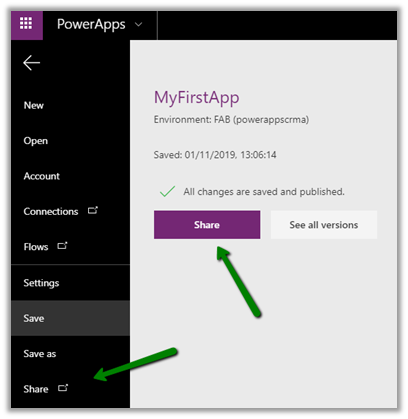
To share the app, Navigate to File and select Share option

Here we searched for the user, made him Co-owner and assigned security roles which will give him access to Accounts entity.

We can see the embedded canvas app rendered properly in this case for the poweruser2

In this post, we covered some of the key points about the embedded canvas app along with steps to create, update and share it (although we just used the OOB generated app here),  I would recommend to check out the videos by Shane Young to learn about PowerApps and different scenarios that we could implement.

Hope it helps..

Advertisements

Step by Step – Calling Flow from PowerApps (Dynamics 365 CE/CRM)


Let us take a simple example of creating lead to understand how we can call Flow from PowerApps.

Log in to PowerApps Studio and create the form as below.

  • TextInput for entering the Last Name, First Name and Email ID.
  • Button to call Flow.
  • The label named GUID which will display the GUID of the created lead record.

Now select the button, go to Action menu and click on Flows to create a new flow.

Click on create a new flow.

Select Instant – from blank option

Select PowerApps as the trigger.

Add a new Step – Create a new Record (Dynamics 365)

To create a new record step, specify the Dynamics 365 Organization Name, select Leads as the entity name.

For the Last Name field, click Ask in PowerApps that will generate the parameter to which we will pass the value from our PowerApps.

The generated parameter.

Repeat the above step for the First Name and Email field.

*for Topic field we have passed a hardcoded value.

Save the create step and add a new step “Respond to a PowerApp or flow

Here we have selected output of type Text

We have added the output parameter as varLeadId and selected leadid as the unique identifier.

Save the Flow and navigate back to PowerApp and select the flow created for our button.

After adding the Flow, the next step is to update the formula to send the field’s value to the flow and also to receive the output from it.

Below will be our formula to pass the text to the flow.

But as we are expecting the GUID in return, we need to update it.

We are using the Set function to set the variable varResponseFromFlow with varleadid output.

Also, we have updated the label field for GUID with the variable

Now let us save the changes and run the PowerApp.

On clicking the button, we can see the GUID updated on the label on the form.

Back in our Dynamics 365 CE, we can see the lead created.

Thus we saw how easy it is to write a PowerApp which interacts with Dynamic 365 CE using Flow. We took a very basic example to understand how things glue, but we can clearly see the potential here to implement complex real-world scenarios with ease.

Hope it helps..

Advertisements

Execute SQL Select, Insert, Update and Delete command on Dynamics 365 Customer Engagement Data using Skyvia Query


Recently came across the wonderful product called Skyvia Query

It is one of the most advanced Visual Query Builders out there, that let us write complex SQL queries with simple drag and drip and configuration. The most interesting part is that it works with both Cloud as well as On-Premise databases.

To try it out we can create a free trial account.

https://app.skyvia.com/register

In this post, we will see how we can quickly use it to connect to our Dynamics 365 CE Database and perform select, insert, update and delete queries.

Navigate to connections and create a new Dynamics CRM Connection

Provide the connection details and test and save the connection.

Navigate to the Query section and select New Builder option to use SQL Builder tool to create the query

Specify the connection and search for the Entity (table)

Here we have searched for and selected the Opportunity Entity. Now simply drag and drop the fields to the designer surface.

Results Fields:

Filters:

Sort Fields:

Click on Execute (F9) to get the result.

Let us drag and drop opportunity rating field in the result fields section and Execute it

The results can be exported to PDF, CSV and can also be used for creating a chart that can be exported as an image.

PDF:

Chart:

Going back to our designer screen, now let us work with the actual SQL query that was being generated by the query builder for us.

For this, click on the SQL tab.

Below is the generated query.

We can work with the query in the SQL query window itself and can also drag and drop fields from the Table on the left.

For e.g. we have dragged Records count on the SQL query window, which generated the count query for us.

Now let us see the Insert query in action

We can see our contact record created

Now let us perform Update.

Here it asks for the confirmation before performing the update. Selecting Apply All performs the update.

Now let us look at the DELETE query in action.

Similar to Update it asks for the confirmation before deleting the records.

Thus Skyvia Query tool makes it so easy and intuitive to work with Dynamics 365 CE data, as we are using SQL statement instead of Fetch XML.

I would highly recommend giving this product a try.

https://skyvia.com/pricing/

Hope it helps..

Advertisements

How to – Use PCF Custom Control Builder (XrmToolBox Plugin) to update existing control in Dynamics 365 / PowerApps


A couple of months back I had written my first PCF Control to display GUID of the record, it was more of a hello world kind of thing.

https://pcf.gallery/guid-control/

Well, the code was using Xrm.Page client API which as we know is deprecated.

So, it was time to update it to use context instead.

More on context

So, thought of using the wonderful PCF Custom Control Builder tool to do that by Danish (which got a new update today – 22- Oct-2019)

Connect to the organization, select Edit existing PCF Control option

Specify the Control Location and VS Command Prompt Location (VsDevCmd.bat)

And click on Reload Details which will list down the details of the component and the solution as shown above.

Click on Open in VS Code to open the project in Visual Studio Code and start making the required update.

It opens the project in Visual Studio Code.

i.e.

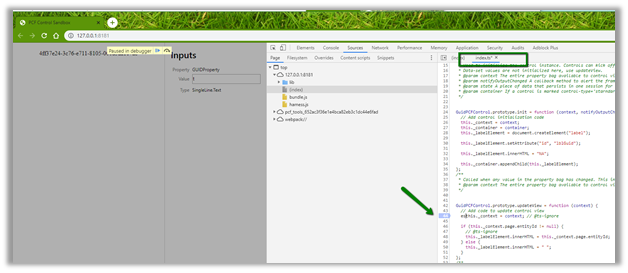
Here let us update the index.ts file to use context to fetch the GUID.

Save the changes. And click on Build

i.e.

Now click on Test to see it in action or to debug.

We can see it populating the GUID

To debug it à we can use the developer tools (F12) and put the breakpoint in the index.ts file.

Now let us deploy it to our organization

Deployment in action

After successful deployment, we can see the solution added to our organization

Now let us use it for the single line of the text control.

Publish the changes.

Create the new lead record and we can see the GUID of the record created in the control

Thus, the wonderful PCF Custom Control Builder plugin of XrmToolBox makes it so easy to update the existing PCF Control and also to create new PCF Control.

Hope it helps..

Advertisements

Single Instance / Organization Considerations in Dynamics 365 Customer Engagement / Dynamics CRM


Let us start from the scenario that the enterprise has decided to use Microsoft Dynamics CRM /365 CE as a preferred customer relationship solution for their organization.

For a large enterprise and/or having multiple different departments, the first question that comes up is, do they need to have a single instance or organization or multiple instance or organization. Well, that decision is not that easy but one thing is for sure the decision should be made as early as possible in the project.

Well you could refer to these posts that could help us to make the decision

https://medium.com/capgemini-dynamics-365-team/does-enterprise-scale-dynamics-require-multiple-instances-f1931a443930

https://nishantrana.me/2019/07/23/single-organization-vs-multiple-organization-single-instance-vs-multiple-instance-key-points-to-consider-in-dynamics-365-ce-on-premise/

Now suppose we have made the decision to go with the single instance \ organization, so what are some of the key points we need to consider.

There could be multiple ways of implementing and defining the segregation layer as well as what needs to be shared from data and customization perspective among the different business units, the most important being the security model and the business unit structure being one of the key components of it.

Check out the below Webinar –

http://www.xrmcoaches.com/2017/07/free-webinar-friday-creating-your-dynamics-365-security-model/

also listen to the below podcast to get some guidance around the setting up the security model

http://crmmvppodcast.com/episode-19-setting-up-your-security-architecture-like-a-crm-mvp

In one of our projects, the way we segregated different departments, after defining the appropriate business unit structure, was by having the Business Unit lookup (custom field) in all the common entities that were being shared by the departments and populating that field accordingly, every time record is created either through User Interface or through code and to refer the same field in the customizations (plugin, workflow etc.) as and when applicable.

In the other project, we were referring to the Business Unit lookup field in the System User / Team Entity.

Well there could be multiple ways of doing the same with its own pros and cons.

But what if you have already implemented for one of the units and didn’t consider that the same instance would need to be extended to accommodate the different business unit(s).

Well, then it is time to modify a couple of things to make the Business Unit structure scalable (if it is not).

Let us go through the each of the main components one by one and how they can be segregated among different business units.

Wrong root business unit name?

Set Parent Business Unit lookup field as optional, open the Business Unit record and rename it.

Need to rename the organization?

For Online à

Navigate to Admin Portal, select the instance and click on edit and update the organization name and if required the URL as well as shown below.


For On-Premise à

  • Follow the below steps to update the Display Name

https://blogs.msdn.microsoft.com/darrenliu/2013/09/21/change-crm-organization-display-name/

  • Updating Organization Database Name

https://blogs.technet.microsoft.com/crmbipl/2008/01/14/how-to-change-crm-4-0-organizations-database-name/

Forms

Create separate new Main forms for different business units.

Enable appropriate security roles for the Form.

Views

Fields

Reuse the fields that are common instead of ending up creating a large number of fields.

Field security profiles can also be used if required when certain entity’s records are shared across the business unit and we want to hide the sensitive information.

Business Rules

Business rule can be configured to run on the scope of Form instead of the Entity.

Dashboards

For Dashboards, we can enable the security roles.

Workflows

  • Use scope fields to make sure the workflows fire appropriately.
  • Or put the first step to check for which business unit it is firing (depends on the segregation logic implemented)

Plugins

Have a field in the records to identify to which Business Unit it belongs to and check for this field as the first thing in the plugin or check for the Business Unit of the user under whose context the plugin is getting fired or use the secure \ unsecure configuration etc. it purely depends upon the way the segregation logic has been implemented.

SLAs

Use SLA lookup field to apply the SLA dynamically through plugin or workflow.

https://nishantrana.me/2019/07/24/apply-sla-choosing-the-sla-in-the-sla-lookup-field-for-the-sla-enabled-entities-in-dynamics-365-ce/

Business Process Flow

If there are multiple business process flow, make sure appropriate one is applied

Apply business process flow while creating an entity record.

https://www.powerobjects.com/blog/2019/04/24/business-process-flows-switch-bpf-dynamics-365-javascript/

There would be multiple other key points to be considered apart from the one listed above specific to each implementation; the above points are some of the things that can be taken as guidelines.

Lastly we must consider  creating different apps for different department \ teams\ users and add required solution components to it.

Design custom business apps by using the app designer

Please feel free to add comments and share your thoughts.

Hope it helps..

Generate Dynamics 365 CE (CRM) Business Unit Org Chart through SmartDraw


Recently we were looking at the options of generating a Business Unit Org Chart for quick review.

Using SmartDraw we were able to do achieve it very quickly.

Steps

  • Keep only the Name and Parent Business column and delete all the other columns including the hidden ones.

  • Excel with required columns.

  • Create the trial account of SmartDraw cloud

  • Click on Org Charts from the New Document menu.

  • Select Build Org Chart from Data option

  • Browse and select the xls file.

  • Click on Process.

  • Select Show in Shape for the columns and click on the Build diagram.

  • The result

  • The other option is to select any of the Organizational Charts

  • Select Import from file

  • Select the excel file

  • The result

  • The chart can be exported, shared and print.

Thus SmartDraw makes it very easy to generate the Org Chart for the Business Unit.

To achieve the same through Visio

http://www.planetxrm.com/12-steps-to-creating-crm-business-unit-org-charts/

Hope it helps..