Binding Choice / OptionSet (multiselect) with Combo box in Canvas Apps / Power Apps (DataVerse)


Instead of hardcoding Combo box , we can bind it to the Choice / Option Set field of Dynamics 365 / Dataverse.

Format – Choices(DataSource[@columnname])

Check out the post that explains it – https://debajmecrm.com/how-to-bind-a-multiselect-choice-of-dataverse-to-a-combobox-in-canvas-apps/

Also check out – how to bind and do filter on multiselect combo box – https://youtu.be/5dSk5iOgT68?t=286

To learn about all the properties of Combo box refer – https://www.spguides.com/powerapps-combobox-control/

Hope it helps..

Advertisements

Fix- Multiple levels of many-to-one relationship expansion aren’t supported in PowerApps


We would get this error while trying to get the value of a related entity (lookup) through a related entity (lookup) in the current record using the incorrect formula.

For e.g. here Region is a lookup in the Village, which in turn is a lookup in the Product record (ThisItem).

The solution here is to use the LookUp function

Before

After

ThisItem.Village.Region.Name

LookUp(Villages, Village = ThisItem.Village.Village).Region.Name


Search the Villages table, using the GUID of the Village, and fetch the name of the region lookup field in it.

Hope it helps..

Advertisements

Using DataSourceInfo and RecordInfo function for checking permissions for a Dataverse table or record in Canvas App


DataSourceInfo function can be used to check the Table / Entity level permission.

We can check for Create, Read, Edit, and Delete Permission and can disable, hide and show the corresponding create, edit and delete buttons for the users.

  • DataSourceInfo.CreatePermission
  • DataSourceInfo. DeletePermission
  • DataSourceInfo. EditPermission
  • DataSourceInfo. ReadPermission

DataSourceInfo function can also be used to obtain information about a particular column of the data source like Display Name, Max Length, Max Value, Min Length, Required.

https://www.inogic.com/blog/2020/11/how-to-use-datasourceinfo-in-canvas-app/

  • DataSourceInfo.DisplayName
  • DataSourceInfo.MaxLength
  • DataSourceInfo.MaxValue
  • DataSourceInfo.MinValue
  • DataSourceInfo.Required


Similarly, the RecordInfo function can be used to get the information about the record of a Dataverse data source.

We can check for the Read, Edit, and Delete Permission.

  • RecordInfo. ReadPermission
  • RecordInfo. EditPermission
  • RecordInfo.DeletePermission

Hide Show control based on Security Role in Canvas App

Here for our sample Canvas App we have a button and a Gallery  having Data source as Cases

1 

Visible    

Button

If(DataSourceInfo(Cases,DataSourceInfo.ReadPermission), true, false)

2 

Visible   

Edit

If(RecordInfo(Gallery1.Selected, RecordInfo.EditPermission),true, false)

3 

Visible    

Delete

If(RecordInfo(Gallery1.Selected, RecordInfo.DeletePermission),true, false)

Now to test it, we have assigned the below custom security role/rights to another user – Test User 1 (along with Basic User security role)

i.e. Read, Write and Delete permission at the User Level on Case.

We have also shared the Average order shipment time record with Test User 1 assigning him the Write Permission.

Now when Test User 1 will open the Canvas App, the first button will be visible as he has the Read permission on the Case table.

In the gallery only the one record shared will be visible along with the Edit button on the same.

Let us just share one more case record with only Read permission to Test User 1.

We can see the record displayed for Test User 1.

It shows the Edit button for the new record, although we shared the record with the Read permission.

We have the following formula for the Edit button’s OnSelect

Patch(Cases, LookUp(Cases,’Case Number’ = lblCaseNumber.Text), {‘Case Title’:”Sample Title”})

So clicking on Edit for the new record shared ‘Complete overhaul required‘ gives the below Permission error

Now pressing the same edit button for the ‘Average order shipment time’ record will update the record (set title as Sample Title) as it was shared with Write permission with Test User 1.

Get all the details here –

https://docs.microsoft.com/en-us/powerapps/maker/canvas-apps/functions/function-datasourceinfo

https://docs.microsoft.com/en-us/powerapps/maker/canvas-apps/functions/function-recordinfo

Hope it helps..

Advertisements

Use TemplateFill property to highlight selected item in Gallery – Canvas App


To highlight the selected item inside a gallery control, we can use its TemplateFill property.

The default value is

RGBA(0,0,0,0)

Change it to

If(ThisItem.IsSelected,RGBA(114, 189, 125, 1))

The result à

Pick color from – https://rgbacolorpicker.com/

Hope it helps..

Advertisements

Canvas App – Quick Reference


Recently we were working on Canvas Apps so thought of listing down some of the key points for quick reference

  • Use Items property for defining values for Drop Down and Combo Box.

Items = [“Branch”,”Country”]


  • Use DefaultSelectedItems for Setting Default values for Combo Box.

DefaultSelectedItems = [“Branch”]

  • To disable multiple selections for Combo Box set SelectMutiple as false

SelectMultiple = false


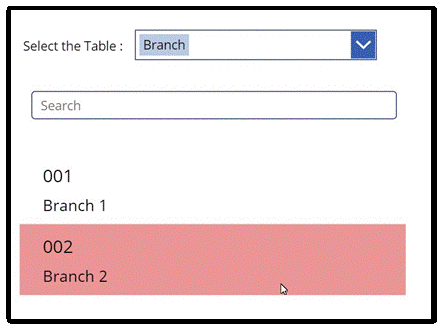
  • Change Data Source of Gallery based on Combo Box selected value

Items = If(ComboBox1.Selected.Value = “Branch”, Branches, Countries)


  • Filter Gallery’s data based on Text Box (string search)

Items = If(ComboBox1.Selected.Value = “Branch”,Filter(Branches,searchInput.Text in cre9d_value ||searchInput.Text in cre9d_name), Filter(Countries,searchInput.Text in cre9d_value ||searchInput.Text in cre9d_name))

Filter à

Search à

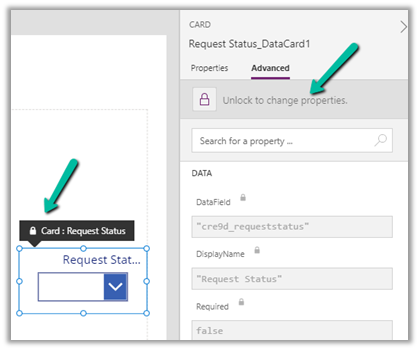
  • Unlock the Data Card field within the form to make changes to its properties

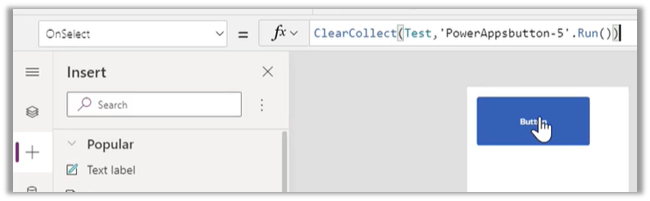
  • Use Navigate to move to a different Screen on OnSelect of Button

Navigate(Screen2, ScreenTransition.Fade)

  • The first item of the Gallery acts as a template

  • Use TemplateFill property to highlight the selected item in the Gallery.

TemplateFill = If(ThisItem.IsSelected,RGBA(233,150,150,10))

  • Use Sort to sort the Data Source for Items property

Items = Sort(Requests,’Created On’,Descending)

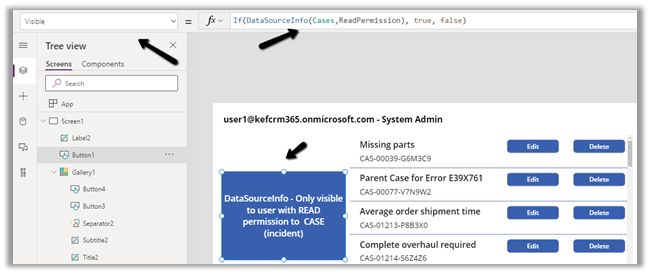
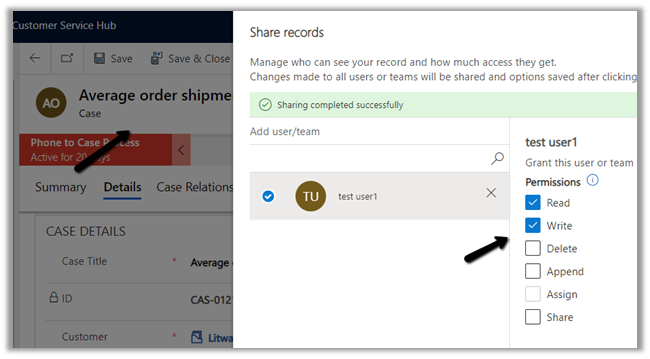
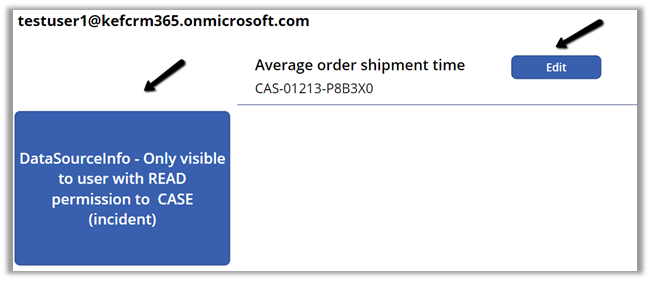
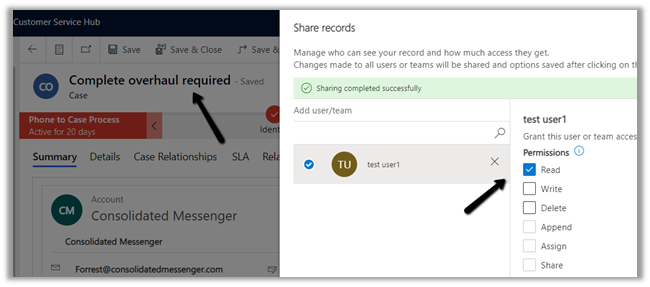
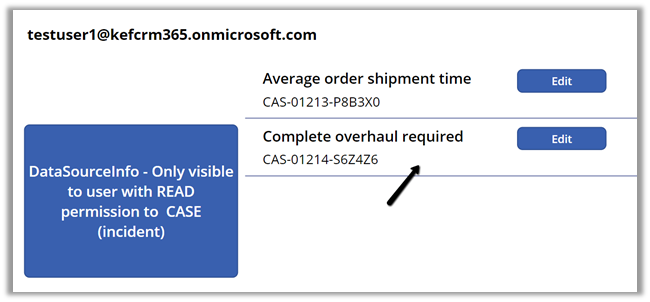
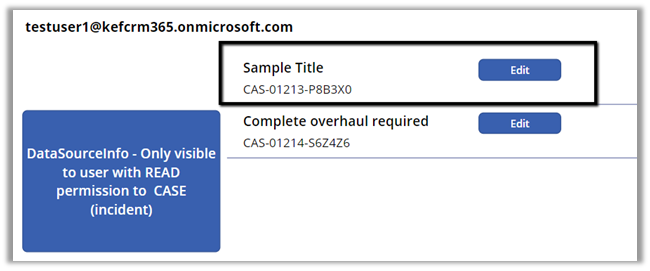
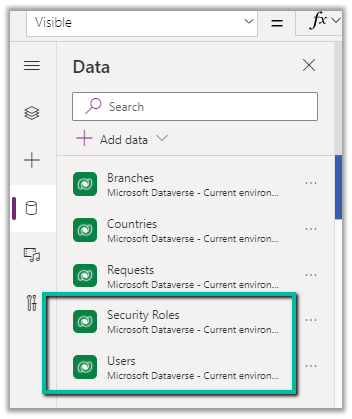
  • Fetch User’s Security Role and hide and show control based on it.

If(LookUp([@’Security Roles’], Name = “Maker”, Role) in Concat(LookUp([@Users], ‘Primary Email’ = User().Email).’Security Roles (systemuserroles_association)’, Role & “;”), true, false)

  • Submit, Reset, and New Form on saving a record on OnSelect of Button

SubmitForm(frmRequest);

ResetForm(frmRequest);

NewForm(frmRequest);

  • DataField is the most important property of the DataCard, which binds the control to the field in the Data Source.

The default value of the DataCard.

  • ThisItem is how we interact with the current record.

  • On SubmitForm – the form control reads the value of DataField property of all the cards to find the field to change and the value of each card from the Update property.

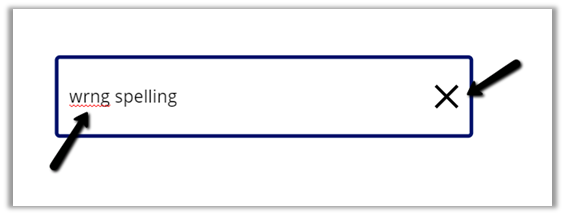
  • Clear Button and Enable Spell Check option for Text Input

checks for the spelling as well provide the option to clear the text box as shown below.

Update / Set a Contextual Variable (referenced on the screen where they are created) 

UpdateContext({varCount: 1, varActive: true, varName: User().FullName})

Set a global variable (available across the app

Set(varCount, 1);Set(varActive, true);Set(varName, User().FullName)

  • With UpdateContext we can declare more than one variable at a time, which is not possible with global variable.
  • Use GUID function à

To generate a new GUID use  GUID()

To convert a string to GUID(“0f8fad5b-d9cb-469f-a165-70867728950e”)

  • To set a variable null – Set(myNullVar, Blank())
  • GroupBy  function – returns a table with records grouped together based on the values in one or more columns.

https://docs.microsoft.com/en-us/powerapps/maker/canvas-apps/functions/function-groupby

GroupByTableColumnName1 [, ColumnName2, … ], GroupColumnName )

  • ForAll function – to evaluate a formula against all records of a Table

ForAll(TableFormula)

  • Table – Required. Table to be acted upon.
  • Formula – Required. The formula to evaluate for all records of the Table.

https://docs.microsoft.com/en-us/powerapps/maker/canvas-apps/functions/function-forall

  • Component – Reusable control

https://docs.microsoft.com/en-us/powerapps/maker/canvas-apps/create-component

  • Pass parameter 

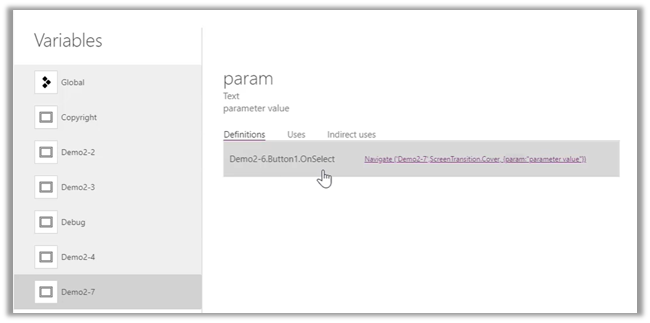
https://docs.microsoft.com/en-us/powerapps/maker/canvas-apps/functions/function-param#param

  • Patch gives more control than SubmitForm

https://sharepains.com/2020/06/19/patch-vs-submitform-vs-update-power-apps/

  • Delegable data sources – Dataverse, SharePoint, SQL Server

https://docs.microsoft.com/en-us/powerapps/maker/canvas-apps/delegation-overview

https://docs.microsoft.com/en-us/connectors/commondataservice/#power-apps-delegable-functions-and-operations-for-dataverse

  • Get the response from Power Automate

  • App OnStart Property

https://docs.microsoft.com/en-us/powerapps/maker/canvas-apps/functions/object-app#onstart-property

  • Using Excel as Static Data for the app.

http://powerappsguide.com/blog/post/code-how-to-define-a-read-only-table-of-static-data

  • Connection.Connected (Offline) – to check if app is connected to network or not.

https://docs.microsoft.com/en-us/powerapps/maker/canvas-apps/functions/signals#connection

  • Concurrent Function to evaluate multiple formulas at the same time.

https://docs.microsoft.com/en-us/powerapps/maker/canvas-apps/functions/function-concurrent

  • IfError for Error handling

https://docs.microsoft.com/en-us/powerapps/maker/canvas-apps/functions/function-iferror#iferror

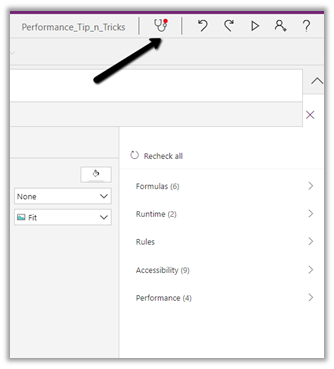
  • AppChecker – for checking the canvas app for accessibility.

https://docs.microsoft.com/en-us/powerapps/maker/canvas-apps/accessibility-checker

Hope it helps ..

Advertisements

How to – Hide and show controls in Canvas App based on security role of the user (Dataverse / Dynamics 365)


Suppose we have the below Maker and Checker Canvas App, with two button one for raising the request and the other for approving and rejecting the request.

We have below custom security roles created in our Dynamics 365

  • Maker
  • Checker

Here we want Submit a Request button to be visible only to users with Maker security role and the Approve and Reject Request button to users with Checker role.

For this we can write the below formula on Visible property of the button.

Add the Users and Security Roles data sources first.

If(

LookUp([@’Security Roles’], Name = “Maker”, Role) in Concat(LookUp([@Users], ‘Primary Email’ = User().Email).’Security Roles (systemuserroles_association)’, Role & “;”),

true,

false

)


Based on email address of the user, we are comparing the Maker security role with all the different roles assigned to the user, which we are fetching from systemuserroles_association.

  • User function in Power Apps

https://docs.microsoft.com/en-us/powerapps/maker/canvas-apps/functions/function-user

  • Lookup function in Power Apps

https://docs.microsoft.com/en-us/powerapps/maker/canvas-apps/functions/function-filter-lookup

Hope it helps..

If(LookUp([@'Security Roles'], Name = "Maker", Role) in Concat(LookUp([@Users], 'Primary Email' = User().Email).'Security Roles (systemuserroles_association)', Role & ";"),
true,
false)
Advertisements