Use Sales Copilot to compose email messages (preview)– Dynamics 365


Sales Copilot can generate and suggest email content while composing or replying to an email in Dynamics 365 in the context of a Lead or Opportunity record.

Allow data movement across regions in the Power Platform Admin Center using Enable copilots and generative AI features outside United States and Switzerland – Power Platform | Microsoft Learn

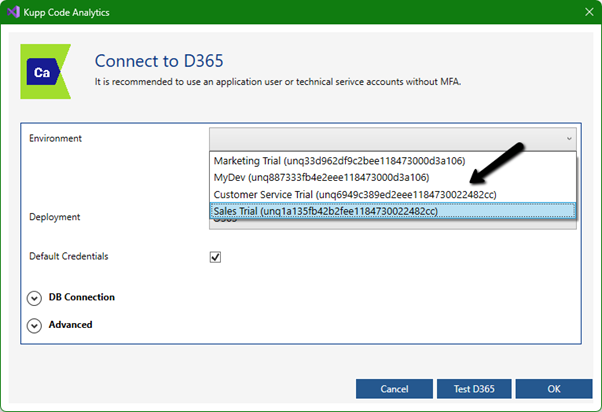
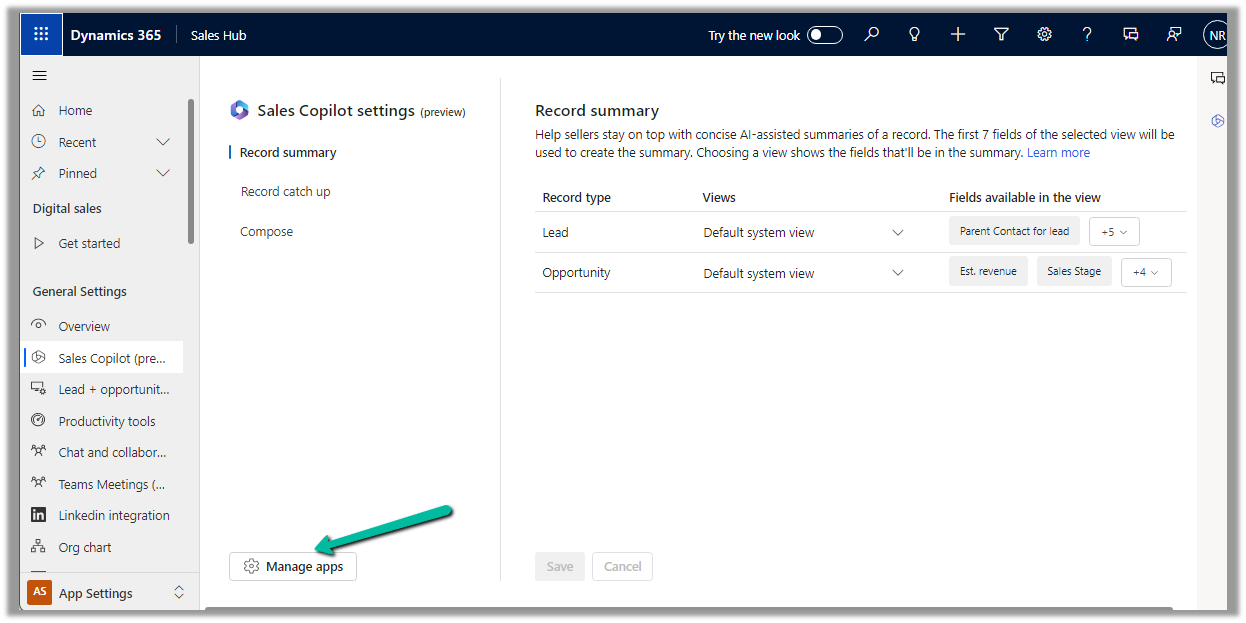
To enable Sales Copilot, navigate to

Sales Hub >> App Settings >> Sales Copilot (preview) >> Set up Sales Copilot

Or if we have already enabled it, we can manage the features provided along with the different apps we want to apply the Sales Copilot using the Manage apps option.

Here we can specify to which apps we want to enable the Compose and Chat feature

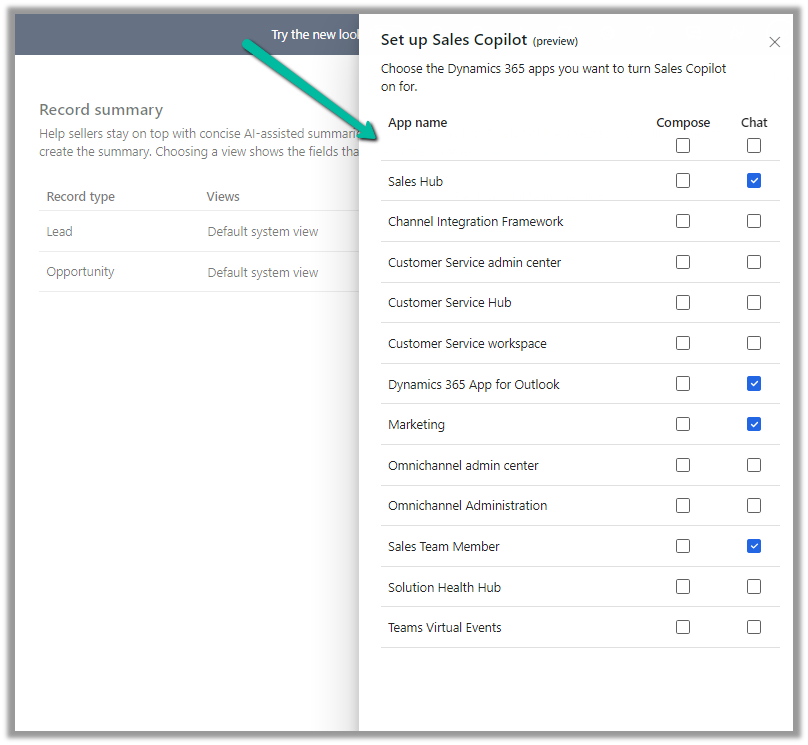
The Compose refers to the AI-driven email insights here.

Let us create a new Email from the timeline of the lead record.

We can see the Sales Copilot Compose in the inactive state right now. It becomes active when opening an email record or creating a new email record with either lead or opportunity in the Regarding field.

On the new email record, we can see the Compose tab enabled, and the option Describe the email you want.

We get the option to specify the statement, for which the content should be generated.

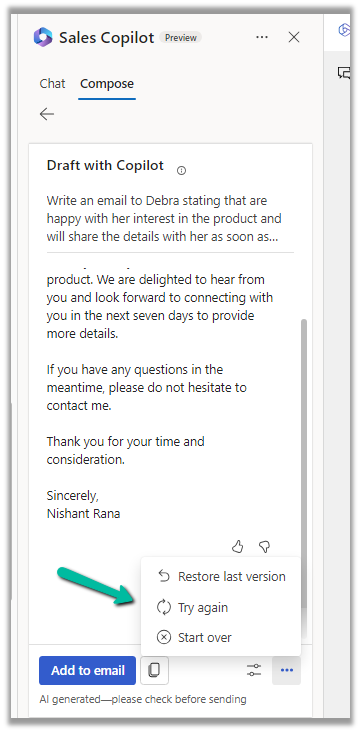
Below we can see the suggested content

We also get the option to Add content to the Email, Copy it

Adust tone and add more details

Also, Restore the last version, Try again, Start Over

Similarly, in the case of replying to an email we get the below options to start with along with an Email Conversation Summary.

Selecting the Address a Concern option generates the following content.

Get all the details here

Hope it helps..

Advertisements

Date Time Fields (Date Only and User Local – Behaviour) in Power Automate (Dataverse)


Recently we faced an issue in our flow that was showing a different date that the date entered by the user for a date time field.

Let us look at the below scenario to understand it.

Say we have the below field Date and Time with Time Zone Adjustment as User Local created in CRM / Dataverse.

Now user enters the below value in in the field and saves the record which triggers the flow.

The user’s time zone is set as below

Now in our Power Automate flow, we can see the UTC date for it.

2023-08-27T20:00:00Z

Now to convert to the user’s New Zealand Time Zone we can make use convertTimeZone function here

convertTimeZone(triggerOutputs()?[‘body/cr0e8_mydatetimefield’],’UTC’, ‘New Zealand Standard Time’, ‘MM/dd/yyyy’)

We get the date as expected i.e. 28th

Now let us change the Format of the field to Date Only, and we keep the Time zone adjustment as User Local only.

Let us trigger the flow again. (now we don’t have the time part)

We get the date without time part as expected.

But this time the convertTimeZone
function doesn’t work, as we only have the Date part and it is not in the UTC format.

convertTimeZone(triggerOutputs()?[‘body/cr0e8_mydatetimefield’],’UTC’, ‘New Zealand Standard Time’, ‘MM/dd/yyyy’)


Check this thread that talks about it –

https://powerusers.microsoft.com/t5/Building-Flows/Dataverse-Date-only-field-is-set-1-day-off-from-original-value/td-p/805859

Here one quick fix could be to change the Time zone adjustment to Date Only or Time zone independent for that field(i.e. no time zone conversion).

https://learn.microsoft.com/en-us/power-apps/maker/data-platform/behavior-format-date-time-field#date-and-time-column-behavior-and-format

Now triggering the flow again, we get the below values –

as now there is no time zone conversion for that field.

Hope it helps..

Advertisements

Getting Started – Installation and Setup Kupp Code Analytics


In the previous post, we covered key features and capabilities of Kupp Code Analytics – the powerful Visual Studio Extension for Power Platform and Dynamics 365 Developers.

You can refer to it here

In this blog post, we’d cover the installation and setup of the Kupp Code Analytics extension.

To get the extension, inside Visual Studio Marketplace, we can search for it and download the appropriate extension.

Below we can see that there are 2 versions of the extension available, one for Visual Studio 2022 and the other for Visual Studio 2019.

Visual Studio 2022 – https://marketplace.visualstudio.com/items?itemName=KuppSoftware.kca2022

Visual Studio 2019https://marketplace.visualstudio.com/items?itemName=KuppSoftware.KuppCodeAnalytics2019

We can also install it from inside Visual Studio, navigate to Extension, search for Kupp Code Analytics, and download the extension.

Click on Install / Modify (if already existing) to start/modify the installation.

Below we have successfully installed the extension for Visual Studio 2019.

Next, we need to specify and activate the License

We have 2 types of licenses available for the extension.

Community License (free)– Select type Single, enter the contact details and click on Activate to apply for the community license. Clicking on Activate activates the license instantly.

Enterprise License – This is paid license for the enterprise, that comes with additional features and capabilities not available in the Community license.

We can contact the sales team of Kupp for it – https://kuppsoft.com/contact/

Once added, we can see and manage the license information in Tools >> Options >> Kupp Code Analytics >> License

With Extension Installed, and the license activated, the next step is to configure the tool to connect to our Power Platform / Dynamics 365 Environment.

Navigate to Extensions >> Kupp Code Analytics >> Connection >> Configure

Select the appropriate connection or deployment type

Here to connect to Dynamics 365 Online, we keep the Deployment type as O365 and click on Load Organization

This opens the sign-in dialog where we can provide the appropriate account details.

After successful sign-in, we see all the environments populated to which the user has access. Select the environment, we want to connect to.

After selecting the environment, we can click on the Test D365 button and test the connection.

On a successful connection, we will get the success message as shown below.

Clicking on OK will close the connection dialog box, and the tool will start the process of downloading the metadata for the environment connected. The download should be complete in a matter of a few seconds.

This completes the installation and configuration part of the extension. In the next blog post, we’d cover the key features of the extension in detail.

Also don’t forget to check out the other intuitive products developed by Kupp Software GmbH –https://kuppsoft.com/our-products/

Hope it helps..

Advertisements

How to – Create an Automated low-code plug-in (Dataverse) (experimental)


In the previous post, where we installed the Dataverse Accelerator app and saw how to write basic low-code Instant Plugins.

Here we’d look at the Automated low-code Plugins.

Select the New Plugin option in the Dataverse Accelerator app to create Automate Plugins.

We get the option to select the table, the event, define the behavior of the plugin using Power FX, specify pre or post-operation, and the solution as shown below.

To keep it simple, we have created a plugin on pre-operation that checks for null, the email address field in the Contact record on Create, and if blank throws an error.

On trying to create a contact record without an email address, we get the exception as specified in the plugin.

That’s all we are done with our plugin.

Now interestingly if we check our solution specified, we will not find our plugin there. We need to add them to the solution manually right now, here we need to look for FxExpression.

Read more about it here – https://debajmecrm.com/how-to-write-plugins-in-dataverse-using-low-code-powerfx-functions/

And all the details here

Hope it helps..

Advertisements

How to – Create an Instant low-code plug-in (Dataverse) (experimental)


Low-code plug-in is a new experimental feature released by Microsoft, for early adopters, not meant to be used in production. As per Microsoft, “the experimental features can change radically or completely disappear at any time“.

There are 2 types of low-code plug-ins we can write – Instant and Automated.

Instant plug-ins are triggered manually and support parameters, whereas automated plug-in as the name suggests, runs when a particular event (create, update, or delete) occurs on a table and they do not support parameters.

As a prerequisite, we need to first install the Dataverse Accelerator

We can install it from Admin Center >> Resources >> Dynamics 365 Apps

Or from the App Source, look for Dataverse Accelerator and click Get in now.

https://appsource.microsoft.com/en-us/product/dynamics-365/microsoftpowercatarch.dataversekit1?exp=kyyw

Specify the Environment to start the installation. (Should take around 5 minutes)

Open the Dataverse Accelerator App.

Click on + New plugin for the Instant Plugins

Provide the display name and the description for the plugin, and also select the appropriate solution.

We can specify optional Input and Output parameters along with the Expression that uses Power FX formulas to define the logic for the plugin.

Our sample plugin takes City as the Input Parameter and returns the total number of contact records having that same city.

Save the plugin and click on Test.

Provide the value for the input parameter and click on Run.

We can see the status as Success and the output parameter Result having a value of 4.

This completes our plugin.

Now to use it, click on the Integrate tab.

The tab provide us the required details.

We can copy the Power FX expression and use it inside the Canvas App.

We get the output as expected.

Below we are calling it from within the Power Automate Flow from a Perform an unbound action

The result –

Get more details and Check out the known limitations

Hope it helps..

Advertisements

Try the new modern look for the Model-driven app (Preview)


The new modern refreshed look for the Model-driven app can be enabled from Maker Portal >> Model-driven App (Edit) >> Settings >> Upcoming – Try the new look and feel (preview)

The new look makes use of the latest Fluent UI React Components

Or now we see the option to Try the new look in the app itself in the command bar.

Let us look at the changes

  • Grids now have the checkboxes added to it

(open the image in new tab to view it clearly)

  • Infinite scrolling
  • The same grid is applied to Sub Grid and Associated Grids
  • Forms now have a new Command Bar, refreshed BPF, Sections, etc.
  • Form fields now have a background, icon placement, stying changes, etc.

Get all the details here

Hope it helps..

Advertisements