Fixed – change the owner of the Flow or Flow client error returned with the status code “Forbidden” and ConnectionAuthorizationFailed in Power Automate


Recently while trying to change the owner of the workflow we were getting the below error 

Flow client error returned with status code “Forbidden” and details “(“error”:X [“code”: “ConnectionAuthorizationFailed”, “message”: “The caller object id is ‘ffcdd1fc-2858-4019-9a96-19d73ae124c8″. Connection ‘providers/Microsoft.PowerApps/APIs/shared_commondataserviceforapps/connections/shared-commondataser-87229e07-1003-4e05-8172-fdaf112ceb98’ to ‘shared_commondataserviceforapps cannot be used to activate this flow, either because this is not a valid connection or because it is not a connection you have access permission for. Either replace the connection with a valid connection you can access or have the connection owner activate the flow, so the connection is shared with you in the context of this flow.”}}”.

Below are the steps we were following to change the owner of the cloud flow –

https://learn.microsoft.com/en-us/power-automate/change-cloud-flow-owner

Select Edit for the flow, specify the owner and save.


In our case, the owner had left the organization and the user’s record was not available in the CRM. Finally, we managed to change the owner and fix the issue, by assigning the new owner to the corresponding modern flow record through the below steps – 

  • Open Advanced Find
  • Search for Process Type equals Modern Flow


  • Select the flow, click on the Assign Process button and specify the new owner.


This way we were able to change the owner without any error and got the flow working properly.

Hope it helps..

Advertisements

Fixed – The reference assemblies for. NETFramework,Version=v4.6.2 were not found. To resolve this, install the Developer Pack (SDK/Targeting Pack) for this framework version or retarget your application


Recently while trying to use the Power Platform Toolshttps://learn.microsoft.com/en-us/power-apps/developer/data-platform/tools/devtools-install , got the below error in Visual Studio 2019. (not supported for VS 2022)


To fix it either you can, open Visual Studio Installer and select Modify and select the appropriate developer pack.


Or as specified in the error message, open https://aka.ms/msbuild/developerpacks, and download the appropriate Developer pack from there.


This fixed the issue –


Hope it helps..

Advertisements

Power Apps Component Life Cycle – Quick look


We can read about the architecture and the life cycle of the Power Apps component here.

Check the screencast – PowerApps Component Life Cycle

Let us see it in action using a sample project.

Launching the test harness, we can see the init executed followed by updateView.

Making any change in the component’s form factor, width, height, or Data Inputs property triggers the updateView method.

Now let us update the index.ts and add a textElement along with an event listener for its change event.

Inside the test harness, when we change the Value of the sampleProperty, if we want the value of the textElement to be updated, we need to use the updateView method to fetch the changed value from the bound sample property field and reflect this new data in the UI.

We can get the value of the sampleProperty from the context and use it to set the textElement value as shown below.

Now let us do the opposite, let us change the value inside the textElement. Here as expected none of the methods triggers.

Here we need to call the notifyOutputChanged method, to notify the host that the component’s output has changed.

On calling notifyOutputChanged, the framework runtime will first call getOutputs to get the value of the bound properties of the component, and then notifies the host.

The host will perform the validation and if the output received is valid it will call the updateView.

But before we do that let us first try setting the value of the sampleProperty in the change event handler of the textElement. Here on changing the value inside the text box, we can see only the change event handler is triggered. No other methods are triggered here as expected.

There is no update in the value of the bound sampleProperty.

This is because we need to call the notifyOutputChanged method to let the host know about the changes made in the value inside the text box.

On calling the notifyOutputChanged and changing the text value this time, we can see the getOutputs being called.

The value remains the same for the bound property and updateView method is not called as our getOutputs method was not returning anything.

Let us update the getOutputs method to return the sampleProperty having the text value.

On changing the textElement value this time getOutputs is called, followed by updateView.

To summarize,

  • To notify the host, about the user changes in the UI                                                ècall notifyOutputChanged
    è the framework will call the getOutputs
    è followed by èupdateView
  • Host changes the data/properties                                                               èupdateView will be called è context passed è we can update the UI as per our requirements

Check the following links to understand more about the life cycle –

https://dianabirkelbach.wordpress.com/2020/03/29/pcf-when-is-updateview-called/

https://dianabirkelbach.wordpress.com/2022/02/28/async-requests-inside-pcf-init-and-updateview/

To learn about PCF –

Getting started with PCF Custom Controls by Danish Naglekar

https://www.youtube.com/watch?v=ZYOHaHUf83Y

https://www.youtube.com/watch?v=o3OW6UW-RMI&list=PLqJfvq4Fy1P5TgPGm8Ny_legkZUk5BfyV&index=2

PCF Academy by Andrew Butenkohttps://www.youtube.com/watch?v=YJ9hrKxAhTU&list=PL0WiRFWRFGlQr5tGZdUGUlyTl7Gi1Wb_K

https://bgx.blob.core.windows.net/files/powerplatform/PCFControlGuide.pdf

Hope it helps..

Advertisements

How to – Set up Omnichannel Voice using Azure Communication Service (ACS)


To add Voice Calling (PSTN – Public Switched Telephone Network) connectivity to an app or service, we can buy a number from Microsoft, which acts as a PSTN carrier (based on availability in the region).

https://learn.microsoft.com/en-us/dynamics365/customer-service/voice-channel-region-availability#azure-direct-routing

This is the easiest way to connect ACS (Azure Communication Services) to PSTN, managed by Microsoft. Here Microsoft will provide the numbers, and there is no deployment or maintenance of the on-premises deployment required for PSTN (Voice Calling).

If Voice Calling (PSTN) is not available in the region or if we want to use a different PSTN carrier we can opt for Azure direct routing. The advantage of Azure direct routing is that we can use a telephony carrier of our choice, by connecting Azure Communication Services to the supported SBC – Session Border Controller.

A session border controller (SBC) is a dedicated hardware device or software application that governs how phone calls are initiated, conducted, and terminated on a voice-over-Internet Protocol (VoIP) network.

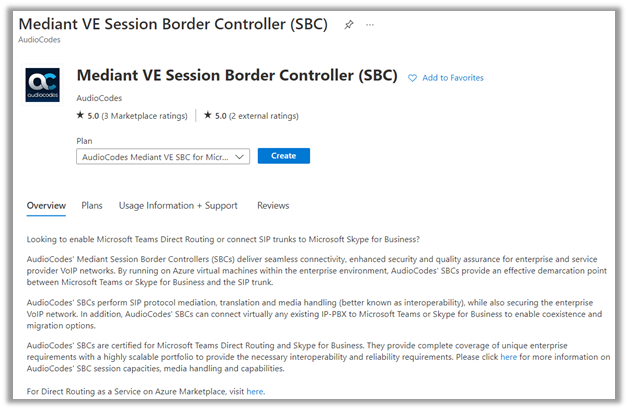
For Direct Routing to work, we could configure products from the certified SBC Vendors, one such example is AudioCodesMediant VE Session Border Controller (SBC) from Azure Marketplace.

List of certified SBC Vendors

https://learn.microsoft.com/en-us/azure/communication-services/concepts/telephony/certified-session-border-controllers#certified-sbc-vendors

SIP stands for Session Initiation Protocol, and is essentially a way to make end connections for data and voice transfers over the internet, similar to HTTP functions for pages on the internet, provides a way to convert voice signals into data that can be decoded by devices used by the caller. The trunk is used to refer to a bundle of phone lines shared between users.

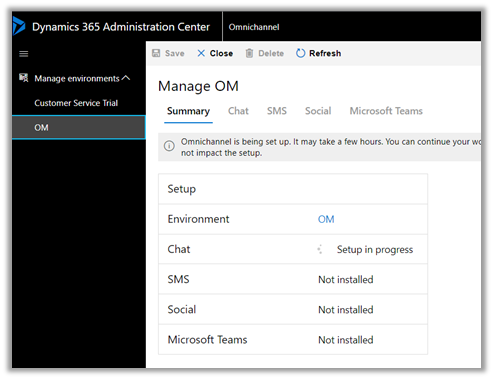
To configure the Omnichannel’s voice configuration using the ACS, navigate to Phone Numbers in the Omnichannel admin center and click on Get started.

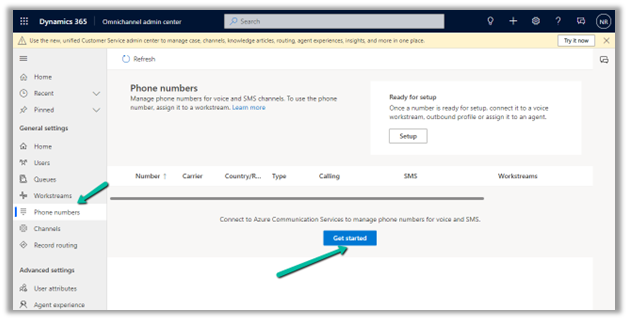
The Get started option gives us the option to create and deploy a new ACS resource or select an existing ACS resource.

Get started option will only appear if we have trial has ended, or we have ended it manually or disconnected any existing ACS connection.

https://learn.microsoft.com/en-us/dynamics365/customer-service/voice-channel-connect-existing-resource?tabs=customerserviceadmincenter#prerequisites

https://learn.microsoft.com/en-us/dynamics365/customer-service/voice-channel-acs-resource

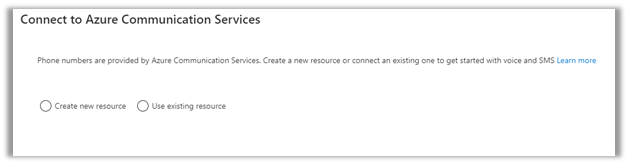
With Create new resource option, we can create a new Azure
Subscription, Azure
Resource Group, provide a Resource Name, and can select Deploy to create and deploy the required resource.

For the Use existing resource option, we need to specify the following details.

Note – To enable call recording and SMS service using Azure Event Grid – https://learn.microsoft.com/en-us/dynamics365/customer-service/voice-channel-connect-existing-resource?tabs=customerserviceadmincenter#enable-call-recording-and-sms-services

To create ACS Resource, login to Azure Portal and search for Communication Services.

Once the ACS resource is created, we have the option to configure the Phone Numbers (if we are using the numbers provided by Microsoft) or Direct Routing (for other carriers) as specified earlier.

We’d get the following options while adding Phone numbers –

  • Country or Region
  • Use Case – application or person.
  • Number Type – local or toll free.
  • Calling and SMS.

In the Numbers tab, we can find and purchase the number.
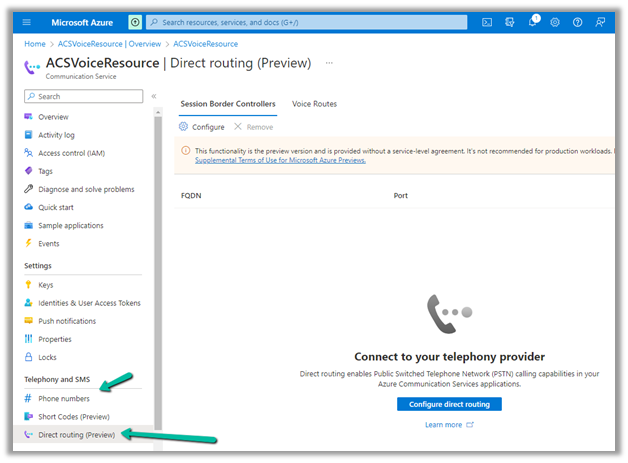
For Direct Routing

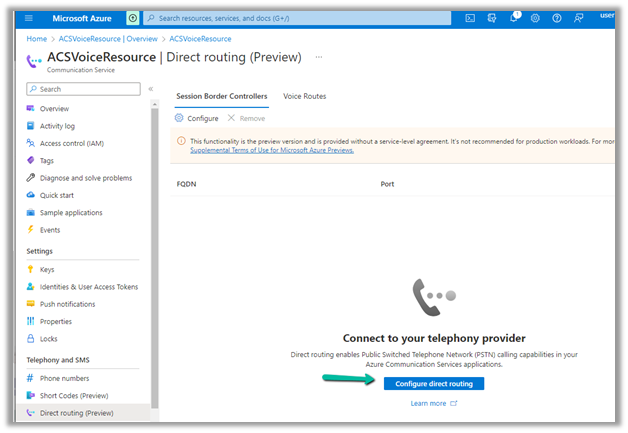
In the Session Border Controllers tab, will be specifying the FQDN
Fully Qualified Domain Name of the SBC along with the signal port number.

In the Voice Routes tab, we’d specify the number pattern and the corresponding session border controller that allows a call to be sent to a specific SBC based on the called or dialed number pattern.

https://learn.microsoft.com/en-us/azure/communication-services/concepts/telephony/direct-routing-provisioning#voice-routing-considerations

On saving the details, it will validate the information entered.

Once we have set up the ACS, next we’d register an application in Azure, these are required details inside Omnichannel Administration App while configuring the ACS in the Event grid app id and Event grid app tenant id.


The remaining ACS details required, we’d get from the ACS resource created earlier.

Enter the details and click on Connect.

Once the connection is successful, select Advanced.acsad

For Direct Routing, select Add number for Bring your own number via Azure Direct Routing (preview)

Note – SMS is not supported with Azure direct routing

https://learn.microsoft.com/en-us/dynamics365/customer-service/voice-channel-bring-your-own-number?tabs=customerserviceadmincenter

bron

Specify details of the required details –

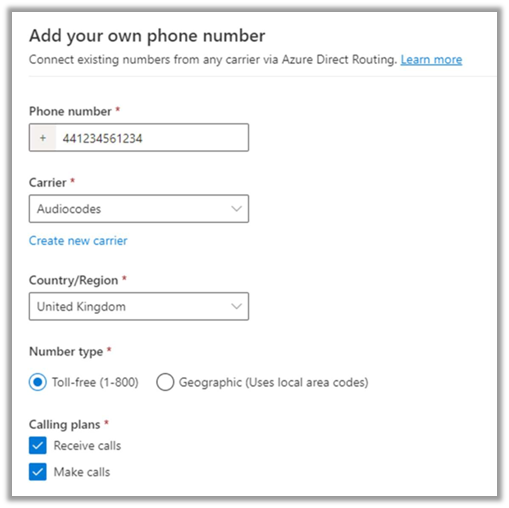
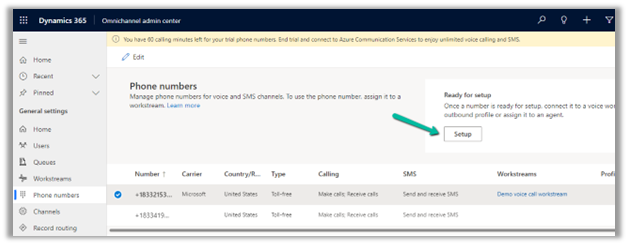
This adds the number to the phone number list and is ready for setup.

Next click on Setup

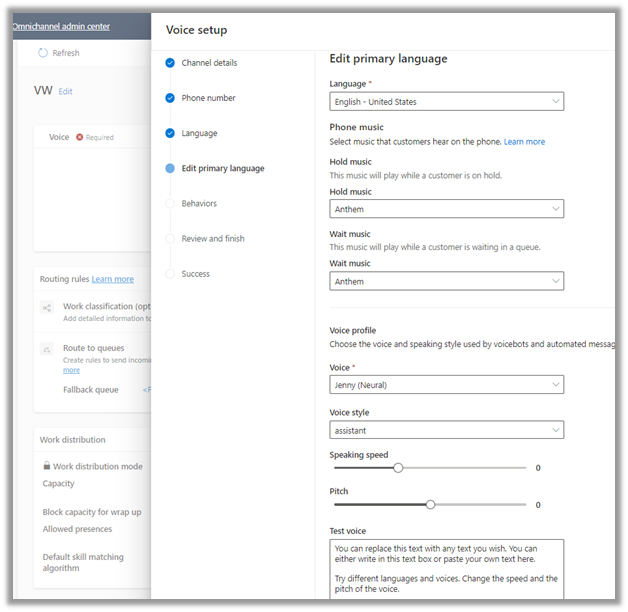
Select the Setup workstream option there.

Specify other required details like phone number, language, behaviors, etc.

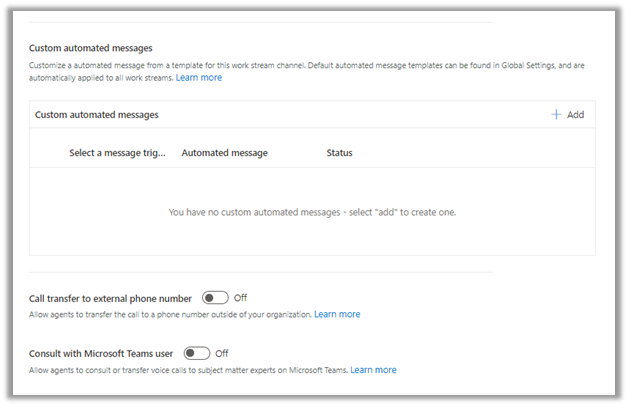
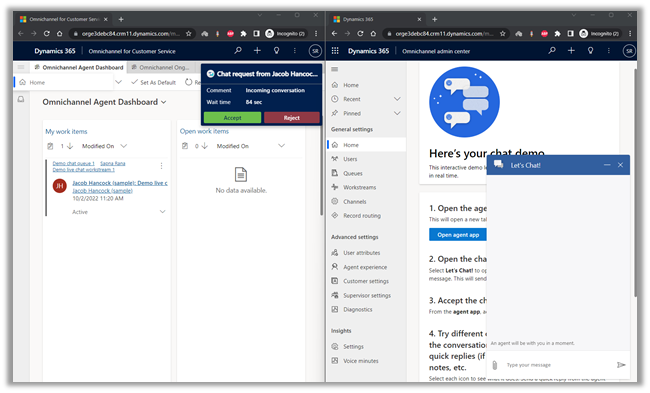
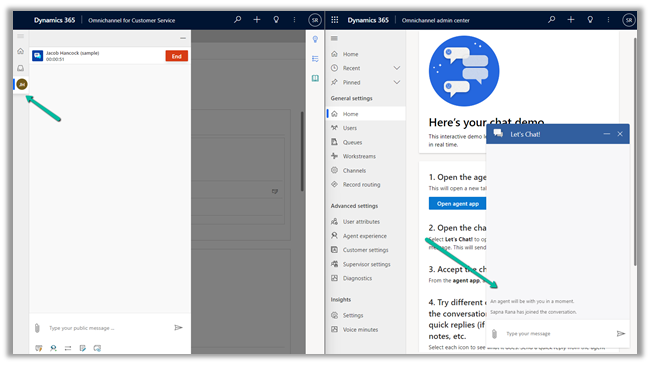
After we have configured the workstream successfully, we can call the number configured to see the Voice Channel in action.

So, for Omnichannel voice to work, we can either use Voice Calling (PSTN) provided by Microsoft or if it is not available or we want a different carrier, we can do it via Azure Direct Routing, which requires appropriate infrastructure in place along with certified Session Border Controller (SBC) and a working connection between SBC to Azure Communication Services.

Helpful links –

https://learn.microsoft.com/en-us/azure/communication-services/concepts/telephony/direct-routing-infrastructure

https://triciasinclair.com/2022/04/25/setting-up-omnichannel-voice-using-azure-communication-service/

https://neilparkhurst.com/2022/02/09/omnichannel-for-customer-service-voice-channel/

https://learn.microsoft.com/en-us/dynamics365/customer-service/voice-channel-connect-existing-resource?tabs=customerserviceadmincenter#enable-call-recording-and-sms-services

Hope it helps..

Advertisements

How to – Provision / Setup Omnichannel for Customer Service trial – Dynamics 365


In this post, we’d start by creating a trial of Dynamics 365 Customer
Service.

Navigate to – https://dynamics.microsoft.com/en-us/customer-service/overview/

And select Try for free

Enter your email details and follow the steps.

In a few mins, the trial will be ready.

Clicking on Launch Trial opens the Customer Service Workspace app.

Below are the other apps we can see installed as part of the Customer Service Trial, including the Omnichannel Admin Center and Omnichannel for Customer Service along with the Customer Service admin center app.


Opening the Omnichannel Admin Center app allows us to configure the Chat Demo.

In a few seconds, the demo will be configured.

Clicking on the Open agent app opens the Omnichannel  for Customer Service App.

Click on Let’s Chat! widget to start the chat.

Opening the Let’s Chat widget sends the notification to the agent as shown below.

Clicking on Accept in the notification starts a new session.

It also starts the conversation.

The agent can click on End or the customer can close the Chat Widget to end the conversation

The End button is grayed out and the customer gets the message as Agent has ended the conversation.

As we can see, we have the working Omnichannel trial environment ready for us to try out different channels/features, etc.

In Power Platform Admin Center, if we check inside Resources >> Dynamics 365 Apps for the Customer Service Trial we can see the Omnichannel Apps installed.

Interestingly if we navigate to Resources >> Dynamics 365 apps and check the Omnichannel for Customer Service app we see the status Not configured.

Clicking on the Manage option, opens the dialog box, informing us that it will navigate us to Dynamics 365 apps admin page.

In our case it kept us asking to sign in, instead of taking us to the admin page.

So next we tried Providing the data access consent as mentioned in the MS Docs.

https://learn.microsoft.com/en-us/dynamics365/customer-service/omnichannel-provision-license#provide-data-access-consent

For which we got the below error.

As it failed, we tried the same after assigning the Power BI (free) license to the admin user. (The user should also have Microsoft 365 Global Admin roles along with System Administrator in the env.)

https://learn.microsoft.com/en-us/dynamics365/customer-service/try-channels

https://learn.microsoft.com/en-us/dynamics365/customer-service/omnichannel-provision-license#prerequisites

And it worked this time.

This time clicking on Manage for the Omnichannel for Customer Service, took us to the Dynamics 365 Admin page.

Inside Dynamics 365 Administration Center we can manage the environments in which we want to install or remove the Omnichannel as well as different channels inside it.

From the Admin Center, we managed to upgrade the Omnichannel in the Customer Service Trial environment and also configure it in another sandbox environment.

Interestingly even after the update/setup was completed

the status of Omnichannel for Customer Service on the Dynamics 365 Page was “Not configured”, which could be some bug or something as mentioned in the MS Docs.

https://learn.microsoft.com/en-us/dynamics365/customer-service/omnichannel-provision-license#set-up-omnichannel-for-customer-service-

“You can safely ignore the status”

So in our case, when we had configured the Customer Service Trial, the Omnichannel was already configured in that environment as we saw earlier. We were mainly facing issues to access the Dynamics 365 Administration Center, which got resolved after assigning the Power BI License to the admin user followed by giving the required consent.

Kindly refer to the below links to learn about Omnichannel in in-depth

https://neilparkhurst.com/2022/08/11/omnichannel-for-customer-service-collection-2/

https://thecrm.ninja/omnichannel-for-dynamics-365/

https://www.youtube.com/watch?v=WM2JLGNPzT8

Hope this helps..

Advertisements

How to – Clone a record in Dataverse / Dynamics 365 (C#)


Here we will be cloning the below contact record –

For it, we can make use Clone method of EntityExtensions class

If we run the below code, we will get the “Cannot insert duplicate key” exception.

Because we need to set the ID for the newly cloned record to either empty or a new GUID.

Also, we need to remove the contactid attribute or entity’s id field else we will get the below exception – “Entity Id must be the same as the value set in property bag

Also if we are retrieving all the attributes we need to make sure we remove those attribute which can cause below unique constraint errors.

Sql error: The operation attempted to insert a duplicate value for an attribute with a unique constraint. CRM ErrorCode: -2147012606 Sql ErrorCode: -2146232060 Sql Number: 2627

In case of contact, we had to remove the address id attributes, to get the record cloned.

Now let us clone the same contact record with its related leads.

  • Here first we need to retrieve contact along with its associated lead record.
  • Then remove the id attribute that could duplicate issues in the child lead records also.

Please refer the helpful posts –

https://debajmecrm.com/clone-record-dynamics-crm-clone-method/

https://www.inogic.com/blog/2014/08/clone-records-in-dynamics-crm/

https://dyncrmexp.com/2017/10/24/retrieve-primary-entities-along-with-related-entities-with-one-queryexpression/comment-page-1/

https://dynamict.eu/2016/08/09/create-record-with-related-records-in-a-single-request-using-c/

Hope it helps..

 // related lead records of contact
                    QueryExpression query = new QueryExpression("lead");                    
                    query.ColumnSet = new ColumnSet(true);

                    // contact and lead - 1 - n relationship
                    Relationship relationship = new Relationship("lead_parent_contact");
                    relationship.PrimaryEntityRole = EntityRole.Referenced;

                    RelationshipQueryCollection relatedEntity = new RelationshipQueryCollection();
                    relatedEntity.Add(relationship, query);

                    RetrieveRequest request = new RetrieveRequest();
                    request.RelatedEntitiesQuery = relatedEntity;
                    request.ColumnSet = new ColumnSet(true);
                    request.Target = new EntityReference("contact", new Guid("ca0aa844-57c6-ec11-a7b6-00224826af1e"));

                    RetrieveResponse response = (RetrieveResponse)svc.Execute(request);
                    var contactToBeCloned = response.Entity;                   
                    var clonedContact = contactToBeCloned.Clone(true);

                    // remove attribute that can cause error from main entity             
                    clonedContact.Id = Guid.NewGuid();
                    clonedContact.Attributes.Remove("contactid");                    
                    clonedContact.Attributes.Remove("address1_addressid");
                    clonedContact.Attributes.Remove("address2_addressid");
                    clonedContact.Attributes.Remove("address3_addressid");

                    // remove attribute that can cause error from child / related entities
                    foreach (var relatedEntities in clonedContact.RelatedEntities)
                    {
                        foreach(var leadEntity in relatedEntities.Value.Entities)
                        {
                            leadEntity.Id = Guid.NewGuid();
                            leadEntity.Attributes.Remove("leadid");
                            leadEntity.Attributes.Remove("address1_addressid");
                            leadEntity.Attributes.Remove("address2_addressid");
                        }
                    }
                    svc.Create(clonedContact);
Advertisements