Microsoft.Crm.CrmException: An application user’s access mode cannot be changed error in Dataverse (Dynamics 365 / CRM)


Just a short one –

As the error message suggests “An application user’s access mode cannot be changed “, it is not possible to change the Access mode of an application user from Non-interactive to either administrative or Read-write.

While trying to change the Application User’s Access Mode to Read-Write, the error message –

Get all the details about different type of users –

https://docs.microsoft.com/en-us/power-platform/admin/create-users#user-types

also check – https://community.dynamics.com/365/sales/f/dynamics-365-for-sales-forum/367844/when-uisng-non-interactive-users-when-using-application-users

Hope it helps..

Advertisements

Sample Code – Update format of Autonumber attribute in Dataverse (Dynamics 365 / CRM)


At times we may have a requirement to update the format of the Auto Number dynamically / programmatically so that the new set of records take up the new format.

Let us understand through a simple example.

Right now for the below field, we have the auto-number format set as

{SEQNUM:4}


Below is the sample code to update the auto-number format programmatically.

It makes use of our RetrieveAttribute and UpdateAttribute requests.

https://docs.microsoft.com/en-us/dynamics365/customerengagement/on-premises/developer/create-auto-number-attributes?view=op-9-1#autonumberformat-options

We have retrieved the attribute then have specified a new auto number format, followed by update request.

After executing the above code successfully, and creating a new contact record we can see the new number generated as per the specified format.

Sample Code

        string ConnectionString = "AuthType = OAuth; " +
              "AppId=51f81489-12ee-4a9e-aaae-a2591f45987d; " +
              "Username=test@test.onmicrosoft.com; " +
              "Password=test; " +
              "RedirectUri=app://58145B91-0C36-4500-8554-080854F2AC97;" +
              "Url = https://test.crm.dynamics.com/;";


        CrmServiceClient svc = new CrmServiceClient(ConnectionString);

        if (svc.IsReady)
        {
            var retAttributeRequest = ((RetrieveAttributeResponse)
                             svc.Execute(new RetrieveAttributeRequest
                             {
                                 EntityLogicalName = "contact",
                                 LogicalName = "cr59f_myautonumber",
                                 RetrieveAsIfPublished = true
                             })).AttributeMetadata;

            retAttributeRequest.AutoNumberFormat = "MyFormat-{SEQNUM:6}-{DATETIMEUTC:yyyyMMddhh}-{RANDSTRING:6}";

            var updateAttrRequest = new UpdateAttributeRequest
            {
                EntityName = "contact",
                Attribute = retAttributeRequest
            };

            var updateAttrResponse = (UpdateAttributeResponse)
                svc.Execute(updateAttrRequest);

Check other posts on Auto Number attribute –

Hope it helps..

Advertisements

Power Apps grid control in Model-driven apps (Dynamics 365 / CRM)


Power Apps grid control is a new read-only control, now auto-enabled as part of 2022 Release Wave 1 for Model-driven apps.

We can also enable it by navigating to Customization, selecting the entity, then the Controls tab, and clicking on Add Control option.

Select the Power Apps Grid control.


Here we have enabled it for the Web.

The different properties that can be set for the control are –

  • Jump bar – this will be disabled by default.
  • Reflow behavior
  • Allow filtering

With Jump bar disabled –


Enable the jump bar.

After enabling the jump bar, we get the option to filter by alphabets.

It will also support Infinite Scrolling

We can use Edit Columns to add, remove and order the columns for the view

Edit Filters allows us to edit the filters.

Any changes made to the column or filter can be saved as a personal view.

Also, Grid remembers the context, here we have filtered the record by search text = “Blue”

Let us open the first record.

On navigating back, the context is retained.

We can also show and hide the Edit Columns and Edit filters option on views from Power Platform Admin Center >> [Environment] >> Settings >> Features >> Grid and Views section


Hope it helps ..

Advertisements

Manage and share views in Modern Advanced Find – Dataverse (Dynamics 365 / CRM)


Let us have a quick look at this new feature introduced as part of 2022 Release Wave 1.

Make sure we have updated the environment to 2022 Release Wave 1.

Then navigate to [Environment] >> Settings >> Features

Switch On – Modern Advanced Find and Allow users to hide system view 


Reset Default View
is the only option available before we switch on the Modern Advanced find feature.


After enabling the Modern Advanced Find feature

We get the option to Search Views as well as Manage and share views


Search Views – It allows us to filter / search within the views.


Manage and share views – It opens the dialog listing the views.


We can sort by

  • Personal before system, A to Z
  • System before personal, A to Z
  • A to Z


To hide a view we can select hover and select the option to hide.

With Allow users to hide system views  option switched on, the user has the option to hide system view also, else he could only hide the personal views.


For System Views, we have the option to either Hide or Set as a default view.

For Personal Views, we have more options like 

Hide, Set as default view, Share etc. as shown below.

Learn everything about the new Modern Advanced Find View  – https://jukkaniiranen.com/2022/02/modern-advanced-find-test-drive/

https://powerapps.microsoft.com/en-us/blog/modern-advanced-find-with-enhanced-view-management-in-model-driven-apps/

Hope it helps..

Advertisements

How to – Unify (Map, Match and Merge) Entities in Dynamics 365 Customer Insights


In the earlier posts, we set up the trial of Dynamics 365 Customer Insights, configured our data sources, one from Microsoft Dataverse and the other from a local excel file.

In this post, we will unify the contact in our different data sources and create the Customer Profile.

Navigate to Unify, and click on +Select entities to select our contact entities from the different data sources for creating the customer profile.

We have selected all the fields from ContactsLocal Excel Data Source.

We have selected Id, emailaddress1, first name, gender code, last name, mobile phone field selected from the contact entity of CRMDataSource.

Click on Apply.

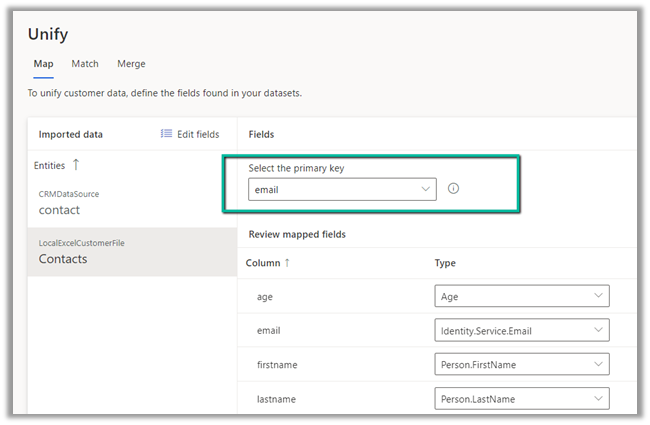
For CRM Data Source – Contact, we can see the field auto mapped as we have Intelligent mapping on by default.

For the primary key, we have specified ID as the primary key.

For Contact – Local Excel Data Source, we can see one field not mapped.

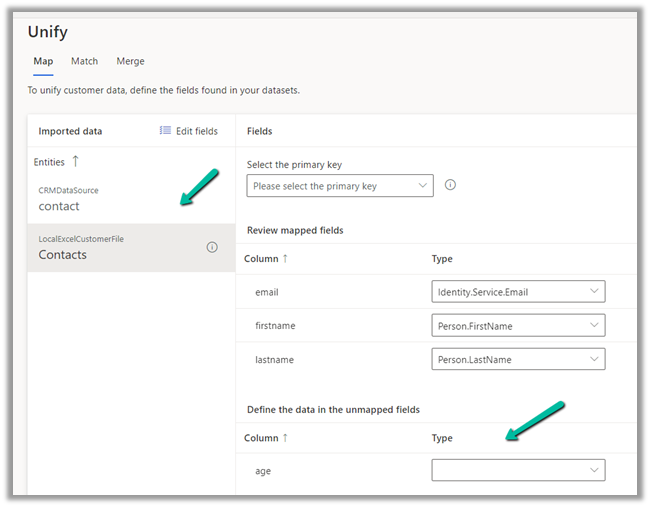
As we cannot find the field in the existing list of fields, we can type in and that will create the new field.

For the primary key, we have selected email.

Save the mapping.

Now let us move to Match.

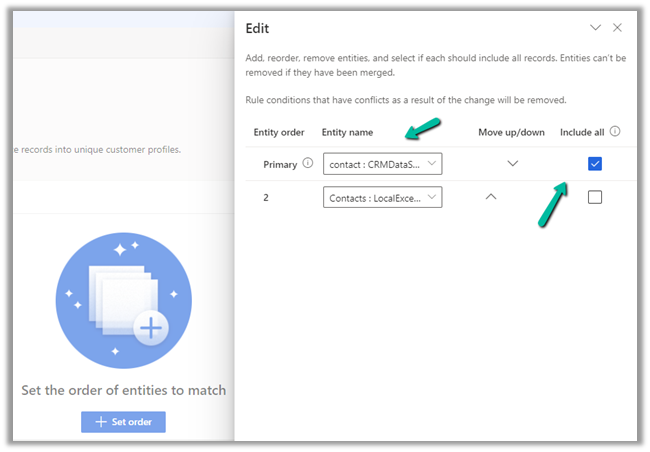
Here we will define the order first.

Here we have specified our CRM’s Contact as the primary data source and specified that all the records from it should be included.

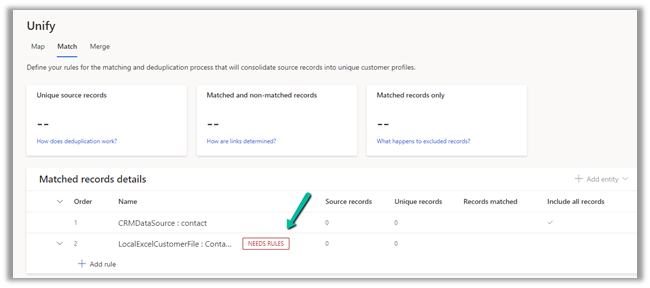
Next, we need to define the rules for matching the records between the data sources.

We have selected the email field and set the precision as Basic – Medium.

The other option for Precision is Custom, where a value between 1 to 100 can be specified and we can also add additional rules.

For now, we’d only keep the email address rule with precision as a basic – medium.

Save the changes and Run the rule.

We can see the results after some time.

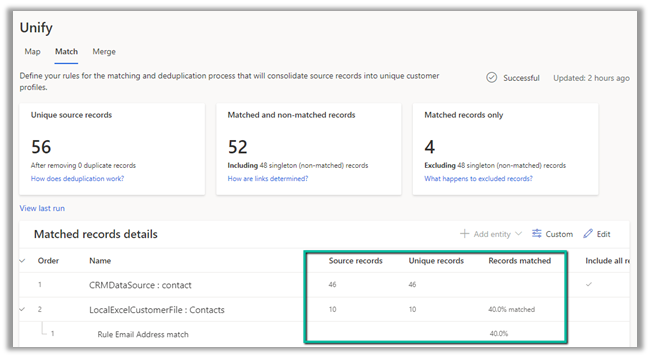
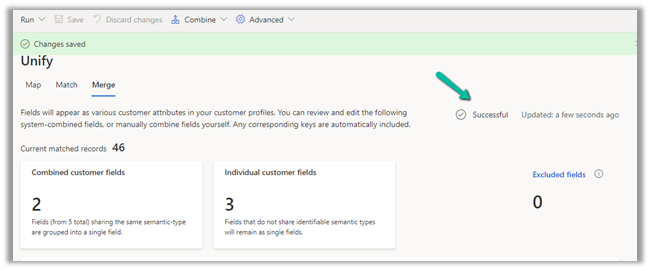
Time for Merge now. Clicking on Merge, we can see that it has auto-combined 2 fields first name and last name.

We have the option of Editing, renaming, separating, excluding, moving fields up and down.

We’d save and run the Merge.

For Run, we have 2 options –

Run Only Merge will affect the unified customer entity, whereas Run Merge and downstream processes will run enrichment, segments, measures process followed by changes in the customer profile.

Here we have selected Run Only Merge.

After around 5 minutes we can see the Merge successful.

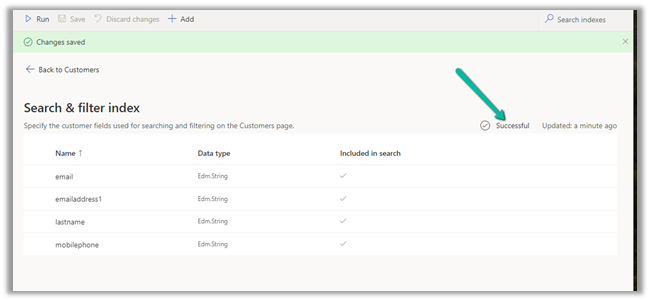
Clicking on Customers asks us to configure the last step – Search & filter index.


Click on Add fields to define fields for searching and filtering.

We have selected below fields for indexing

Save and Run.

After a couple of minutes, we can see the indexing is successful.

Click on Back to customers to see our customer profile ready.

We will explore other features of Customer Insights in the coming posts.

Hope it helps..

Advertisements

How to – Import Data from local data files to Dynamics 365 Customer Insights


Continuing our previous posts,

Set up Dynamics 365 Customer Insights Trial

Import Data from Dataverse

here we will import the contact records from a local excel file.

Navigate to Data >> Data Sources and click on Add data source

This time we will select the import method as Microsoft Power Query

Select Excel Workbook as the source.

Select Upload File (preview) option that lets us upload or drag a file directly from the local machine.

It will upload the file to the user’s OneDrive for Business account.

On dragging or uploading the file, we need to specify details for Connection Credentials i.e. create a new connection (if not already existing).

We have the different options for

  • Authentication kind – Anonymous or Organization Account.
  • Privacy Level – None, Private, Organizational, Public.

Let us change the Authentication kind to Organization account (followed by sign-in) and Privacy Level as Public and click on Next.

After successful sign-in, click on Next.

We can also see the file uploaded in the one drive.

Now within the Power Query editor, we have set the first row as a header.

Also, we need to remove the space from the column name (if any).

Save the query and click on Next.

For now, we have set the Refresh Settings as Refresh manually.

We can see the new data source added and being refreshed.

We have just 10 records in our Contact excel file.

It took around 2 hours for refresh to complete.

We can see the contact entity from the excel file added in Entities.

Click on it to see the Attributes.

And the Data

Now we have our contacts data ready from 2 different data sources ready, one from Dataverse and another from excel for the map, match, and merge, which we would do in the next post.

Hope it helps..

Advertisements