How to – Immediately (sync)bulk delete AsyncOperation or Workflow System Job records in Dataverse (Dynamics 365 / CRM)


Recently we noticed File usage of some of our environments reaching around 50 GB, and most of it was because of the AsyncOperation table.

async

So to quickly delete the AscyncOperation records the option we can choose is –

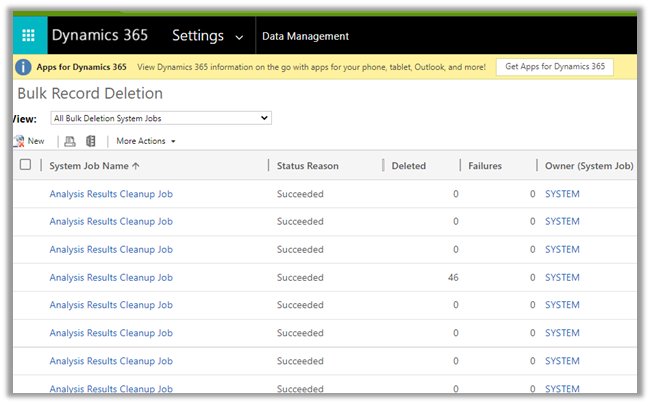
Create a new Bulk Record Deletion job from Settings >> Data Management

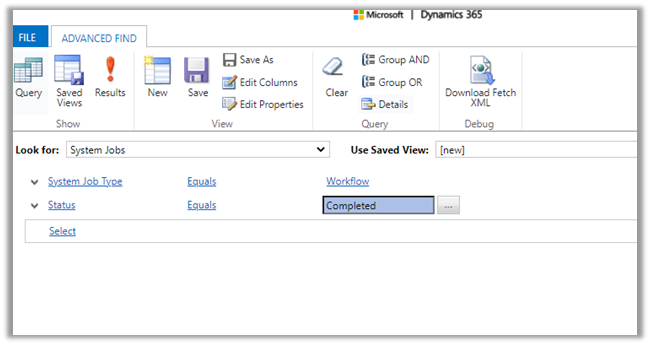
Select System Jobs table and filter as System Job Type equals Workflow

Select Bulk deletion job start time as Immediately

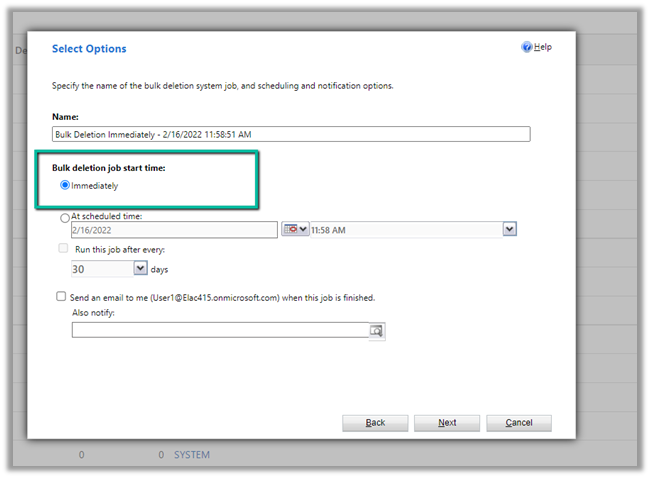
The Immediately option will only be available –

  • For entity – System Jobs
  • Filter Criteria is System Job type equals Workflow (we can add additional criteria)
  • User has organization-level
    delete rights on AsyncOpertion entity.

This will only delete the AsyncOperation records that are in the completed state of system job type workflow.

It will delete 1 million records whenever it is run. If there are more than 1 million records, it will have to be run again.

The key part is that it will delete the records through direct SQL Execution, so the records will be deleted immediately, rather than each record going through the delete pipeline, thus improving the performance immensely.

Back to our bulk deletion job, we can click on Submit to initiate the deletion.

We encountered a few errors when submitting, the solution was to keep trying, and eventually it will get submitted successfully.

error

After successful submission, we can see all our completed workflow system job records deleted immediately.

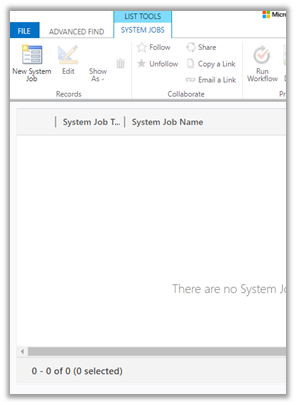
Also as it is Sync Job, we will not see it listed in Bulk Record Deletion views.

Get more details here –

https://cloudblogs.microsoft.com/dynamics365/it/2018/06/21/cleaning-up-records-from-the-asyncoperationbase-workflowlogbase-table/

https://docs.microsoft.com/en-us/power-platform/admin/free-storage-space#reduce-file-storage

Hope it helps..

Advertisements

Microsoft.Crm.CrmException: An application user’s access mode cannot be changed error in Dataverse (Dynamics 365 / CRM)


Just a short one –

As the error message suggests “An application user’s access mode cannot be changed “, it is not possible to change the Access mode of an application user from Non-interactive to either administrative or Read-write.

While trying to change the Application User’s Access Mode to Read-Write, the error message –

Get all the details about different type of users –

https://docs.microsoft.com/en-us/power-platform/admin/create-users#user-types

also check – https://community.dynamics.com/365/sales/f/dynamics-365-for-sales-forum/367844/when-uisng-non-interactive-users-when-using-application-users

Hope it helps..

Advertisements

Sample Code – Update format of Autonumber attribute in Dataverse (Dynamics 365 / CRM)


At times we may have a requirement to update the format of the Auto Number dynamically / programmatically so that the new set of records take up the new format.

Let us understand through a simple example.

Right now for the below field, we have the auto-number format set as

{SEQNUM:4}


Below is the sample code to update the auto-number format programmatically.

It makes use of our RetrieveAttribute and UpdateAttribute requests.

https://docs.microsoft.com/en-us/dynamics365/customerengagement/on-premises/developer/create-auto-number-attributes?view=op-9-1#autonumberformat-options

We have retrieved the attribute then have specified a new auto number format, followed by update request.

After executing the above code successfully, and creating a new contact record we can see the new number generated as per the specified format.

Sample Code

        string ConnectionString = "AuthType = OAuth; " +
              "AppId=51f81489-12ee-4a9e-aaae-a2591f45987d; " +
              "Username=test@test.onmicrosoft.com; " +
              "Password=test; " +
              "RedirectUri=app://58145B91-0C36-4500-8554-080854F2AC97;" +
              "Url = https://test.crm.dynamics.com/;";


        CrmServiceClient svc = new CrmServiceClient(ConnectionString);

        if (svc.IsReady)
        {
            var retAttributeRequest = ((RetrieveAttributeResponse)
                             svc.Execute(new RetrieveAttributeRequest
                             {
                                 EntityLogicalName = "contact",
                                 LogicalName = "cr59f_myautonumber",
                                 RetrieveAsIfPublished = true
                             })).AttributeMetadata;

            retAttributeRequest.AutoNumberFormat = "MyFormat-{SEQNUM:6}-{DATETIMEUTC:yyyyMMddhh}-{RANDSTRING:6}";

            var updateAttrRequest = new UpdateAttributeRequest
            {
                EntityName = "contact",
                Attribute = retAttributeRequest
            };

            var updateAttrResponse = (UpdateAttributeResponse)
                svc.Execute(updateAttrRequest);

Check other posts on Auto Number attribute –

Hope it helps..

Advertisements

Power Apps grid control in Model-driven apps (Dynamics 365 / CRM)


Power Apps grid control is a new read-only control, now auto-enabled as part of 2022 Release Wave 1 for Model-driven apps.

We can also enable it by navigating to Customization, selecting the entity, then the Controls tab, and clicking on Add Control option.

Select the Power Apps Grid control.


Here we have enabled it for the Web.

The different properties that can be set for the control are –

  • Jump bar – this will be disabled by default.
  • Reflow behavior
  • Allow filtering

With Jump bar disabled –


Enable the jump bar.

After enabling the jump bar, we get the option to filter by alphabets.

It will also support Infinite Scrolling

We can use Edit Columns to add, remove and order the columns for the view

Edit Filters allows us to edit the filters.

Any changes made to the column or filter can be saved as a personal view.

Also, Grid remembers the context, here we have filtered the record by search text = “Blue”

Let us open the first record.

On navigating back, the context is retained.

We can also show and hide the Edit Columns and Edit filters option on views from Power Platform Admin Center >> [Environment] >> Settings >> Features >> Grid and Views section


Hope it helps ..

Advertisements

Manage and share views in Modern Advanced Find – Dataverse (Dynamics 365 / CRM)


Let us have a quick look at this new feature introduced as part of 2022 Release Wave 1.

Make sure we have updated the environment to 2022 Release Wave 1.

Then navigate to [Environment] >> Settings >> Features

Switch On – Modern Advanced Find and Allow users to hide system view 


Reset Default View
is the only option available before we switch on the Modern Advanced find feature.


After enabling the Modern Advanced Find feature

We get the option to Search Views as well as Manage and share views


Search Views – It allows us to filter / search within the views.


Manage and share views – It opens the dialog listing the views.


We can sort by

  • Personal before system, A to Z
  • System before personal, A to Z
  • A to Z


To hide a view we can select hover and select the option to hide.

With Allow users to hide system views  option switched on, the user has the option to hide system view also, else he could only hide the personal views.


For System Views, we have the option to either Hide or Set as a default view.

For Personal Views, we have more options like 

Hide, Set as default view, Share etc. as shown below.

Learn everything about the new Modern Advanced Find View  – https://jukkaniiranen.com/2022/02/modern-advanced-find-test-drive/

https://powerapps.microsoft.com/en-us/blog/modern-advanced-find-with-enhanced-view-management-in-model-driven-apps/

Hope it helps..

Advertisements

How to – Unify (Map, Match and Merge) Entities in Dynamics 365 Customer Insights


In the earlier posts, we set up the trial of Dynamics 365 Customer Insights, configured our data sources, one from Microsoft Dataverse and the other from a local excel file.

In this post, we will unify the contact in our different data sources and create the Customer Profile.

Navigate to Unify, and click on +Select entities to select our contact entities from the different data sources for creating the customer profile.

We have selected all the fields from ContactsLocal Excel Data Source.

We have selected Id, emailaddress1, first name, gender code, last name, mobile phone field selected from the contact entity of CRMDataSource.

Click on Apply.

For CRM Data Source – Contact, we can see the field auto mapped as we have Intelligent mapping on by default.

For the primary key, we have specified ID as the primary key.

For Contact – Local Excel Data Source, we can see one field not mapped.

As we cannot find the field in the existing list of fields, we can type in and that will create the new field.

For the primary key, we have selected email.

Save the mapping.

Now let us move to Match.

Here we will define the order first.

Here we have specified our CRM’s Contact as the primary data source and specified that all the records from it should be included.

Next, we need to define the rules for matching the records between the data sources.

We have selected the email field and set the precision as Basic – Medium.

The other option for Precision is Custom, where a value between 1 to 100 can be specified and we can also add additional rules.

For now, we’d only keep the email address rule with precision as a basic – medium.

Save the changes and Run the rule.

We can see the results after some time.

Time for Merge now. Clicking on Merge, we can see that it has auto-combined 2 fields first name and last name.

We have the option of Editing, renaming, separating, excluding, moving fields up and down.

We’d save and run the Merge.

For Run, we have 2 options –

Run Only Merge will affect the unified customer entity, whereas Run Merge and downstream processes will run enrichment, segments, measures process followed by changes in the customer profile.

Here we have selected Run Only Merge.

After around 5 minutes we can see the Merge successful.

Clicking on Customers asks us to configure the last step – Search & filter index.


Click on Add fields to define fields for searching and filtering.

We have selected below fields for indexing

Save and Run.

After a couple of minutes, we can see the indexing is successful.

Click on Back to customers to see our customer profile ready.

We will explore other features of Customer Insights in the coming posts.

Hope it helps..

Advertisements