Configuring CRM Form inside The Portal Connector for Dynamics CRM / Dynamics 365


The Portal Connector makes it easy to quickly setup a portal that interacts with CRM.

Here let us look at a simple example of setting up Lead form in Insert Mode, which creates lead record in CRM.

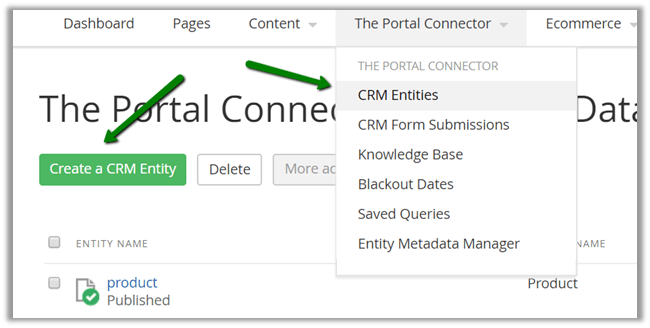
Open the Dashboard

Go to CRM Entities and click on Create a CRM Entity.

Here we are creating Lead entity.

Once our lead is setup, we’d create the form.

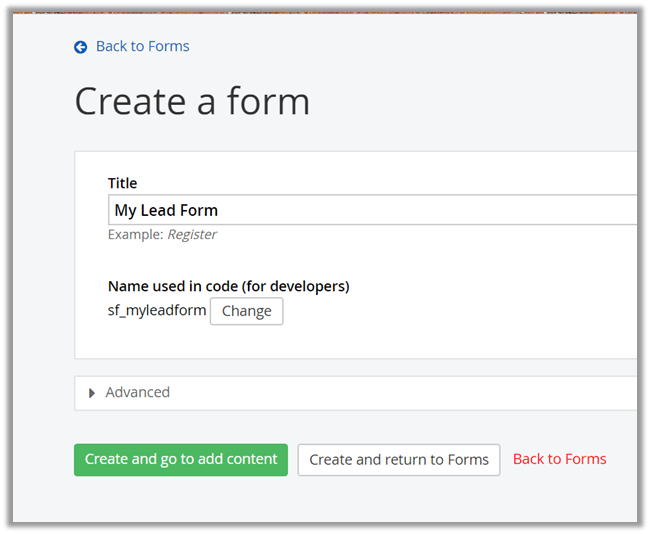
Go to Contents – Forms.

Click on Create a form.

Inside form, first go to Layout and select TPC Form Layout.

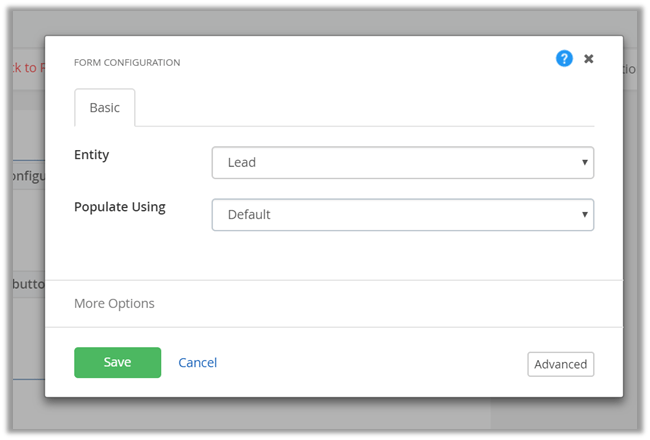
Then go to Content tab, and add Form Configuration

Click on Edit inside Form Configuration and specify the Lead entity we just created.

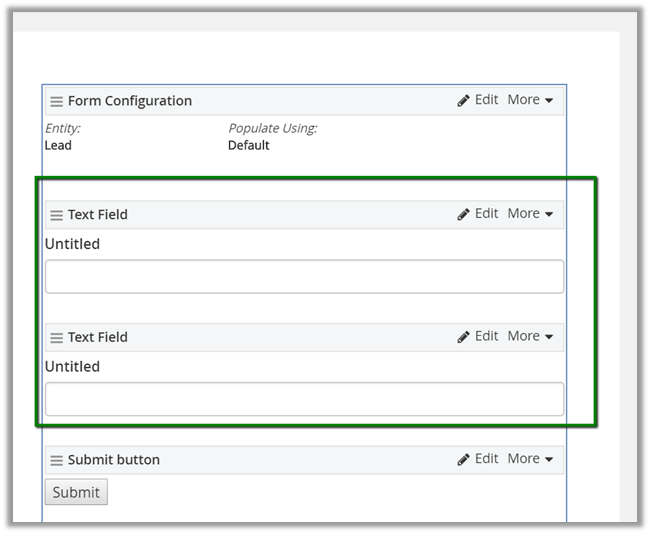
Drag and add two text fields, one we will configure against first name and other with last name.

Do the same for Last Name text box and publish the form.

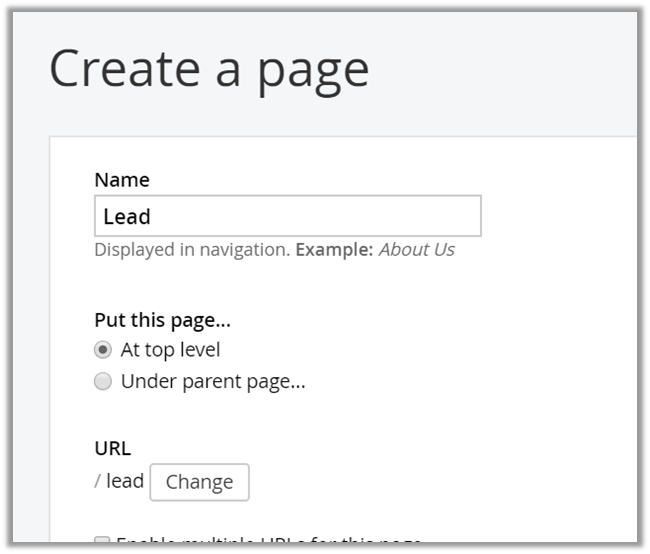
Next we need to create a Page wherein we’d display this form. Go to Pages and click on Create a page.

We have created a page named Lead.

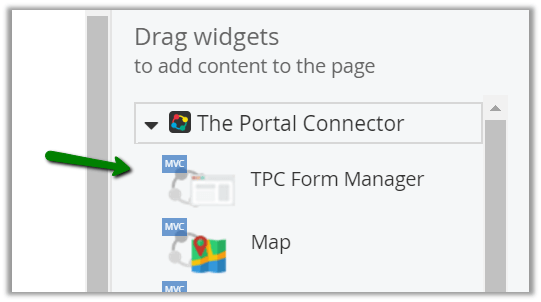
Drag TPC Form Manager in the page content.

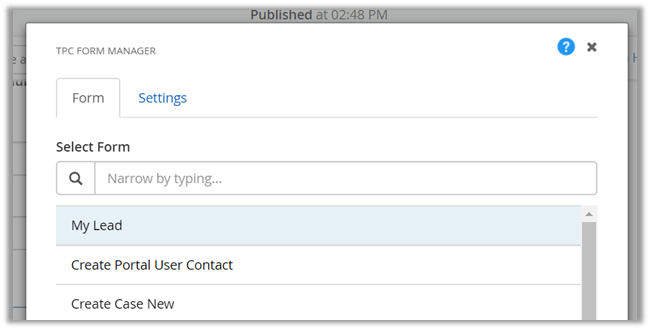
Configure it and specify our newly created My Lead form.

Select Insert Only check box.

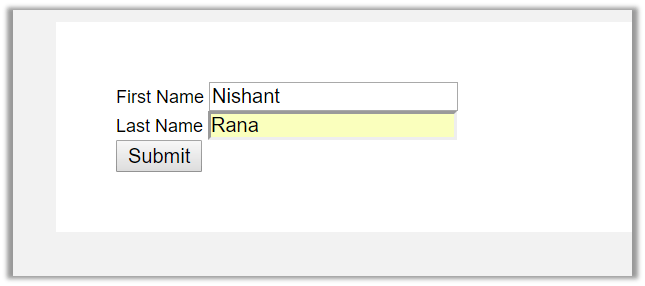
Publish the page and test it. Specify the values and click on Submit.

We’d get the following message.

The lead record created in CRM.

Hope it helps..

Fixed – Workflow must be in Published State error while converting Case to Work Order in CRM


Recently, while trying to convert a case to work order we got the below error.

The immediate thought was to check all the workflow associated to work order and case and see if they all are published, which in fact they were.

Then as suggested here

http://ms-crm-2011-beta.blogspot.ae/2016/11/workflow-must-be-in-published-state.html

we deactivated and activated one of our SLA written against the Work Order entity and it fixed the issue.

Hope it helps..

Sample code – Upload file to Azure Blob Storage from CRM Online Plugin


Sharing a sample code which we can use to upload files to Azure Blog Storage from within a CRM Online Plugin. Here we’d be making use of the REST API to simplify things (instead of using Windows Azure Storage library) in our Plugin.

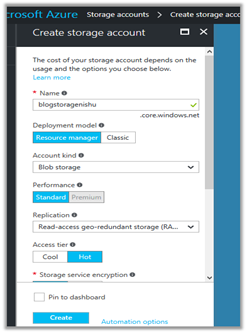
First, we will be creating a storage account of type blob storage and a container inside it.

Log in to Azure Portal

https://portal.azure.com

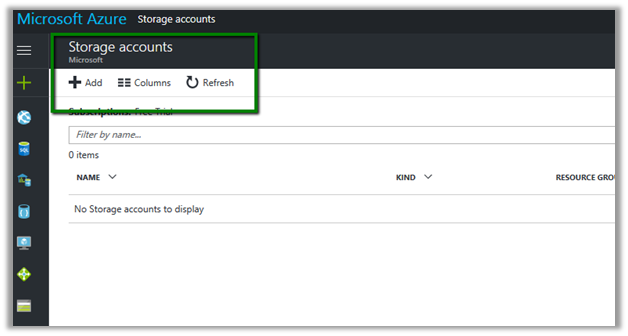
Click on Add to add a new storage account.


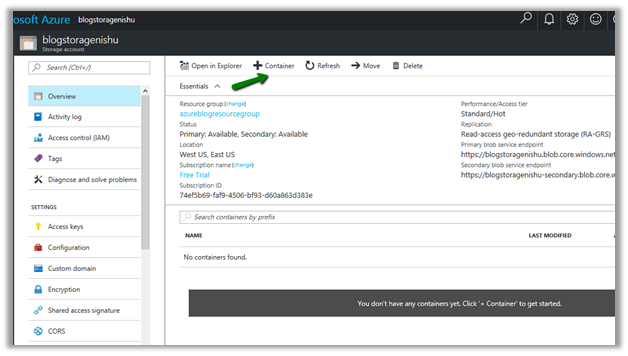
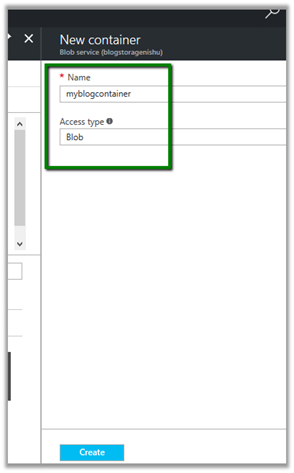
Create a new container in it to store the blob files


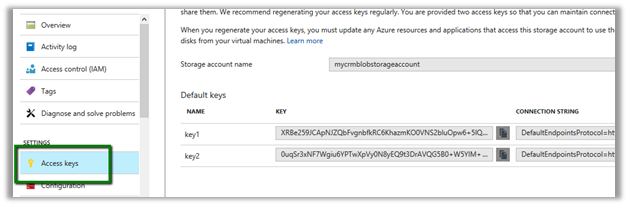
In Azure Portal – Storage Account, go to Access Keys and copy the key


And also note down the storage account name and container name which will be used to construct the URL.


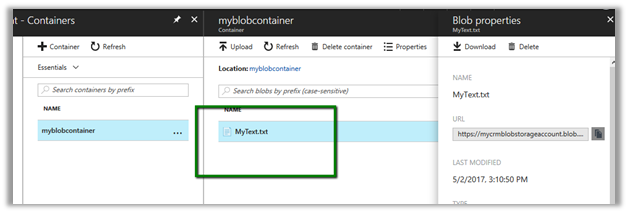
We can also go to container, select its properties and copy the url.


Here we have written the plugin on Create of Annotation, which then retrieves the attachment and uploads its content to the container.

Let us first see it in action.

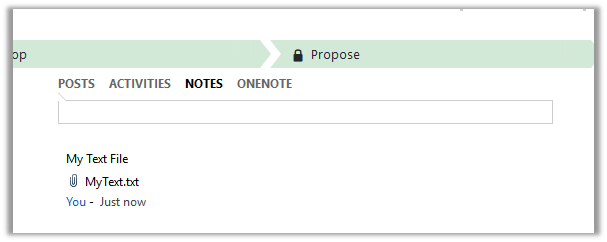
We have created a new note and attached a text file to it.


Going back to our portal, we can see the file in our container.


The sample code for the plugin.

<br />
using Microsoft.Xrm.Sdk;<br />
using System;<br />
using System.IO;<br />
using System.Net;<br />
using System.Security.Cryptography;<br />
using System.Text;<br />
namespace MyTestPlugin<br />
{</p>
<p>public class UploadFile : IPlugin<br />
{<br />
public void Execute(IServiceProvider serviceProvider)<br />
{<br />
try<br />
{<br />
// Obtain the execution context from the service provider.<br />
IPluginExecutionContext context = (IPluginExecutionContext)serviceProvider.GetService(typeof(IPluginExecutionContext));</p>
<p>// The InputParameters collection contains all the data passed in the message request.<br />
if (context.InputParameters.Contains("Target") &amp;&amp; context.InputParameters["Target"] is Entity)<br />
{<br />
// Obtain the target entity from the input parameters.<br />
Entity noteEntity = (Entity)context.InputParameters["Target"];<br />
byte[] doumentBody = Convert.FromBase64String(noteEntity.Attributes["documentbody"].ToString());<br />
string content = Encoding.UTF8.GetString(doumentBody);<br />
string fileName = noteEntity.Attributes["filename"].ToString();</p>
<p>// Upload the attached text file to Azure Blog Container<br />
UploadFileToAzureBlobStorage(content, fileName);</p>
<p>}<br />
}<br />
catch (Exception ex)<br />
{<br />
throw new InvalidPluginExecutionException(ex.Message);<br />
}<br />
}</p>
<p>void UploadFileToAzureBlobStorage(string content, string fileName)<br />
{</p>
<p>string storageKey = "storagekey";<br />
string storageAccount = "storageaccountname";<br />
string containerName = "strogaecontaninername";<br />
string blobName = fileName;</p>
<p>string method = "PUT";<br />
string sampleContent = content;<br />
int contentLength = Encoding.UTF8.GetByteCount(sampleContent);</p>
<p>string requestUri = $"https://{storageAccount}.blob.core.windows.net/{containerName}/{blobName}";</p>
<p>HttpWebRequest request = (HttpWebRequest)WebRequest.Create(requestUri);</p>
<p>string now = DateTime.UtcNow.ToString("R");</p>
<p>request.Method = method;<br />
request.ContentType = "text/plain; charset=UTF-8";<br />
request.ContentLength = contentLength;</p>
<p>request.Headers.Add("x-ms-version", "2015-12-11");<br />
request.Headers.Add("x-ms-date", now);<br />
request.Headers.Add("x-ms-blob-type", "BlockBlob");<br />
request.Headers.Add("Authorization", AuthorizationHeader(method, now, request, storageAccount, storageKey, containerName, blobName));</p>
<p>using (Stream requestStream = request.GetRequestStream())<br />
{<br />
requestStream.Write(Encoding.UTF8.GetBytes(sampleContent), 0, contentLength);<br />
}</p>
<p>using (HttpWebResponse resp = (HttpWebResponse)request.GetResponse())<br />
{<br />
if(resp.StatusCode == HttpStatusCode.OK)<br />
{<br />
// successfully uploaded<br />
}<br />
}</p>
<p>}</p>
<p>public string AuthorizationHeader(string method, string now, HttpWebRequest request, string storageAccount, string storageKey, string containerName, string blobName)<br />
{<br />
string headerResource = $"x-ms-blob-type:BlockBlob\nx-ms-date:{now}\nx-ms-version:2015-12-11";<br />
string urlResource = $"/{storageAccount}/{containerName}/{blobName}";<br />
string stringToSign = $"{method}\n\n\n{request.ContentLength}\n\n{request.ContentType}\n\n\n\n\n\n\n{headerResource}\n{urlResource}";</p>
<p>HMACSHA256 hmac = new HMACSHA256(Convert.FromBase64String(storageKey));<br />
string signature = Convert.ToBase64String(hmac.ComputeHash(Encoding.UTF8.GetBytes(stringToSign)));</p>
<p>String AuthorizationHeader = String.Format("{0} {1}:{2}", "SharedKey", storageAccount, signature);<br />
return AuthorizationHeader;<br />
}<br />
}</p>
<p>}</p>
<p>

Hope it helps.

Advertisements

Using Azure Functions for writing Scheduled Jobs for Dynamics CRM


Update -26 – Sep- 2018

https://nishantrana.me/2018/09/26/changing-the-target-runtime-version-of-azure-functions/

https://nishantrana.me/2018/09/25/the-type-or-namespace-name-xrm-could-not-be-found-are-you-missing-a-using-directive-or-an-assembly-reference-error-while-using-azure-functions-2-x/


In our previous post we saw how we can invoke CRM from within the Azure Function.

https://nishantrana.me/2017/04/28/call-dynamics-crm-from-azure-functions/

Using that knowledge, let us now write an Azure Function that will run periodically.

Here we will take a simple example of creating a lead record every 2 minutes. Obviously real world scenario would involve much complex scenario like checking the status of all the open records and update them daily something of that sort.

Another way of writing a scheduled job is using Web Job I have written about it over here.

https://nishantrana.me/2017/03/21/dynamics-crm-web-job-and-azure-scheduler/

Login to Azure Portal and create a new Function App

Create a new function with Timer and CSharp template.

function.json bindings defines the schedule for the timer, it take a CRON expression for value schedule.

CRON Expression format: –

If we want it to run every 2 minute

‘

Back to our code let us click on Run and test it.

Now let us quickly plumb the code to create Lead in CRM.

Go to App Service Editor for the Function App and add new a file named project.json which refers to the CRM Nuget Package.

Sample code that creates the lead record in CRM.


using System.Net;
using Microsoft.Xrm.Sdk;
using Microsoft.Xrm.Sdk.Client;

public static void Run(TimerInfo myTimer, TraceWriter log)
{
IServiceManagement orgServiceManagement = ServiceConfigurationFactory.CreateManagement(new Uri("https://nishutrial.crm.dynamics.com/XRMServices/2011/Organization.svc"));

AuthenticationCredentials authCredentials = new AuthenticationCredentials();
authCredentials.ClientCredentials.UserName.UserName = "test@test.onmicrosoft.com";
authCredentials.ClientCredentials.UserName.Password = "*******";
AuthenticationCredentials tokenCredentials = orgServiceManagement.Authenticate(authCredentials);

OrganizationServiceProxy organizationProxy = new OrganizationServiceProxy(orgServiceManagement, tokenCredentials.SecurityTokenResponse);
Entity lead = new Entity("lead");
lead.Attributes["subject"] = "Lead Created at" + DateTime.Now ;
organizationProxy.Create(lead);

log.Info($"C# Timer trigger function executed at: {DateTime.Now}");
}

Inside CRM

To monitor our Azure Function please select Monitor

Click on live event stream to monitor it real-time.

To stop or disable the function, select Manage and click on function state Disabled.

Hope it helps..

How to – Call Dynamics CRM from Azure Functions


Update -26 – Sep- 2018

https://nishantrana.me/2018/09/26/changing-the-target-runtime-version-of-azure-functions/

https://nishantrana.me/2018/09/25/the-type-or-namespace-name-xrm-could-not-be-found-are-you-missing-a-using-directive-or-an-assembly-reference-error-while-using-azure-functions-2-x/


Let us take a look at a simple Azure Function that refers our CRM assemblies and creates contact record in CRM.

Log in to Azure Portal, search for Function App and create a Function App.

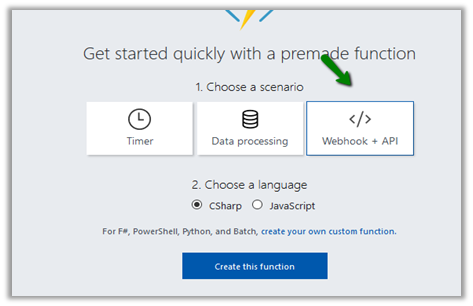
Here we have specified WebHook + API and CSharp Template. Click on Create this function.

Select the function app, go to Platform features tab and click on App Service Editor.

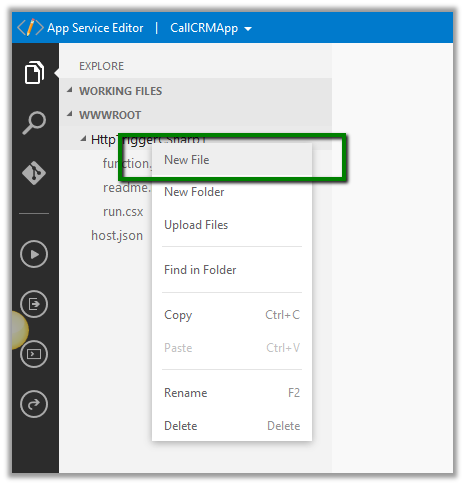
Right click the function and add a new file named project.json. It is within this file we will refer our Nuget Packages that we need in our function.

https://docs.microsoft.com/en-us/azure/azure-functions/functions-reference-csharp

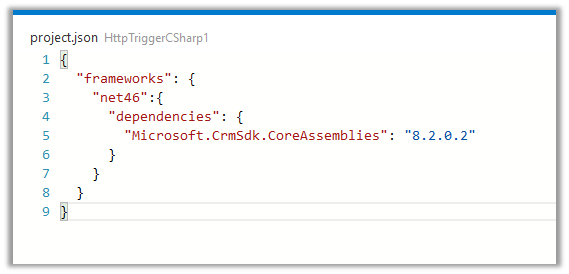
Here we will reference the following Nuget Package for CRM

https://www.nuget.org/packages/Microsoft.CrmSdk.CoreAssemblies/

</p>
<p>{<br />
"frameworks": {<br />
"net46":{<br />
"dependencies": {<br />
"Microsoft.CrmSdk.CoreAssemblies": "8.2.0.2"<br />
}<br />
}<br />
}<br />
}</p>
<p>

Back in our Function when we click on Save or Run, we can see the required assemblies being installed in our Log.

The sample code for the Azure Function (just for simplicity the values are all hardcoded)

</p>
<p>using System.Net;<br />
using Microsoft.Xrm.Sdk;<br />
using Microsoft.Xrm.Sdk.Client;</p>
<p>public static async Task Run(HttpRequestMessage req, TraceWriter log)<br />
{<br />
log.Info("C# HTTP trigger function processed a request.");</p>
<p>// parse query parameter<br />
string firstname = req.GetQueryNameValuePairs()<br />
.FirstOrDefault(q =&gt; string.Compare(q.Key, "firstname", true) == 0)<br />
.Value;</p>
<p>string lastname = req.GetQueryNameValuePairs()<br />
.FirstOrDefault(q =&gt; string.Compare(q.Key, "lastname", true) == 0)<br />
.Value;</p>
<p>IServiceManagement orgServiceManagement = ServiceConfigurationFactory.CreateManagement(new Uri("https://nishutrial.crm.dynamics.com/XRMServices/2011/Organization.svc"));</p>
<p>AuthenticationCredentials authCredentials = new AuthenticationCredentials();<br />
authCredentials.ClientCredentials.UserName.UserName = "abc@abc.onmicrosoft.com";<br />
authCredentials.ClientCredentials.UserName.Password = "*****";<br />
AuthenticationCredentials tokenCredentials = orgServiceManagement.Authenticate(authCredentials);</p>
<p>OrganizationServiceProxy organizationProxy = new OrganizationServiceProxy(orgServiceManagement, tokenCredentials.SecurityTokenResponse);<br />
Entity contact = new Entity("contact");<br />
contact.Attributes["firstname"] = firstname;<br />
contact.Attributes["lastname"] = lastname;<br />
var contactId = organizationProxy.Create(contact);<br />
// Get request body<br />
dynamic data = await req.Content.ReadAsAsync();</p>
<p>string fullname = "";<br />
return fullname == null<br />
? req.CreateResponse(HttpStatusCode.BadRequest, "Please pass a name on the query string or in the request body")<br />
: req.CreateResponse(HttpStatusCode.OK, "Contact created in CRM " + contactId.ToString());<br />
}</p>
<p>

Let us now test our function.

The function expects 2 query string parameter firstname and lastname and creates the contact record in CRM.

In our CRM, we can see the contact record created.

Hope it helps..


Advertisements

Calling Azure Functions (GenericWebHook-Csharp) from CRM


In our previous post, we created a simple Azure Function using a free account. (1-hour limitation).

https://nishantrana.me/2017/04/26/starting-with-a-simple-hello-world-azure-functions/

In this post, we’d use our trial Azure account to create a Function App for which we will configure Web Hook trigger and it outputs to Queue and Azure Blog Storage.

We will call this Function from Plugin on Post Create of Lead in CRM Online and pass Lead details to it. This detail will be then passed to Queue and a file inside Azure Blog Storage as Output from the Function.

Open the Azure Portal

https://portal.azure.com

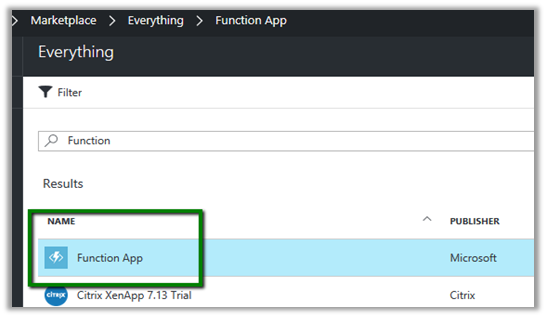
Select Function App.
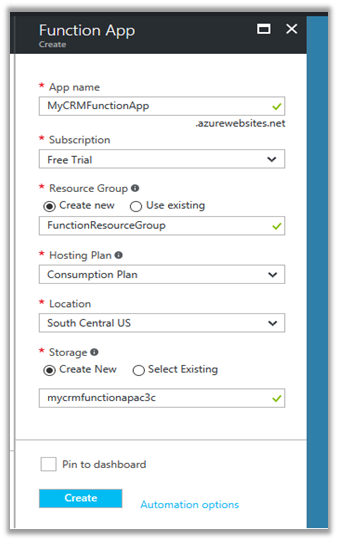
Create the Function App.
Click on + for Functions to create a new Function.
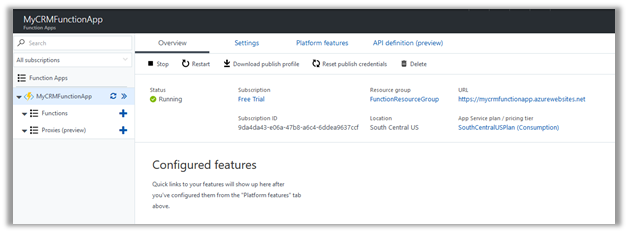
We’d select GenericWebHook-Csharp template here.
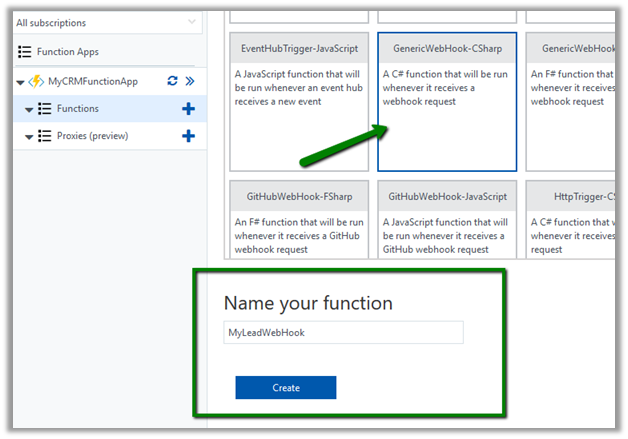
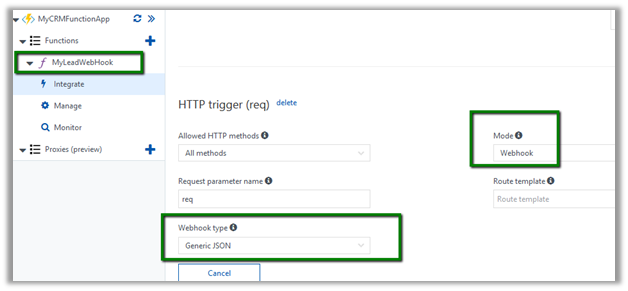
This creates a new Function nme MyLeadWebHook and it has mode set to Webhook and type as Generic JSON.
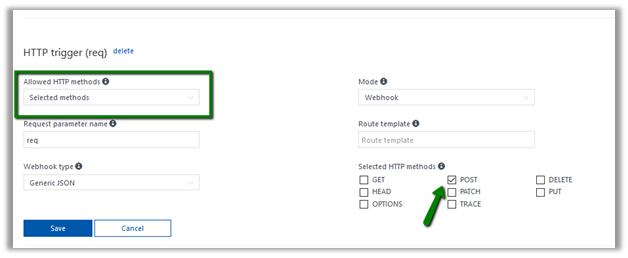
We can define Post as the only allowed method to call this function as shown below.
Update the code for the function by defining the Lead Object and deserialization logic as shown below.

#r is syntax for referencing the library. Here Newtonsoft.Json library is being referenced for deserialization.
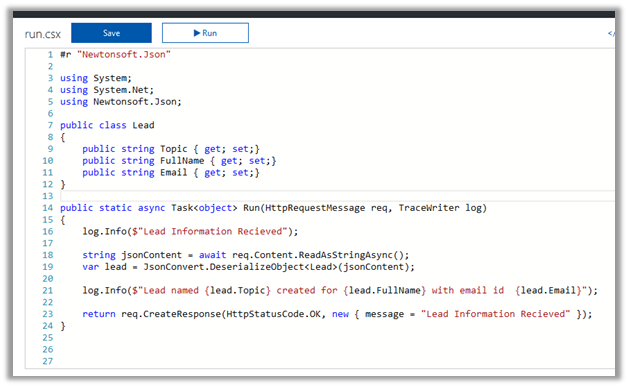
Save and Run to check if it has compiled successfully or not. Click on Test tab to test the function by passing the JSON in the request body.

We can see below that our function has run successfully.
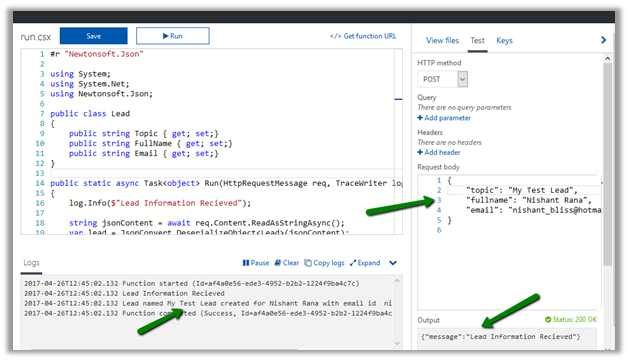
This finishes our Web Hook trigger part. Now let us define the Queue Output to it.

Select Integrate and click on New Output.
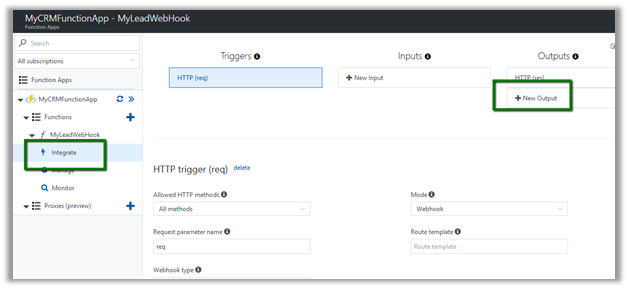
Select Azure Queue Storage template here.
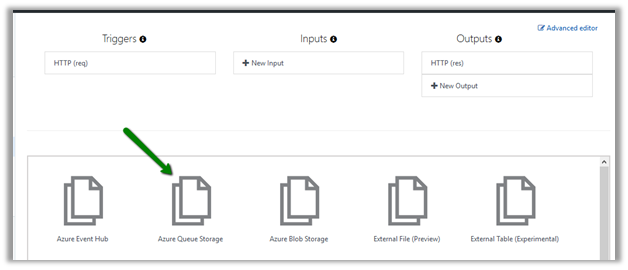
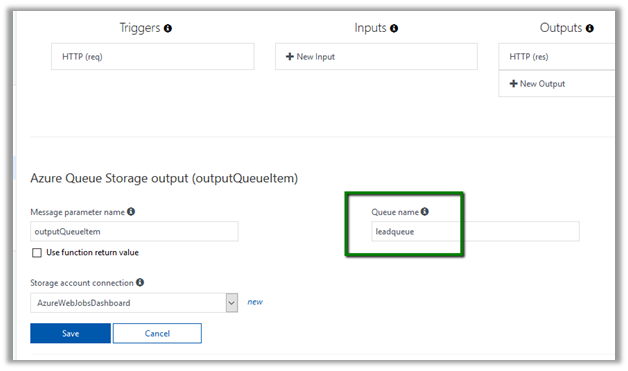
Name the queue as leadqueue. This will automatically create a queue name leadqueue.

The parameter name here is outputQueueItem. We will update our code to pass the lead details to this parameter.
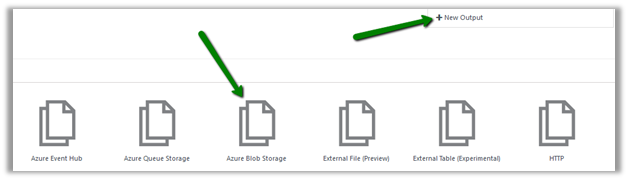
Before we update the code for our function let us add new output which saves the Lead details to a text file. Click on new output and select Azure Blog Storage.
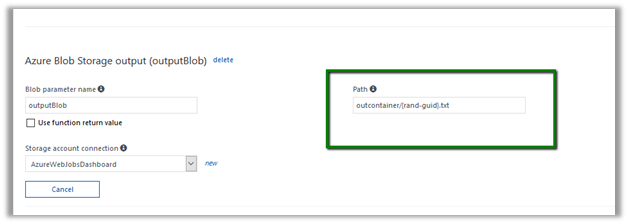
Here outputBlob is the parameter to which we need to provide the lead details. In the path outcontainer is the name of the container within Blob and rand-guid generates a random guid for the file name. Here we have added the extension .txt.
Now we have our outputs defined, so let us go back to our code for the function and update it to pass values to both the output parameter one for queue and other for the blob.


#r "Newtonsoft.Json"

using System;
using System.Net;
using Newtonsoft.Json;
public class Lead
{
public string Topic { get; set;}
public string FullName { get; set;}
public string Email { get; set;}
}

public static async Task<object> Run(<span class="hiddenSpellError" pre="" data-mce-bogus="1">HttpRequestMessage</span> req, TraceWriter log, </object>
IAsyncCollector<Lead> outputQueueItem, TextWriter outputBlob)
{
log.Info($"Lead Information Recieved");

string jsonContent = await req.Content.ReadAsStringAsync();
var lead = JsonConvert.DeserializeObject<Lead>(jsonContent);

log.Info($"Lead named {lead.Topic} created for {lead.FullName} with email id {lead.Email}");

// add to queue
await outputQueueItem.AddAsync(lead);

// write to a text file in azure blog storage
outputBlob.WriteLine($"Topic: {lead.Topic}");
outputBlob.WriteLine($"Full Name: {lead.FullName}");
outputBlob.WriteLine($"Email: {lead.Email}");

return req.CreateResponse(HttpStatusCode.OK, new { message = "Lead Information Recieved" });
}

To test the code click on Test and select Run

Click on Monitor tab for the Function and select the log created for our test run. We can see the values for the parameters in the invocation details section.
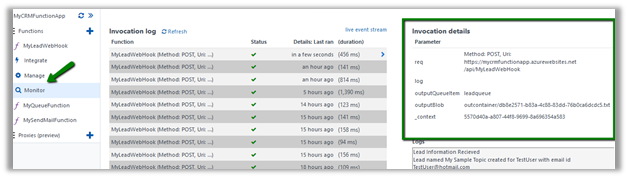
Now let us write a plugin that runs on Post Create of lead and calls this Function App.

First let us get the URL for our function app. Go to Function and click on Get Function URL.
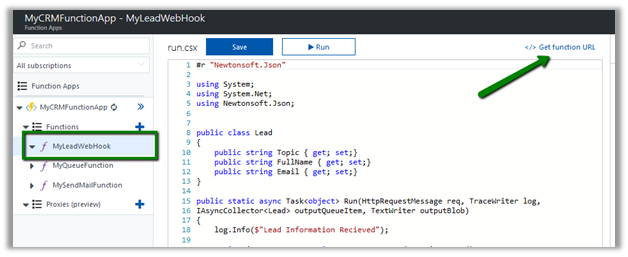
Our Function URL –

The code parameter is the Key that should be passed while calling the above URL.

Keys tab is where we can configure out Keys.
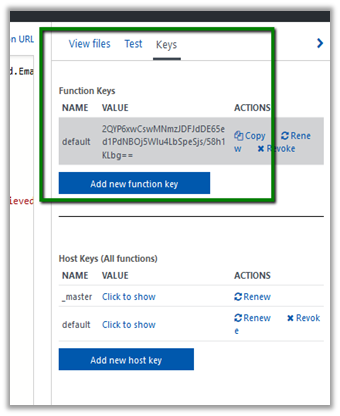
Below is code for our plugin.


using Microsoft.Xrm.Sdk;
using System;
using System.IO;
using System.Net;
using System.Runtime.Serialization.Json;
using System.Text;

namespace MyTestPlugin
{

public class Lead
{
public string Topic { get; set; }
public string FullName { get; set; }
public string Email { get; set; }
}

public class MyPluginClass : IPlugin
{
public void Execute(IServiceProvider serviceProvider)
{
try
{
// Obtain the execution context from the service provider.
IPluginExecutionContext context = (IPluginExecutionContext)serviceProvider.GetService(typeof(IPluginExecutionContext));

// The InputParameters collection contains all the data passed in the message request.
if (context.InputParameters.Contains("Target") && context.InputParameters["Target"] is Entity)
{
// Obtain the target entity from the input parameters.
Entity entity = (Entity)context.InputParameters["Target"];

using (WebClient client = new WebClient())
{
// get the lead details
var myLead = new Lead();
myLead.Topic = entity.Attributes["subject"].ToString();
myLead.FullName = entity.Attributes["fullname"].ToString();
myLead.Email = entity.Attributes["emailaddress1"].ToString();

DataContractJsonSerializer serializer = new DataContractJsonSerializer(typeof(Lead));
MemoryStream memoryStream = new MemoryStream();
serializer.WriteObject(memoryStream, myLead);
var jsonObject = Encoding.Default.GetString(memoryStream.ToArray());

var webClient = new WebClient();
webClient.Headers[HttpRequestHeader.ContentType] = "application/json";

// our function key
var code = "2QYP6xwCswMNmzJDFJdDE65ed1PdNBOj5Wlu4LbSpeSjs/58h1KLbg==";
// the url for our Azure Function
var serviceUrl = "https://mycrmfunctionapp.azurewebsites.net/api/MyLeadWebHook?code=" + code;

// upload the data using Post mehtod
string response = webClient.UploadString(serviceUrl, jsonObject);
}
}
}
catch (Exception ex)
{
throw new InvalidPluginExecutionException(ex.Message);
}
}
}

}

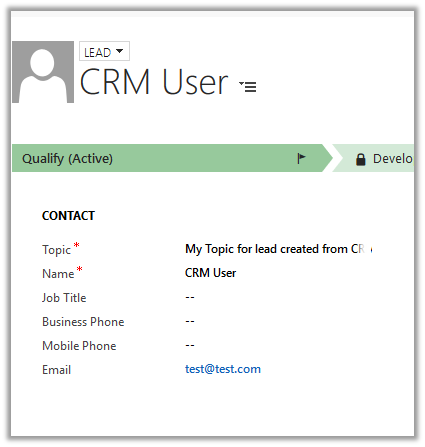
Let us create our lead record in CRM and test our Azure Function.
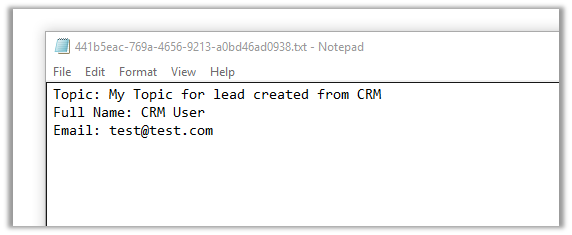
We can check the Monitor tab for our Function and check the logs and can see the Lead Information added to queue and also a text file created from our output parameters.
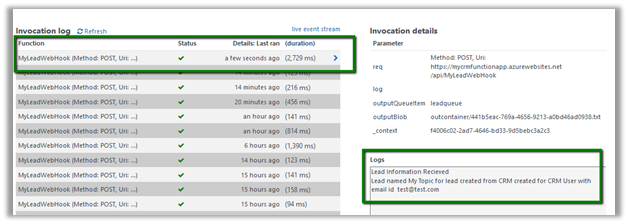
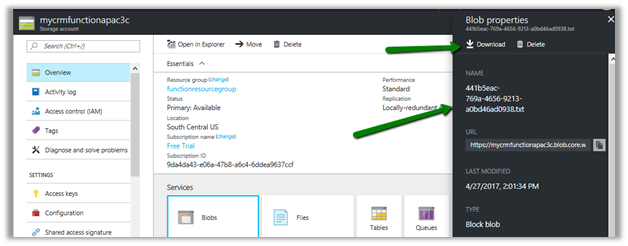
Our text file in the container.
Hope it helps..