Security Enhancements – 24 hours maximum user session timeout in Dynamics 365 / CRM


With recent security enhancements in Customer engagement apps, the maximum user session timeout of 24 hours is removed.

https://docs.microsoft.com/en-us/power-platform/admin/user-session-management#user-session-timeout-management

Now it uses the Azure AD Session Policy to manage user session timeout, which by default has Azure AD refresh token expiration set as 90 days.

https://docs.microsoft.com/en-us/azure/active-directory/develop/active-directory-configurable-token-lifetimes#refresh-and-session-token-lifetime-policy-properties

Refresh toke lifetime and expirationhttps://docs.microsoft.com/en-us/azure/active-directory/develop/refresh-tokens#refresh-token-lifetime

Use Configuring sign-in frequency in Conditional Access to define the periods before a user is required to sign-in again – https://docs.microsoft.com/en-us/azure/active-directory/conditional-access/howto-conditional-access-session-lifetime

Earlier the default session timeout used to be 24 hours with 20 minutes for warning the user – https://nishantrana.me/2017/11/17/configure-session-timeout-and-inactivity-timeout-dynamics-365/

However, we can still override the default Azure AD Session policy, by setting the session timeout and/or inactivity timeout for the individual environment.

To set the same navigate to –

Environments > [Environment] > Settings > Privacy + Security in Power Platform Admin Center.

Specify appropriate values and save the changes.

Get all the details here –

https://docs.microsoft.com/en-us/power-platform/admin/user-session-management#configure-session-timeout

Hope it helps..


Advertisements

How to – Provision Unified Routing in Dynamics 365 Customer Service Hub


Unified Routing can be configured in Customer Service Hub or Omnichannel Admin Center.

To configure it for Dynamics 365 Customer Service, navigate to

Service Management >> Service Configuration Settings >> Unified routing

(requires Tenant administrator’s consent – click on Provide Consent link)


Accept the permissions requested and provide the consent.


In case unified routing remains disabled  –https://nishantrana.me/2022/03/08/solved-disabled-turn-on-unified-routing-option-in-dynamics-365-customer-service-hub/

Unified Routing once switched on, cannot be disabled from the application, and we need to contact Microsoft Support to turn it off.


The provisioning starts


After a couple of hours, we can see Unified Routing configured for the Customer Service app.

We can see the following solution – Anchor solution for UnifiedRoutingForCS in Dynamics 365 solutions installed in the environment.

Hope it helps..


Advertisements

Sample Code to Test and Enable Mailbox programmatically C# (Dynamics 365/CRM)


Suppose we want to Test & Enable Mailbox of the below user programmatically.

We can see the below notification for the disabled mailbox.

This mailbox is disabled for email processing. For more information, see the alerts.

Below is the sample code –

On running the code, we can see the notification removed and the mailbox for the user enabled successfully.

C# Code –

      CrmServiceClient svc = new CrmServiceClient(ConnectionString);

            if (svc.IsReady)
            {
                var mailBox = new Entity("mailbox", new Guid("C88A539A-F493-EC11-B400-000D3A4F37D3"));

                // testemailconfigurationscheduled = Indicates if the email configuration test has been scheduled for a mailbox record
                mailBox.Attributes["testemailconfigurationscheduled"] = true;

                svc.Update(mailBox);

Hope it helps..

Advertisements

Sample Code to Approve Email – Mailbox programmatically C# (Dynamics 365/CRM)


Suppose we want to Approve the Email for the mailbox of the user(s) programmatically.

We’d see the below notification for the user whose mailbox is not yet approved.

Email won’t be processed for this mailbox until the email address of the mailbox is approved by an Office 365 Global Administrator or by an Exchange Administrator. For more information, contact your system administrator.

Below is the sample code –

On running the code, we can see the notification for the email address approval removed or the mailbox approved for the user.

C# Code –

            CrmServiceClient svc = new CrmServiceClient(ConnectionString);

            if (svc.IsReady)
            {

                var systemUser = new Entity("systemuser", new Guid("C48A539A-F493-EC11-B400-000D3A4F37D3"));

                // emailrouteraccessapproval - status of the primary email address
                //0	= Empty, 1 = Approved, 2 = Pending Approval, 3 = Rejected
                systemUser.Attributes["emailrouteraccessapproval"] = new OptionSetValue(1);

                svc.Update(systemUser)

The code should run under the context of the user who has either Global Admin or Exchange Admin role.

Hope it helps..

Advertisements

Business Process Flow UI Improvement in Dynamics 365 / CRM


With 2022 Release Wave 1, we have a small enhancement in the user interface inside the BPF path line’s color contrast.

With 2022 Release Wave 1 turned off

With 2022 Release Wave 1 – the path that needs to be followed is shown now in a slightly darker shade,

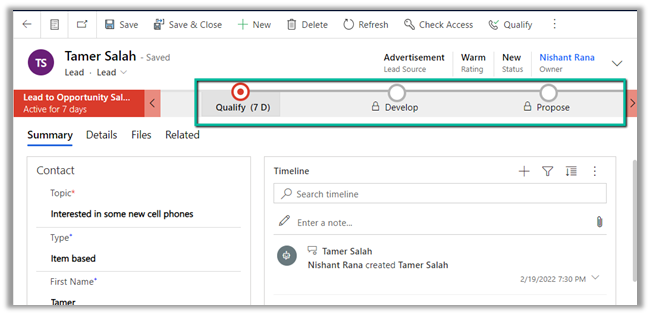
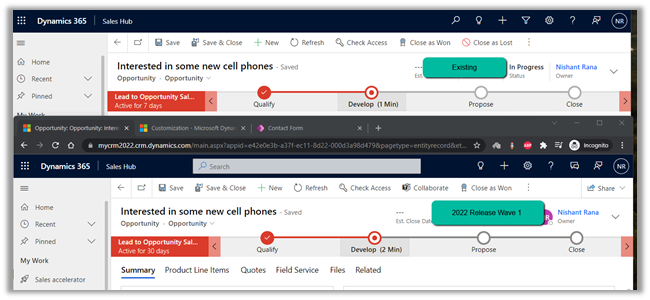
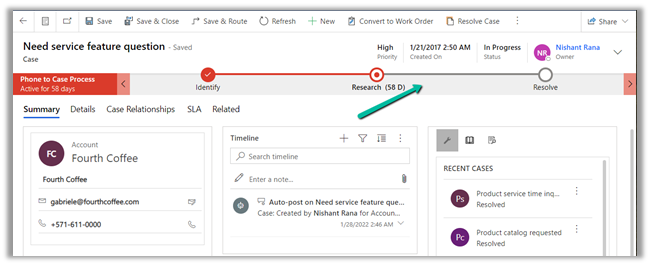
making it easy for an agent to understand the stages to be followed in the business process flow.

Hope it helps..

Advertisements

How to – Define System Filters for Synchronization using SavedQuery in Dynamics 365 / CRM


We covered a few Synchronization topics in the last few blogs, here we will look at defining system filters to manage which records could be synced.

How to – Synchronize Appointments between Dynamics 365 and Outlook using Server-Side Synchronization

How are tasks, letters, fax, phone call synchronized between Dynamics 365 and Outlook

We can see few default User Filters already defined that syncs records owned by the current user.

Users can create new filters, edit the existing filters, delete, activate, deactivate and reset the filters.

These filters like personal filters applied to that particular user only.

The same can also be accessed from Personalization Settings

Personal Options > Synchronization tab

Similar to User Filters we can define System Filters that apply to the entire organization or all the users.

As we can see there are no options (no new button) to create new System Filters from the user interface. The only way we can create them is through SDK.

Suppose we don’t want any tasks to be synced.

For this, we can create a filter like “sync only those tasks where created on doesn’t have value” which will always evaluate to false.

On executing the below code

We can see the system filter created successfully.

Hope it helps..

Entity savedQuery = new Entity("savedquery");
                savedQuery.Attributes["name"] = "System Filter for Task";
                savedQuery.Attributes["description"] = "To restrict sync of tasks";            
                savedQuery.Attributes["isquickfindquery"] = false;

                // saved query is of type outlook fiter
                savedQuery.Attributes["querytype"] = SavedQueryQueryType.OutlookFilters;
                
                savedQuery.Attributes["returnedtypecode"] = "task";

                // sync only those tasks which have created on as null
                // this is to restrict task sync

                savedQuery.Attributes["fetchxml"] = 
                    @"<fetch>" +
                     "<entity name='task'>"+
                     "<attribute name='activityid'/>" +
                     "<filter>" +
                     "<condition attribute='createdon' operator='null'/>" +
                     "</filter>" +
                     "</entity>" +
                     "</fetch>";

                var response= svc.Create(savedQuery);
Advertisements