Fixed – Invalid data from the network error in the custom page – Power Apps / Dataverse


Recently in one of our custom pages, we were getting the below error

“Invalid data from the network”

We had this setting “Formula-level error management” as On, switching it off was hiding this error on the page.

To fix it we tried removing the fields one by one to figure out the issue. Eventually, we saw the error was going away if we remove one of the option set fields from the gallery or comment it’s formula. Later when we removed and added the field back in the gallery and the error got fixed for us.

The page loading properly without the error –

Hope it helps..


Advertisements

How to – switch between Enhanced and Legacy (Default) multisession workspace in Customer Service Workspace


Update – We can use the below option – Customer Service Admin Center >> Operations >> Miscellaneous >> New and upcoming features – Multisession Layout ImprovementsEnhanced

With the Enhanced multisession layout in Customer Service Workspace, we have different sessions open in different tabs at the top and different tabs inside each session, along with the Navigation on the left.

To revert to the old default workspace or legacy navigation (deprecated), open the developer tools in the browser.

And paste the following command in the Console tab.

Xrm.Utility.getGlobalContext().saveSettingValue(“msdyn_MultiSessionLayoutImprovements”,false)

Or

Xrm.Utility.getGlobalContext().saveSettingValue(“msdyn_MultisessionNavigationImprovements”,false)


We can see the layout changed to the legacy one–

To enable the new enhanced layout (recommended) back, in the console window of developers tools paste the below command.

Xrm.Utility.getGlobalContext().saveSettingValue(“msdyn_MultiSessionLayoutImprovements”,true)

Hope it helps..

Advertisements

Using addProperty to dynamically add a custom property to a JSON object – Power Automate


Recently while working on the integration of Facebook Lead Ads with CRM, through Webhooks / Power Automate we had to process the lead data and create lead and contact records.

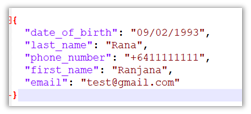
Below is a sample format in which we’d get the lead data for the FB form having a first name, last name, date of birth, and email fields in it.

Now we want to create an object having name as proprety and value from values like below from the above response, which will make it easy for use to refer in add a new row / update a row Dataverse step.

For this we will be using addProperty function.

Below is our sample flow –

First we are initializing varJSON – string variable with the JSON response

Than intializing the another variable varFieldData as type Object

Parse JSON action using the sample response.

Here we are interested in field_data property

So in the next step, we loop through each field_data, than use addProperty function in Compose to add name and value to the varFieldData object, and use the outputs of compose to set the varFieldData variable.

addProperty function – addProperty(variables(‘myObject’), ‘newProperty’, ‘propertyValue’)

In the next step, we can see the varFieldData and the way we can access the property last_name added to it.

On running the flow we can see the result as expected –

Hope it helps..

Advertisements

Stop / Go live Lead Score Model behavior in Dynamics 365 Marketing


Recently we were writing a plugin on the Lead Score table to update the associated lead with Score and the Grade values.

The plugin was on Update of Lead Score (msdyncrm_leadscore_v2) to update lead when the Score Status = Up to date.

The interesting point we observed here was that when we stop the lead scoring model all the associated lead scoring records get deleted, which was kind of different than the usual behavior of related records, where we expect it to get deactivated/disabled.

On clicking the Stop button on the lead scoring model all the associated lead score records will get deleted.

All lead score records deleted :-

And now as soon as we Go live, the new lead score records get created back.

It starts the process of creating the records immediately.

Hope it helps..


Advertisements

Notification template in Omnichannel Voice (Dynamics 365 Customer Service)


Below is the default notification the agent receives on incoming conversations/calls.

It is defined through the below out-of-the-box template.

Property

Description

Title

To define the title.

Icon

To define the icon.

Show Timeout

Yes / No – to hide/show the timer (timer still runs in the background)

Time (seconds)

For the Phone Call / Voice workstream the maximum value = is 150 seconds.

Auto-assign work items

Auto-assign incoming work item

Accept Button

Specify the text of the Accept Button

Reject Button

To hide or show the button

Show desktop notification

Never / When the app is in the background

Notification Fields

Specify fields to be shown in the notification using Slugs.

To make changes in the notification, we need to create a new notification template as we cannot update the box notification template.

Navigate to Agent Experience >> Workspaces >> Notification Templates (Manage)


Here we will create a new notification template to be used in place of Voice call – incoming authenticated – default template

For our custom template, we have made the following changes –

Increased the timeout value, and changed the text for Accept and Reject buttons.

Added notification fields and enabled Desktop notification.

Let us update one of our workstreams to use this custom notification template.

Navigate to Customer Support >> Workstreams – Open the workstream and open the Advanced Settings and update the Incoming Authenticated template in the Agent notifications section.

We can see the changes reflected in the Notification.

And also in the desktop notification –


Get all the details here-

https://neilparkhurst.com/2020/06/29/omnichannel-for-customer-service-notifications/

Hope it helps..

Advertisements

How to – Configure Voicemail Workstream and Queue – Dynamics 365 Customer Service


When we configure the Voice demo, we can see 2 workstreams and queues created for Voicemail one for individuals other for voicemail of type group.

The Default Group Voicemail Workstream has the following intake rule defined.

And following Route to Queue Rule

Configuring Voicemail – https://nishantrana.me/2023/02/23/how-to-configure-voicemail-in-omnichannel-voice-channel-dynamics-365-customer-service/

Similarly, Default Individual Voicemail Workstream has the following intake rule

And Route to Queue rule

Now say we want the voicemail of an advanced queue (type – voice) to be routed to its corresponding advanced queue (type – record) instead of the Default Group Voicemail Queue.

Say we have the below Advanced Queue of type Voice used in the Voice Workstream– 


And the below Advanced Queue – My Sample Voice Mail Queue

Now let us define the Workstream that will route the voicemail to that queue.

Select Type as Record and Record Type as Voicemail.

The intake rule checks for the Queue record in the related entity of voice mail – Missed Conversation (Conversation)

So basically any conversation or voicemail generated because of a call to My Sample Voice Queue / Workstream will be routed to its corresponding Voice Mail Queue.

Overflow handlinghttps://nishantrana.me/2023/03/07/understanding-overflow-handling-work-item-limit-exceeds-in-voice-channel-omnichannel-dynamics-365-customer-service/

And the intake rule of that workstream to route to the Voicemail Queue created earlier.

Hope it helps..

Advertisements