How to – Permanently delete users in the Power Platform (Dataverse / Dynamics 365)


To delete the user from Power Platform, we need to enable the following feature – Delete disabled users.

Before enabling this feature we can see the following Views for the Users.

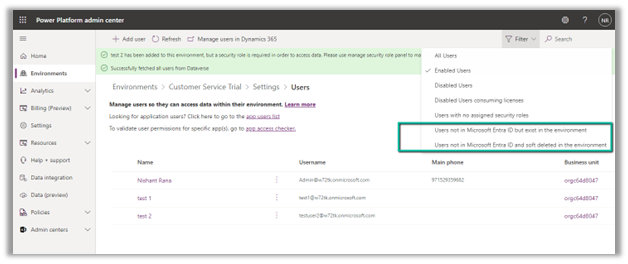
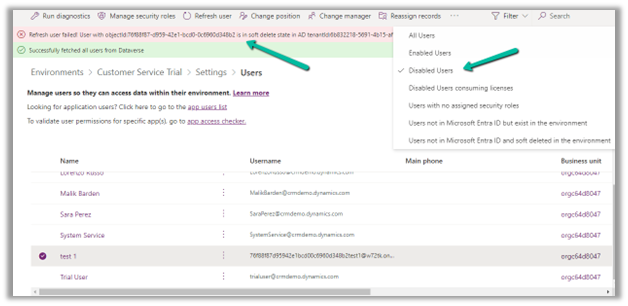
After enabling Delete disabled users, we can see 2 new views added,

  • Users not in Microsoft Entra ID but exist in the environment.
  • Users not in Microsoft Entra ID and soft deleted in the environment.

Also currently we can see 3 users (enabled) in the environment.

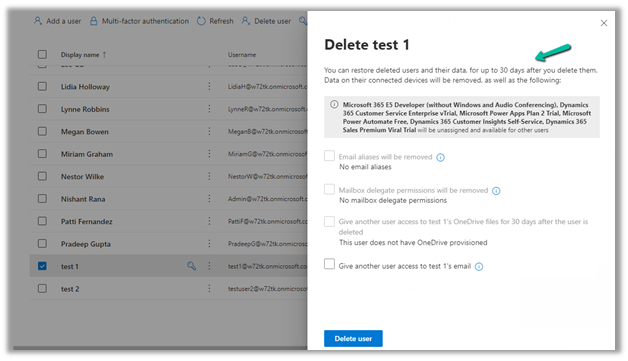
Now let us delete the test 1 user from the Microsoft 365 Admin Center.

The deleted user and its data can be restored up to 30 days (soft delete)

Inside Power Platform Admin Center, we can see the user account being disabled (and soft delete state in AD)

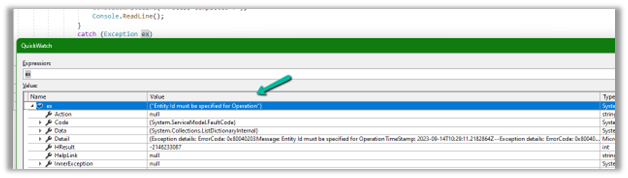
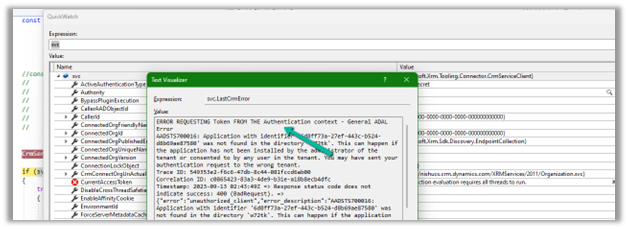
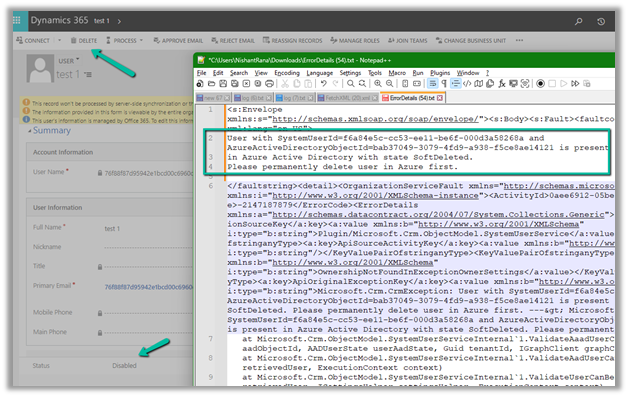
If we try to delete the record, we will get the below error that use is present in AD in the state SoftDeleted. Please permanently delete the user in Azure first.

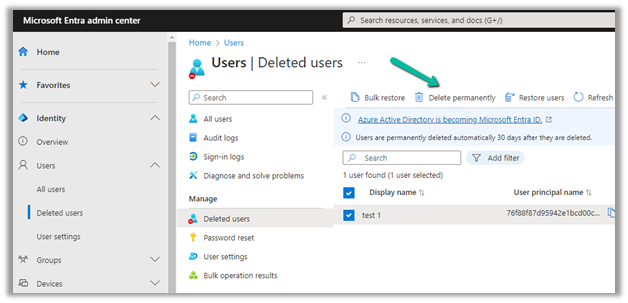
Let us permanently delete the user in Azure AD.

Login to Azure Portal or Microsoft Entra admin center, select Users
>> Deleted Users

Select the user (deleted) and click on Delete Permanently.

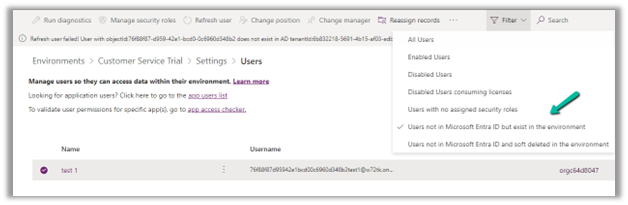
On Refreshing the user, we get the message that the user does not exist in the AD, and also user record is now moved to the “Users not in Microsoft Entra ID but exist in the environment” view.

Let us try deleting the user record from CRM now.

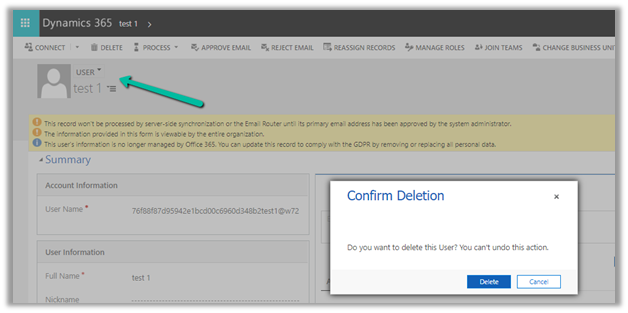
This time user records get deleted (soft delete) successfully.

Within the Power Platform Admin Center, we can see the user record moved to “Users not in Microsoft Entra ID and soft deleted in the environment”

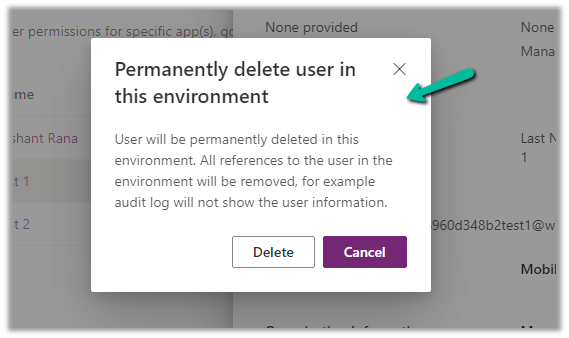
Similar to Azure Active Directory or Microsoft Entra, now we get the option to permanently delete users from the Power Platform Admin Center after soft delete.

Get all the details here

Hope it helps..

Advertisements

Analytics capabilities of Kupp Code Analytics


In the previous posts, we covered the Overview and Key Features of Kupp Code Analytics, the installation and setup process of the extension, and its Intellisense capabilities.

Here we’d have a quick look at the analytics capabilities of the extension.

To enable it, inside Visual Studio, navigate to Tools >> Options >> Kupp Code Analytics >> General or Extensions >> Kupp Code Analytics >> Analytics >> Configure Analytics

Set “Enable C# Code Analyzer” to “True”. Requires Visual Studio to be restarted on change.

To run the analytics, select Extensions >> Kupp Code Analytics >> Analytics >> Run

Below we can see the results of running the analytics on our sample plugin class.

Let us see the code analysis rules one be one.

PCA001: The lPlugin interface should not be used directly.

The suggestion is to use a custom base class instead to handle the call delegation, using the context information of the plugin.

PCA002: Plugins should be stateless. Remove all instances properties and values.

Plugins are instantiated on a per-request basis and handle specific execution contexts. The plugin instances are short-lived and should not be assumed to persist across multiple requests. Also if multiple plugin instances execute especially in the case of bulk operations, it could lead to concurrency issues.

PA002: Attribute collection should only include the changed attributes. Create a new entity for the update

While updating the table or entity, create a new Entity instance and only include those attributes that are changed.

PA001: Specify the required columns instead of retrieving all columns.

Specify the required attributes to be retrieved instead of all columns as this would impact the performance.

EBEA002: Late bound entities should be replaced with early bound entities.

SVA001: Entity Logicalname ‘myTable’ doesn’t exist.

It is suggested to use early bound entities as they provide Type Safety and IntelliSense Support decreasing the likelihood of runtime errors and can enhance productivity through auto-completing and context-aware suggestions.

These were a few of the examples, that show the key capabilities of the extension, for the complete list, please refer to the product documentation

Hope it helps..

Advertisements

Entity Id must be specified for Operation – Dataverse / Dynamics 365


We might get the below error while performing the update operation.

This could be if we have not specified the GUID of the record to be updated or if we are using an Alternate Key to update the record, we have not specified the KeyAttributes property.

We either need to specify the Id property or specify the KeyAttributes property

Or in the Entity’s Constructor.

Hope it helps..

Advertisements

ERROR REQUESTING Token FROM THE Authentication context – General ADAL Error (Dataverse / Dynamics 365)


We might get the below error while connecting to the Dataverse Web API using the client ID and client secret.

AADSTS700016: Application with identifier ‘6d8ff73a-27ef-443c-b524-d8b69ae87580’ was not found in the directory ‘w72tk’. This can happen if the application has not been installed by the administrator of the tenant or consented to by any user in the tenant. You may have sent your authentication request to the wrong tenant.

This could be if we have specified wrong Client or App Id.

Check the correct App Id either from Azure you can also refer to the correponding Application User created for it.

Hope it helps..

Advertisements

Free up storage space – Dataverse / Dynamics 365


Recently for setting up a new environment, we created a new sandbox environment and copied the production environment to it. Next, we had to reduce the storage space occupied by this new environment.

We followed the below steps

  • Bulk Deletion Job – Delete Email Messages having Attachments older than 1 month.
  • Bulk Deletion Job – Delete Notes having attachments older than 1 month.
  • Delete System Job with Status as Succeeded.
  • Delete Process Session with Status as Complete
  • For Logs, we deleted Audit Logs
  • Similarly, we can also delete Plugin Trace Logs records.

These steps allowed us to decrease the Database Usage from 110 GB to 65 GB.

And File Usage from 315 GB to 16 GB.

Also, check –

Get all the details here –

https://learn.microsoft.com/en-us/power-platform/admin/free-storage-space

Hope it helps..

Advertisements

Use Copilot to create a journey – Dynamics 365 Marketing


We can make use of Copilot to create a journey for us, using everyday conversational language.

To enable it, navigate to

Settings >> Overview >> Feature Switches >> Journey (Copilot)

Let us see it in action, by creating a new journey record.

We get the option to select predefined
examples to start with.

Here we have selected the last example “When a contact submits a marketing form, assign a phone call….”

On selecting it, we are presented with the option to specify the Trigger.


We have selected the existing Marketing Form Submitted trigger record here.

After specifying the trigger, we get the option to specify the marketing form or to leave it empty to run it for all the form submissions and also the audience type, which could be either Contact or Lead.

Clicking on Submit gives the option to review and then eventually Create Journey.

Clicking on Create Journey generates the journey for us.

We can review the journey, add any further content required, modify it, etc.

For example, we need to specify the follow-up email to be sent, before we can save and publish it.

Once we are done with defining the journey, we can publish it.

Get more details here.

Hope it helps..

Advertisements

Nishant Rana's Weblog

Everything related to Microsoft .NET Technology

Skip to content ↓