Workstreams Overview – part 1 – Dynamics 365 Customer Service / Omnichannel


Workstreams can be defined as records or settings, where we can set up the channel, and define routing rules, work distribution, and bots to route work items to the appropriate queue/agents.

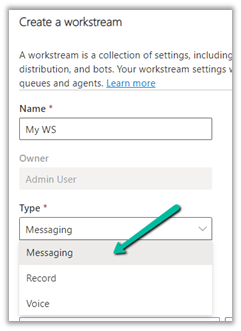
Workstream can be of 3 different types – Messaging, Record, and Voice.

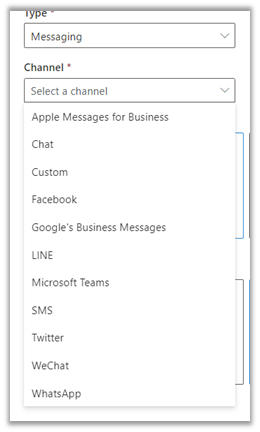
For Messaging we can specify the below channels – Apple messages for business, Chat, Custom, Facebook, Google’s Business Messages, LINE, SMS, Twitter, WeChat, and WhatsApp.

  • For Messaging Type as Channel, we can specify Work Distribution Mode as either Push or Pick.

We also need to specify a Fallback Queue, this Queue will be used if no matching queues are found based on the routing rules.

In the case of the Chat channel, we have the option of making chats persistent, so any new messages from the customer will be routed to the same queue and same agent if available or the next best agent.

For all other channel types, we have the same Work Distribution mode and Fallback queue option.

  • For the workstream type as Record, we can select the entities with queues enabled. The remaining option of work distribution mode and fallback queue remains the same.

For the record routing to work, we need to make sure Unified Routing is switched on in the environment.

And the entity is enabled for record routing.

  • For the workstream type as Voice, we have the voice channel selected as default and disabled.

The only difference is in the distribution mode, where we do not have the option of Pick.

In a nutshell –

Workstream Type 

Channel 

Additional Information 

Messaging 

Apple Message for Business, Chat, Custom, Facebook, Google’s Business Messages, LINE, Microsoft Teams, SMS, Twitter, WeChat, WhatsApp 

For Chat, we have an additional option to make chats persistent.

https://learn.microsoft.com/en-us/dynamics365/customer-service/persistent-chat

Push and Pick – Work distribution mode. 

Record 

Entities With Queue and Record Routing enabled

Push and Pick – Work distribution mode 

Voice 

Voice Call (default / disabled) 

Only Push distribution mode. 

In coming blog posts we’d delve deep into the workstreams configuration.

Hope it helps..

Advertisements

How to – Provision / Setup Omnichannel for Customer Service trial – Dynamics 365


In this post, we’d start by creating a trial of Dynamics 365 Customer
Service.

Navigate to – https://dynamics.microsoft.com/en-us/customer-service/overview/

And select Try for free

Enter your email details and follow the steps.

In a few mins, the trial will be ready.

Clicking on Launch Trial opens the Customer Service Workspace app.

Below are the other apps we can see installed as part of the Customer Service Trial, including the Omnichannel Admin Center and Omnichannel for Customer Service along with the Customer Service admin center app.


Opening the Omnichannel Admin Center app allows us to configure the Chat Demo.

In a few seconds, the demo will be configured.

Clicking on the Open agent app opens the Omnichannel  for Customer Service App.

Click on Let’s Chat! widget to start the chat.

Opening the Let’s Chat widget sends the notification to the agent as shown below.

Clicking on Accept in the notification starts a new session.

It also starts the conversation.

The agent can click on End or the customer can close the Chat Widget to end the conversation

The End button is grayed out and the customer gets the message as Agent has ended the conversation.

As we can see, we have the working Omnichannel trial environment ready for us to try out different channels/features, etc.

In Power Platform Admin Center, if we check inside Resources >> Dynamics 365 Apps for the Customer Service Trial we can see the Omnichannel Apps installed.

Interestingly if we navigate to Resources >> Dynamics 365 apps and check the Omnichannel for Customer Service app we see the status Not configured.

Clicking on the Manage option, opens the dialog box, informing us that it will navigate us to Dynamics 365 apps admin page.

In our case it kept us asking to sign in, instead of taking us to the admin page.

So next we tried Providing the data access consent as mentioned in the MS Docs.

https://learn.microsoft.com/en-us/dynamics365/customer-service/omnichannel-provision-license#provide-data-access-consent

For which we got the below error.

As it failed, we tried the same after assigning the Power BI (free) license to the admin user. (The user should also have Microsoft 365 Global Admin roles along with System Administrator in the env.)

https://learn.microsoft.com/en-us/dynamics365/customer-service/try-channels

https://learn.microsoft.com/en-us/dynamics365/customer-service/omnichannel-provision-license#prerequisites

And it worked this time.

This time clicking on Manage for the Omnichannel for Customer Service, took us to the Dynamics 365 Admin page.

Inside Dynamics 365 Administration Center we can manage the environments in which we want to install or remove the Omnichannel as well as different channels inside it.

From the Admin Center, we managed to upgrade the Omnichannel in the Customer Service Trial environment and also configure it in another sandbox environment.

Interestingly even after the update/setup was completed

the status of Omnichannel for Customer Service on the Dynamics 365 Page was “Not configured”, which could be some bug or something as mentioned in the MS Docs.

https://learn.microsoft.com/en-us/dynamics365/customer-service/omnichannel-provision-license#set-up-omnichannel-for-customer-service-

“You can safely ignore the status”

So in our case, when we had configured the Customer Service Trial, the Omnichannel was already configured in that environment as we saw earlier. We were mainly facing issues to access the Dynamics 365 Administration Center, which got resolved after assigning the Power BI License to the admin user followed by giving the required consent.

Kindly refer to the below links to learn about Omnichannel in in-depth

https://neilparkhurst.com/2022/08/11/omnichannel-for-customer-service-collection-2/

https://thecrm.ninja/omnichannel-for-dynamics-365/

https://www.youtube.com/watch?v=WM2JLGNPzT8

Hope this helps..

Advertisements

{Hidden Gem}Understanding Server Side sync Performance Dashboard


deepeshsomani2013's avatarMSDYNAMICSBLOG BY DEEPESH

In my previous post, I shared Step by Step guide to configure Server side sync:

{Step by Step} Set up server side sync with CRM 2015 Update 1 Online and Office 365

This post is a logical extension to analyse Server side Sync performance using out of box tools.

Lot of times, People report issues on Server side synchronization for one particular mailbox or set of mailboxes.

First thing, in such scenarios should be to check out of box available Server side performance dashboard:

clip_image002

The first screen gives useful information on the mailboxes with hyperlinks, clicking them can directly take you to the intended mailboxes:

clip_image003

The second graph describes Mailbox processing history with Success/Failiures:

clip_image004

Third graph points to processing times:

clip_image005

Error codes (Top 5 are displayed) in the fourth graph:

clip_image006

CRM Items waiting to be traced can be found in fifth graph:

clip_image007

Last graph displays items processed or failed:

clip_image008

Hope…

View original post 14 more words

Improve fetch xml performance by using latematerialize option.


Rawish Kumar Prajapati's avatarPassion Dynamics

If you have been working on dynamics projects, I bet fetch xml is your best friend as it’s really an easiest way to query and execute in order to get required results. Along with that, constructing it in advanced find is super easy too.

Don’t forget about amazing XRM toolboxes which helps you creating even complex fetch xml queries.

It all sounds fun and easy till your fetch XML becomes really heavy with so many joins or you have a requirement where you need to make many joins.

A Quick tip!

You can have a maximum of 10 joins in fetch xml for dynamics CE.

You will notice that retrieval from dynamics is getting slower and slower as fetch xml becomes complicated. I have faced something similar multiple times. What I did?

well, there are multiple options one of which I want to cover today as using this option, there…

View original post 134 more words

How to – Clone a record in Dataverse / Dynamics 365 (C#)


Here we will be cloning the below contact record –

For it, we can make use Clone method of EntityExtensions class

If we run the below code, we will get the “Cannot insert duplicate key” exception.

Because we need to set the ID for the newly cloned record to either empty or a new GUID.

Also, we need to remove the contactid attribute or entity’s id field else we will get the below exception – “Entity Id must be the same as the value set in property bag

Also if we are retrieving all the attributes we need to make sure we remove those attribute which can cause below unique constraint errors.

Sql error: The operation attempted to insert a duplicate value for an attribute with a unique constraint. CRM ErrorCode: -2147012606 Sql ErrorCode: -2146232060 Sql Number: 2627

In case of contact, we had to remove the address id attributes, to get the record cloned.

Now let us clone the same contact record with its related leads.

  • Here first we need to retrieve contact along with its associated lead record.
  • Then remove the id attribute that could duplicate issues in the child lead records also.

Please refer the helpful posts –

https://debajmecrm.com/clone-record-dynamics-crm-clone-method/

https://www.inogic.com/blog/2014/08/clone-records-in-dynamics-crm/

https://dyncrmexp.com/2017/10/24/retrieve-primary-entities-along-with-related-entities-with-one-queryexpression/comment-page-1/

https://dynamict.eu/2016/08/09/create-record-with-related-records-in-a-single-request-using-c/

Hope it helps..

 // related lead records of contact
                    QueryExpression query = new QueryExpression("lead");                    
                    query.ColumnSet = new ColumnSet(true);

                    // contact and lead - 1 - n relationship
                    Relationship relationship = new Relationship("lead_parent_contact");
                    relationship.PrimaryEntityRole = EntityRole.Referenced;

                    RelationshipQueryCollection relatedEntity = new RelationshipQueryCollection();
                    relatedEntity.Add(relationship, query);

                    RetrieveRequest request = new RetrieveRequest();
                    request.RelatedEntitiesQuery = relatedEntity;
                    request.ColumnSet = new ColumnSet(true);
                    request.Target = new EntityReference("contact", new Guid("ca0aa844-57c6-ec11-a7b6-00224826af1e"));

                    RetrieveResponse response = (RetrieveResponse)svc.Execute(request);
                    var contactToBeCloned = response.Entity;                   
                    var clonedContact = contactToBeCloned.Clone(true);

                    // remove attribute that can cause error from main entity             
                    clonedContact.Id = Guid.NewGuid();
                    clonedContact.Attributes.Remove("contactid");                    
                    clonedContact.Attributes.Remove("address1_addressid");
                    clonedContact.Attributes.Remove("address2_addressid");
                    clonedContact.Attributes.Remove("address3_addressid");

                    // remove attribute that can cause error from child / related entities
                    foreach (var relatedEntities in clonedContact.RelatedEntities)
                    {
                        foreach(var leadEntity in relatedEntities.Value.Entities)
                        {
                            leadEntity.Id = Guid.NewGuid();
                            leadEntity.Attributes.Remove("leadid");
                            leadEntity.Attributes.Remove("address1_addressid");
                            leadEntity.Attributes.Remove("address2_addressid");
                        }
                    }
                    svc.Create(clonedContact);
Advertisements

How to –Upload files to File Column / Attribute in SSIS from Azure Blog Storage – KingswaySoft (Dynamics 365 / CRM)


Below are a few ways we can upload files to the File Column type field using KingswaySoft’ s Integration Toolkit and Premium Flat File Source and Premium Derived column which are part of the SSIS Productivity Pack of KingswaySoft

https://nishantrana.me/2022/03/17/how-to-upload-files-from-file-column-attribute-using-ssis-kingswaysoft-dynamics-365-crm/

Using the Import columnhttps://nishantrana.me/2022/08/10/how-to-upload-files-to-file-column-attribute-using-ssis-kingswaysoft-and-import-column-dynamics-365-crm/

Using the Script Componenthttps://nishantrana.me/2022/08/09/how-to-use-script-component-to-upload-files-to-file-column-attribute-in-ssis-kingswaysoft-dynamics-365-crm/

Here instead of uploading the files from the local drive, we will be uploading the files stored in the Azure Blob Storage to the corresponding contact records inside CRM.

Below is our Blob Container – here to make things simple we have the mobile number of the contact records used as the pdf file name uploaded, and which will be used for updating the contact records.

The contact records in CRM

Below is how our package looks like

Here we have specified the Item Selection Mode as Recursive (File Only) to make sure it picks the files only and not the folder.

Within the Derived Column, we are replacing the pdf extension from the file name i.e. mobile number, and using it to find the contact records and update them.

Finally, in the CDS / CRM Destination Component, we are performing an upsert using the dervied Mobile Phone Formatted derived column as a match.

The mapping –

Let us now run the package.

Let us now open the records and check.

As expected we can see the file uploaded.

Thanks to Venkata for this solution https://www.linkedin.com/in/venkata-satya-kumar-nagumalli-77923972

Also, check out –

To extract attachments from notes-https://nishantrana.me/2021/02/10/extracting-attachments-from-notes-in-dynamics-365-dataverse/

To download files using Download Block Requesthttps://nishantrana.me/2022/03/14/how-to-download-file-from-file-column-using-initializefileblocksdownload-and-downloadblock-request-dynamics-365-crm-dataverse/

To upload files using Upload Block Requesthttps://nishantrana.me/2022/03/15/how-to-upload-file-to-file-column-using-initializefileblocksupload-and-uploadblock-request-dynamics-365-crm/

Understand File and Image Data Typehttps://nishantrana.me/2021/10/01/using-file-and-image-data-type-in-dataverse-dynamics-365/

Try out the wonderful, feature-rich, and powerful SSIS Integration Toolkit for Dynamics 365 by KingswaySofthttps://www.kingswaysoft.com/products/ssis-integration-toolkit-for-microsoft-dynamics-365/download

Check other articles on SSIS plus CRM – https://nishantrana.me/2018/11/26/ssis-and-microsoft-dynamics-365/

Hope it helps..

Advertisements