Couldn’t add resource. Microsoft Dataverse is in use error in Dynamics 365 Customer Insights


We might get the below error while trying to add Microsoft Dataverse Data source in Dynamics 365 Customer Insights.

“Coundn’t add resource. Microsoft Dataverse is in use”

As the error message indicates, this is because we have an already existing data source connected to that same organization.

We can edit the Data Source and can add entities to the same connection.

also delete the data source, if its entities are not used in Match and Merge

else we will get the below error message.

“To proceed, remove its entities from: Match, Merge”

In this case we will have to remove the entities from any Merge and Match configuration first.


Hope it helps..

Advertisements

How to – Set up Dynamics 365 Customer Insights Trial


https://nishantrana.me/2022/02/09/how-to-import-data-from-local-data-files-to-dynamics-365-customer-insights/To set up the trial of Customer Insights, open the Dynamics 365 Free Trial Page and scroll down to Dynamics 365 Customer Data Platform section

https://dynamics.microsoft.com/en-gb/dynamics-365-free-trial/

Click on Try for free

Sign in with your work account or the Dynamics 365 trial account created and click on Get Started

As a first step, it asks for specifying the region for the communication preferences.

For the trial, let us choose the Audience Insights option.

It opens the Demo environment having the sample data. We can explore and understand the features with the sample data or we can start a trial.

Let us select the option Start trial in the tool bar to connect it to an existing CRM / Dataverse Environment.


Enter the basic information requested. Make sure you have selected the correct region else you might get unable to create an environment error later.

The data storage option comes as disabled.

Specify the Dataverse / CRM environment’s URL. (here I am logged in with System Administrator user who is also the Global Admin)

Finally, review the information and click on Create.

This will configure a 30 day trial against the CRM / Dataverse environment.

Now we are ready to explore it further.

How to – Import Data from Dataverse / CRM to Dynamics 365 Customer Insights

How to – Import Data from local data files to Dynamics 365 Customer Insights

How to – Unify (Map, Match and Merge) Entities in Dynamics 365 Customer Insights

Hope it helps..

Advertisements

How to – Use RetrieveAttributeChangeHistoryRequest to get audit data for an attribute (Dataverse/ Dynamics 365/ CRM)


We can use RetrieveAttributeChangeHistoryRequest to get the change history of a particular field / attribute of a record.

We need to set the Target and the AttributeLogicalName property of the request.

AuditDetails records of the RetrieveAttributeChangeHistoryResponse contains the detail of the audit records.

The Audit History records in CRM- 

AttributeAuditDetail contains the details of the changes made on the field’s value. It contains property like – objectid, userid, operation etc. as well as new value and the old value as shown below.

Sample Code (C#) 

 string ConnectionString = "AuthType = OAuth; " +
                  "AppId=51f81489-12ee-4a9e-aaae-a2591f45987d; " +
                  "Username=User1@xxxx.onmicrosoft.com; " +
                  "Password=*******; " +
                  "RedirectUri=app://58145B91-0C36-4500-8554-080854F2AC97;" +
                  "Url = https://xxx.crm.dynamics.com//;";


            CrmServiceClient svc = new CrmServiceClient(ConnectionString);

            if (svc.IsReady)
            {

                var attributeChangeHistoryReq = new RetrieveAttributeChangeHistoryRequest();

                attributeChangeHistoryReq.Target =
                    new EntityReference("incident", new Guid("0a9f62a8-90df-e311-9565-a45d36fc5fe8"));
                attributeChangeHistoryReq.AttributeLogicalName = "prioritycode";

                var attrChangeResponse = (RetrieveAttributeChangeHistoryResponse)svc.Execute(attributeChangeHistoryReq);
                var auditDetailCollection = attrChangeResponse.AuditDetailCollection;


                foreach (var auditDetails in auditDetailCollection.AuditDetails)
                {
                    // Type =  AttributeAuditDetail, AuditDetail, 
                    var type = auditDetails.GetType();

                    if (type == typeof(AttributeAuditDetail))
                    {
                        var attributeDetail = (AttributeAuditDetail)auditDetails;

                        var userName = attributeDetail.AuditRecord.GetAttributeValue<EntityReference>("userid").Name;
                        var operation = attributeDetail.AuditRecord.FormattedValues["operation"];
                        var action = attributeDetail.AuditRecord.FormattedValues["action"];
                        var createdOn = attributeDetail.AuditRecord.GetAttributeValue<DateTime>("createdon");
                        var newValue = attributeDetail.NewValue.FormattedValues["prioritycode"];
                        var oldValue = attributeDetail.OldValue?.FormattedValues["prioritycode"];

                    }
                }
            }

Check other posts on Audit

Hope it helps..

Advertisements

How to – Use AlwaysMoveRecordToOwnerBusinessUnit setting in Dynamics 365 / PowerApps/ Dataverse


The setting – AlwaysMoveRecordToOwnerBusinessUnit allows us to move a user to another business unit without moving all his owned records to that unit.

This makes sure that other users in the new business unit cannot access the user’s records from his previous business unit (unless they have organization-level access / or have a role in that unit / or records are shared)

Also Check –

EnableOwnershipAcrossBusinessUnits setting https://nishantrana.me/2022/01/05/how-to-change-users-business-unit-without-removing-the-security-roles-in-dynamics-365-powerapps-enableownershipacrossbusinessunits-setting/

Modernize Business Units https://nishantrana.me/2022/01/04/modernize-business-units-matrix-data-access-structure-record-ownership-across-business-units-preview-in-dynamics-365-dataverse/

By default this setting is true.

Get the Organization Settings Editor – https://github.com/seanmcne/OrgDbOrgSettings/releases

Let us see the default behavior first, below are the 2 contact records created by User 2 who belongs to BU 1.

Now let us change the Business Unit of User 2 to BU 2.

After changing the BU of the user 2 we have assigned the same security role to the user which he has had in BU 1 that gave him BU level access on the Contact records.

We can see both Owner and Owning Business Unit getting updated as expected.

Now we’d see what will happen if we update the setting AlwaysMoveRecordToOwnerBusinessUnit to False.

But before doing that let us change the business unit of User 2 back to BU 1.

As expected Owning Business Unit is updated back to BU 1

Now let us update the setting to false

This time changing the business unit of User 2 to BU 2 should not update the Owning Business Unit of the contact records owned by User 2 to BU2.

As expected this time the Owning Business Unit remained BU 1.

Based on the true or false value set for AlwaysMoveRecordToOwnerBusinessUnit , we can see the checkbox “Move records to new business unit” either checked or unchecked – but always DISABLED.

If AlwaysMoveRecordToOwnerBusinessUnit is true than – the disabled checkbox is checked – 

cbu

Get more details below –

https://docs.microsoft.com/en-us/powerapps/developer/data-platform/configure-entity-relationship-cascading-behavior#allowed-record-ownership-across-business-unites-is-enabled

Hope it helps..

Advertisements

Modernize Business Units / Matrix data access structure -Record ownership across business units (Preview) in Dynamics 365 / Dataverse


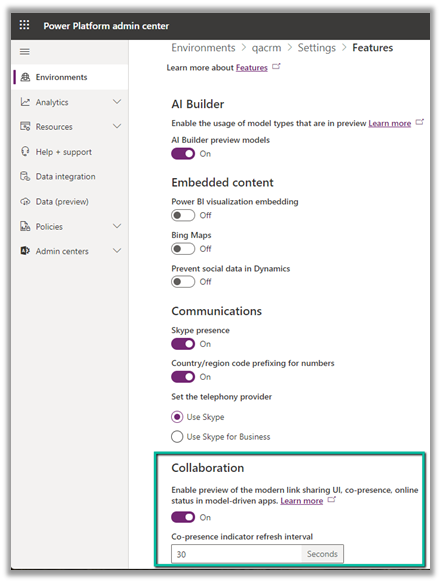
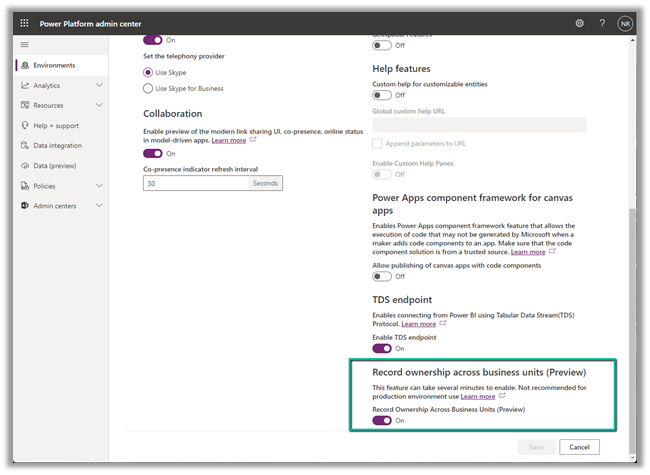
To enable this preview feature, log in to the Power Platform admin center, switch on the

Environment >> Settings >> Features >> Record ownership across business units (Preview)

It took around 5 minutes to enable.

Now let us say we have a BU structure like below.

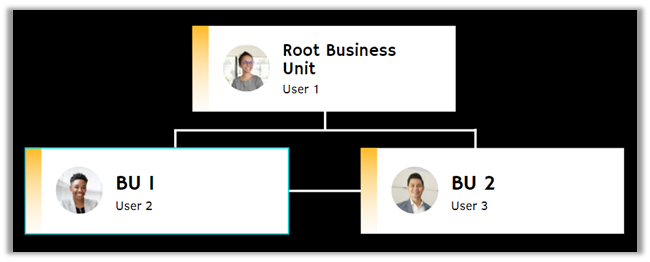
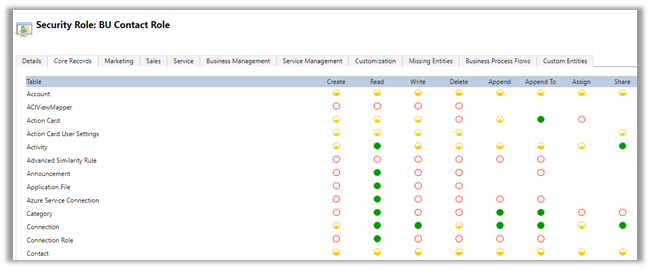
And custom security roles with BU level access to Contact – BU Contact Role.

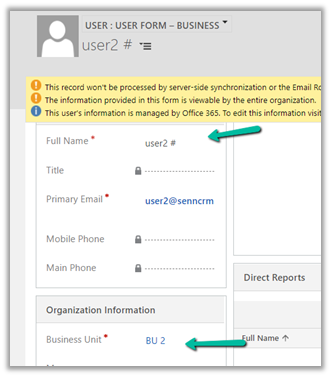
Both user 2 and user 3 have only the BU Contact Role of BU 1 and BU 2 business unit respectively assigned.

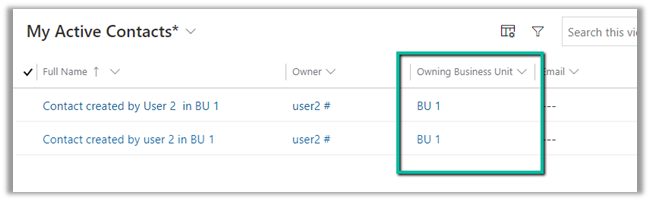
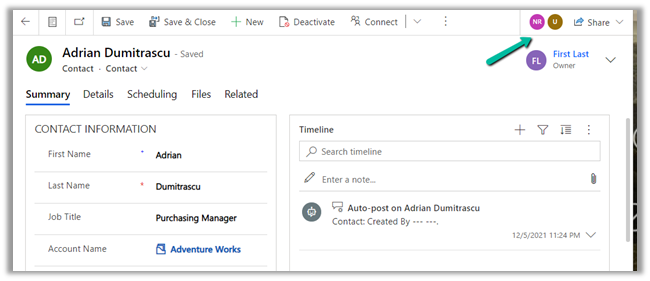
Below is the Contact record created by User 2.

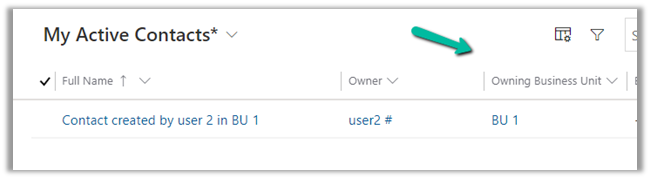
As expected User 3 does not have access to the above record.


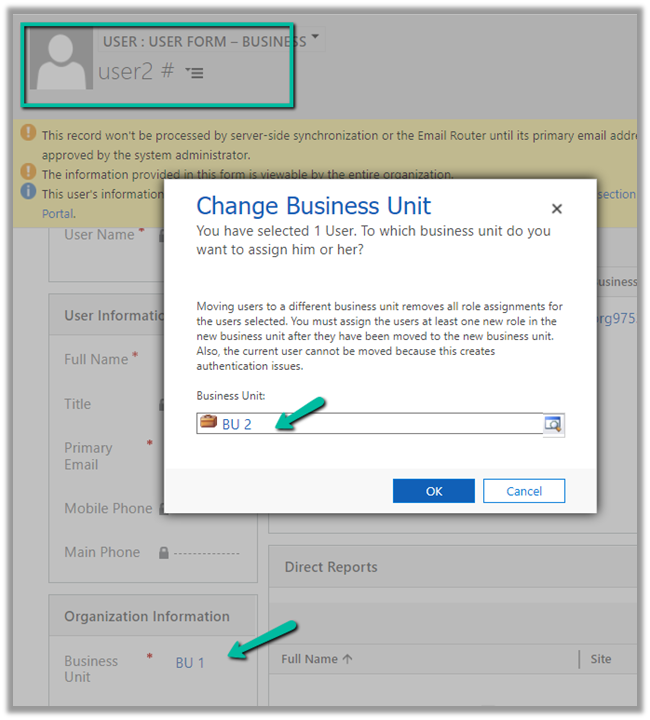
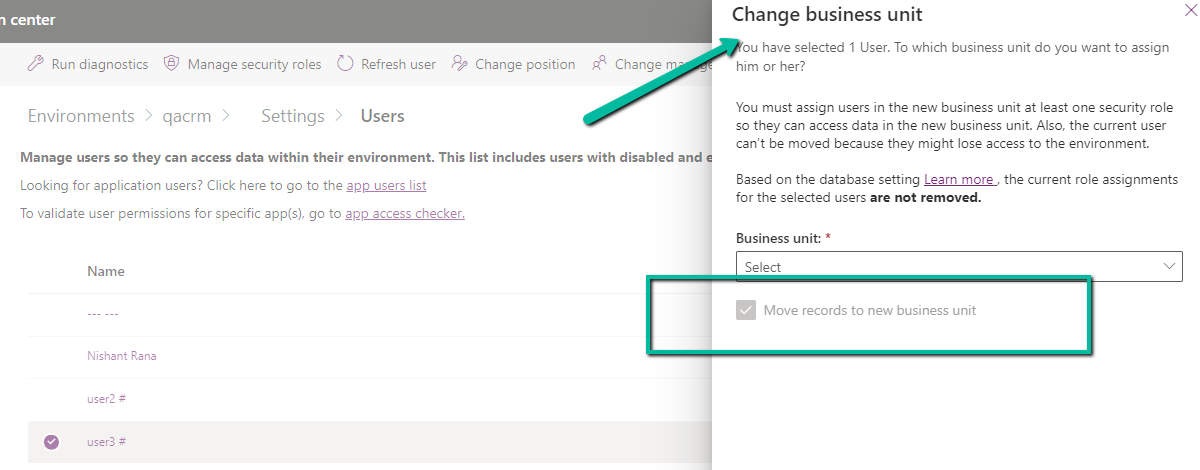
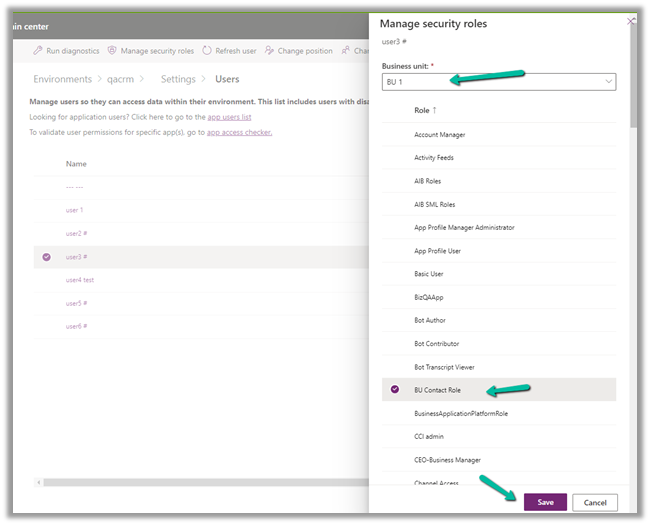
Now let us provide the same BU Contact role to User 3 but this time from BU 1.

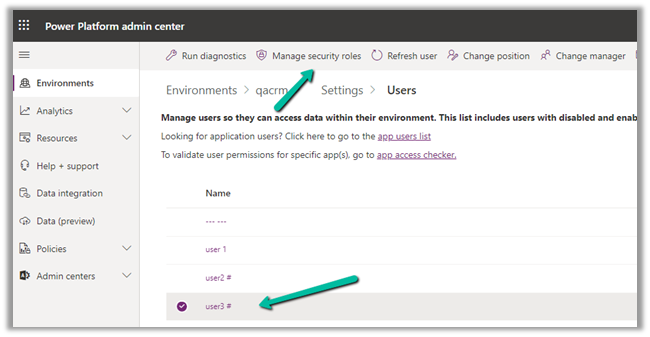
Select the User 3 in Settings >> Users >> Manage Security Roles

The user has already has BU Contact Role in BU 2. Let us change the Business Unit and assign the same role for BU 1.

Click on Save.

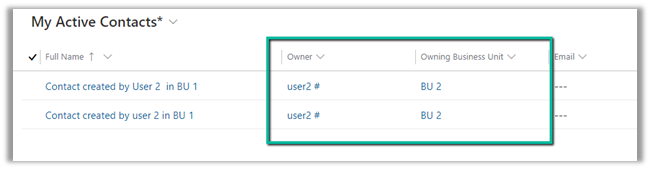
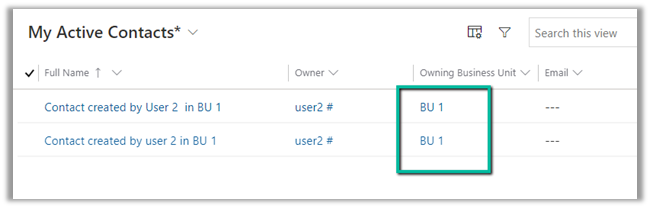
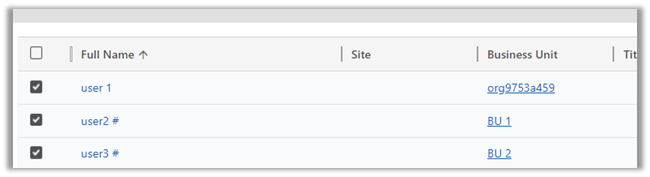
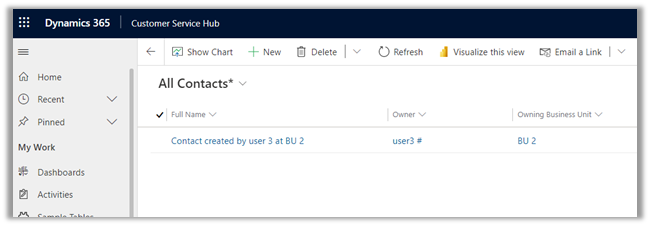
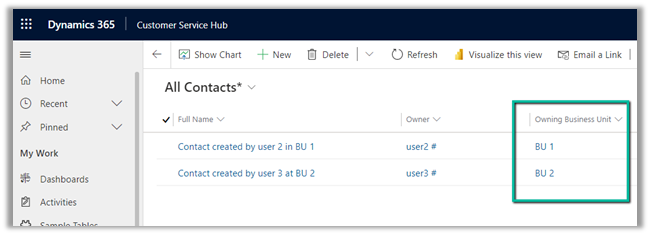
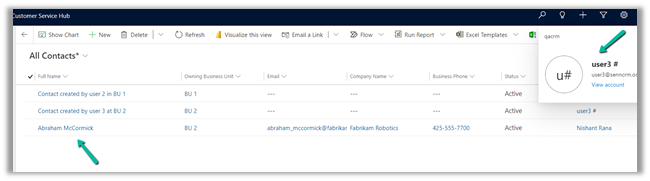
On refreshing the All Contacts view for user 3 now we can see both the records, showing the corresponding owner and the owning business unit the records belong to.

This makes it easy to provide required access to the users across the business unit, without the need of sharing the record or using team access or teams ownership concept here.

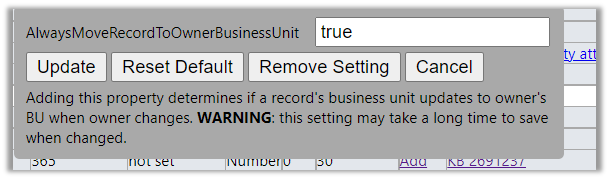
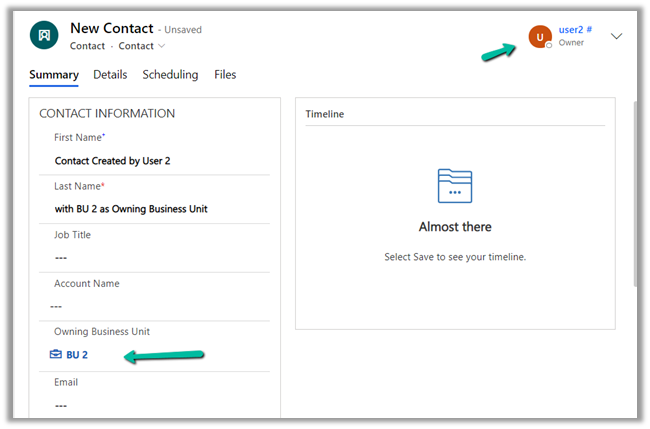
With this preview, we can also update the Owning Business Unit field.

Below the User 2 is creating a new contact record and setting Business Unit as BU 2.

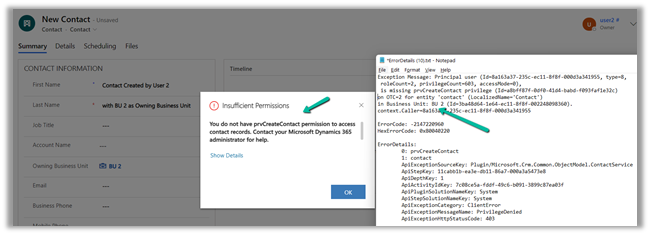
Here it fails because User 2 only has BU level access for Contact Create Rights, and he is trying to create at BU 2.

Let us update one of the existing contact records, by setting Owning Business Unit as BU 2, this time through System Administrator user which belongs to the root Business Unit.

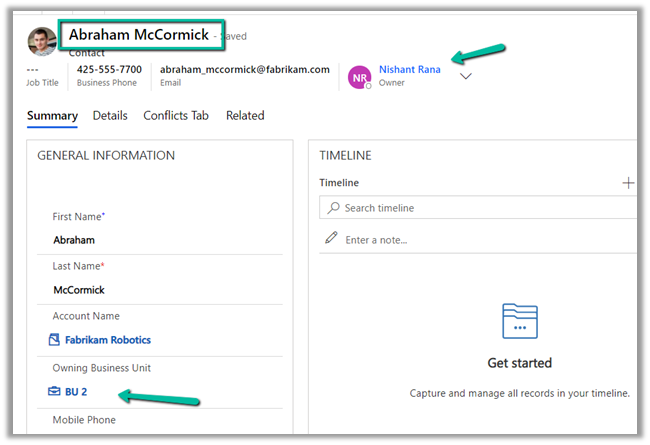
As expected the record is available to User 3, as we have set BU 2 as the owing business unit.

Get all the details here

https://docs.microsoft.com/en-gb/power-platform/admin/wp-security-cds#matrix-data-access-structure-modernize-business-units—preview

Hope it helps..

Advertisements

Modern link sharing UI, co-presence, online status (preview) in the model-driven app (Dynamics 365)


To enable the Collaboration preview feature, log in to the Power Platform Administration Center, select the Environment >> Settings >> Features >> Collaboration


Currently, the following entities are supported – Case, Contact, Account, and Opportunity.

Enabling this feature adds a new section in the command bar for the records, that allows us to see the other users working on the same record.

Here we can see 2 other users working on the same contact record.

We can select the user’s picture to see their status, send an email, start teams chat, and open the contact card.

Send Email opens the default mail app with To populated.

Teams chat opens the team for a chat.

Open contact card opens the contact’s card.

Share allows emailing the link of the current record and sharing the record.

Email link

Clicking on Manage access opens the share records dialog.

Get all the details here –

https://docs.microsoft.com/en-us/powerapps/user/collaboration

Also check – Collaborate using comments –https://nishantrana.me/2021/12/16/collaborate-using-comments-preview-in-modern-app-designer-power-apps-dynamics-365/

Hope it helps.. 

Advertisements