How to – Use Import Column to Upload files to File Column / Attribute in SSIS KingswaySoft(Dynamics 365 / CRM)


A few weeks back had posted on how to upload files to the File Column type field using KingswaySoft’ s Integration Toolkit and Premium Flat File Source and Premium Derived column which are part of the SSIS Productivity Pack of KingswaySoft

https://nishantrana.me/2022/03/17/how-to-upload-files-from-file-column-attribute-using-ssis-kingswaysoft-dynamics-365-crm/

Here we will see an example of achieving the same without using the KingswaySoft Productivity Pack’s Premium Flat File Source and Derived column. (although would recommend using it as it includes over 300 premium components making it easier to rapidly build efficient solutions)

https://www.kingswaysoft.com/products/ssis-productivity-pack

Below is our source file

The contact records in CRM

Below is how the package looks like

The Flat File Source points to the location where we have the source csv file containing email, file path, and file name.

Import Column takes the File Path as the Input.

For the Input and Output properties, add an output column (BinaryColumn) of DataType = image.

In the FilePath input column properties, specify the column id of the output column.

Finally, in the CDS / CRM Destination Component, we are performing an upsert using the Email id as a match.

Here we have mapped the output column of the Import Column i.e. BinaryColumn to the binary content field of the file type attribute of the CRM.

Let us now run the package.

Let us now open the records and check.

As expected we can see the file uploaded.

Also, check out –

To extract attachments from notes-https://nishantrana.me/2021/02/10/extracting-attachments-from-notes-in-dynamics-365-dataverse/

To download files using Download Block Requesthttps://nishantrana.me/2022/03/14/how-to-download-file-from-file-column-using-initializefileblocksdownload-and-downloadblock-request-dynamics-365-crm-dataverse/

To upload files using Upload Block Requesthttps://nishantrana.me/2022/03/15/how-to-upload-file-to-file-column-using-initializefileblocksupload-and-uploadblock-request-dynamics-365-crm/

Understand File and Image Data Typehttps://nishantrana.me/2021/10/01/using-file-and-image-data-type-in-dataverse-dynamics-365/

Try out the wonderful, feature-rich, and powerful SSIS Integration Toolkit for Dynamics 365 by KingswaySofthttps://www.kingswaysoft.com/products/ssis-integration-toolkit-for-microsoft-dynamics-365/download

Check other articles on SSIS plus CRM – https://nishantrana.me/2018/11/26/ssis-and-microsoft-dynamics-365/

Hope it helps..

Advertisements

How to – use Associate Entities and Disassociate Entities Event in Audit to check Security Roles changes in Dynamics 365


Let us assign the System Customizer role to the user John Denver save it and then remove the same.

Let us check the Audit records generated for it.

We can see 2 records with event Associate Entities and Disassociate Entities with security role name – System Customizer created in the Audit Summary View as shown below.

Here the entity will be Security Role.

Let us assign 2 more roles to the user.

As expected we can see 2 records, with event Associate Entities.

Now let us see what happens when we update the Business Unit of the user. If you remember, assigning a new business unit removes all the existing security roles of the user.

Well this can be controlled now through DoNotRemoveRolesOnChangeBusinessUnit
setting – https://nishantrana.me/2022/01/05/how-to-change-users-business-unit-without-removing-the-security-roles-in-dynamics-365-powerapps-enableownershipacrossbusinessunits-setting/

Here we have changed the business unit of user 2, he had salesperson, system administrator, and system customizer roles assigned.

We can see the business unit change is recorded.

From Audit History of the user record – we can check all the Associate Entities and Disassociate Entities record that will give us the details of the previous Security Roles user was having before the Business Unit change.

sr


Other related Audit articles –

Hope it helps..

Advertisements

How to – Use Power Apps Ideas (preview) to generate Power Fx Formulas.


Let us have a quick look at the powerful Power Apps Ideas feature with a few examples.

Power Apps Ideas feature works for –

  • Items property – Gallery and Data table control.
  • Data Sources – Microsoft Dataverse, Microsoft Lists, Excel, SharePoint.
  • Data Types – Text, Whole Number, Decimal Number, Date and Time, Choice, Boolean.
  • It is only available in environments in the US region with en-us as the browser’s default language.
  • Check the list of supported Functions

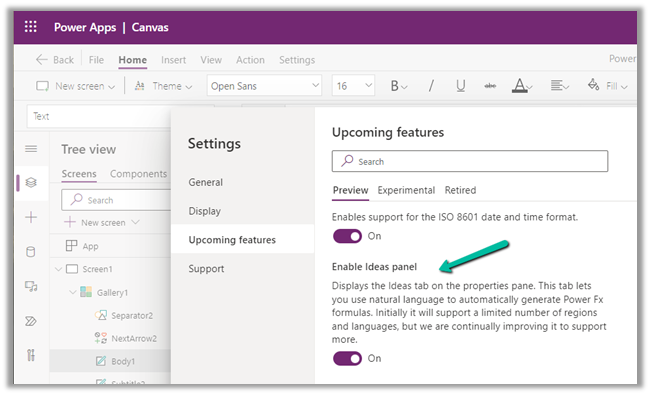
The feature can be controlled from the Settings within the App.

Let us check some of the examples of natural language transformation to Power Fx Formulas.

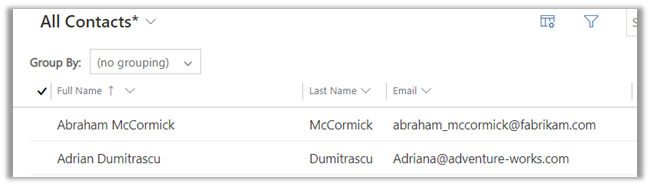
We have a sample canvas app with the gallery control bound to Contacts (Dataverse).

Select the Gallery control, and navigate to the Ideas tab.

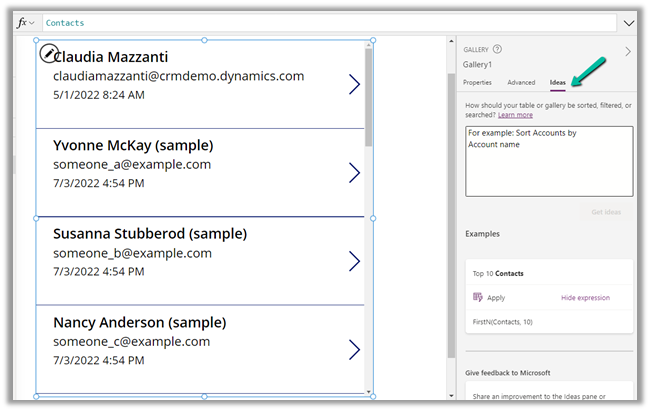
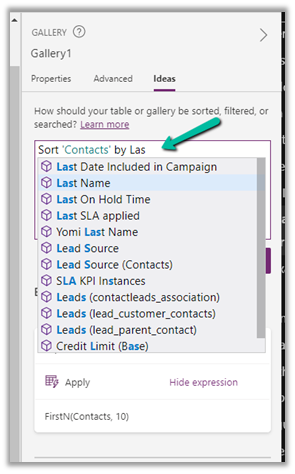
Let us first sort the contacts by Last Name. As we type we get the IntelliSense support.

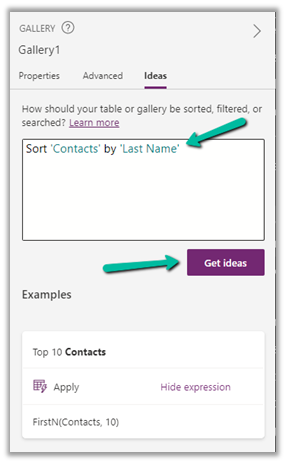
We have our condition ready to sort by Last Name now let us click on Get ideas.

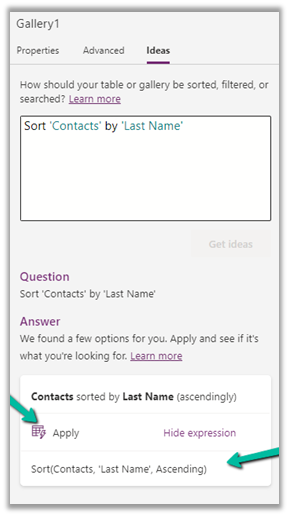
We can see the formula generated for the same. We can click on Appy to apply the formula.

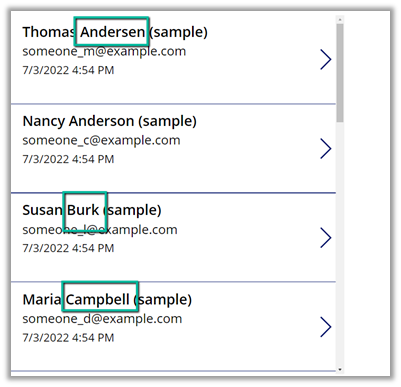
As a result of applying the formula, we have the contacts sorted by Last Name.

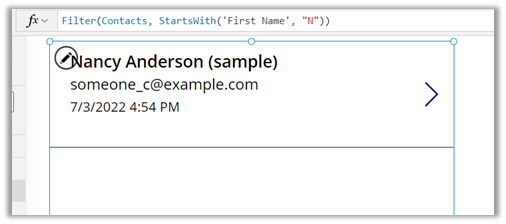
Let us try a filter – filter contacts where the first name starts with N.

On applying the formula, the result –

Another example of a filter based on Created On.

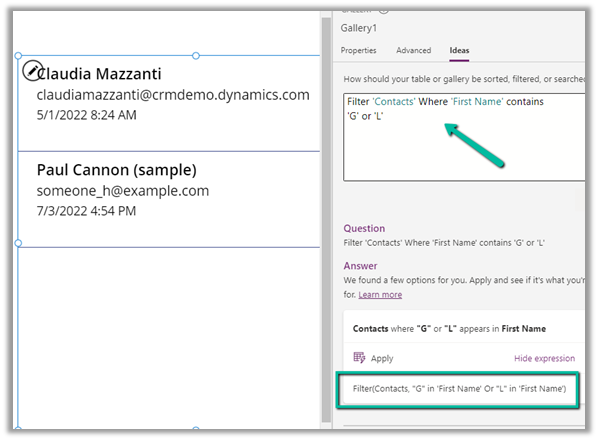
Filter based on text –

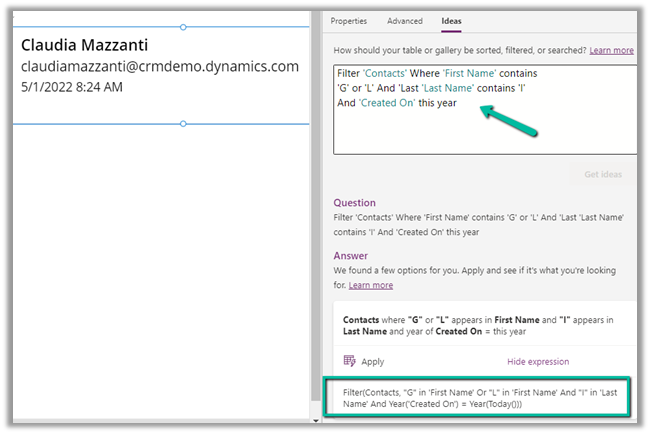
Filter with multiple And conditions –

At times we would have to tweak the generated formula to get the desired result if it is interpreted differently.

We saw the transformation of the natural language, now let us check the transformation of the examples to Power FX Formulas, for this let us select the fields inside the gallery.

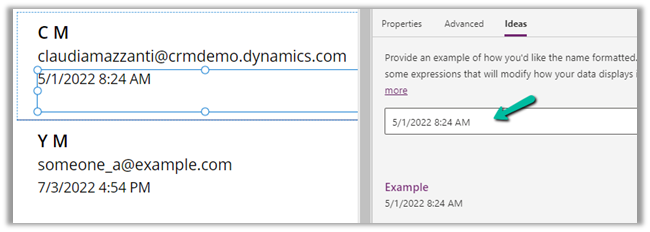
As an example, if we only want the initials of the first and last name instead of the full name, we can change the name to the initials and click on Get Ideas.

Let us change it to C M, followed by selecting Get ideas and Apply.


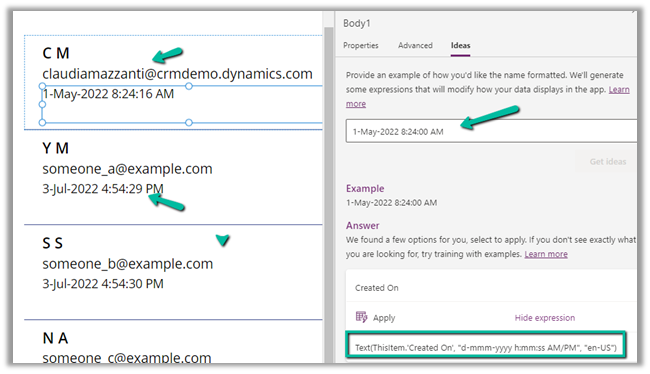
Next, let us change the date format to include the seconds part and the name of the month.

From –

Here we added the name of the month and the seconds in the example and clicked on the Get ideas, which generated the formula, followed by Apply.

We can see the result as expected.

Thus Power App Ideas make it easy for users to quickly apply the correct formulas using natural language and examples.

Get all the details here – Power App Ideas

Hope it helps..

Advertisements

How to – Add users to the Queue – using Manage NN relationships XrmToolBox Plugin and AddPrincipalToQueueRequest (Dynamics 365)


Recently we implemented Unified Routing for one of our projects, and as part of testing we were supposed to add multiple users to different queues (advanced queues in case of unified routing).

So we were looking for a way to do this either through any existing tool or programmatically.

Well, using the Manage NN relationships XrmToolBox plugin we can add users to the queue.  (Thanks to Prashant for suggesting this)

Just as an example, we want to add the below users

to the following Queue named Test, which currently has only one user added to it.

Below is the sample CSV file we have created having the name of the Queue and the email id of the users to be added.

Now let us open the Manage NN relationships tool and specify the appropriate values there.

Here we have specified the First Entity as Queue and the Second Entity as System User.

For Queue we have selected Name and for System User, we have specified Primary Email as the attribute to be considered while importing the data.

Click on Browse and load the file, followed by a click on the Import button to start the process.

As we have received the Success result, let us refresh our Queue to see if the users were added to the Queue or not.

As expected we can see the users added to the Test Queue.

We can also add users programmatically by using the AddPrincipalToQueue Request class.

We need to populate the Principal and QueueId property as shown below.

More on AddPrincipalToQueueRequest.

Hope it helps..

Advertisements

How to – Show only relevant activities in the New Activity drop-down – Dynamics 365


Let us understand this new feature released as part of 2022 Release Wave 1 with a simple example.

Here we have opened the New Activity drop-down list for an existing lead record within Dynamics 365 Sales Hub.

We can see around 15 activities listed there.

Now let us enable the feature. Navigate to

Environments > [Your Environment] > Settings > Features

Scroll down to the bottom, toggle the switch on and save the changes.


As expected now we see only 4 activities listed, that were added in the Sales Hub App appearing there.

Now let’s edit the Sales Hub app and add a new activity table e.g. letter there

Save and Publish the changes

As expected we can see Letter in the New Activity drop-down list.

Now let us open an existing contact record and check.

As expected it is the same for the contact record with the Sales Hub.

Just to confirm let us open the contact record from Dynamics 365 Customer Service Hub.

As expected it shows a different list. It doesn’t show the Letter activity as the letter was added to Sales Hub and shows Service Activity in the drop-down.

Get the details here

Hope it helps..

Advertisements

Import Data (Import Data Wizard) – Few key points


Let us understand a few points about the Import Data feature with a simple example –

Say for example we have exported the following 4 records.

The exported file will have the view name along with the timestamp.

The exported file – 

It has 3 hidden columns that allow for re-import of these records possible.

1st column contains the GUID of the record, the second contains the Row Checksum which it uses to make sure to update only those records or rows which are changed, and the 3rd column is Modified On which it uses to track if the record has been modified since it was exported.

Now let us update one of the records we exported inside CRM.

On importing the same file,

as expected we get 1 failure.

Error message – “You cannot import data to this record because the record was updated in Microsoft Dynamics 365 after it was exported” for the same record which we updated inside the app.

Now let us update one of the records (which has a possible duplicate) and re-import the file.

During import, we have let the Allow Duplicates settings be default i.e. No.

This time also apart from the previous error we get one partial failure.

The error message says – “A record was not created or updated because a duplicate of the current record already exists.

This is because the record that was modified and imported was having another record having the same email id, triggering our duplicate detection rules. Also, we had specified Allow Duplicates as No while importing the file.

This time let us set Allow Duplicates as Yes and try the import with the same file.

As expected there was no partial error this time.

And the record got updated this time.

Another point to remember is if we export and import the file without any changes, or for the rows with no modification, it will not perform any action, i.e. trigger a create/update for any of the records.

For tracking the changes, as we mentioned earlier it uses the Row Checksum column’s hash value.

Now let’s update the GUID of the record in the 1st row (changed b to c in the end) and the modified date (changed to 55 from 53 minute part) for the 4th row and see the results.

As expected both these records failed – 1st one where we changed the GUID with the error message – “The record could not be updated because the original record no longer exists in Microsoft Dynamics 365” and the 4th row with the error that “You cannot import data to this record because the record was updated in Microsoft Dynamics 365 after it was exported” as we had changed the Modified Date in the imported excel file.

Lastly, let us restore the original value of those 2 fields of the hidden columns and try the import to see the results.

As expected we do not get any error for those 2 rows as we had restored the original value.

  • For .zip files 32 MB is the max size limit for other file types i.e. xlsx, csv, txt and xml it is 8 MB.

G

  • Microsoft recommends import to be limited to 20K rows or fewer.

Just in case we are interested to see how the data validation works especially for the option set field in the exported excel file from CRM.

Select the field in excel and open the Data Validation from the Data tab, which refers to the hiddenSheet.

To see the hiddenSheet, right-click the worksheet and select the View Code option.

It opens the VBA window, where we can select the hiddenDataSheet object and change its Visible property to -1-xlsSheetVisible.

Back in our excel, we can see the hiddenSheet visible and the values of our option-set fields.

Hope it helps..

Advertisements