How to – Identify Dynamics 365 Marketing Application App and its corresponding environment


We can easily identify the Marketing App and the environment in which it has been provisioned.

Login to Power Platform Admin Center >> Resources >> Dynamics 365 Apps

https://admin.powerplatform.microsoft.com/

We can find the unique name of the environment/organization suffixed with the name of the app i.e. Dynamics 365 Marketing Application for the configured app.

Navigate to the environment’s Advanced Settings >> Customizations >> Developer Resources 

We can find the Unique Name of our organization there


Hope it helps..


Advertisements

Moving Marketing Email, Journey, Events, etc. between environments – Dynamics 365 Marketing


To move Marketing configurations/data from one environment to another we can make use of the Configuration Migration Tool.

Open the tool, and create the schema file. Connect to the source environment.

Select and add the real-time marketing email table – msdynmkt_email Soure email.

Next, we are going to select the real-time marketing Journey table – msdynmkt_journey

Source Journey.

Lastly events – msevtmgt_event
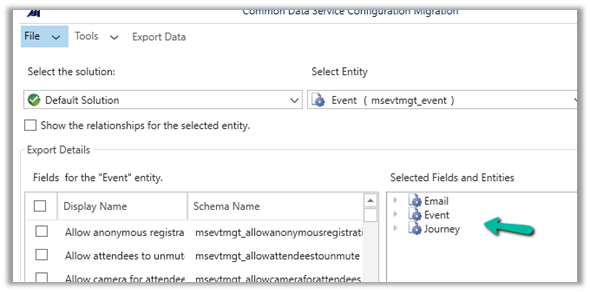
Source events.

Click on Save and Export

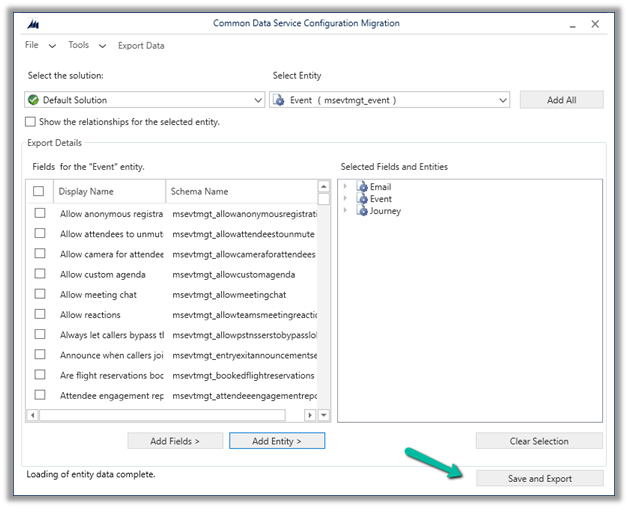
Save the schema file and click on yes.

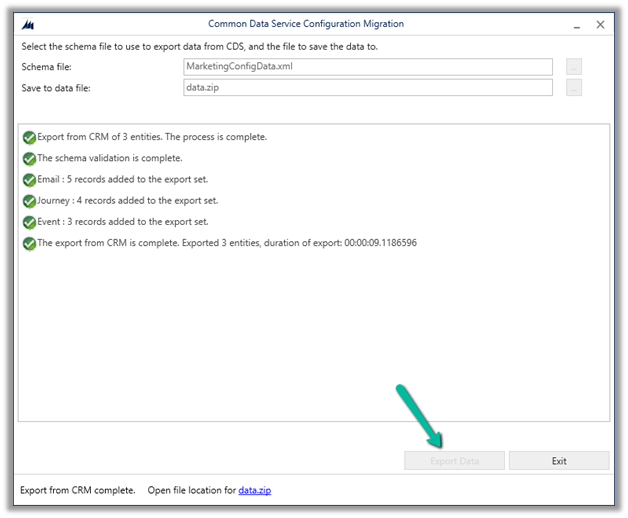
Click on Export data to generate the data to be exported.

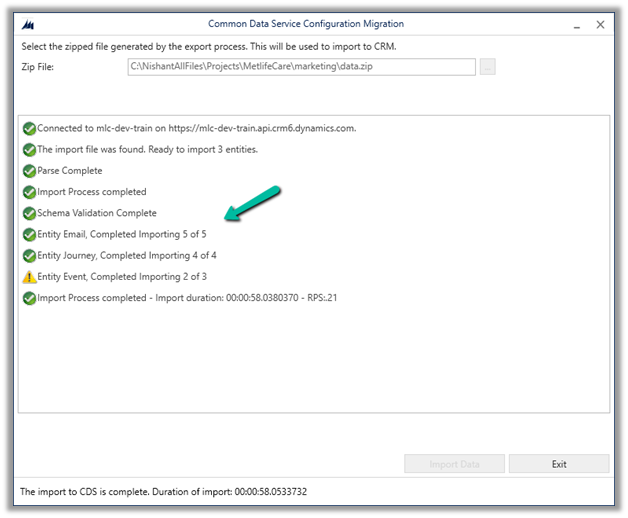
Next with the schema and data exported, select Import Data to start the import and select destination organization.

Select the data file exported earlier and start the import process.

The import process gets completed with a warning for the table Event for one of the records.

Let us now check the destination environment.

We can see 4 Email records created and 1 updated, all in Draft Status.

We can see all 4 journey records created.

And 2 event records were created.

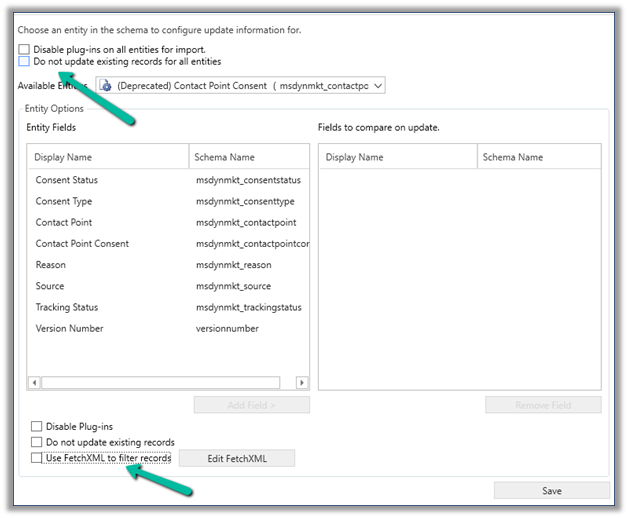
In case we want to filter the records or want to make sure records are not updated in the destination, we can select Tools >> Configure Import Settings

And use Do not update existing records for all entities and specify Fetch XML for it for filtering.

Also, checkPrerequisites for the export/import process

Hope it helps..

Advertisements

How to – Generate Long-Lived Page Access Token – Facebook


Login to Meta for Developers and note down the App ID and App Secret of the app.

Access Tokens – https://developers.facebook.com/docs/pages/access-tokens/

https://developers.facebook.com/apps/

To get the long-lived page access token, first, we need to generate a short-lived Access Token.

In Graph API Explorer – https://developers.facebook.com/tools/explorer, select the App and the page (provide appropriate permissions) and click on Generate Access Token to generate the token.

Navigate to Access Token Debuggerhttps://developers.facebook.com/tools/debug/accesstoken/, paste the token and click on Debug.

We can see the token expiry in 1 hour.

To generate a Permanent or Long-lived token we can make use of the below application.

https://bnjis.github.io/Facebook-permanent-token-generator/

Specify App ID, App Secret, and User Access Token and click on Submit.

We will get the permanent token generated for us.

On pasting this token in the Access Token Debugger, we can see the expiry set to Never.

The other option is to use the Extend Access Token option when we generate a short lived token

EFBT

GT

Check the below link for more details –

https://developers.facebook.com/docs/marketing-apis/overview/authentication/

https://developers.facebook.com/docs/facebook-login/guides/access-tokens/get-long-lived/

https://medium.com/@blienart/get-a-permanent-facebook-page-access-token-a96470dc03ca

https://developers.facebook.com/docs/facebook-login/access-tokens/expiration-and-extension

Hope it helps..

Advertisements

Format property missing in Date Picker in custom page – Dataverse / PowerApps


Recently while designing the custom page, we realized that the format property is missing for the Date Picker control. This is because Date Picker control is based on Fluent UI Library.

One option earlier was to enable the Classic Controls from Settings

And replace the existing control with the classic control

Also, check – https://debajmecrm.com/get-todays-date-format-dates-in-power-apps-canvas-app/

https://powerusers.microsoft.com/t5/Building-Power-Apps/Date-picker-missing-format-property/td-p/903794

https://powerusers.microsoft.com/t5/Building-Power-Apps/Custom-Page-Date-Picket-Format-Date/td-p/1349351

Hope it helps..

Advertisements

Marketing Form and required (mandatory) fields in Lead and Contact – Dynamics 365 Marketing


Let us take one of the out-of-the-box marketing forms available in Dynamics 365 Marketing.

It has only an Email field marked as required and creates / updates both contacts and leads.

If we click on Check for errors we will get the below notifications.

  • To create a Contact, the Last Name (lastname) field should be included in your form and marked as required.
  • To create a Lead, the Last Name (lastname) field should be included in your form and marked as required.

Now let us host this form and try submitting it.

Click on Go Live, and create a new related marketing form page for it. Make sure you have the domain already authenticated.

Authenticate Domainhttps://nishantrana.me/2022/11/09/how-to-authenticate-domain-in-dynamics-365-marketing/

Embed Marketing Form on the external pagehttps://nishantrana.me/2022/11/10/how-to-embed-marketing-form-on-an-external-page/

Open the Form page and copy the script to host the form.

On the host page, let us submit the details.

Back in our Marketing form, we can see the submission.

And also, both the lead and contact records created.

Now let us try one more submission without specifying a value for the lastname field (which it was showing in the notification, as a required field to be added on the form, for both the lead and contact table).

We can see the submissions in the Marketing Form.

And both the lead and contact records were created.

So although it shows the notification for all the mandatory fields which are not added in the form and marked as required, it still allows the record to be created.

Hope it helps..

Advertisements

Sample formula for Associating N:N records and Creating 1:N records in Canvas App (PowerApps / Dataverse)


Just sharing the sample formula, we used for associating selected products from the gallery to lead on OnSelect of a button.

Here collectionCheckedProducts contains the checked products from the gallery bound to the product data source –

varEnquiryIdWithoutCurlyBraces contains the GUID of the Lead record. Here Enquiry is Lead renamed.

Enquires(leadproduct_association) is the name of the relationship between lead and product.

Relate function is used to associate multiple selected products in collectionCheckedProducts to a lead record.

And below is the sample formula we used for creating Quote Product for selected products from the gallery.

varEnquiryIdWithoutCurlyBraces contains the GUID of the Quote record. Proposal Data Source is the Quote renamed.

Hope it helps..


Advertisements