Combo box showing blank values in case of multiple conditions – Canvas App (Dataverse)


Recently while trying to filter combo box Items we were getting the values but it was coming as blank instead of showing the name field.

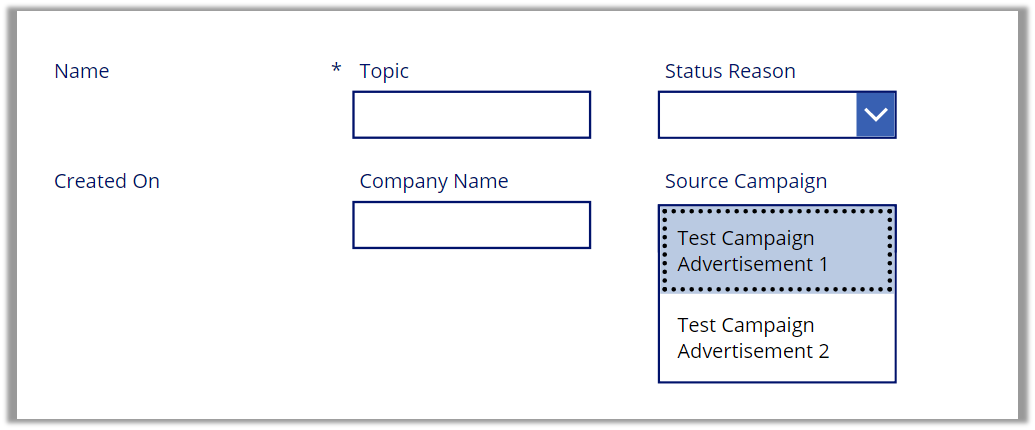
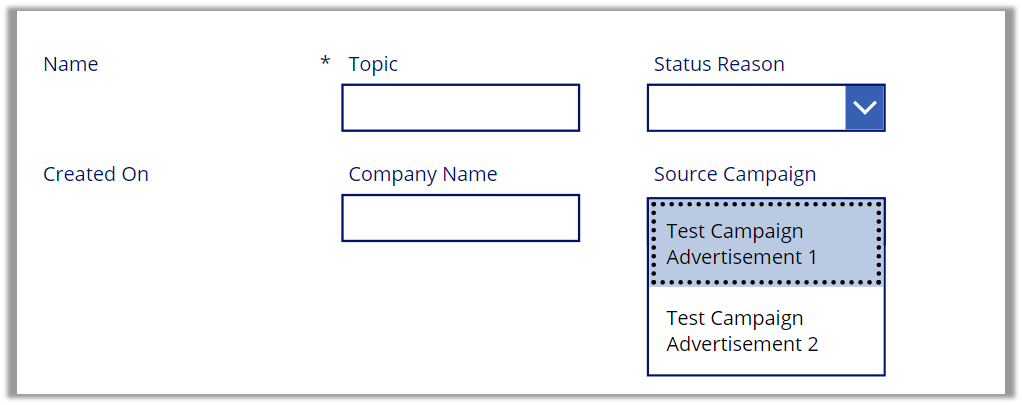
Below is a sample Form – connected to Leads and Source Campaign is the combo box field (lookup to Campaign)

As we can see without applying the filter we can see the name (Display fields) populated.

Now let us try to filter it based on the Campaign Type field.
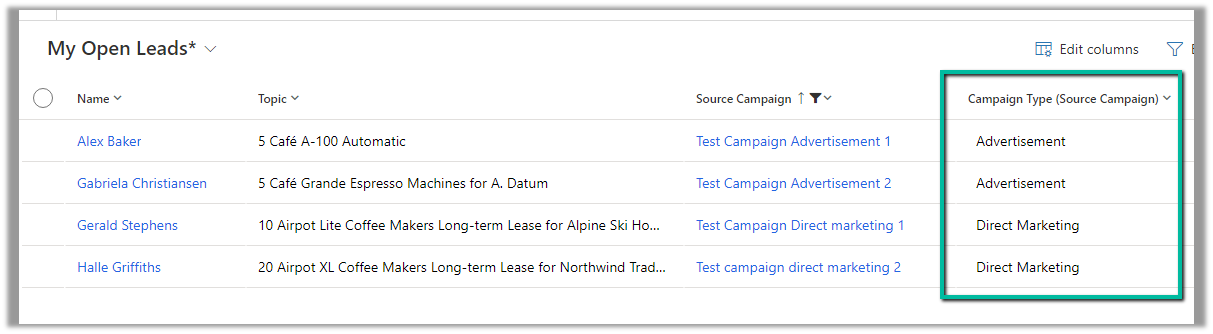
Here we have applied a single filter condition.

We can see the combo box getting filtered correctly.
Now we are introducing a variable just to filter it based on condition.

Till now filtering works as expected.
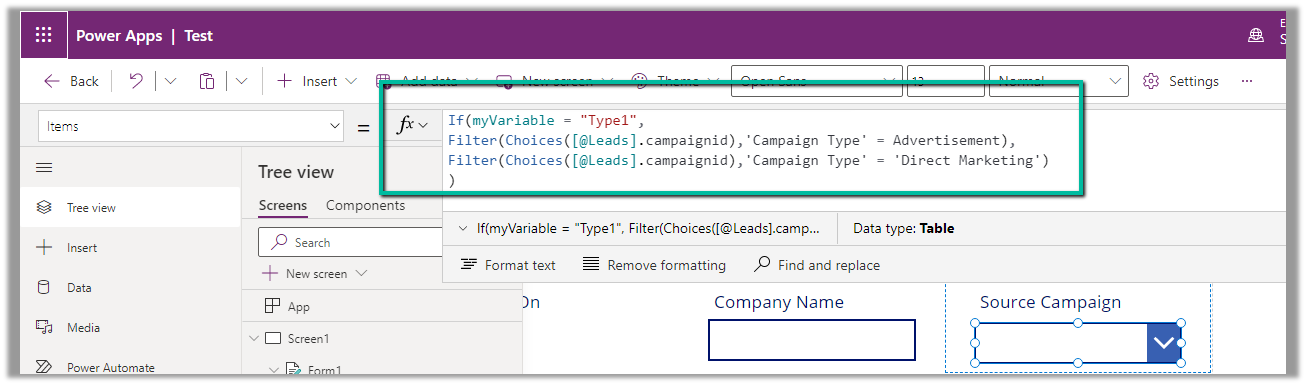
Now let us introduce else condition here.
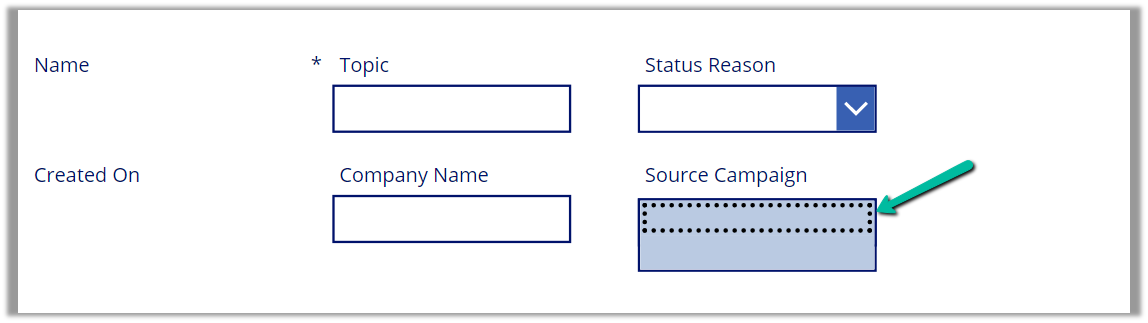
We can see the combo box getting filtered but not showing the name field of the Campaign set as a display field. Through developer tools also, we don’t see the name returned in this case. The same is the case if we use multiple If or Switch in the formula.
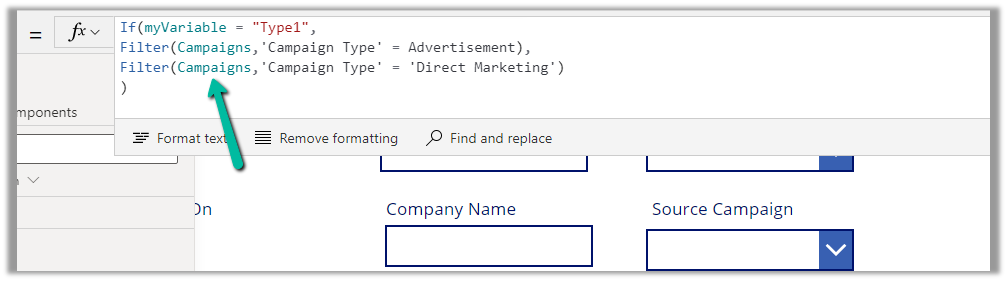
The solution is to filter on Campaigns data source directly, instead of the corresponding Choice field in the Lead.
The result –

Hope it helps..

Advertisements

How to – Create Marketing form submission record through Flow (Power Automate) – Dynamics 365 Marketing


Recently we were exploring the possibility of creating a marketing form submission record through flow/custom code. Here simply creating the marketing form submission record is not enough, for it to be processed by the platform, we need to call the bound action – msdyncrm_UpdateMarketingFormSubmission with Step = Retry. (And it’s all not an officially supported scenario, so be careful)

Below is how the flow looks like

First, we create a form submission record –

After creating the form submission record, we are creating and associating the marketing field submission records with the values that we want to pass for the form – email, first name, and last name in this case.

And then eventually calling the action –msdyncrm_UpdateMarketingFormSubmission to trigger the submission (resubmit) of the form submission record.

On running the flow, we can see the record created with the status as pending.

Within a few seconds, if the input is correct, we can see the status updated as success

and the corresponding contact/lead created or updated.
Hope it helps..

Advertisements

Fixed – Global variables are not allowed in StartScreen (PowerApps / Custom Page)


Recently while working on a custom page we had a requirement to show different screens on the app start based on a choice field in the record. (The custom page was being opened from a button/command on the form)

For the custom page’s App OnStart we were first removing the curly brackets from the recordID parameter passed to set the ContractId variable followed by setting ContractRecord variable using that GUID in the LookUp function.

Below is the JavaScript used to pass the parameters to the custom page (from the command/ribbon button)

Now based on Contract Type optionset field in the Contract record we wanted to show a different screen as the start screen. However, trying to use the Global Variable in the StartScreen function gave us the error – “Global Variables are not allowed in StartScreen”

The solution here was to use the Param recordId to get the record and set the start screen accordingly in the StartScreen instead of ContractRecord global variable.

Also check  – https://debajmecrm.com/how-to-dynamically-show-the-start-screen-of-an-app-in-power-apps-canvas-apps/

Hope it helps..


Advertisements

Using addProperty to dynamically add a custom property to a JSON object – Power Automate


Recently while working on the integration of Facebook Lead Ads with CRM, through Webhooks / Power Automate we had to process the lead data and create lead and contact records.

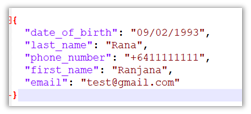
Below is a sample format in which we’d get the lead data for the FB form having a first name, last name, date of birth, and email fields in it.

Now we want to create an object having name as proprety and value from values like below from the above response, which will make it easy for use to refer in add a new row / update a row Dataverse step.

For this we will be using addProperty function.

Below is our sample flow –

First we are initializing varJSON – string variable with the JSON response

Than intializing the another variable varFieldData as type Object

Parse JSON action using the sample response.

Here we are interested in field_data property

So in the next step, we loop through each field_data, than use addProperty function in Compose to add name and value to the varFieldData object, and use the outputs of compose to set the varFieldData variable.

addProperty function – addProperty(variables(‘myObject’), ‘newProperty’, ‘propertyValue’)

In the next step, we can see the varFieldData and the way we can access the property last_name added to it.

On running the flow we can see the result as expected –

Hope it helps..

Advertisements

Stop / Go live Lead Score Model behavior in Dynamics 365 Marketing


Recently we were writing a plugin on the Lead Score table to update the associated lead with Score and the Grade values.

The plugin was on Update of Lead Score (msdyncrm_leadscore_v2) to update lead when the Score Status = Up to date.

The interesting point we observed here was that when we stop the lead scoring model all the associated lead scoring records get deleted, which was kind of different than the usual behavior of related records, where we expect it to get deactivated/disabled.

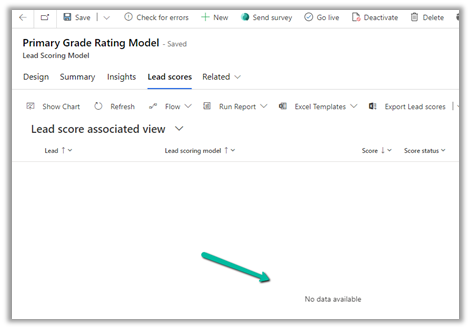
On clicking the Stop button on the lead scoring model all the associated lead score records will get deleted.

All lead score records deleted :-

And now as soon as we Go live, the new lead score records get created back.

It starts the process of creating the records immediately.

Hope it helps..


Advertisements

Notification template in Omnichannel Voice (Dynamics 365 Customer Service)


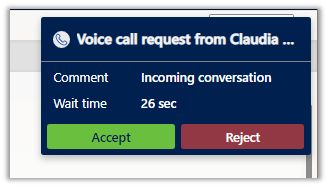
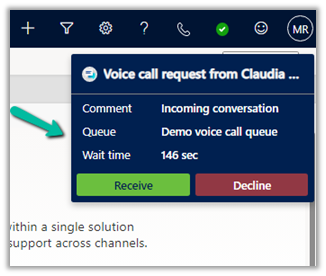
Below is the default notification the agent receives on incoming conversations/calls.

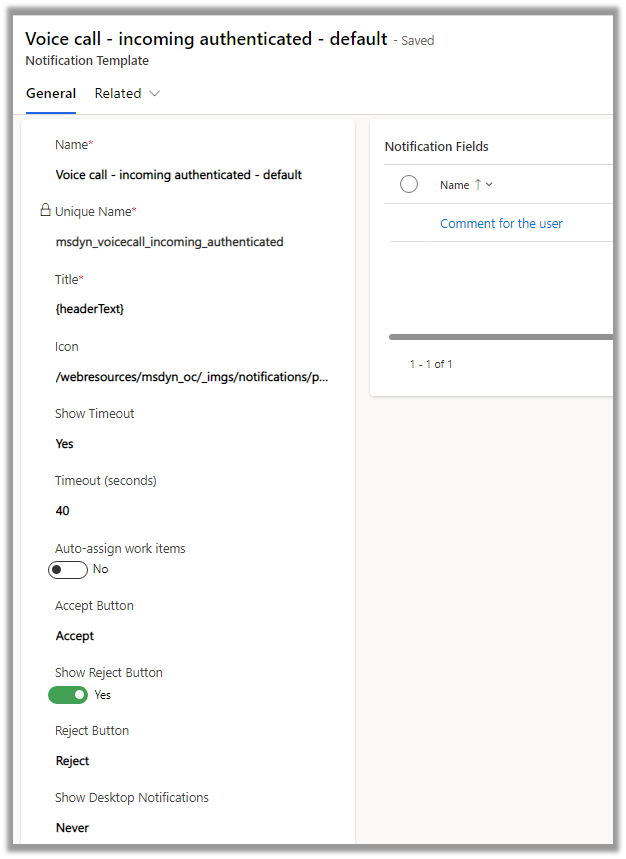
It is defined through the below out-of-the-box template.

Property

Description

Title

To define the title.

Icon

To define the icon.

Show Timeout

Yes / No – to hide/show the timer (timer still runs in the background)

Time (seconds)

For the Phone Call / Voice workstream the maximum value = is 150 seconds.

Auto-assign work items

Auto-assign incoming work item

Accept Button

Specify the text of the Accept Button

Reject Button

To hide or show the button

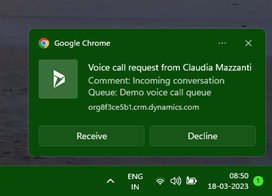
Show desktop notification

Never / When the app is in the background

Notification Fields

Specify fields to be shown in the notification using Slugs.

To make changes in the notification, we need to create a new notification template as we cannot update the box notification template.

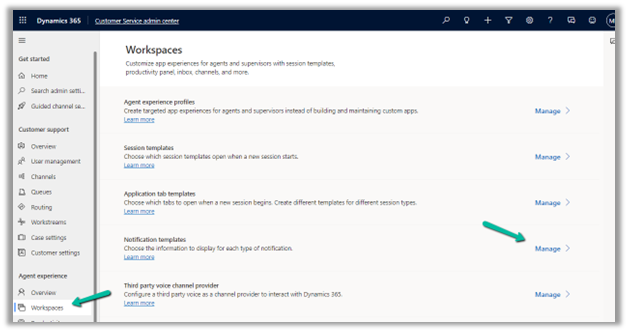
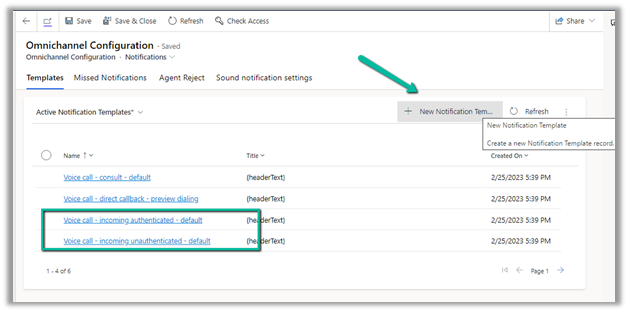
Navigate to Agent Experience >> Workspaces >> Notification Templates (Manage)


Here we will create a new notification template to be used in place of Voice call – incoming authenticated – default template

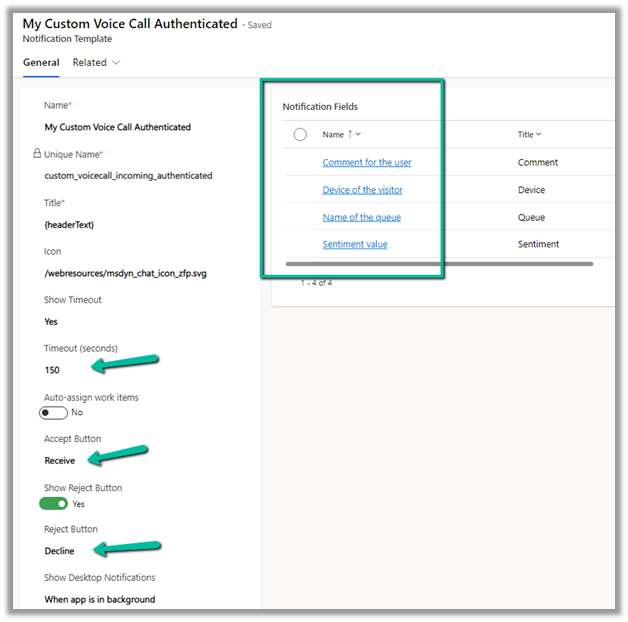
For our custom template, we have made the following changes –

Increased the timeout value, and changed the text for Accept and Reject buttons.

Added notification fields and enabled Desktop notification.

Let us update one of our workstreams to use this custom notification template.

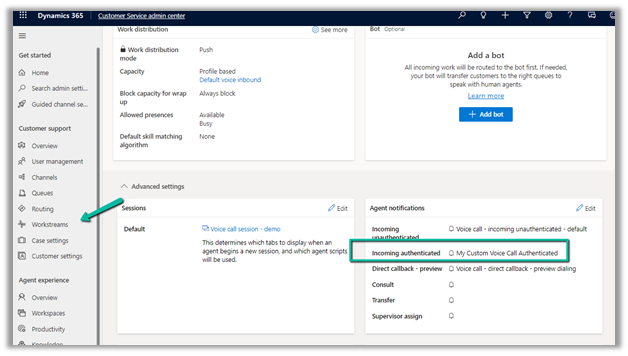
Navigate to Customer Support >> Workstreams – Open the workstream and open the Advanced Settings and update the Incoming Authenticated template in the Agent notifications section.

We can see the changes reflected in the Notification.

And also in the desktop notification –


Get all the details here-

https://neilparkhurst.com/2020/06/29/omnichannel-for-customer-service-notifications/

Hope it helps..

Advertisements